Tree Mapping for Leaf Collection Guidelines (Mont Mégantic only)
Anna L Crofts, Sabine St-Jean
Abstract
Here, we describe the protocol used by the Canadian Airborne Biodiversity Observatory (CABO) at Parc National du Mont Mégantic, a forested study site in southeastern Québec, to select trees for leaf-level measurements. Healthy, mature, fully sunlit leaves were harvested from permanently marked individuals distributed across the park and representing 23 species (n = 204). Harvested leaves were bulked per individual and foliar spectral reflectance measurements and a suite of foliar functional traits were quantified by the CABO foliar spectra/trait team based out of the Université de Montréal (protocol for foliar measurements described elsewhere). Additionally, height, diameter at breast height (DBH), and crown diameter were quantified for each individual. To facilitate re-location, individuals were positioned (horizontal accuracy < 2 m) and photographed. All data were collected using Fulcrum , a data collection application.
Before start
- Field work within Parc national du Mont Mégantic requires a valid research permit. Prior to field work obtain research permit and ensure permit is being carried during field work.
- If working at a site other than Parc national du Mont Mégantic ( MtMeg-1 ), create the site in Fulcrum prior to field work.
- If working in a project other than 2019-Crofts-PHD-UDES , create the project in Fulcrum prior to field work.
- Ensure that the batteries of the cellphone, LaserGeo, and Trimble Catalyst are fully charged prior to field work.
Attachments
Steps
Tree Selection
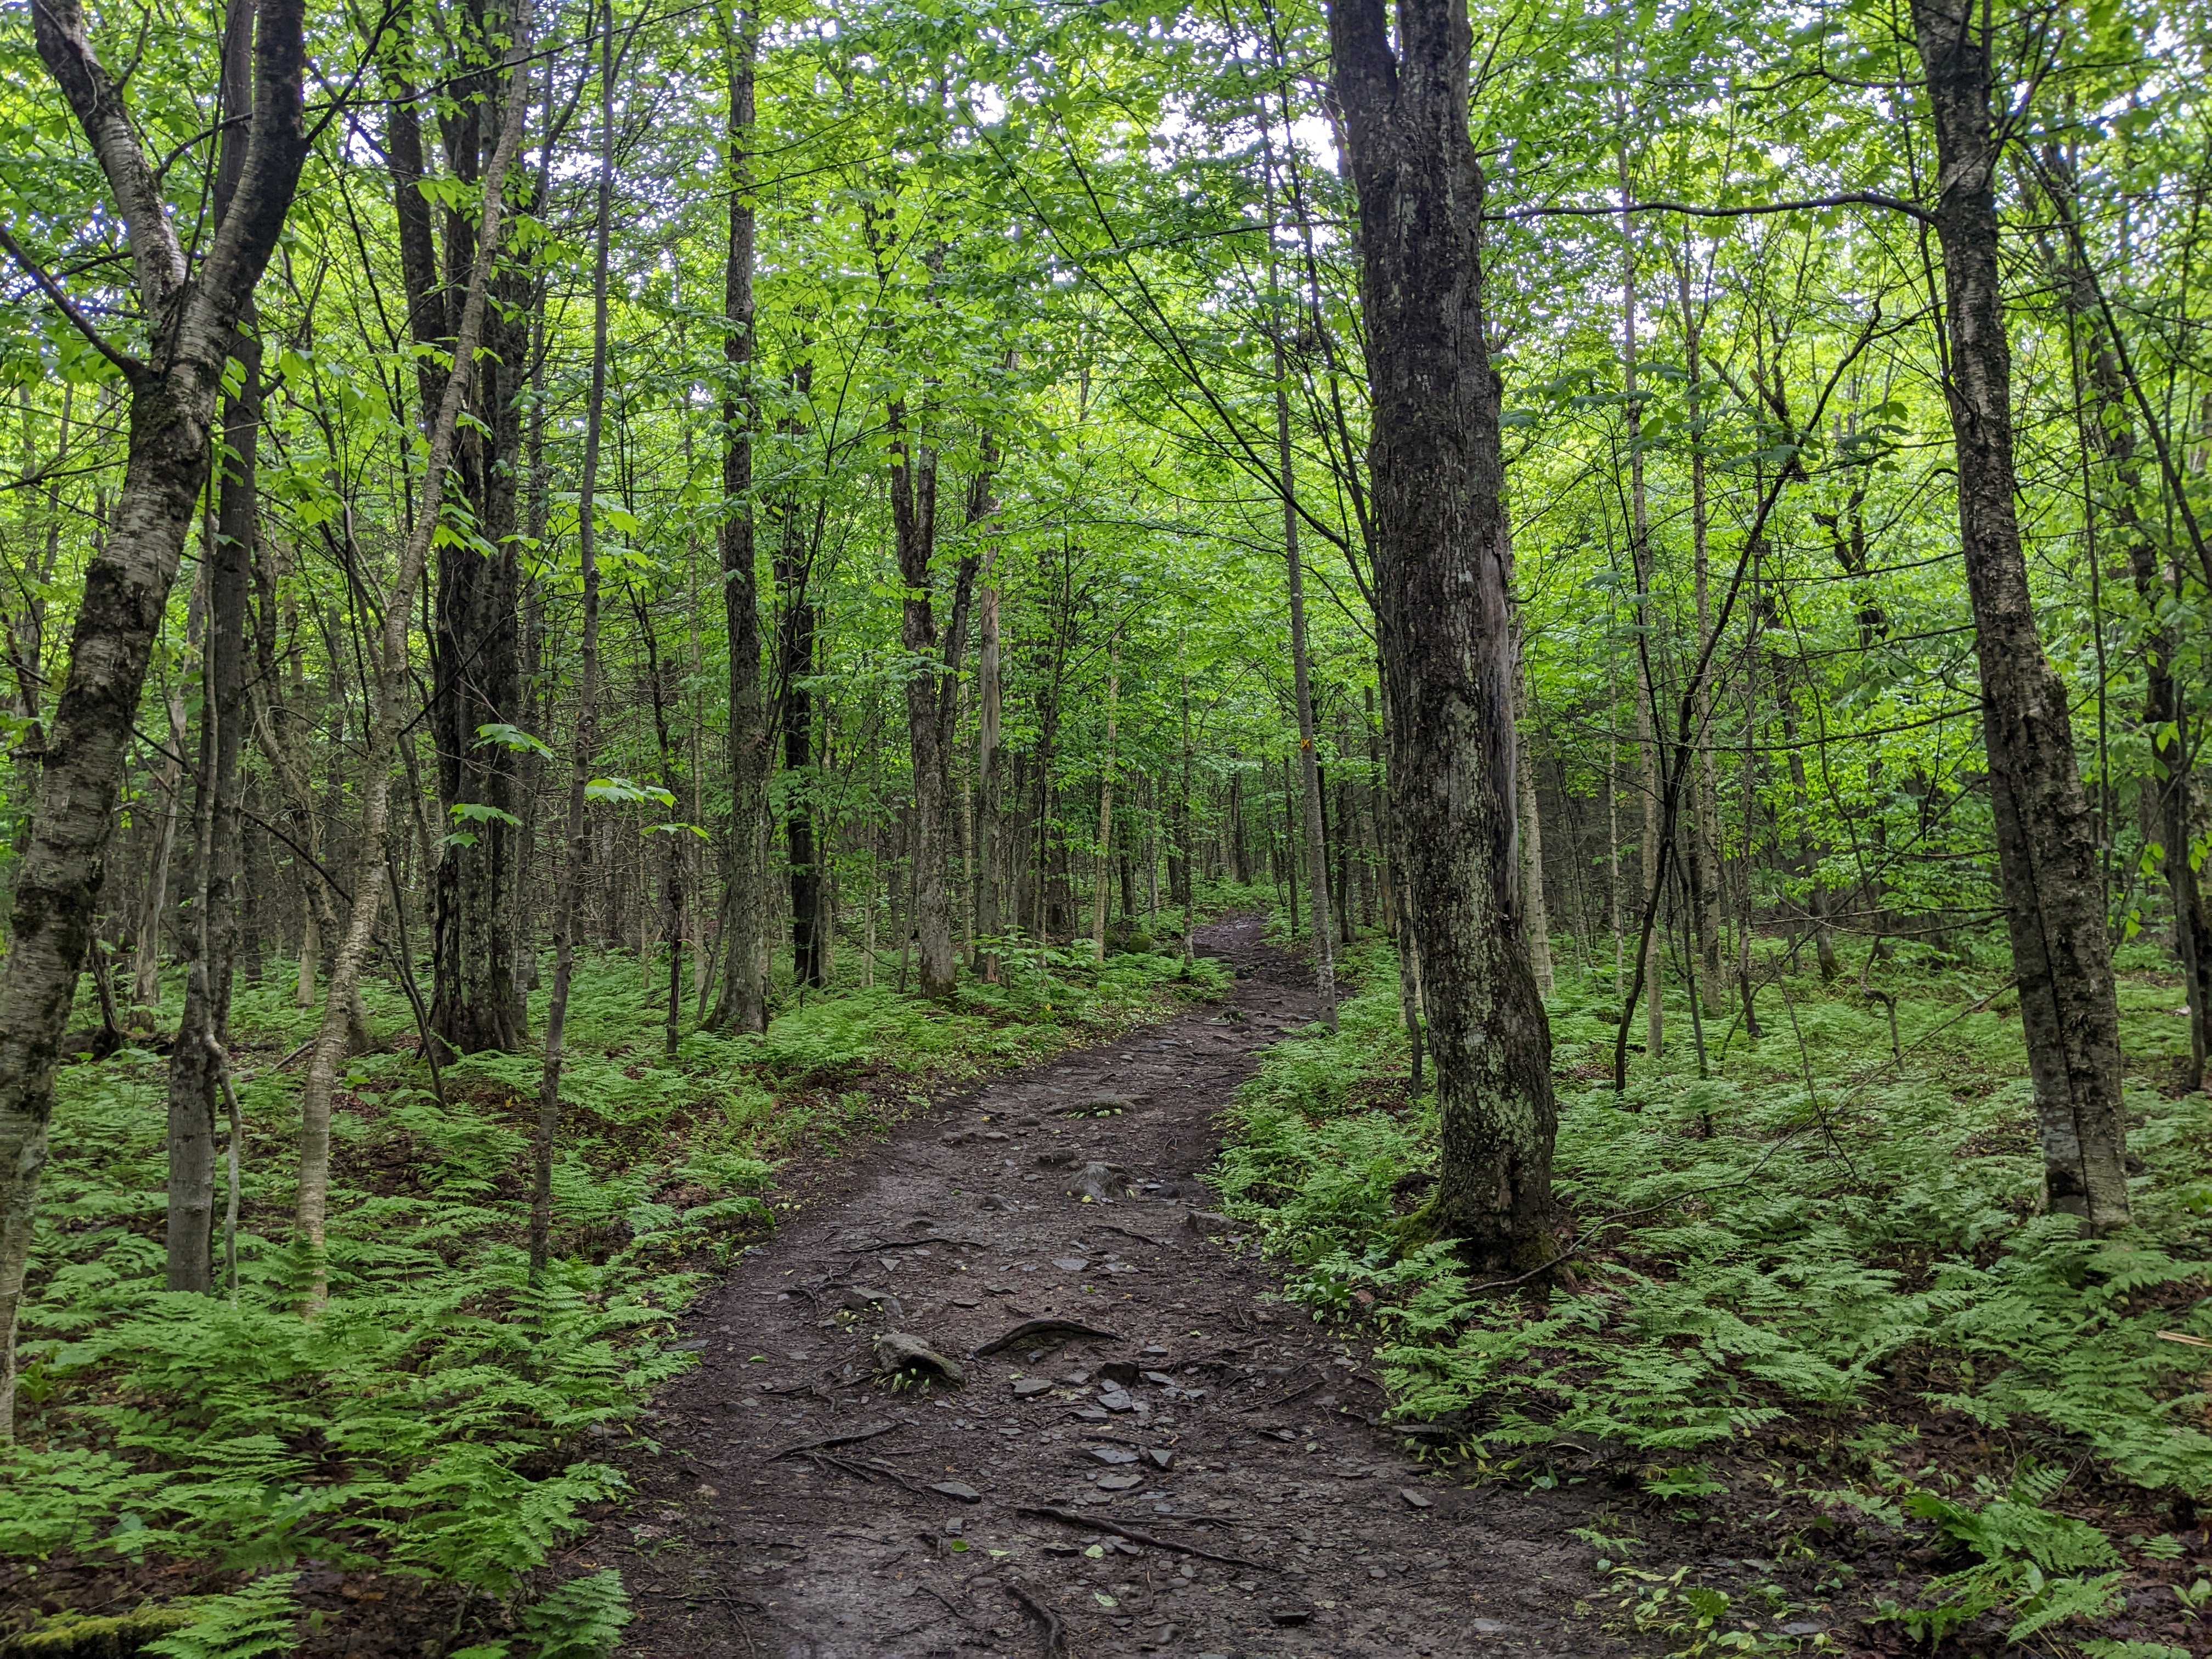
Systematically select individuals that meet the leaf-level measurement requirements1 across the majority of species that occur within the park2. Specifically, selected individuals should:
- Have mature, healthy, and fully sunlit (exposed to >3hrs of sunlight per day) leaves,
- Not exceed a height beyond harvesting capability (target leaves located ≤ 20 m above forest floor),
- Be located within 30 mins, but ideally 15 mins, from the foliar spectra/trait team's mobile laboratory2 and,
- When possible, distribute selected individuals of the same species across the park (i.e., in both sectors and across the altitudinal gradient).
Tag Individual
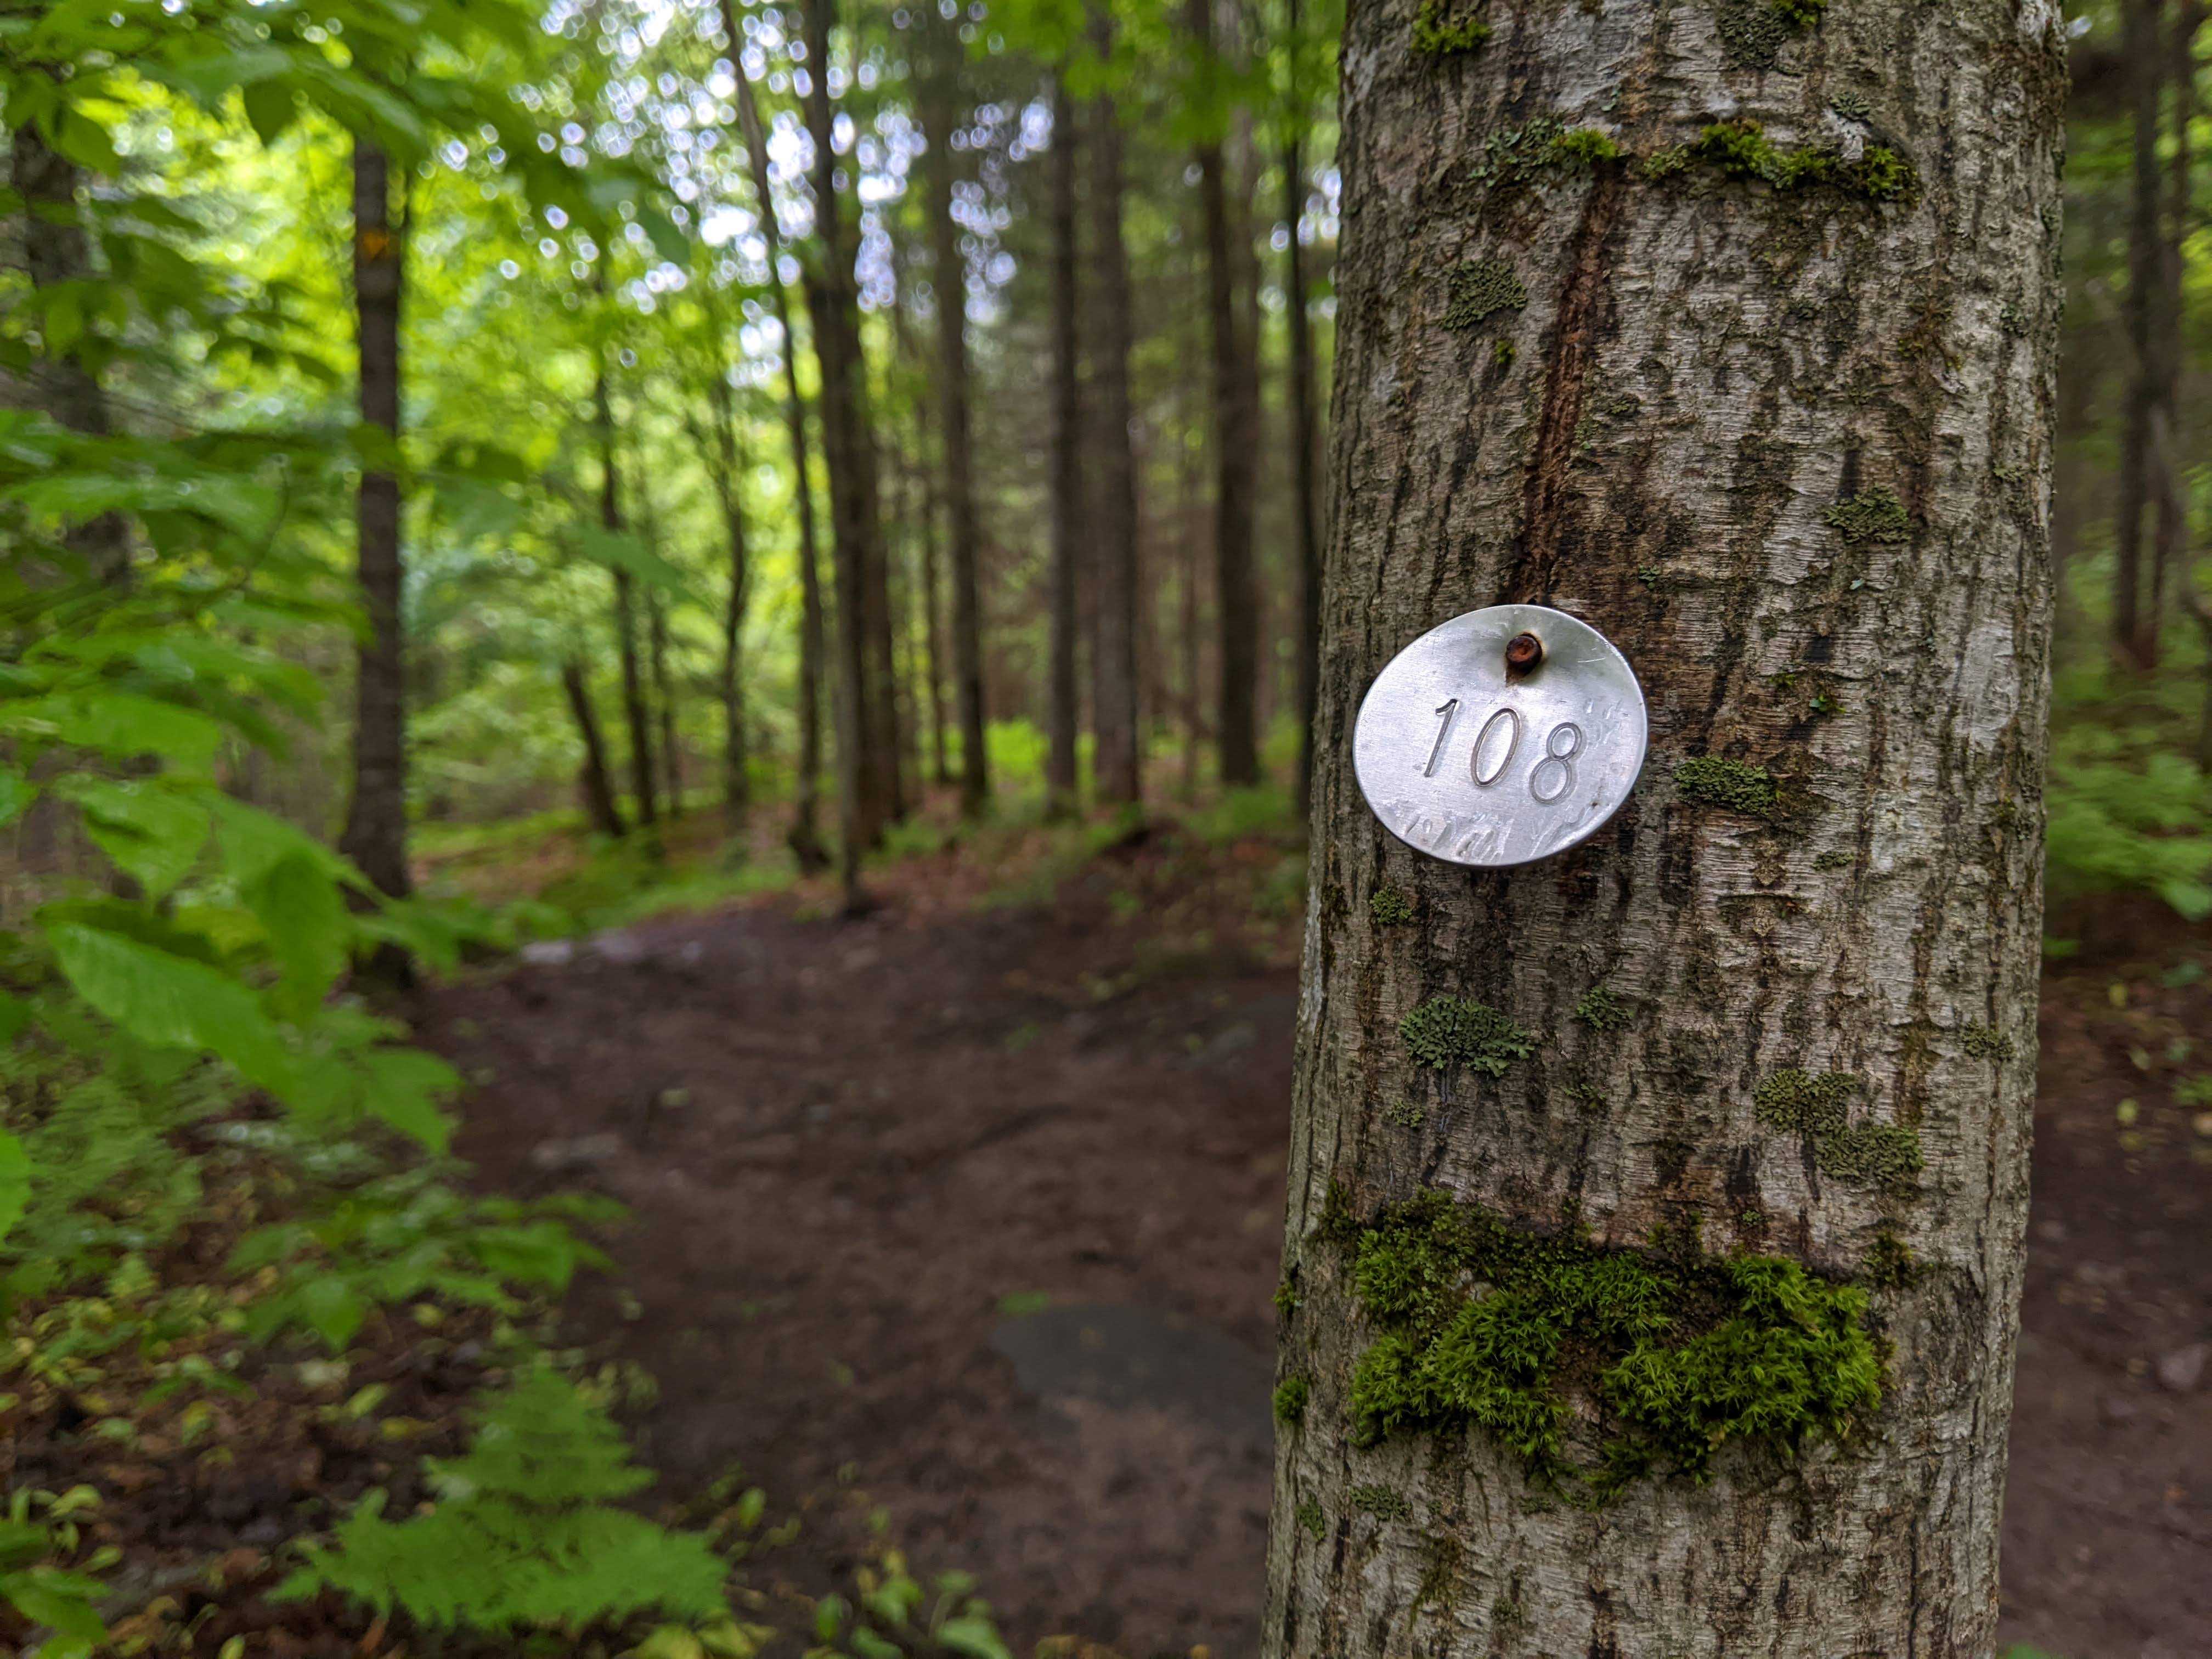
For each selected individual, tag tree with a numbered aluminum tag (Fig. 2).
- Attach the numbered aluminum tag to the individual at breast height (~1.5 m) on the side of the trunk facing away from the trail.
- Partially hammer the nail on a downward angle into the individual's trunk, so the tag is not flush against the bark and the individual can continue to grow without growing around the tag.
To facilitate re-locating the individual for leaf collection, temporarily tag individual with flagging tape at breast height1.
Create Plant Record in Fulcrum
For each selected individual, create a plant record in Fulcrum.
- Create a plant record in Fulcrum by selecting + Record within the Plants app (Fig. 3a,b).
- TAP TO SELECT PROJECT 1and select the appropriate Site 2(Fig. 3c).
- Answer YES to Plant Tagged? After selecting YES, additional fields will appear. Enter the Tag ID and assign Tag Type as aluminum tag (Fig. 3d,e).
- Under Plant Photos select the camera icon and take a picture(s) of the individual (Fig. 3e).
- If necessary, add additional comments under Plant Remarks (Fig. 3e).
- List the names of the surveyors who the plant was First Observed By (Fig. 3f).
- UPDATE LOCATION WITH GPS 3 - Latitude (degrees), Longitude (degrees), Horizontal Accuracy (m), and Altitude (m) fields will automatically be filled in when Update Location with GPS is selected (Fig. 3g).
- If needed, you can apply filters but regardless, select VASCAN Taxon 4 and choose a species from the drop-down list (Fig. 3h,i).
- After selecting the species, additional fields will appear. Enter the name of the surveyor who the plant was Identified By and select the Identification Protocol used (Fig. 3j). If necessary, add identification remarks.
![Figure 3. Screenshots from Fulcrum mobile application CABO account. To create a new record of a plant select the Plants app from the home page (panel a) and then within the Plants app select + Record (panel b). Tap to select project that you are working with (here, project is already selected as 2019-CROFTS-PHD-UDES) and select the appropriate study site (panel c). After answering YES to Plant tagged? (panel d), additional fields will appear. Enter the Tag ID, select Aluminum tag as Tag Type, and then select the camera icon under Plant Photos to add photos of the tagged individual (panel e). List the names of the surveyors who the plant was First Observed By (panel f). Then, UPDATE LOCATION [of the individual] WITH GPS (panel g). Next, select VASCAN Taxon (panel h) from the drop down list (panel i). After, selecting the appropriate species additional fields will appear. Enter the name of the surveyor who the plant was Identified By and the appropriate Identification Protocol (panel j). Red boxes have been added to screenshots to illustrate selections. Note that Fulcrum can be used via a mobile app or desktop website and that the two are organized differently. Figure 3. Screenshots from Fulcrum mobile application CABO account. To create a new record of a plant select the Plants app from the home page (panel a) and then within the Plants app select + Record (panel b). Tap to select project that you are working with (here, project is already selected as 2019-CROFTS-PHD-UDES) and select the appropriate study site (panel c). After answering YES to Plant tagged? (panel d), additional fields will appear. Enter the Tag ID, select Aluminum tag as Tag Type, and then select the camera icon under Plant Photos to add photos of the tagged individual (panel e). List the names of the surveyors who the plant was First Observed By (panel f). Then, UPDATE LOCATION [of the individual] WITH GPS (panel g). Next, select VASCAN Taxon (panel h) from the drop down list (panel i). After, selecting the appropriate species additional fields will appear. Enter the name of the surveyor who the plant was Identified By and the appropriate Identification Protocol (panel j). Red boxes have been added to screenshots to illustrate selections. Note that Fulcrum can be used via a mobile app or desktop website and that the two are organized differently.](https://static.yanyin.tech/literature_test/protocol_io_true/protocols.io.kxygxe97ov8j/Protocol1.png)
Quantify Dendrometric Properities
For each selected individual, quantify height, diameter at breast height (DBH), and crown diameter.
In the individual's Fulcrum plant record, add plant size measurements.
- Select Size Measurements followed by + Record (Fig. 4a,b).
- Select Measurement Type and then DBH , Height , and Crown Diameter followed by DONE (Fig. 4c,d).
The measurement fields will now appear (Fig. 4e).

Use DBH tape to measure individual's DBH.
- Measure DBH at ~1.5 m1.
- Enter the DBH to DBH (cm) field in the individual's plant record in Fulcrum (Fig. 5)
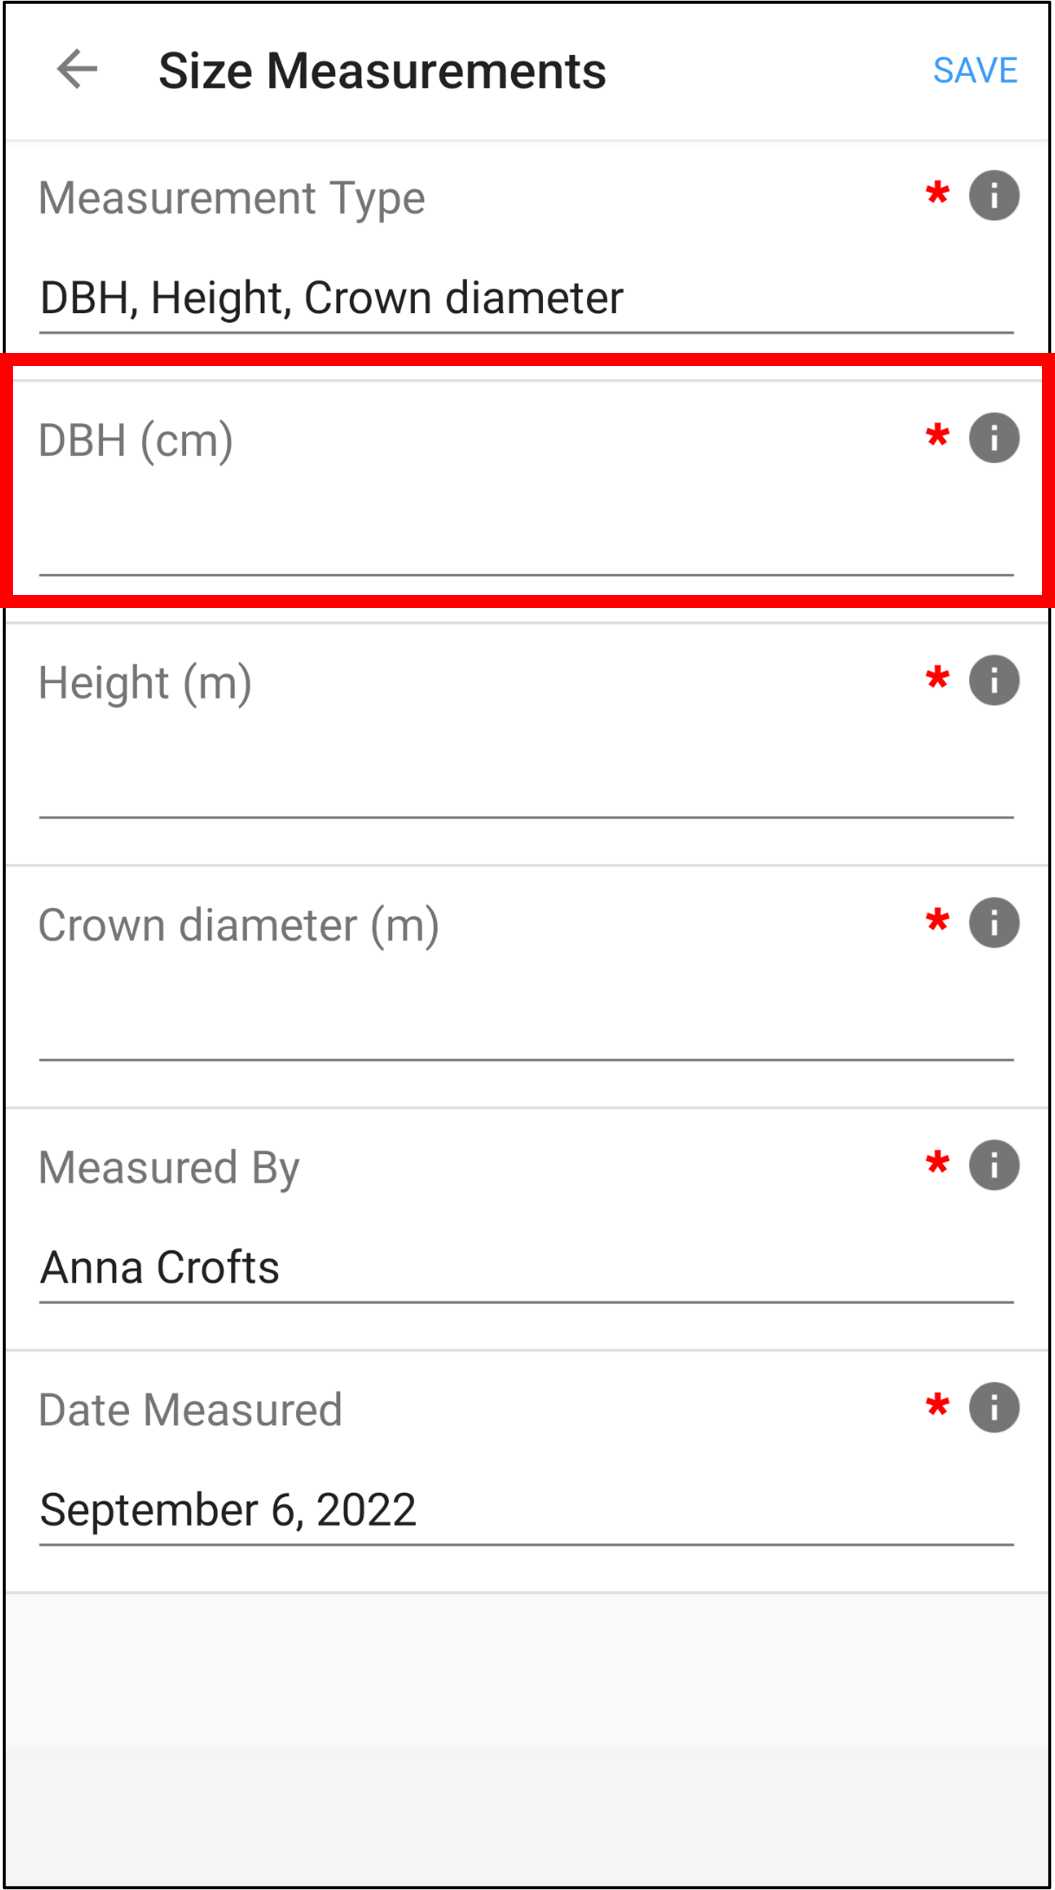
Figure 5. A screenshot from Fulcrum mobile application CABO account. Enter the DBH into the DBH (cm) field in the individual's plant record in Fulcrum. The red box has been added to screenshot to illustrate selections. Note that Fulcrum can be used via a mobile app or desktop website and that the two are organized differently.
Use LaserGeo to measure individual's height.
-
To account for uneven ground, use the LaserGeo's HEIGHT 3P function that quantifies the height by measuring: 1) Distance to the individual's trunk at eye-level,
2) Angle to the base of the trunk, and 3) Angle to the tip of the individual's crown<sup>1,2,3,4</sup> (Fig. 6a). -
Enter the height to Height (m) field in the individual's plant record in Fulcrum (Fig. 6b).
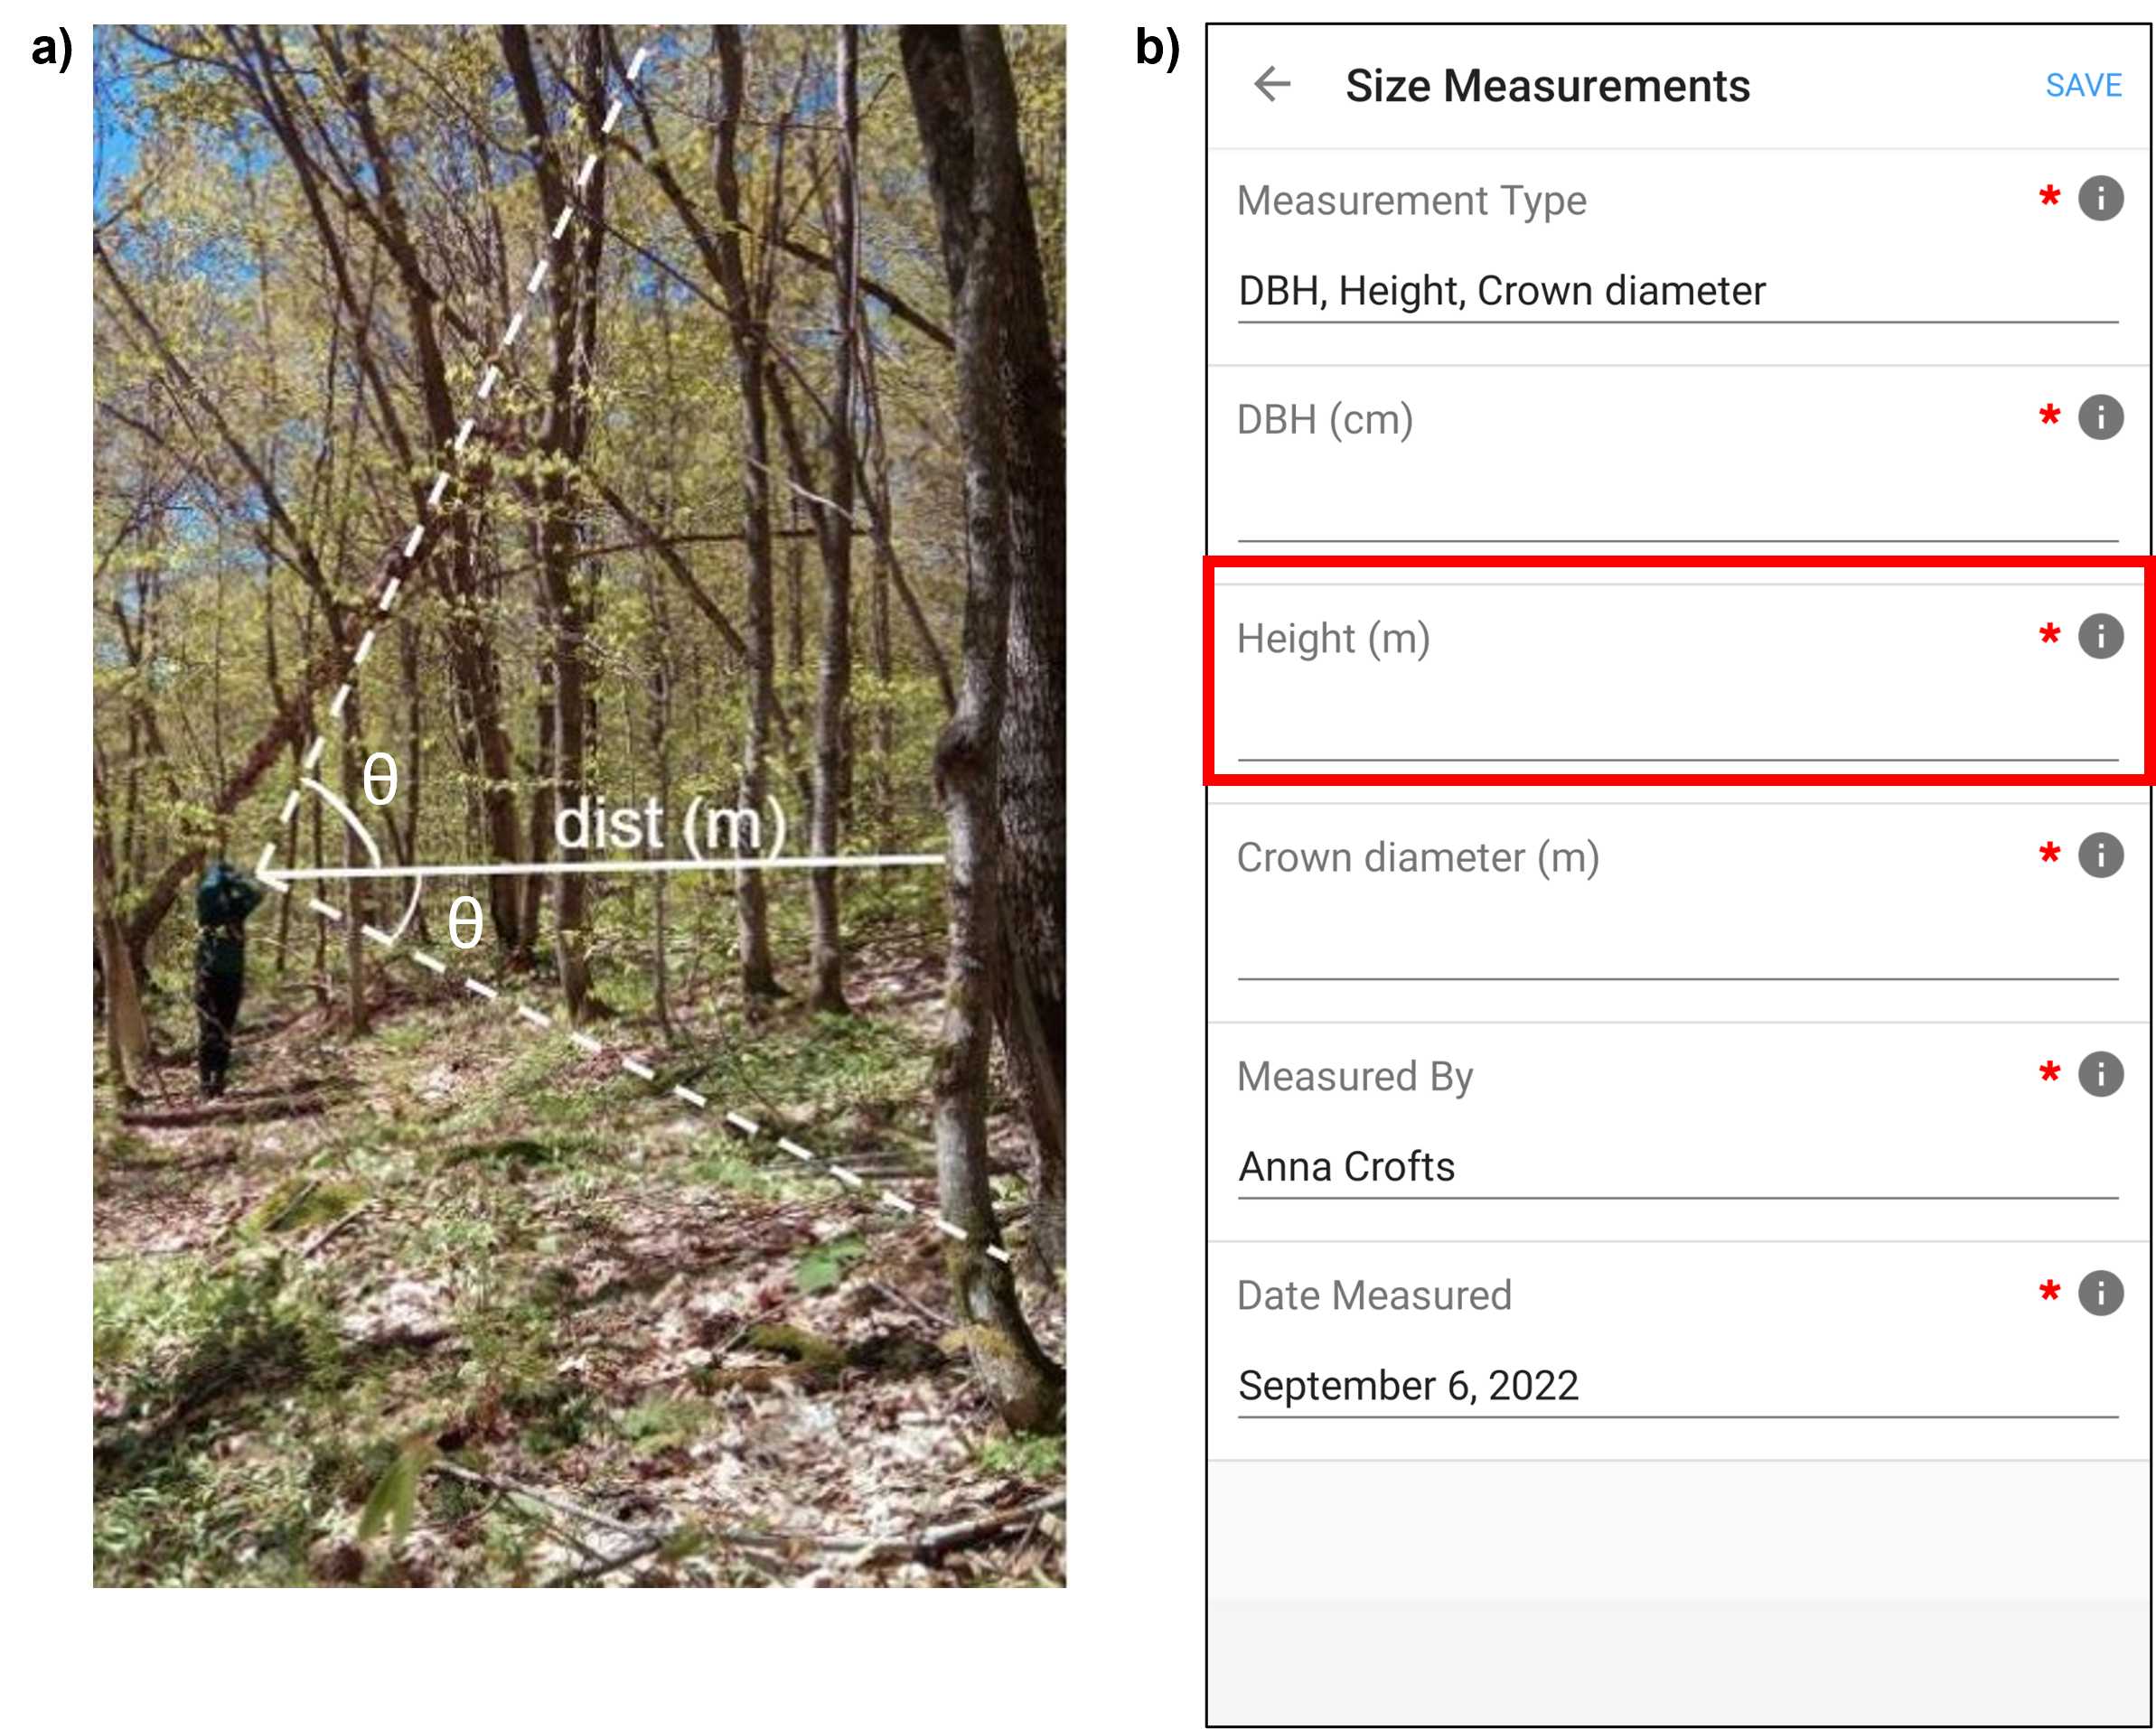
Figure 6. a) An annotated photo of a surveyor using the LaserGeo to measure the heigh of individual trees, by quantifying the distance to the individual at eye-level, the angle to the base of the trunk, and the angle to the top of the individual. b) A screenshot from Fulcrum mobile application CABO account. Enter the height into the Height (m) field in the individual's plant record in Fulcrum (panel b). The red box has been added to screenshot to illustrate selections. Note that Fulcrum can be used via a mobile app or desktop website and that the two are organized differently.
Use LaserGeo to measure individual's crown diameter.
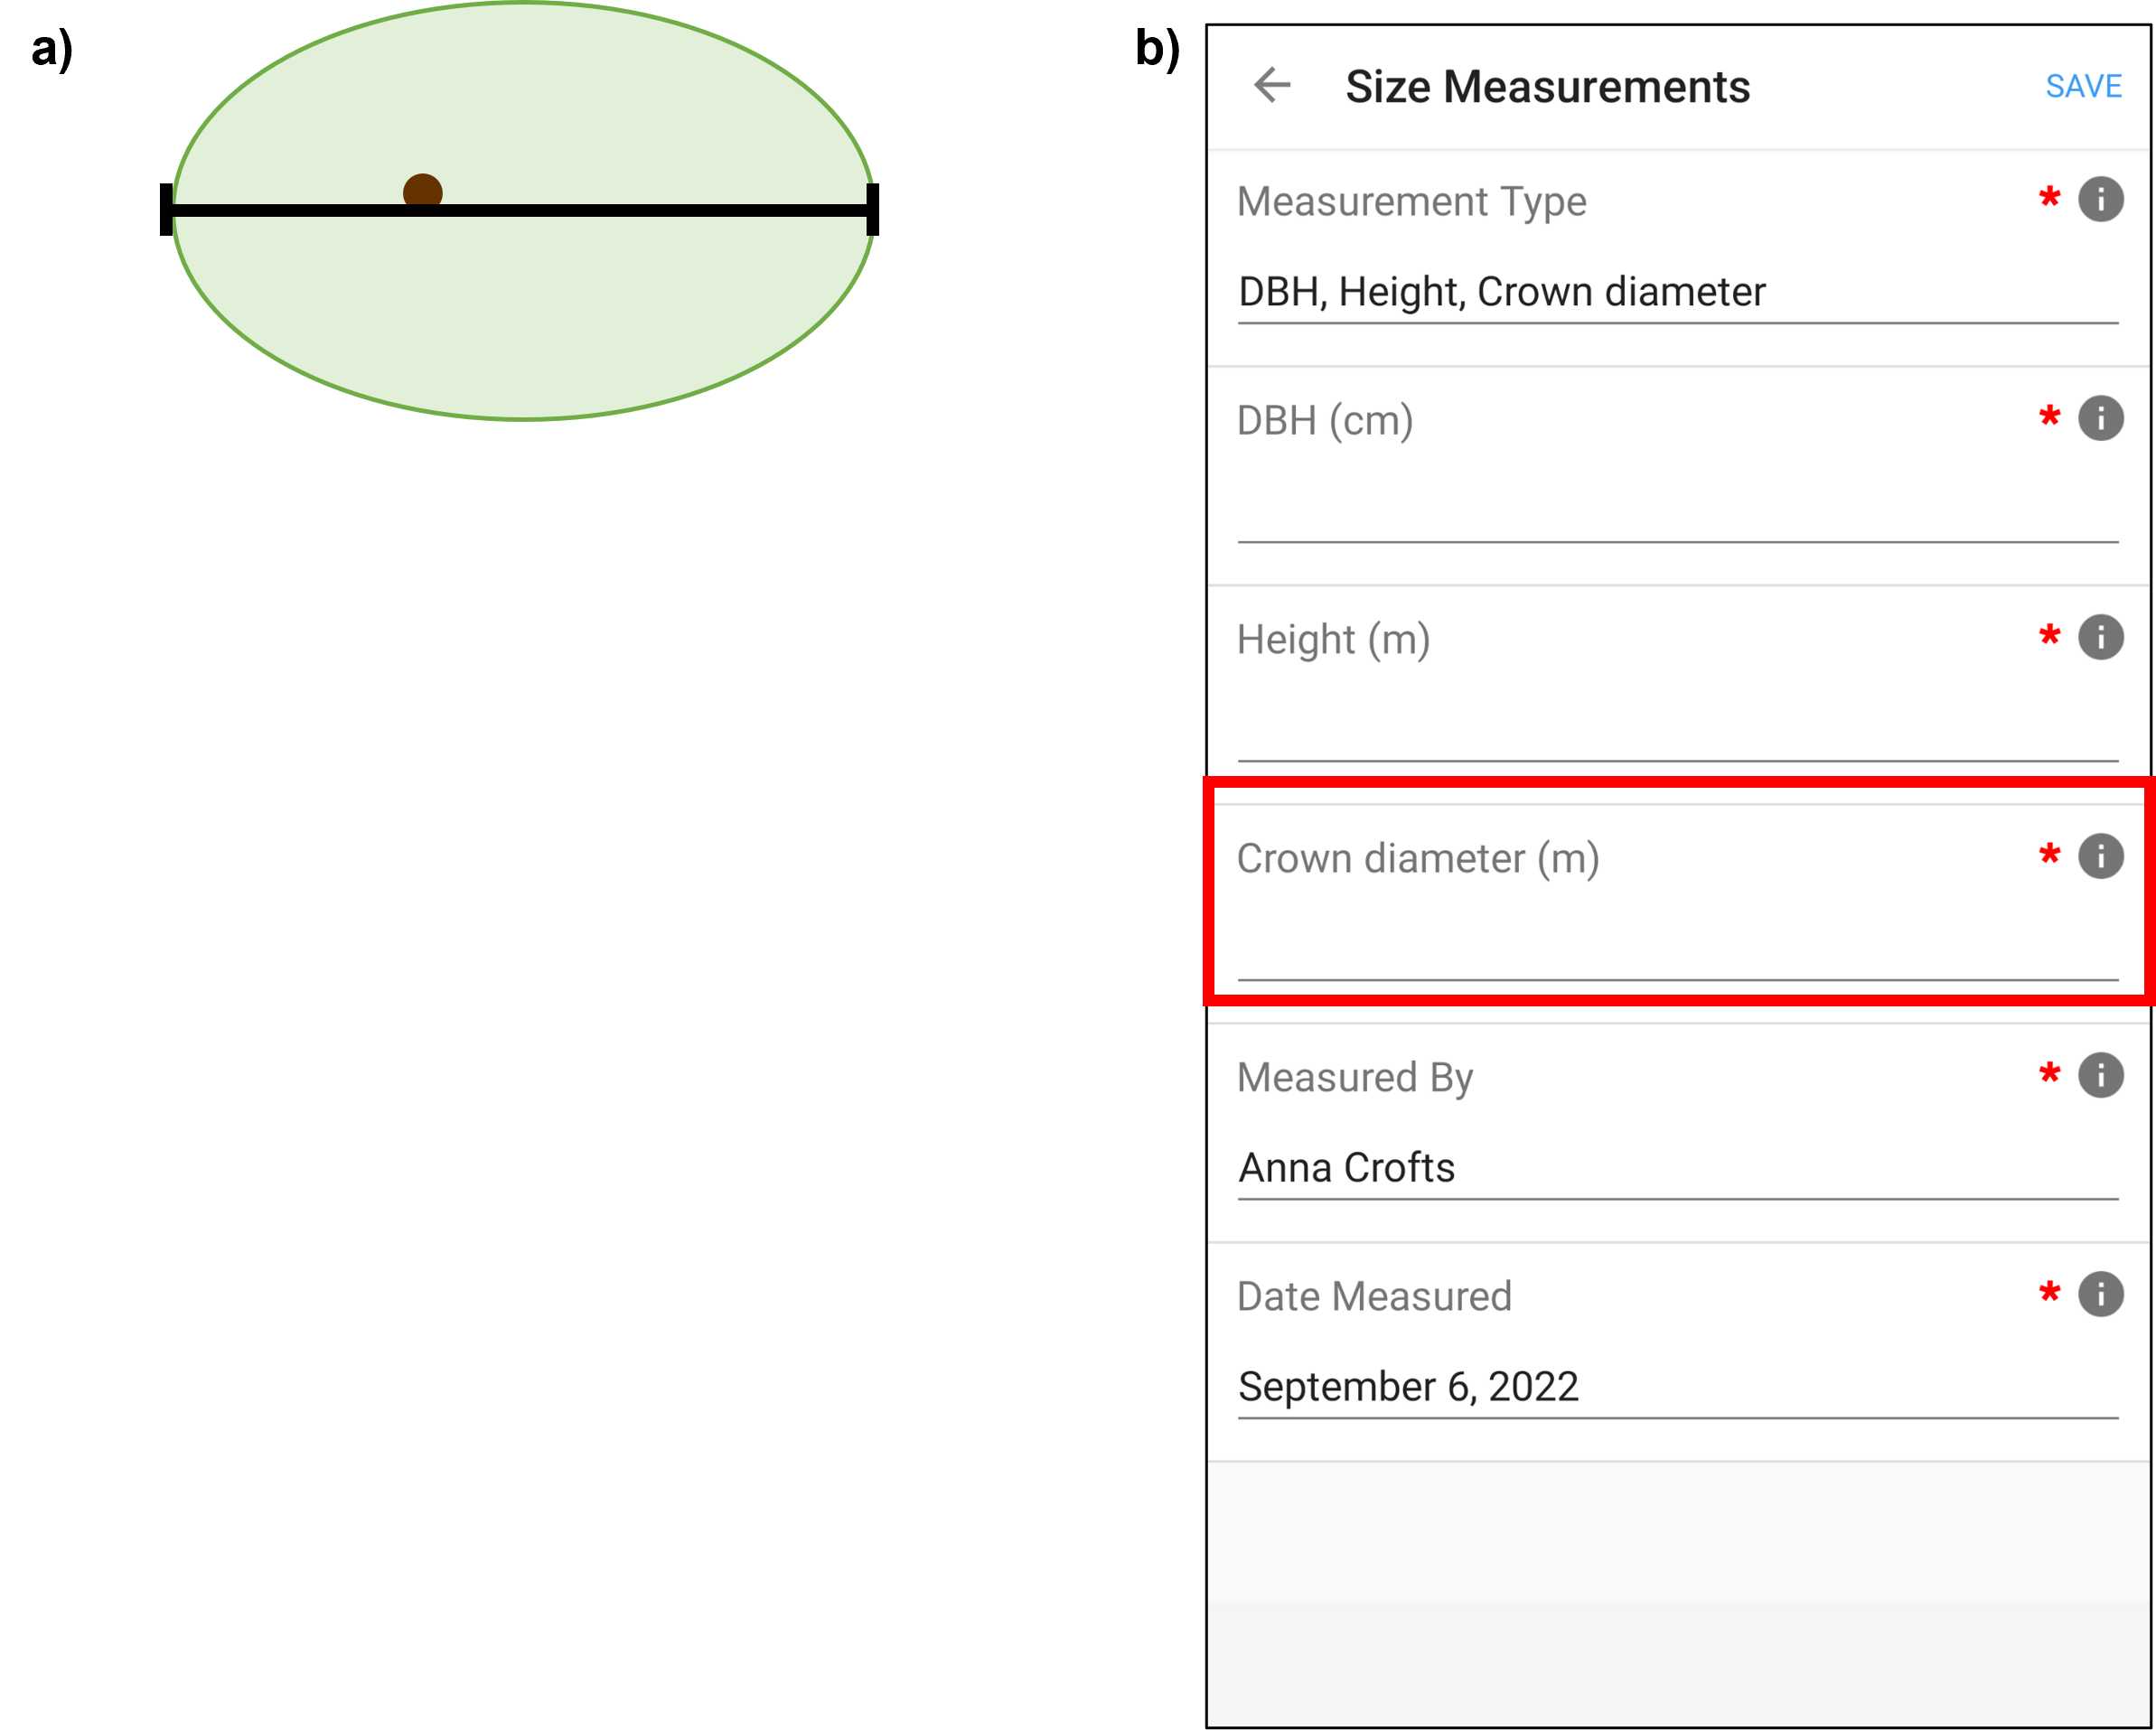
- Use the LaserGeo's DME function to measure the length of the longest crown diameter (Fig. 7a).
- Enter the crown diameter to the Crown diameter (m) field in the individual's plant record in Fulcrum (Fig. 7b).
Save individual's size measurements in the Fulcrum App.
- Select SAVE 1 once size measurements are complete (Fig. 8a).
- Exit Size Measurements by selecting the left arrow in the top left corner (Fig. 8b).
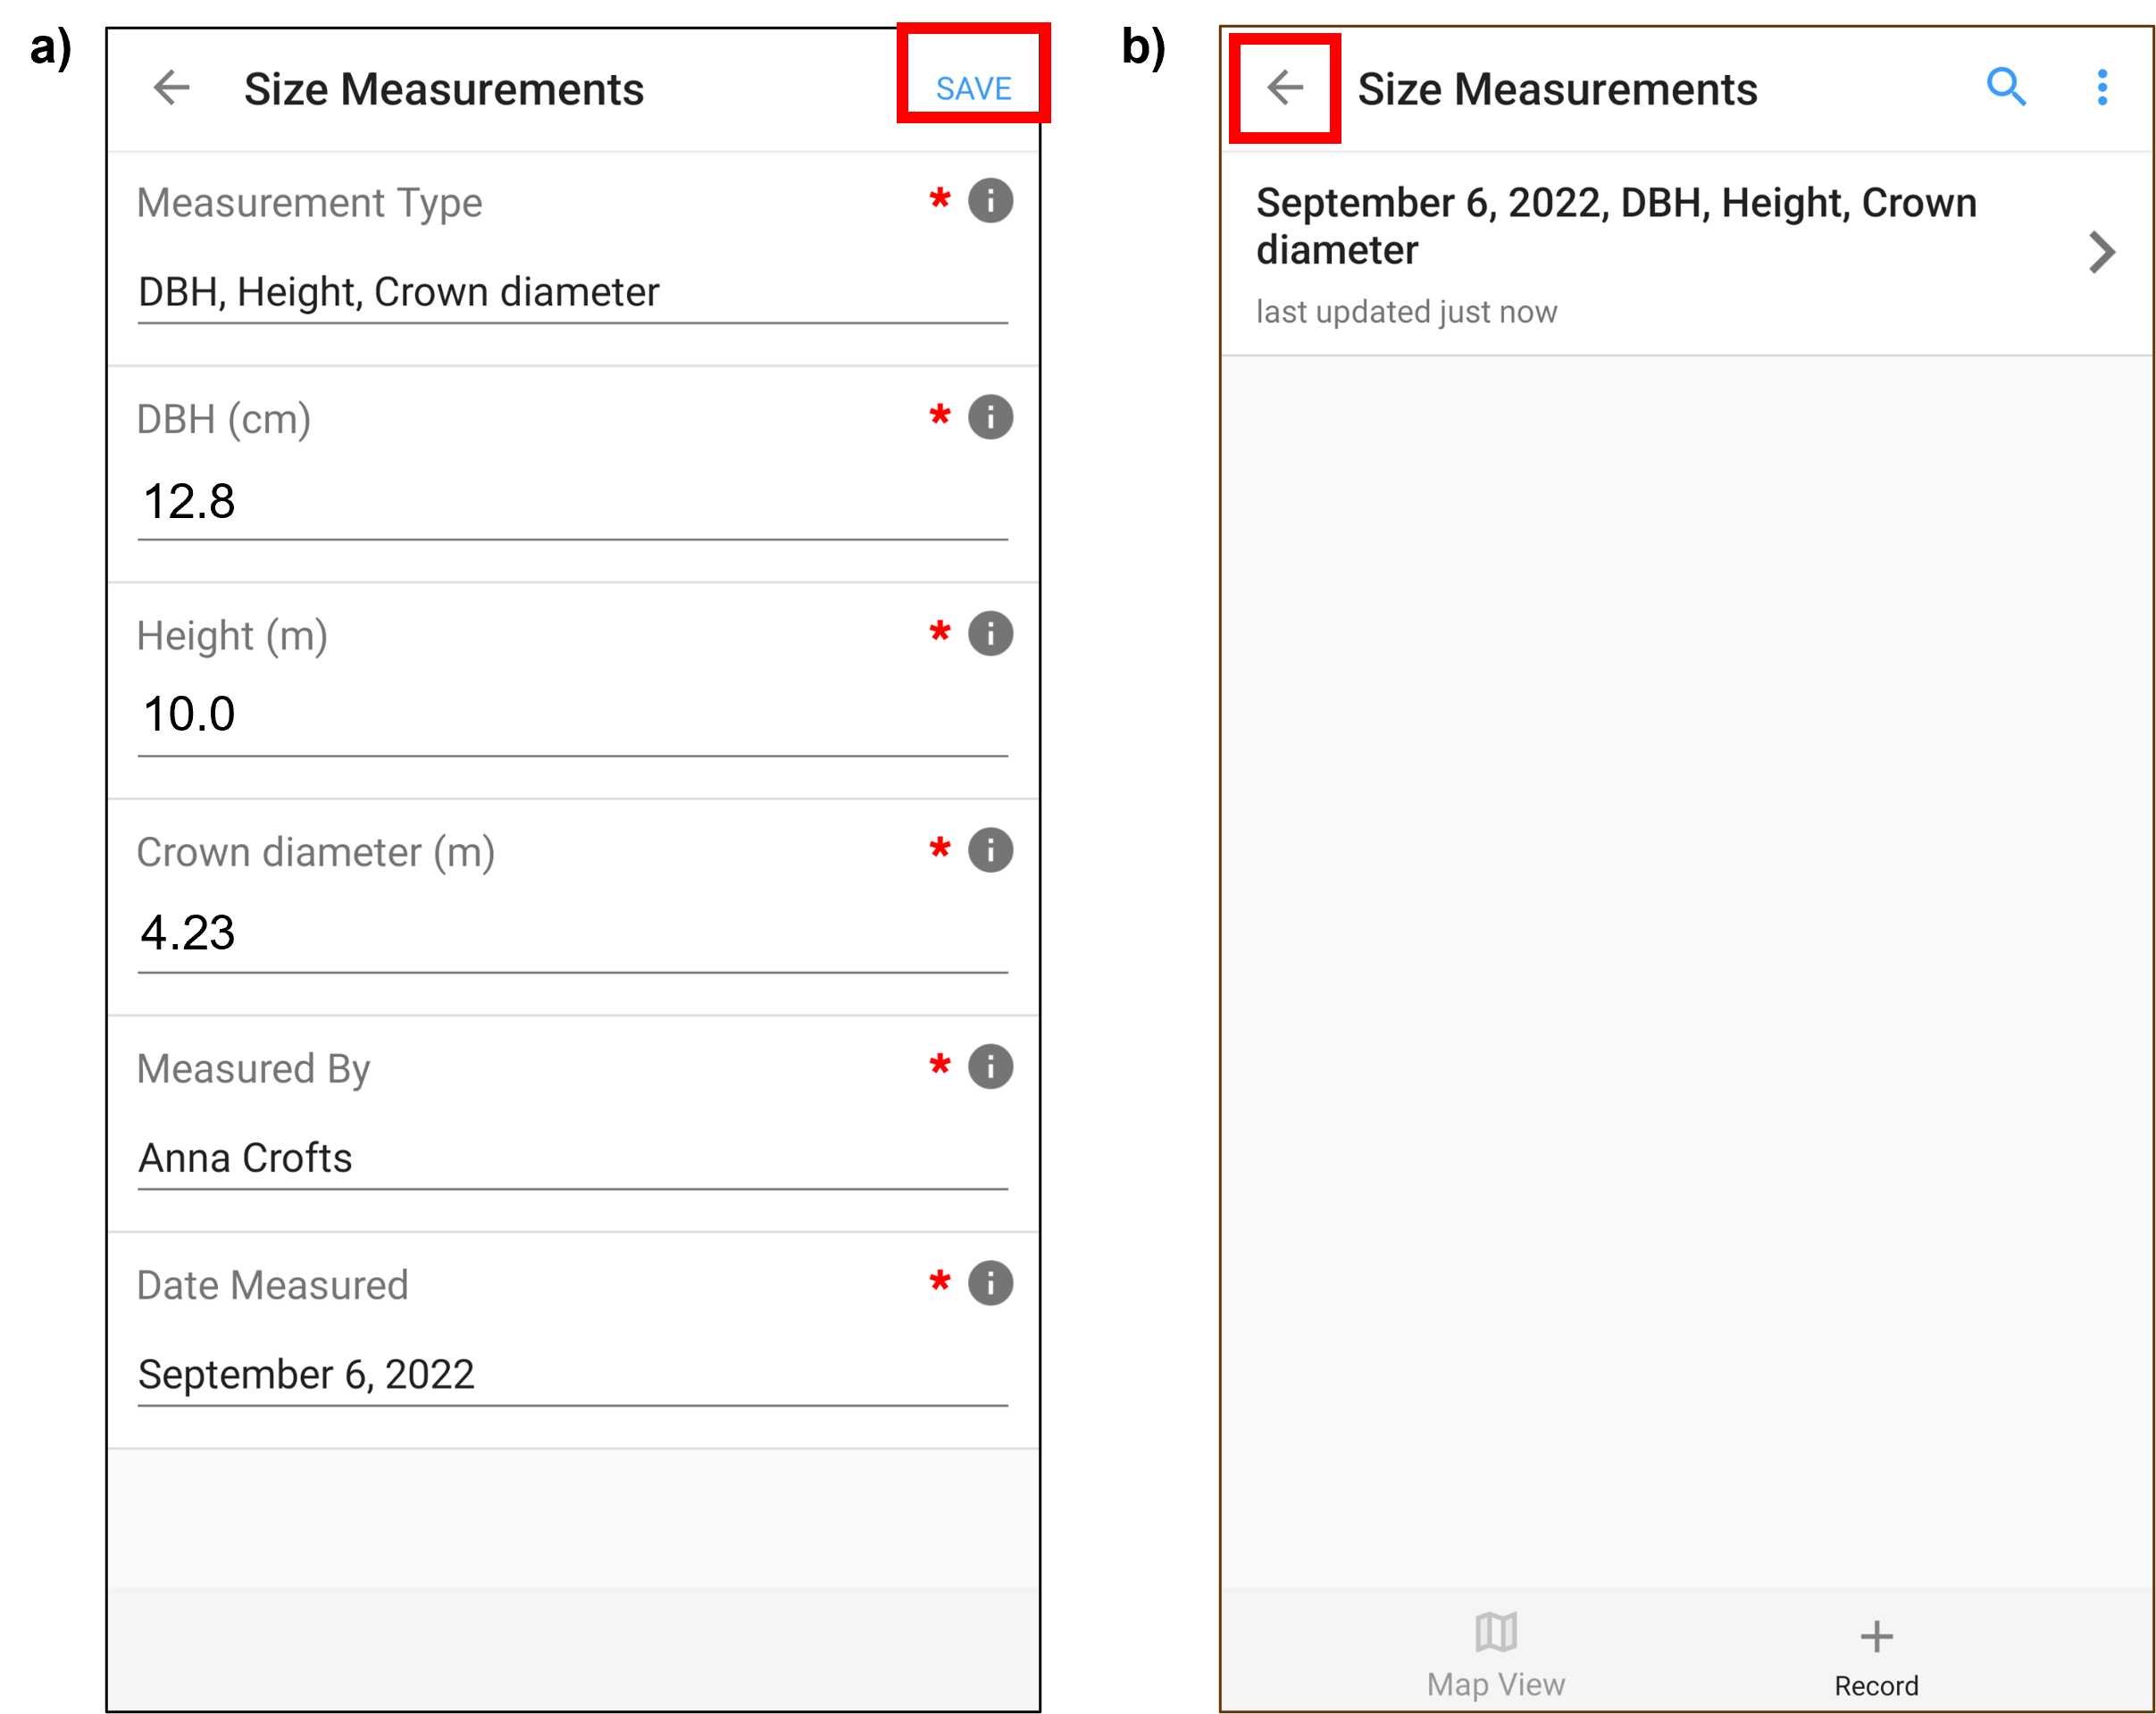
Figure 8. Screenshots from Fulcrum mobile application CABO account. Select SAVE to save the Size Measurements (panel a) and exit the size measurements by selecting the left arrow in the top left corner (panel b). The red box has been added to screenshot to illustrate selections. Note that Fulcrum can be used via a mobile app or desktop website and that the two are organized differently.
Save Fulcrum Record
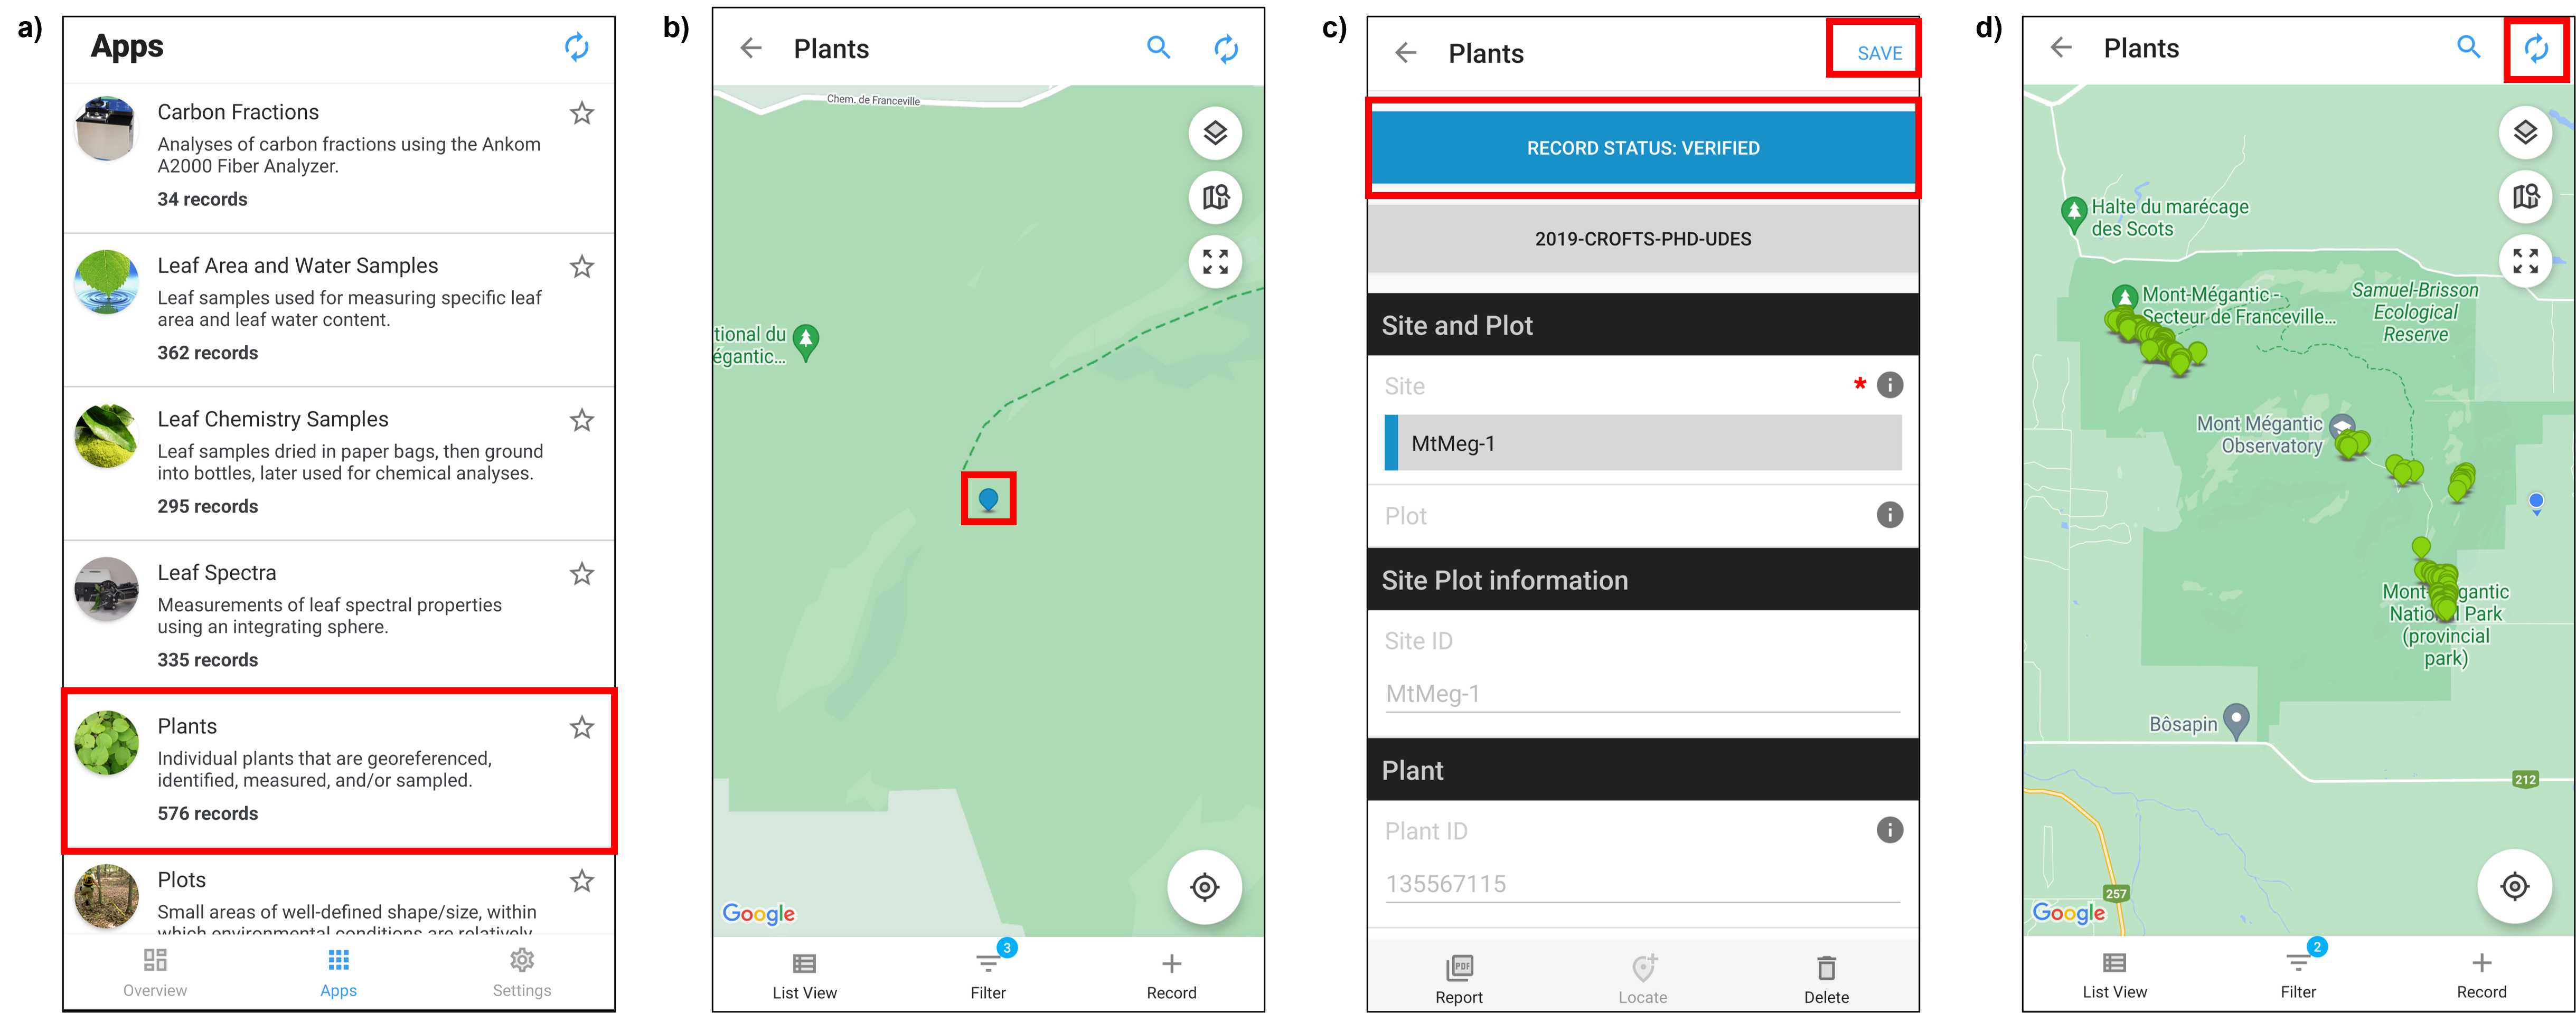
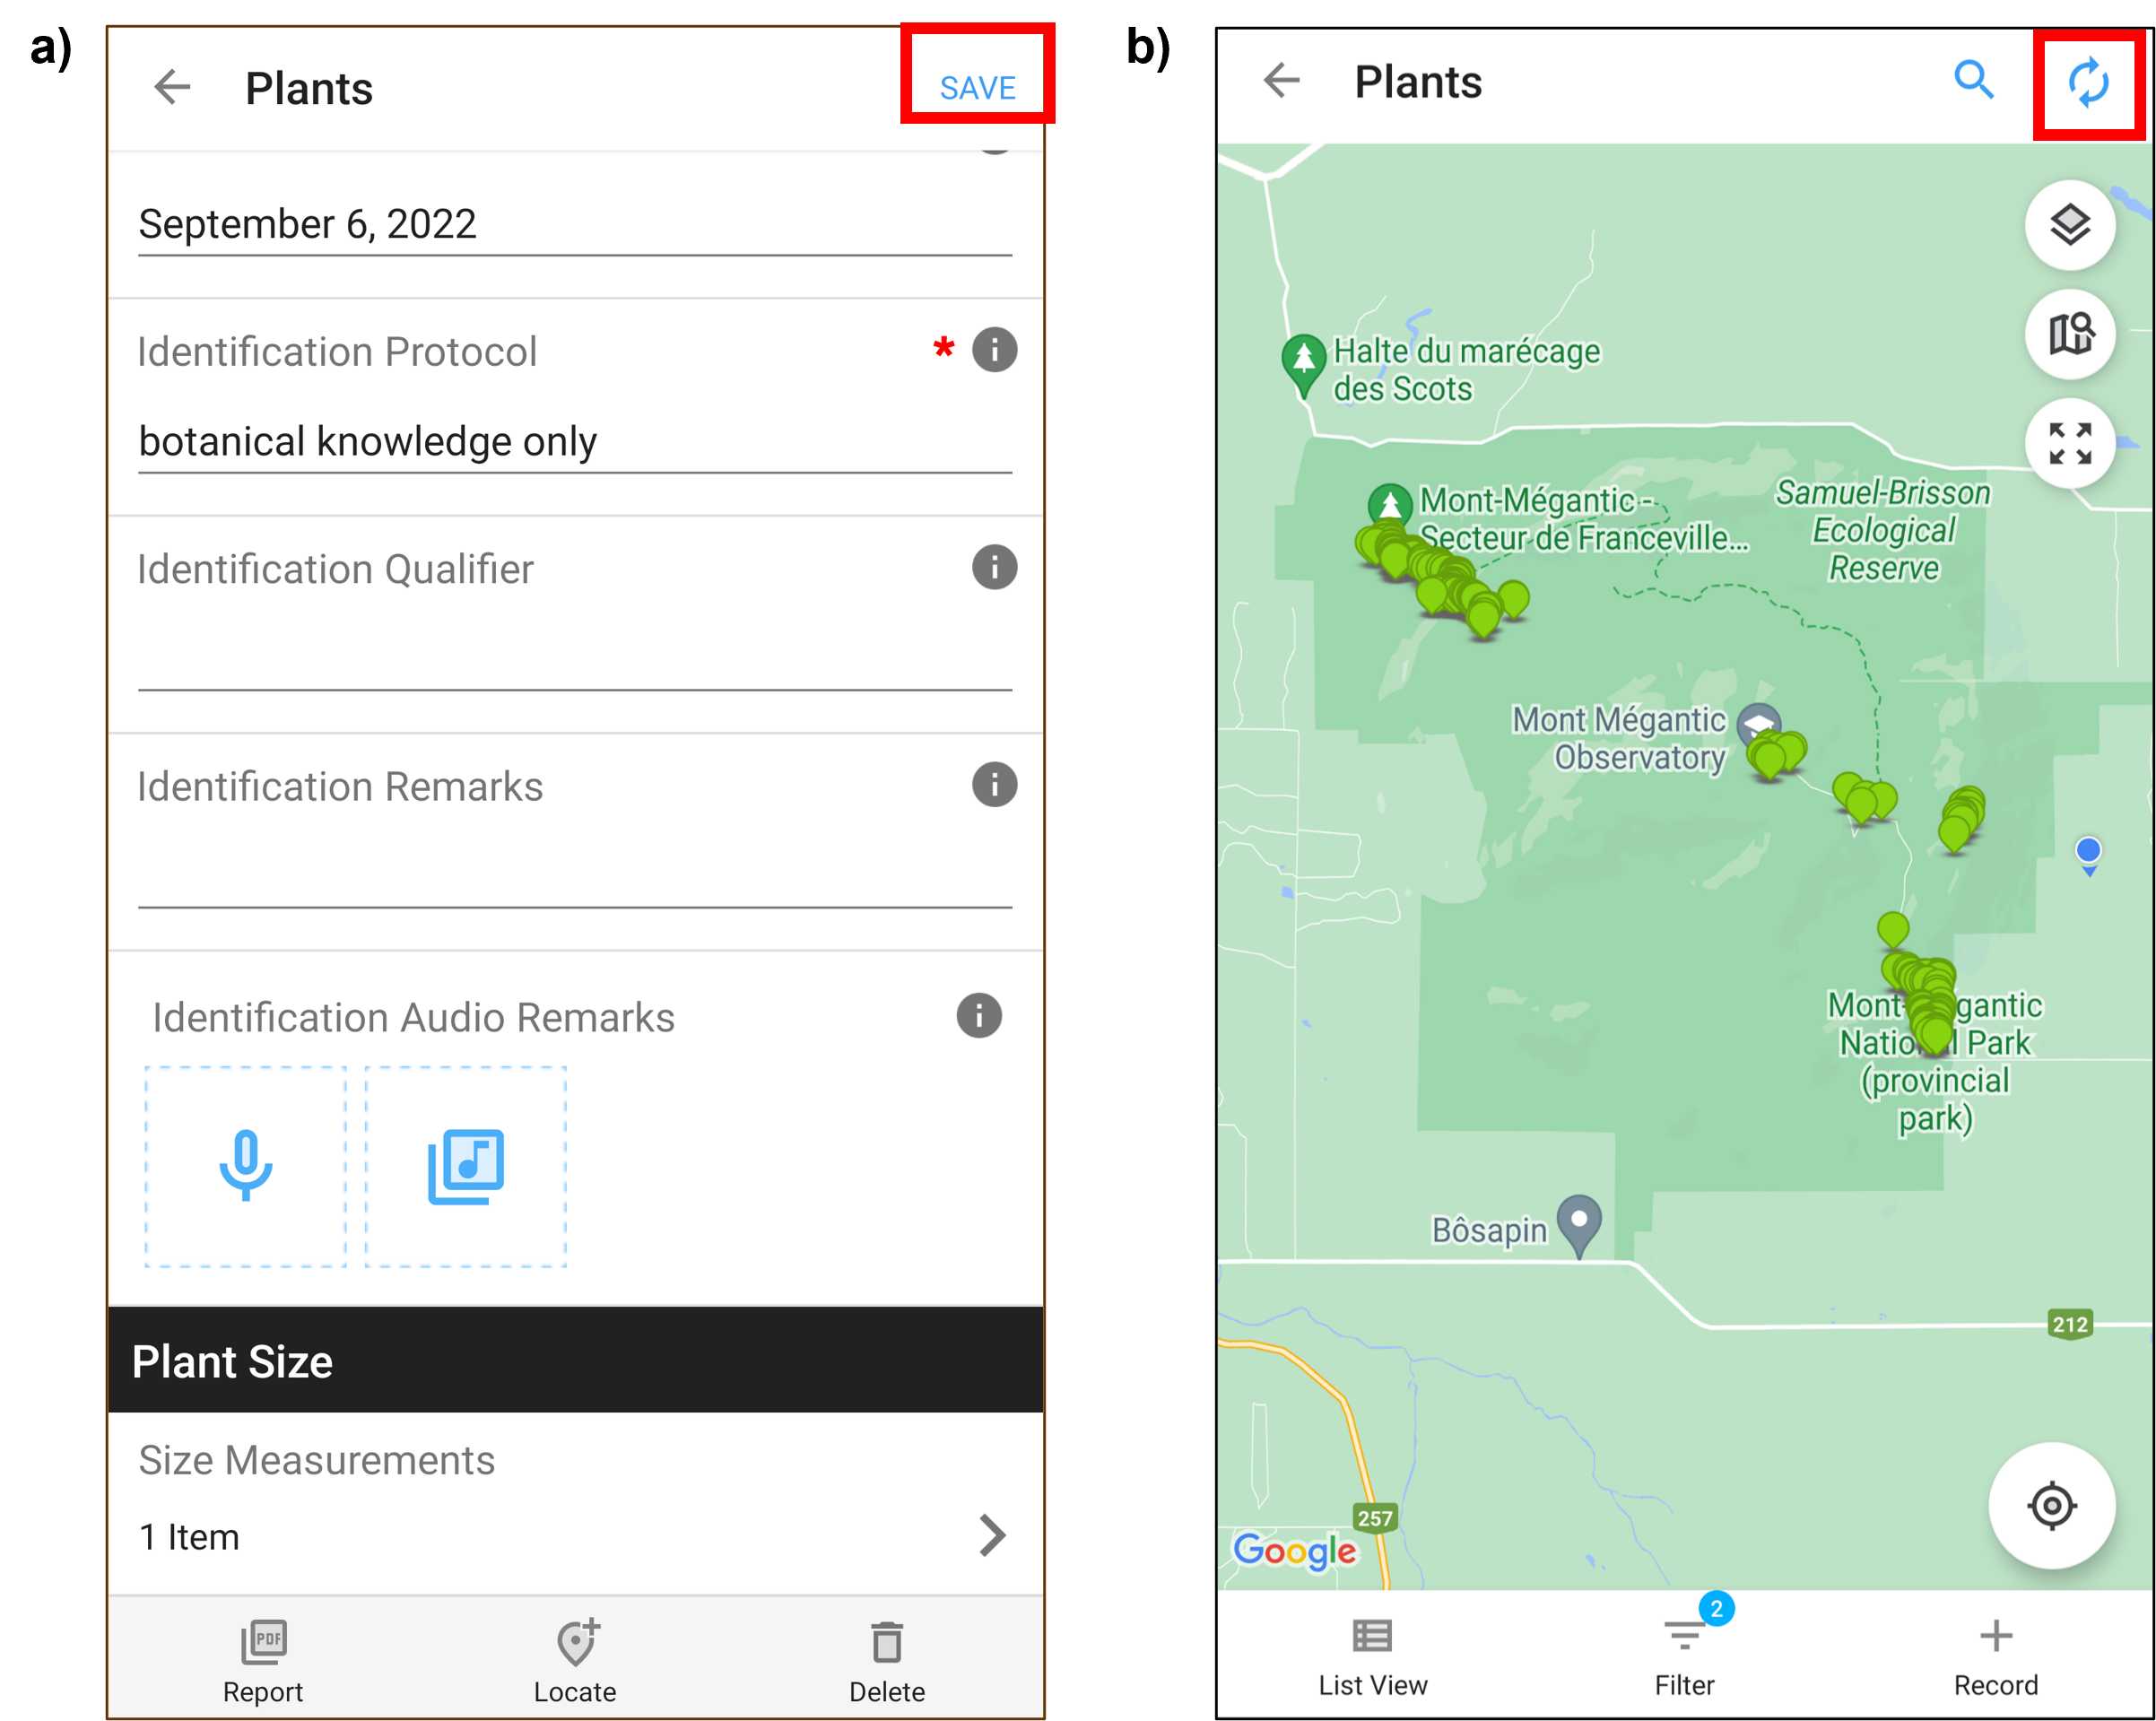
SAVE 1 the individual's plant record in Fulcrum (Fig. 9a). This will return you to the Plants app (Fig. 9b).* Sync2 Fulcrum to upload the individual's plant record online by selecting the icon of two circular arrows. This icon will spin when synchronizing is in progress (Fig. 9b).
Update GPS Position
Return to tagged individuals with Trimble Catalyst (Trimble Catalyst DA1 antenna with Trimble RTX correction service, Trimble Inc.) or alternative high-precision GPS to obtain more precise coordinates of sampled individuals. See Trimble GPS Protocol for step-wise details regarding how to use Trimble Catalyst.
-
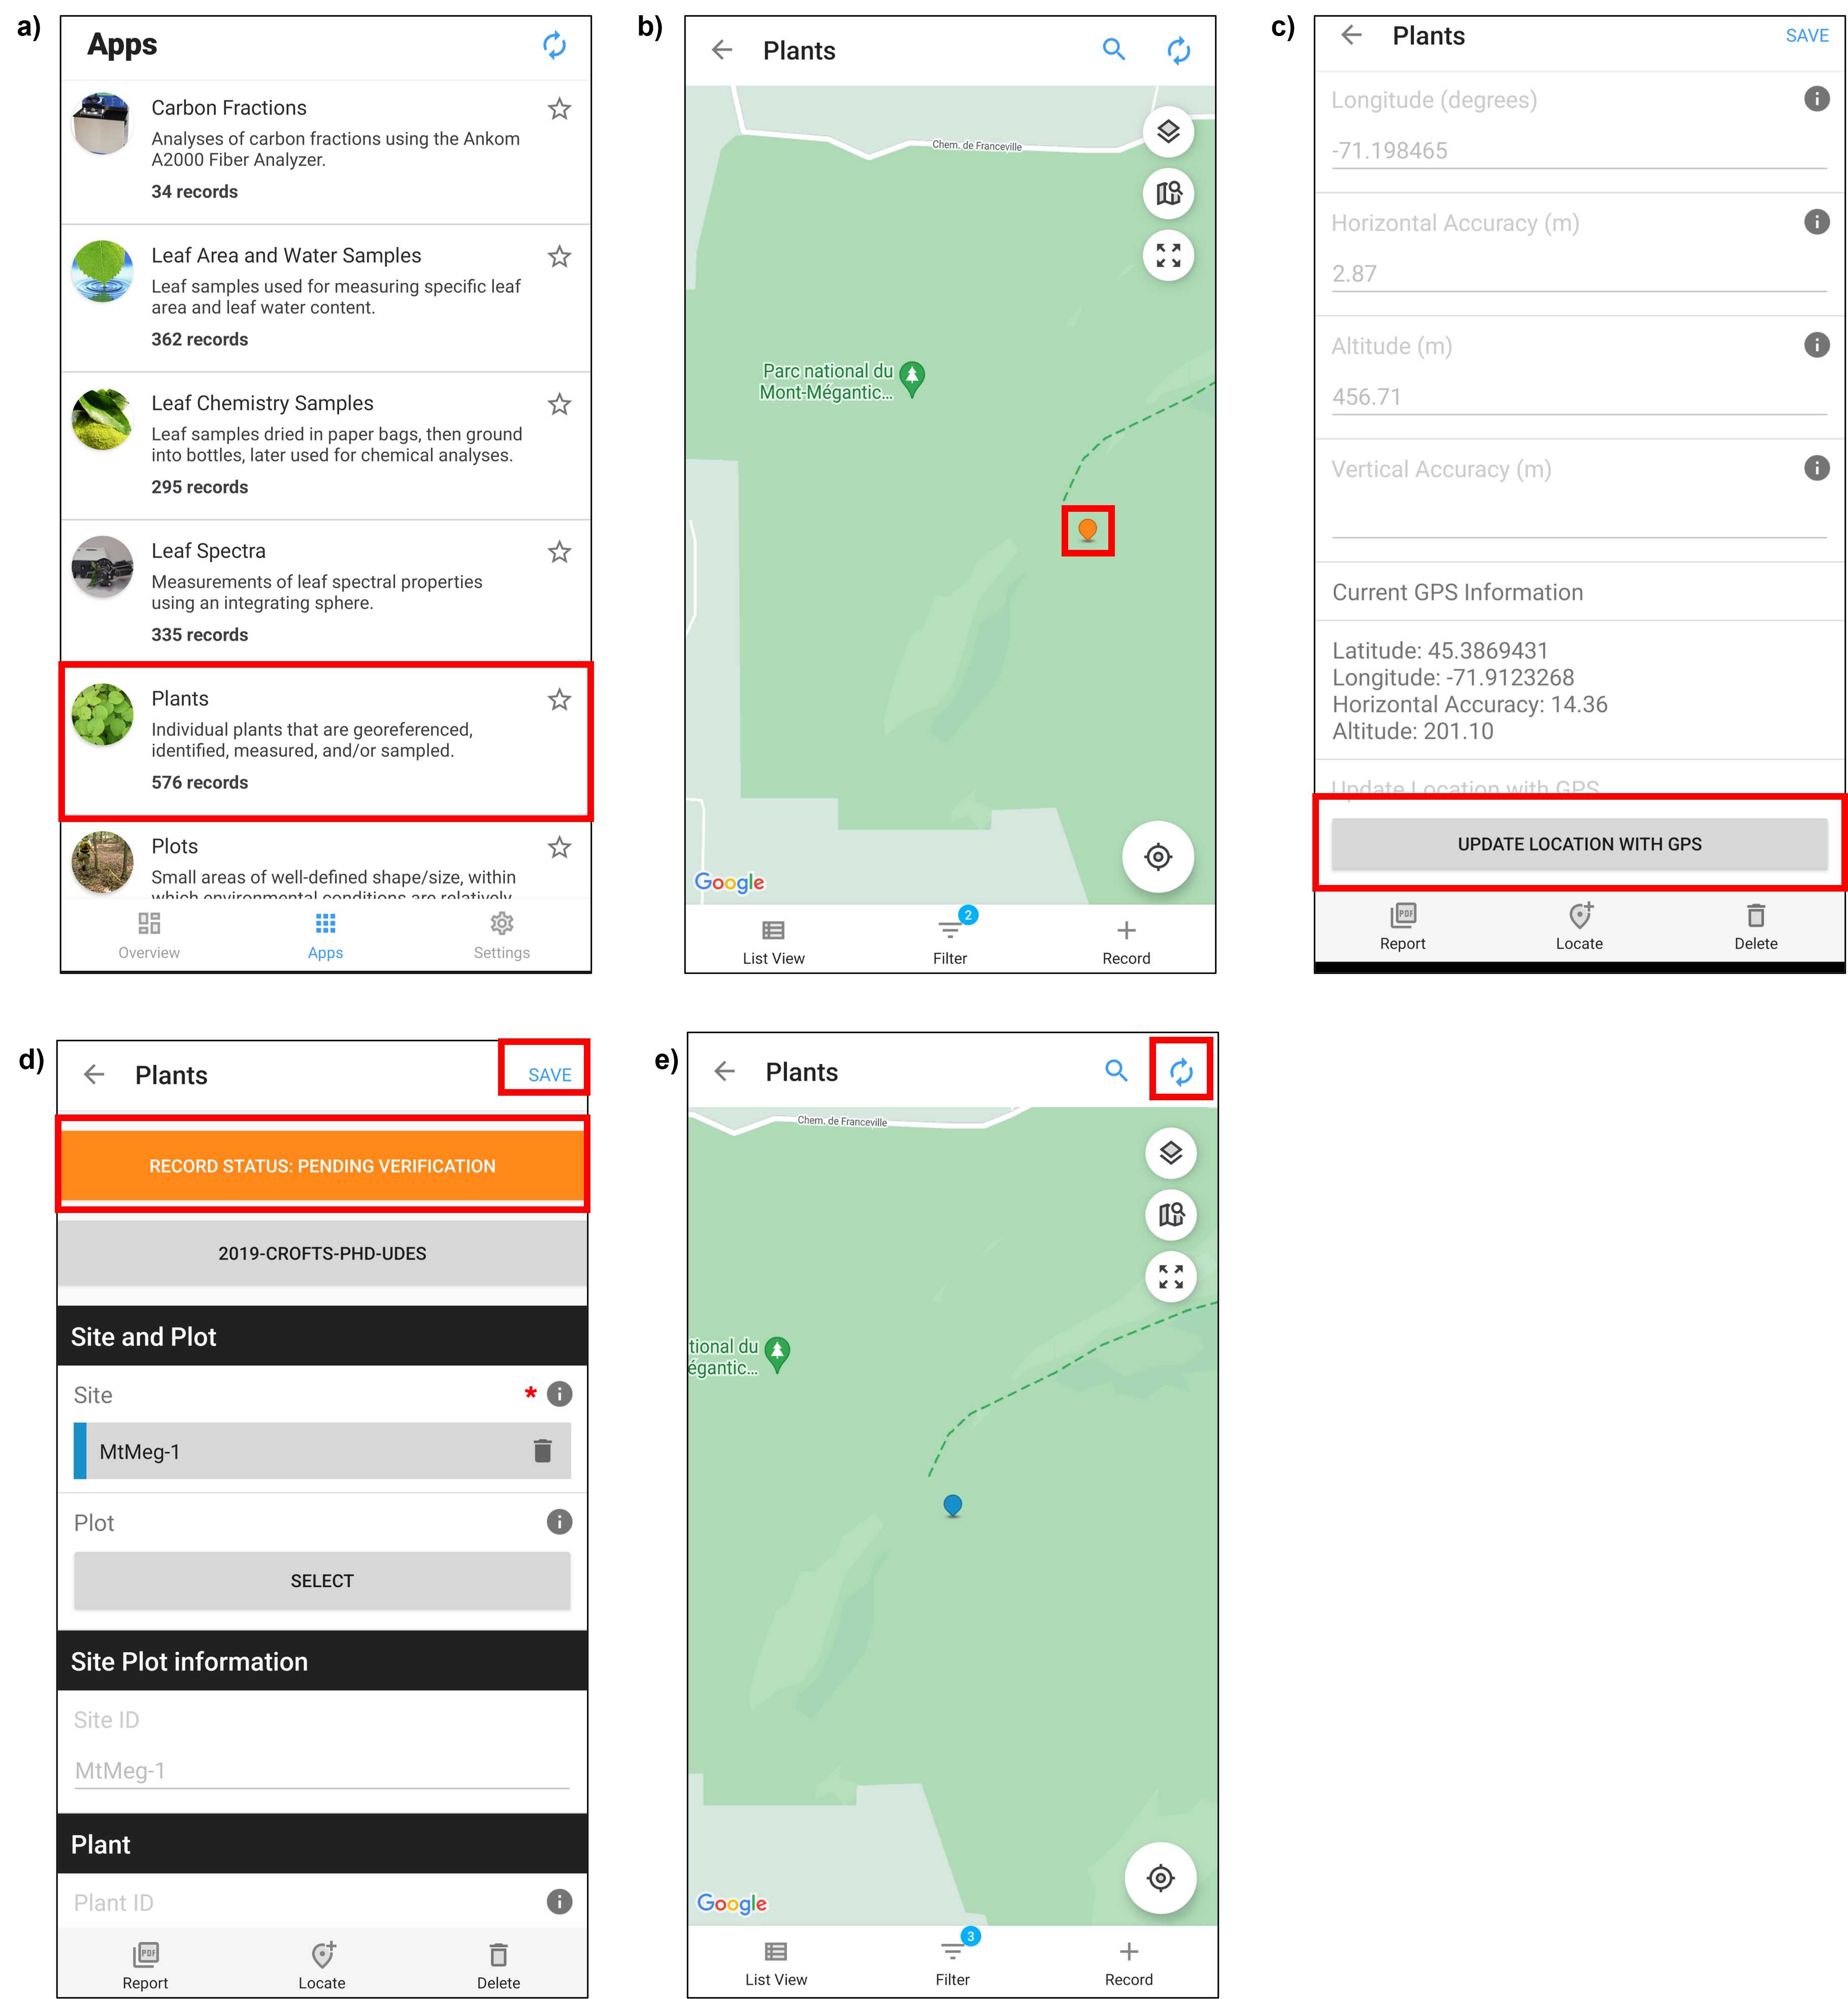
Within the Plants app in Fulcrum select the appropriate plant record (Fig. 10a,b).
-
The Trimble Catalyst integrates with Fulcrum , select UPDATE LOCATION WITH GPS - Latitude (degrees), Longitude (degrees), Horizontal Accuracy (m), and Altitude (m) fields will automatically be filled in when Update Location with GPS is selected - once GPS connection is established and, ideally, horizontal accuracy is ≤ 2.0 m1 (Fig. 10c).
-
Select the RECORD STATUS: PENDING VERIFICATION in the plant's Fulcrum record and change the status to VERIFIED. The colour of the Record Status bar should change from orange to blue (Fig. 10d).
-
SAVE the plant's record in Fulcrum. This will return you to the the Plants app (Fig. 10d).
-
Sync2 Fulcrum to upload the changes online by selecting the icon of two circular arrows. This icon will spin when synchronizing is in progress (Fig. 10e).
Download Plant Record Data
Using the Fulcrum desktop website,
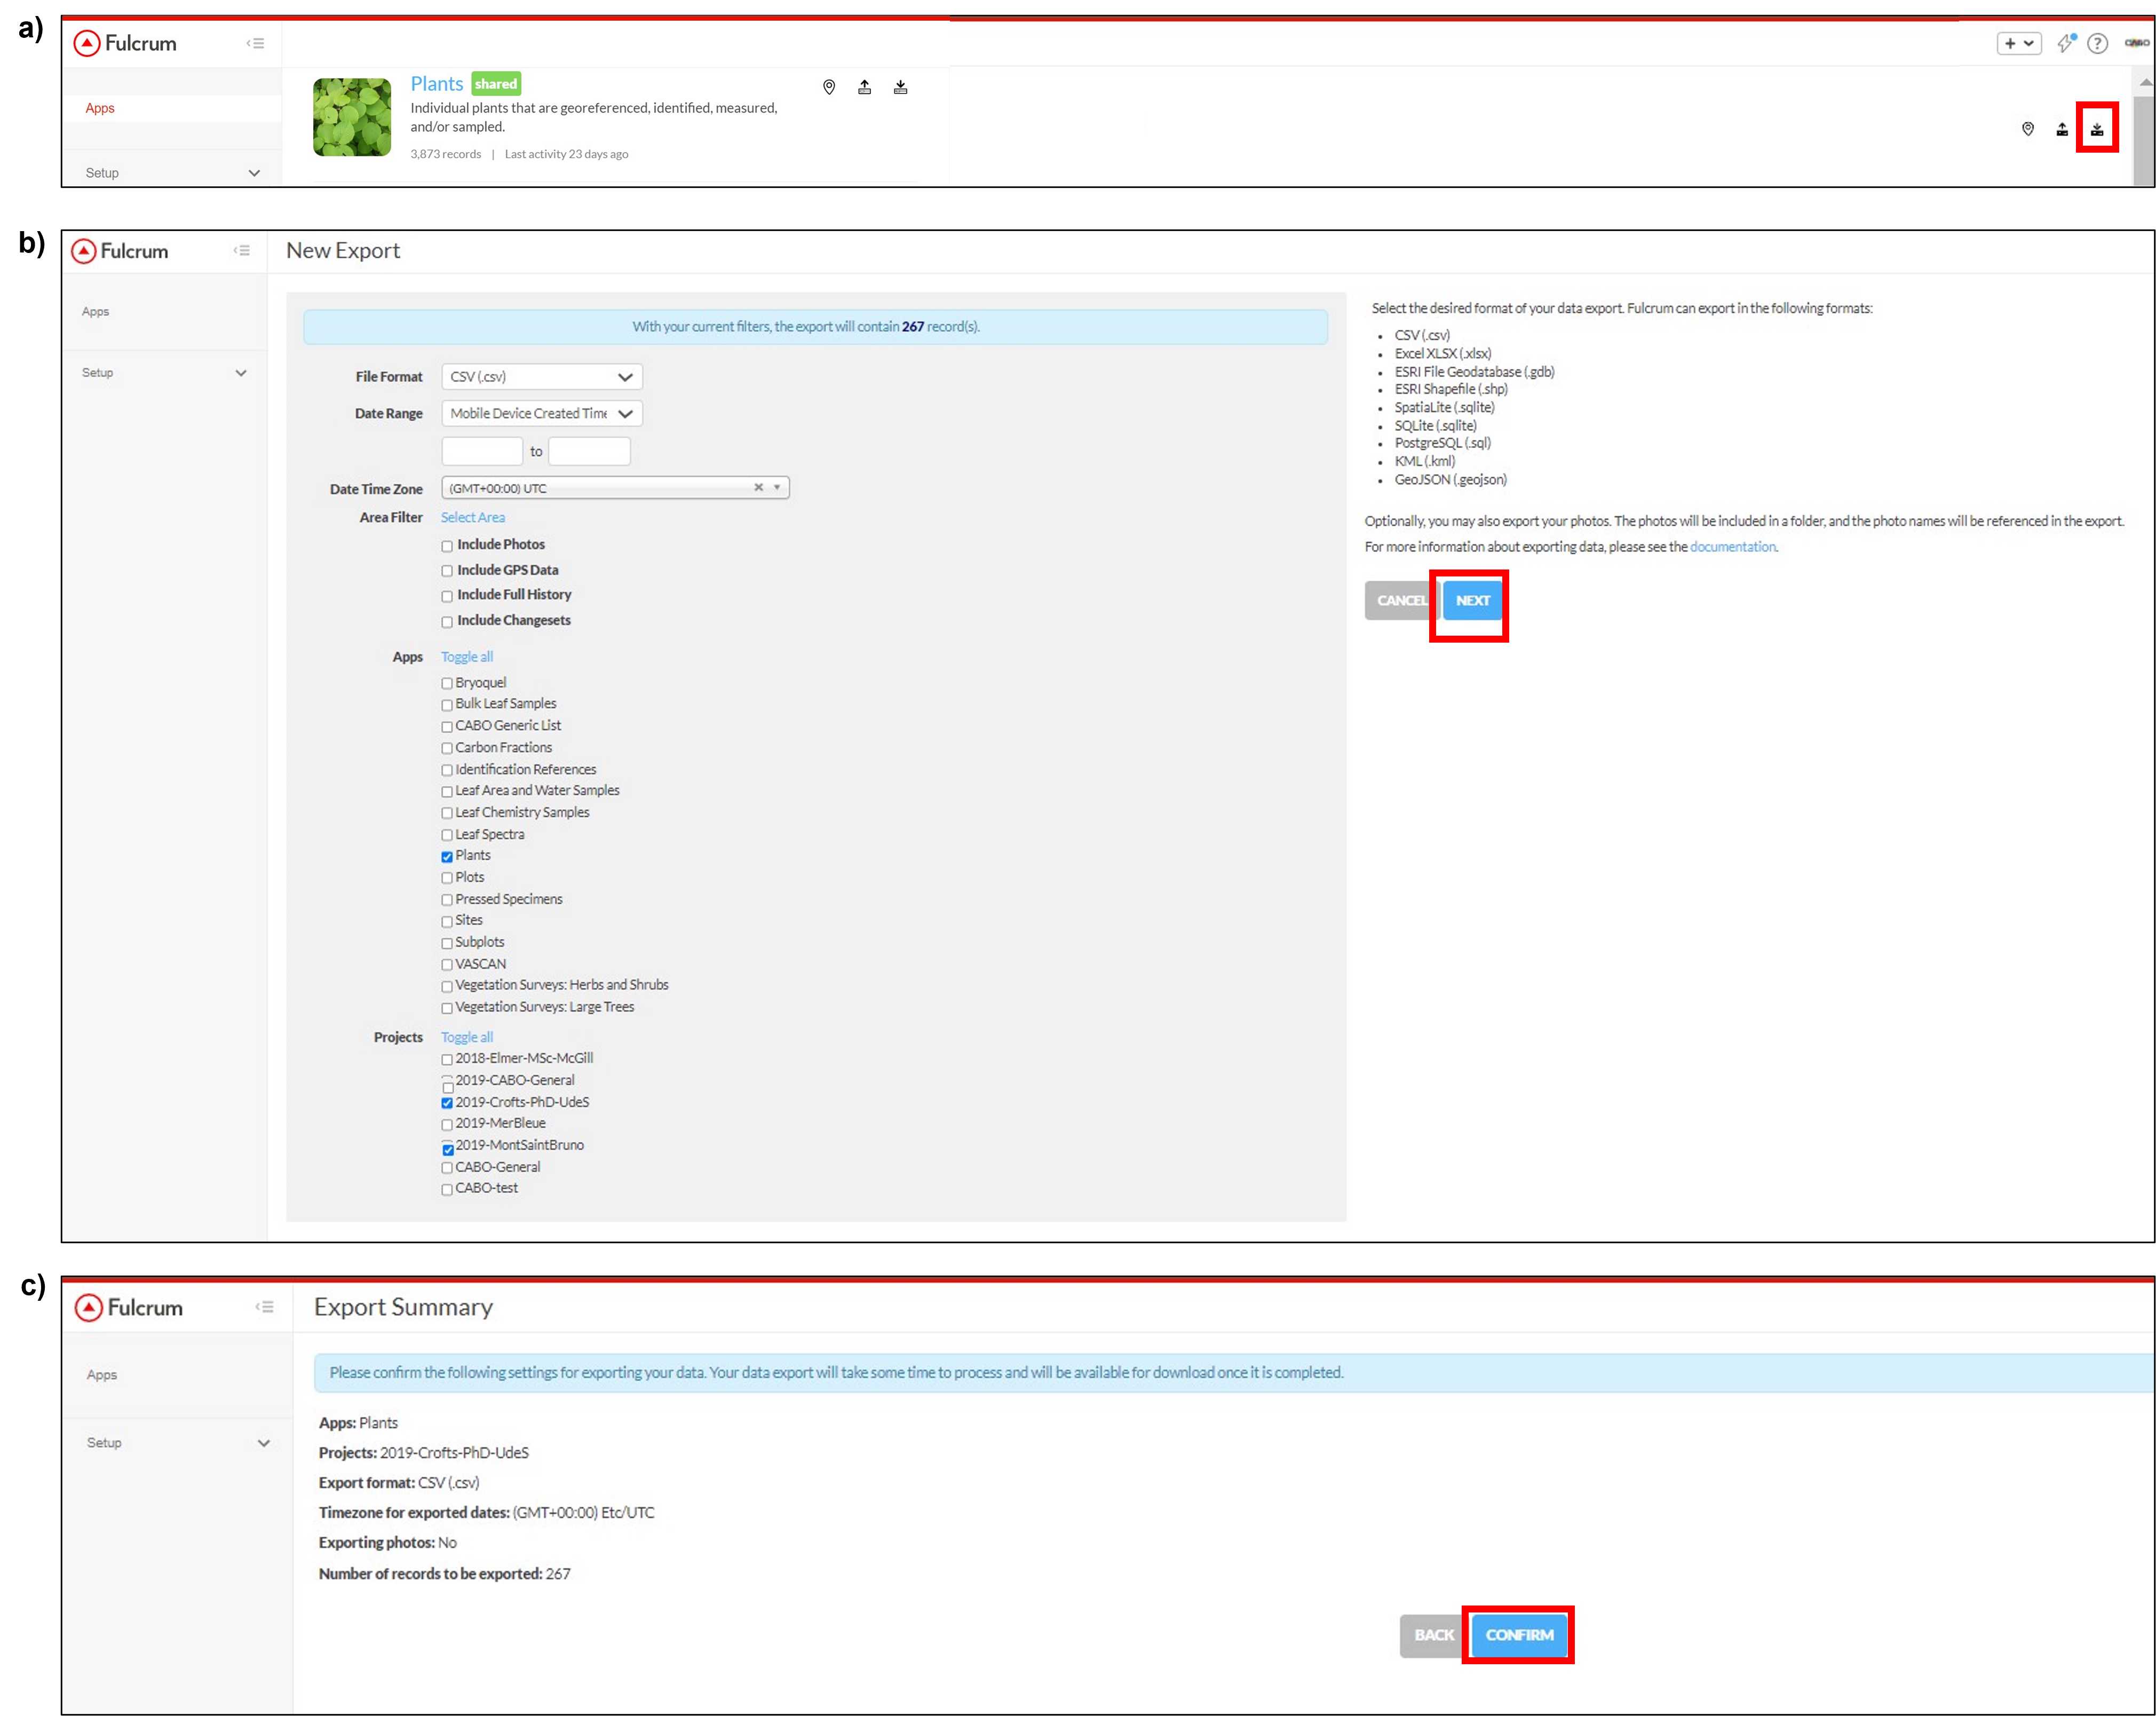
- In CABO's Fulcrum account, select Export Data as indicated by a downward facing arrow (Fig. 11a)
- Select the File Format , in Apps select Plants , in Projects select 2019-CROFTS-PHD-UDES or alternative, and then select NEXT (Fig. 11b).
- Review Export summary and select CONFIRM to download (Fig. 11c).
Submit Plant Record Data
Once the foliar sampling campaign is complete and data has been checked, change the status of all plants to 'Submitted' in Fulcrum .
- Within the Plants app in Fulcrum select plant records (Fig. 12a,b).
- For each plant record, select the RECORD STATUS: VERIFIED in the plant's Fulcrum record and change the status to SUBMITTED . The colour of the Record Status bar should change from blue to green (Fig. 12c). Then SAVE the changes in Fulcrum . This will return you to the Plants app (Fig. 12c).
- Once the status of all appropriate plant records have been changed, Sync Fulcrum to upload the changes online by selecting the icon of two circular arrows. This icon will spin when synchronizing is in progress (Fig. 12d).
