Setting and Customizing OT-2 for LAP Entries
Ana Mariya Anhel, Lorea Alejaldre, Ángel Goñi-Moreno
Abstract
Automation scripts such as those included in the LAP repository (https://www.laprepo.cbgp.upm.es/repository/) require set up steps that not directly part of the experimental process but are essential for execution.
This protocol is divided into 5 sections: connecting to an OT-2, transferring files between the robot and the user system, creating and uploading custom labware to the OT app and robot system and preparing the robot system.
These steps establish the necessary environment for running experiments with the LAP entry scripts and user-specific variables.
Not all sections are required for every LAP entry run. For more information on each script in the LAP repository, visit www.laprepo.com and refer to the documentation attached to each entry. LAP repository entries can contain links to protocols.io entry to provide a step by step experimental validation protocol.
Before start
This protocol consists of various sections with interlinked steps to transfer files to an OT-2 robot such as variables files, script or customized labware. It is not always necessary to complete all of them to run a LAP entry protocol (i.e your protocol does not use customized labware)
Steps
Connect to the OT-2
Creation ssh-key connection
An OT-key should be generated to connect to the robot, and it is done with the ssh-keygen command and transferring the public key to the OT.
For more information about how to generate and set the connection between your computer and the Opentrons robot, visit https://support.opentrons.com/s/article/Setting-up-SSH-access-to-your-OT-2
Connect to the robot
To connect to the robot's system to perform different actions such as installing packages, check files that are in the system, etc.
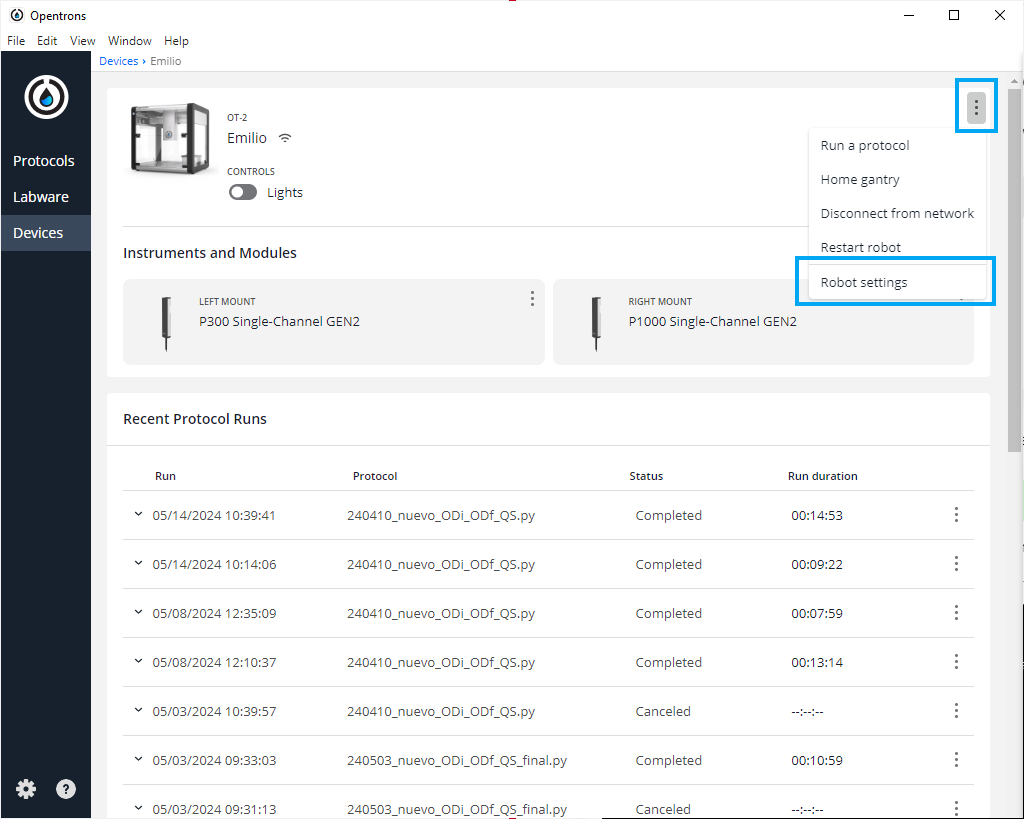
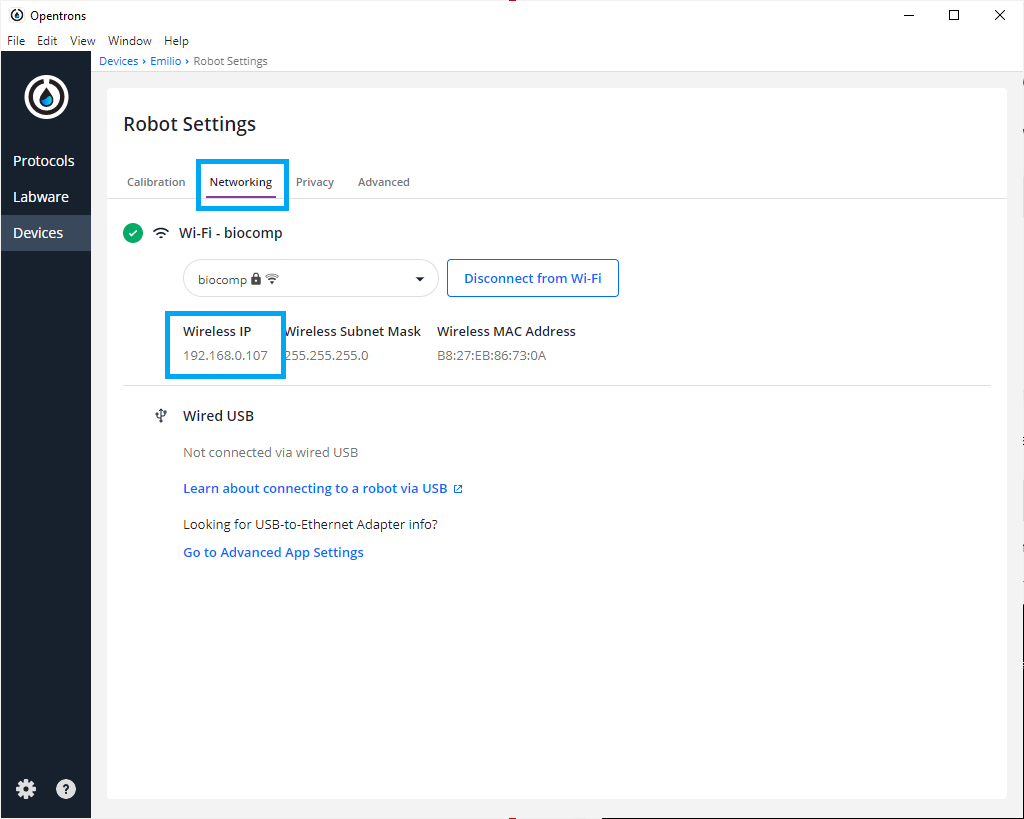
Find the IP of the robot
In the OT app go to Devices -> Robot you want to connect -> Superior 3 dots -> Robot Settings -> Networking
Connect to the robot
Either in a bash (unix systems) or powershell (windows systems) use the command ssh
#Connect to Linux based OT via ssh
ssh -i [path ot_key] root@[Robot_IP]

Transferring files between user system and robot system
Connect to the robot
You can either connect on the same inalambric network as the robot or by USB
Find the IP of the robot
Transfer the files
In different systems you can/must transfer the files in different ways always taking in account that the system of the OT-2 robot is a Linux Raspberry
MacOS/Linux
We can use the bash or command line to transfer the file(s) with the following command
#Passing Files to OT
scp -i [ot_key] [file_to_send] root@[IP_OT]:[final_path]
```The ot_key is referring to the private key created in step 1,


You can face difficulties transferring files in MacOS Ventura (13) and Sonoma (14). These problems can be solved by adding the argument -O (uppercase o) to the command
#Transferring files to OT (MacOS 13 and 14) scp -O -i [ot_keypath] [file path to send] root@[IP_robot]:[final_path]
Windows
There are several ways to send files from a Windows to a Linux system (for example, with a virtual machine or Windows Powershell in the latest versions of Windows). With the latter you can use the same steps as in 5.1
Another way is using FileZilla (https://filezilla-project.org/download.php?type=client).
You can set the connection between your computer and the OT-2 robot system as follows.
Open Filezilla -> File (in the toolbar) -> Site Manager -> New Site (Press button) -> Rename Site
Now that the site is created you can see on the right the settings of that particular site. In the General tab Change Protocol to SFTP . Then, introduce in Host the OT IP, change the Logon Type to key file , change User to root and give the directory where the OT key is. It should look something like the following image
 to Linux (OT)")
Then press Connect , and we will have a connection between our computer and the robot.
After this connection, we should be able to move the files that we want to the final path of the robot that we desire to send them.
This method can be used as well in some Linux and MacOS systems
Exit the robot
To return to your system you only need to type exit in the command line
Preparing Robot OS
Check needed packages and versions of LAP entry
In the Requirements Section of each LAP Entry you can find that the protocol/entry needs more packages than the ones are installed in the OT-2 system
Check python packages of robot
To know which packages are needed to be installed in the opentrons robot you can connect to the robot ()and get a list of all the packages and their versions installed in that scpecific python
Take in account that there are some packages like math or random which versions are specified or linked to the python version
Connect to robot
Use pip command
You can use the pip command to get the entire packages that are installed in your robot's version of python. Take in account that the packages that are by default in python such as math will not appear in that list
#List installed pip packages (Unix)
pip list
```To store the packages of the robot in a file for the future you can use the pipe >
#List installed pip packages and save (Unix) pip list > [name_file_store_packages]
You can check for a specific package with the following command
#List installed pip specific package (Unix) pip show [name_package]
1. A small piece of text giving you the name, version and summary of the package, within other information. This will mean that the package is installed on the python
1. Warning message telling you that the package does not exist. This means that either the package has not been installed in that version of python or that it is not installed with pip (it is by default in python or it is installed with other vias like conda)
Install needed packages
To install 1 or more packages you can use any of the following 2 commands
#Install package Python
python -m pip install [name_package_1] [name_package_2] [name_package_3]
#Install packages with pip
pip install [name_package_1] [name_package_2] [name_package_3]
```Make sure that the robot has access to the internet so it can download the packages


<Note title="Note" type="warning" ><span>For more information about installing packages in the opentrons robots, check the following Opentrons page: <b>For more information about installing packages in the opentrons robots, check the following Opentrons page: https://support.opentrons.com/s/article/Using-Python-packages-in-Python-API-protocols</b></span></Note>
Exit the robot
To return to your system you only need to type exit in the command line
Uploading custom labware
Creation of .json custom labware file
The description file can be obtained by describing the labware dimensions at https://labware.opentrons.com/create/
Uploading file to the OT App
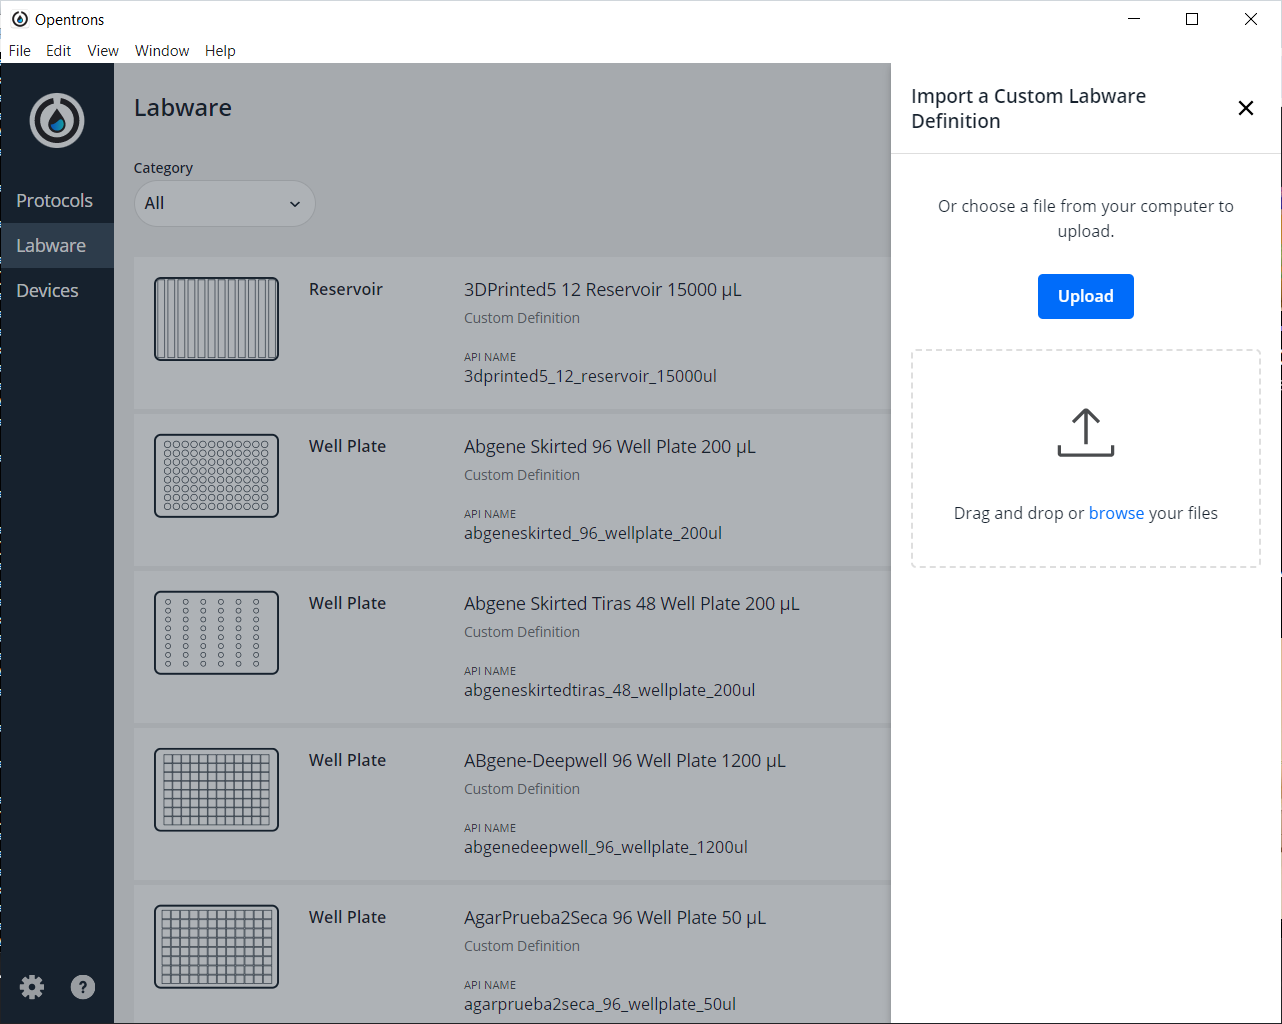
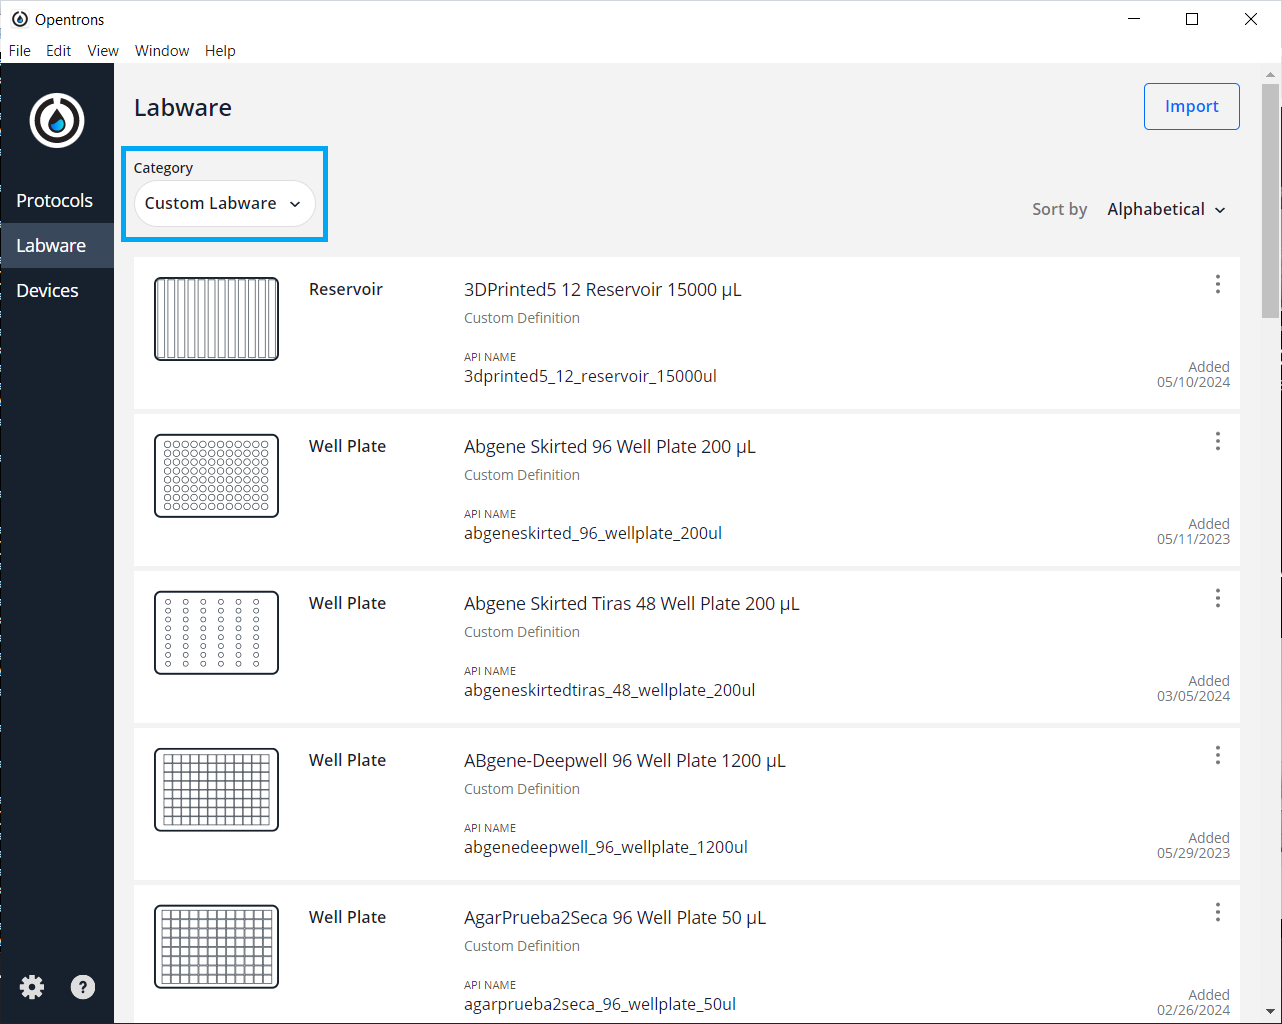
In the OT app, we need to perform the following route: Labware -> Import -> Choose File -> Select file we have created in step 9
In some LAP entries or in versions of them there is a need to upload in 2 places the created files so you need to complete as well the following steps.
Uploading definition to OT robot system
Create a directory with the defintion
We need to create a directory with the API name of the labware, the name that we are going to use to load it in the opentrons
Rename .json file
We need to rename the .json file that the opentrons labware creation to 1.json and place it inside of the directory created in Step 13.1
Transfer the directory to a specific location
To upload the directory with the .json file that represents the custom labware that has been created in step 11 to the robot systems we are going to use the steps from 3 to 6 transferring the file to the final path /data/labware/v2/custom_definitions/custom_beta with some changes with the argument -r as shown in the following command
#Transferring the used custom labware to OT (Linux)
scp -i [ot_key] -r [custom labware directory path] root@[IP_OT]:/data/labware/v2/custom_definitions/custom_beta
```You can face difficulties transferring files in MacOS Ventura (13) and Sonoma (14). These problems can be solved by adding the argument -O (uppercase o) to the command
#Transferring the used custom labware to OT (Linux) scp -O -i [ot_key] -r [custom labware directory path] root@[IP_OT]:/data/labware/v2/custom_definitions/custom_beta
