RNA Slide Preparation Protocol (FFPE) for nanostring DSP - GeoMx - Human Breast samples
Nicolas Martin
Disclaimer
The steps of the protocol are from Nanostring MAN-10150-03 June 23 version.
Abstract
This protocol is designed for RNA slide preparation for formalin-fixed tissue.
Before start
Steps
Slides sectioning
Tissue sections should be 5 µm thick and mounted on Superfrost Plus or BOND Plus slides. Tissue sections must be placed in the Scan Area (shown in green in Figure 3) in the center of the slide and be no larger than 35.3 mm long by 14.1 mm wide . Mounted material should not overlap the slide gasket (shown in blue) or the tip calibration area (shown in red). If mounting multiple sections per slide, ensure that tissues are at least 2–3 mm apart and still fit within the Scan Area.

If sections are too large and/or placed off-center, continue with slide preparation as usual. Just before loading the slide in the instrument slide tray, scrape off the parts of the tissue exceeding the scan area, ensuring the slide gasket and tip calibration area are tissue-free. Scraping off tissue before slide preparation could generate tissue folds that may result in staining or binding artifacts.

Slides baking
Bake slides with mounted sections in a 60°C drying oven for 30 minutes to 3 hours prior to deparaffinization. Stand slides vertically during baking to allow excess paraffin to flow off. Longer baking times may be necessary for some tissues to sufficiently adhere to the slide (e.g., overnight
at 37°C followed by 2-4 hr at 60°C); this should be empirically tested.
Deparaffinize and rehydrate FFPE tissue sections (31 minutes),
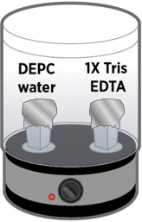
The steamer, staining jars, 1X Tris- EDTA (pH 9.0) (antigen retrieval solution), DEPC- treated water, water bath and Proteinase K solution are preheated here for their use in a later step.
(To prepare cell pellet samples, use a hot plate set to 85°C, rather than the steamer).
Fill the steamer reservoir up to the fill line with water. Place two staining jars inside, one containing DEPC-treated water and one containing 1X Tris-EDTA (pH 9.0) (Antigen Retrieval Solution). Ensure sufficient reagent volume to cover slides up to the label. Loosely cover each jar with aluminum foil instead of the jar lid to allow for a thermometer reading in a later step . Preheat the steamer to 100°C. More water may need to be added to the steamer during preheating. Check on the steamer every 30 minutes .
The Nesco steamer takes 1 hour to heat the liquid in the jars to a stable maximum temperature near 100°C. The final temperature can be checked by inserting a digital thermometer through the hole in the steamer's lid into the staining jars.
Alternatively, a pressure cooker may be used for antigen retrieval. However, the pressure cooker must be usewithout pressure (i.e. pressure valve open) during the incubation time.
Prepare the pressure cooker by adding water to the correct level per the manufacturer's instructions, level 6 and preheating to 115°C with the 1X Tris EDTA (pH9.0) and DEPC water. Once the temperature reaches 110°C, turn off the pressure cooker and release the pressure by leaving the valve open.
Deparaffinize and rehydrate FFPE tissue sections . Place slides in a rack and perform the following washes in stainingjars (see Figure 2). Ensureyou have sufficient buffer volume to cover all slides. Slides should be dipped up and down gently several times when placing in and before removing from staining jars. Afterthe last wash,slides can be stored in the 1X PBS for up to one hour.


During wash steps, preheat the water bath to 37°C. Prepare the Proteinase K dilution, if not yet done, and add the diluted Proteinase K solution to a staining jar and place in the water bath to preheat to 37°C. Refer toTable 2fo or the recommended Proteinase K concentration for your tissue type.
Perform target retrieval (25 minutes)
Needed for this step: Steamer, Staining jars, 1X Tris-EDTA (pH 9.0) (antigen retrieval solution), DEPC- treated water (all preheated in the step 2) and 1X PBS.
Plastic staining jars are recommended for this step to avoid the risk of glass breaking. If using a glass jar, be aware of the risk of glass breaking during incubation or upon removal of the jar to room temperature.
Place an instant-read digital thermometer through the vents in the steamer lid without removing thelid and pierce the aluminum foil covering the 1X Tris-EDTA. Ensure the 1X Tris-EDTA has reached ~99°C. Reset the steamer's timer to ensure consistent heating during incubation, and add more water as needed.

Once the 1X Tris-EDTA reaches 99°C, carefully remove the steamer lid, pressure cooker lid, and jar covers. Dip the slides into the DEPC-treated water for 10 seconds to bring the slide temperature up to ~99°C. Quickly transfer the slides to the 1X Tris-EDTA . Replace jar cover, then replace steamer/ pressure cooker lid.
If using a pressure cooker, ensure that the pressure valve is open and the temperature of the pressure cooker is above 110°C. Once the pressure is fully release, open the pressure cooker and Dip the slides into the DEPC-treated water for 10 seconds to bring the slide temperature up to ~99°C. Quickly transfer the slides to the 1X Tris-EDTA . Replace jar cover, then replace steamer/ pressure cooker lid.

Incubate the slides according to the conditions for different tissue types in Table 2. Incubation times and temperatures may need to be empirically determined. If the tissue type you wish to use is not listed, start with 15 minutes in your empirical testing.
Epitope retrieval times were determined based on FFPE tissue blocks meeting the constraints outlined in the sample guidance section. Samples were primarily tumor with minimal normal adjacent tissue. These conditions may vary by sample,the amount of normal adjacent tissue, and other factors. These conditions were optimized for large tumor sections and may not apply to arrayed tissues, cored tissues, and needle biopsies.
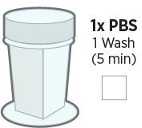
When target retrieval time is up, move slides to room temperature 1X PBS immediately.
Wash in room temperature 1X PBS for 5 minutes . Slides can be stored forup to 1 hour in 1X PBS
Expose RNA target (10-30 minutes)
Expose RNA targets (10–30 minutes).
Needed for this step: preheated water bath, preheated Proteinase K dilution, and 1X PBS.
Incubate slides in Proteinase K solution at 37°C according to the conditions for different tissue types in Table 2. Proteinase K concentration and incubation times may need to be empirically determined. If the tissue type you wish to use is not listed, start with a concentration of 1 µg/mL for 15 minutes.
Proteinase K digestion conditions were determined based on FFPE tissue blocks meeting the constraints outlined in the sample guidance section. Samples were primarily tumor with minimal normal adjacent tissue. Optimization may be required for your sample types. The values listed above are recommended starting points. Using Proteinase K from vendors other than those specified will require optimization of incubation times and concentration.
Wash slides in 1X PBS for 5 minutes. During the wash, ensure that the 10% NBF and NBF Stop Buffer needed in the next step are ready. Proceed to the next step immediately.

Post-fixation (20 minutes)
Postfix: Preserve tissue morphology for soft tissues (20 minutes).

Post-fix the tissue by performing these washes(see Figure 3)):

Slides can be stored in the final 1X PBS wash up to 1 hour at room temperature or 6 hours at 4°C .
In situ hybridization (overnight)
Needed for this step: hybridization chamber, hybridization oven, Buffer R, RNA Probe Mix, and 2X SSC or DEPC-treated water.
IMPORTANT: Probe mixes should be handled in an area separate from nCounter work, NGS library prep, or other GeoMx workflows. . GeoMx detection reagents can cross-contaminate probe mixes and give misleading or incorrect results. Areas should be cleaned thoroughly with RNase AWAY after probe mix formulation. Alternatively, handle probe mixes in PCR workstations decontaminated with UV light. Change gloves after handling any probe mixes to avoid cross-contamination.
Due to the high sensitivity of this assay, it is recommended that you change pipette filter tips for every step, change gloves frequently, and use fresh wipes to remove excess liquids.
Prepare reagents : Warm Buffer R and RNA detection probes to room temperature before opening. (Warming RNA detection probes reduces viscosity, improving pipetting accuracy.) Before use, flick to mix, then spin down. S tore unused RNA detection probes at 4°C for up to 6 months or re-freeze.
Clean the hybridization chamber and other equipment with RNase AWAY and allow to dry, or rinse with DEPC- treated water. The hybridization chamber can be a key source of contamination by oligos. Arrange fresh Kimwipes on the bottom of the chamber and wet with 2X SSC or DEPC- treated water. Kimwipes should be thoroughly damp, but the liquid should not pool. If your chamber is light permeable, wrap the lid in aluminum foil to minimize light exposure.
Make hybridization solution following for NGS assays or Table 4 for nCounter assays.
Confirm that you use probe mix for manual/semi-automated slide preparation (white label, green/white/amber cap) and not probe mix for fully automated slide prep (yellow label, red cap). Write down the part and lot numbers of the probe set you are using. You will need the part number when loading the slides on the instrument.
Table 4: Hybridization solution for assays with NGS readout(Atlas = WholeTranscriptome Atlas (WTA), n = number of slides.
| A | B | C | D | E |
|---|---|---|---|---|
| Panel Configuration | Buffer R | Atlas Probe Mix | DEPC- treated H2O | Final Volume |
| Atlas (WTA) | 200 μL x n | 25 μL x n | 25 μL x n | 250 μL x n |
One at a time, remove slides from 1X PBS, wipe away excess liquid, and set in a hybridization chamber in a horizontal position. Take care not to let the slides dry out.
Ensure that the Kimwipes and liquid do not contact the slides. Hybridization solution can wick off of the slides if it comes into contact with Kimwipes or liquid.
Add 200 μL hybridization solution to each slide. Take care not to introduce any bubbles.
To avoid bubbles, leave a small residual volume in the pipette tip. If a bubble forms, aspirate it gently with the pipette. Do not touch the tissue with the tip. It is preferable to lose some hybridization solution and remove bubbles than to have bubbles in the solution as long as sufficient solution remains to cover the tissue after the coverslip is applied.
IMPORTANT: From this point on, minimize the slides' exposure to light to preserve the integrity of the photocleavable barcodes.
Gently apply a Grace Bio-Labs HybriSlip
Start by setting one edge of the coverslipdown in solution on the slide, then gradually laying down the rest of the coverslipto avoid the formation of air bubbles(see Figure 4)).

Repeat steps 4–7 for each slide.
Close hybridization chamber, insert into hybridization oven, and clamp into place. Incubate at 37°C overnight (16–24 hours).
Perform stringent washes to remove off-target probes (90 minutes)
Needed for this step: water bath, 4X SSC, 100% formamide , 2X SSC , and (optional) 2X SSC-T
WARNING: Use of appropriate personal protective equipment is advised.

Preheat water bath to 37°C.
Warm 100% formamide to room temperature before opening. Make Stringent Wash by mixing equal parts 4X SSC and 100% formamide . Fill two staining jars with Stringent Wash and preheat them in the 37°C water bath.

Dip slides in 2X SSC allowing coverslips to slide off. Continue to wash steps within 5 minutes s.
If coverslips do not come off immediately, move them to 2X SSC-T for a maximum of 5 minutes. If coverslips have not fallen off in 5 minutes, proceed to the first Stringent Wash.

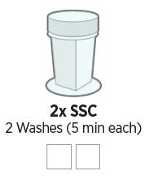
Perform 2 washes in Stringent Wash at 37°C for 25 minutes each h, then 2 washes in 2X SSC for 2 minutes each (see Figure 5)5). After the last wash,slides can be stored in 2X SSC for up to 1 hour.

Add morphology markers (100 minutes)
Needed for this step: humidity chamber, Buffer W, SYTO 13 nuclear stain, morphology markers, and 2X SSC .

Block with Buffer W: Remove one slide at a time from 2X SSC and tap slide on clean, absorbent surface to remove excess liquid. Place slide in the humidity chamber. Cover tissue with up to 200 µL Buffer W and leave at room temperature for 30 minutes, protected from light.
Wash in 2X SSC , 2 times for 5 minutes each.
Ensure adequate Buffer W surrounds the edges of the tissues so they don't dry out. Use a pipette tip to gently move the solution so there is a 2–3 mm border around the tissue. A hydrophobic barrier or hydrophobic pen can be used at this step if desired but must be carefully removed with a razor blade before loading on the instrument.
Prepare 220 μL of morphology markersolution per slide (see Table 4).
")
- If using non-NanoString morphology markers, optimal concentration in the morphology marker solution must
be determined by user testing.
**If using a different number of morphology markers, Buffer W amount needs to be adjusted to bring total volume up to 220 µL per slide.
Mix morphology marker solution by flicking and briefly picofuging.
Remove Buffer W from one slide at a time by tapping slide onto a Kimwipe, then return the slide to the humidity chamber.
Cover tissue with morphology marker solution (up to 200 µL).
Repeat steps 11.5 and 11.6 for each slide.
Incubate for 1 hour in the humidity chamber at room temperature, protected
from light.
After staining, remove solution by tapping slide on a clean, absorbent surface.
Add nuclei morphology markers (25minutes)
Cover tissue with diluted nuclei morphology marker solution (200-1000 µL of the diluted nuclei marker).
Syto 13 FITC 1:10,000
Syto 83 Cy3 1:10,000
Syto 59 Texas Red 1:10,000
Syto 62 Cy 5 1:10,000
Incubate for 10 min in the humidity chamber at room temperature, protected from light.
Wash in DEPC water , 3 times for 5 minutes each.
Stripping and re-probing procedure for RNA slides
GeoMx RNA assay slides are reusable and can be restained with a different commercial or custom panel following this procedure. This procedure requires a UV light box or transilluminator capable of emitting 302/312 nm UV light (example), 2X SSC-T, 1X Tris-EDTA, and 2X SSC.
Place the slide flat on the surface of a UV transilluminator.
Apply enough 2X SSC-T to completely cover the tissue (50–200μL depending on the size of the tissue).
Expose to UV light for 3 minutes to cleave tags from bound probes.
Carefully tap each slide on a clean, disposable surface (e.g., paper towel) to remove liquid and avoid oligo contamination.
Wash slides by dipping in a staining jar with 2X SSC-T.
Transfer to another staining jar with fresh 2X SSC-T .
Incubate the slides in 1X Tris- EDTA at 85°C using either a hotplate or a pressure cooker on a low
pressure setting for 15 minutes.
Wash 3 times in 2X SSC .
Proceed to In situ hybridization (overnight) section 8.
Load slides onto the GeoMx DSP following the GeoMx DSP Instrument User Manual (MAN-10152).
Follow instruction from User Manual
Prepare reagents
Prepare the reagents using the dilution instructions (see Table 1). Use DEPC- treated water for all dilutions. The actual volume of
reagents used in the protocol will vary – the volumes to prepare iTable e 1 are suggestions.
Table 1: Reagent prep for RNA slide preparation
| A | B | C |
|---|---|---|
| Reagent | Dilution | Storage |
| 95% EtOH | Prepare 500 mL of 95% ethanol by adding 25 mL of DEPC-treated water to 475 mL of 100% ethanol. NanoString recommends to prepare fresh each week. | RT |
| 1X PBS pH 7.4 | Prepare 1 L of 1X PBS by combining 100 mL of 10X PBS and 900 mL of DEPC- treated water. Do not reuse. | RT |
| Proteinase K | Default concentration (1 µg/mL) is made by adding 10 μL of 20 mg/mL Proteinase K to 200 mL of 1X PBS made with DEPC-treated water. See Table 2 for alternative concentrations by tissue type. Note: Prepare fresh and do not reuse. Take care to pipette accurately. Inaccurate concentration of Proteinase K will affect assay performance. | n/a |
| NBF stop buffer | Add 6.06 g tris base and 3.75 g glycine to 5 L DEPC-treated water to yield 0.1 M tris, 0.1 M glycine. Store at RT up to 1 month. | RT |
| 2X SSC | Prepare 1 L of 2X SSC by combining 100 mL of 20X SSC and 900 mL of DEPC-treated water. | RT |
| 2X SSC-T (optional) | Prepare 250 mL of 2X SSC-T by combining 25 mL of 20X SSC, 2.5 mL of 10%Tween20, and 222.5 mL of DEPC-treated water. | RT |
| 4X SSC | Prepare 1 L of 4X SSC by combining 200 mL of 20X SSC and 800 mL of DEPC-treated water. | RT |
| 1X Tris-EDTA pH 9.0 (antigen retrieval solution) | Prepare 1 L of 1X Tris-EDTA pH 9.0 by combining 100 mL of 10X Tris-EDTA pH 9.0 and 900 mL of DEPC-treated water. | RT |
Bake slides with mounted sections in a 60°C drying oven for 30 minutes to 3 hours prior to deparaffinization. Stand slides vertically during baking to allow excess paraffin to flow off. Longer baking times may be necessary for some tissues to sufficiently adhere to the slide (e.g., overnight at 37°C followed by 2-4 hr at 60°C); this should be empirically tested.
