PCR amplicon next generation sequencing
Susanne Kreutzer, Lilly van de Venn, Charles Yeh, Mark DeWitt
Abstract
Preparation of Amplicons for deep sequencing is based on two PCR steps. The genomic loci of interest is enriched in a first PCR including a stubber sequence to both ends of the molecule. For the subsequent barcoding PCR the stubber sequence is targeted and the full NGS sequencing adapter including dual barcodes are introduced to the molecule ends, enabling Illumina sequencing on all instruments.
By default we recommend a 150 PE sequencing workflow and amplicon size including the specific primer binding sites should not extend 280bp.
Schematic overview
<img src="https://content.protocols.io/files/k8b6bmvzf.jpg" alt="PCR 1: The specific PCR primer surround the genomic loci of interest and include a "stubber" sequence which carry the partial TruSeq Illumina adapter sequence." loading="lazy" title="PCR 1: The specific PCR primer surround the genomic loci of interest and include a "stubber" sequence which carry the partial TruSeq Illumina adapter sequence."/>

Before start
Attachments
Steps
Extract genomic DNA from edited cells using QuickExtract solution
Resuspend cell pellet to ≥2,500 cells/µL in QuickExtract solution. Vortex or pipette-mix to resuspend thoroughly.
Make sure to check whether QuickExtract is appropriate for your sample and application. Take a look at
for a more extensive list of gDNA extraction methods available in the lab.
Place on 68°C heat block or thermocycler. Incubate for 0h 30m 0s.
Place on 98°C heat block or thermocycler. Incubate for 0h 15m 0s.
NOTE: Extract genomic DNA in a pre-PCR area to prevent amplicon carry over.
Prepare first PCR (genomic DNA PCR)
Prepare PCR 1 Mastermix with 100ng input gDNA per sample (adjust primer concentrations and annealing temperature according to your setup).
Recipe for one rxn:

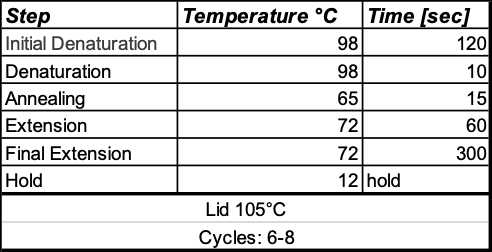
Thermal Cycling protocol:

Purify first genomic PCR using SPRI beads
Purify 50 µL PCR with 0.8X SPRI beads, eluting in 30 µL water.
-
Add 40 µL SPRI beads to each 50 µL PCR (0.8X ratio), mix thoroughly, and incubate for 5-8 minutes
-
Place on magnetic stand, wait for solution to clear (~1-2 minutes).
-
Remove clear supernatant.
-
Wash 2x with 80% Ethanol:
Add 200 µL ethanol solution (wait 30 seconds), remove, add 200 µL ethanol solution (wait 30 seconds), remove.
-
Remove residual ethanol with a P20 pipette. Remove plate from magnetic stand.
-
Allow sample to visibly dry, 3-5 minutes. Do not over-dry the samples as this can affect the yield.
-
Resuspend beads in 30 µL PCR-grade water. Place on magnetic stand.
-
Allow solution to clear. Remove 27 µL of clear supernatant (contains DNA) and place in a new 96 well plate.
QC the first PCR
Confirm proper amplification by running a 2% agarose gel with 5 µL of purified product. Alternatively, you can run the gel on the PCR, before purification.
The first PCR product is often impure, especially when amplifying more complex samples (e.g. mouse samples). Confirm presence of the desired band before proceeding with the second PCR.
Measure concentration of first PCR with the Qubit Spectrophotometer.
For qubit, use 2 µL Purified PCR per sample, and the '1x DNA HS kit'. Follow manufacturer's instructions.
Prepare the second PCR from 10 ng of product from the first PCR
Place 10 ng of first PCR product into a second 50 µL Q5 polymerase master mix with the Illumina PCR primers containing dual 8nt barcodes. This PCR completes the Illumina adapter to be sequenced on a Illumina MiSeq sequencer.
Recipe for one rxn:

Thermal Cycling protocol:
Confirm proper amplification by running a 2% agarose gel with 5 µL of purified product. Primer dimers will be removed in the following bead purification.
Purify the Second PCR using SPRI beads
Purify 50 µL PCR with 0.8X SPRI beads, eluting in 30 µL water.
Use SPRI beads at RT.
- Add 40 µL SPRI beads to each 50 µL PCR (0.8X ratio), mix thoroughly, and incubate for 5-8 minutes
- Place on magnetic stand, wait for solution to clear (~1-2 minutes).
- Remove clear supernatant.
- Wash 2x with 80% Ethanol: Add 200 µL ethanol solution (wait 30 seconds), remove, add 200 µL ethanol solution (wait 30 seconds), remove.
- Remove residual ethanol with a P20 pipette. Remove plate from magnetic stand.
- Allow sample to visibly dry, 3-5 minutes. Do not over-dry the samples as this can affect the yield.
- Re-suspend beads in 30 µL PCR-grade water. Place on magnetic stand.
- Allow solution to clear. Remove 27 µL of clear supernatant (contains DNA) and place in a new 96 well plate.
QC the second PCR and pooling
Measure the concentration of your purified PCR 2 product using the Qubit Spectrophotometer.1. Calculate the molar concentration of your samples using the fragment length of your PCR 2 product. Molar concentratron [nM] = (PCR 2 concentration [ng/µl] / 660 [g/mol] * {fragment length} [bp] ) * 10^6
- Pool the samples equimolar to a final concentration of 10nM.
- Measure the Pool with a Tapestation D1000 measurement. Tapestation Quick Guide: https://www.agilent.com/cs/library/usermanuals/public/ScreenTape_D1000_QG.pdf
NOTE: Calculation of molar concentration and pooling is provided in the attached excel file.
NOTE: General recommendations for sequencing depth:
| A | B |
|---|---|
| Amplicons for editing check | 0.2 |
| Clone genotyping | 0.02 |
| ChIP | 20 |
Illumina sequencing
Sequencing recommendations
-
We recommend a read length of 151bp from both sides as well as two 8bp barcode reads for amplicon sequencing (151 I 8 I 8 I 151)
-
Add PhiX
as amplicons are considered low-diversity libraries.
Illumina MiSeq
- Add 10% of PhiX to ensure sequencing variability.
- Start the run with a final loading concentration of 8-9pM
Sequencing kit options:
-
Sequencing read output 15M reads
<reagents text="MiSeq Reagent Kit V2 (300-cycles)" label="Illumina, Inc."/> -
Sequencing read output 4M reads
<reagents text="Miseq v2 Micro Sequencing Reagent Kit (300 cycles)" label="Illumina, Inc."/>
Illumina NextSeq2000
- Add 15-20% of PhiX
- Start the run with a final loading concentration of 650pM
Sequencing kit options:
- Sequencing read output 100M reads
