GeoMx-NGS Readout Library Preparation
Jamie Allen, Jeff Spraggins, Angela R.S. Kruse, Melissa Farrow, Morad C Malek
Abstract
This protocols describes the preparation of a library for Illumina NGS sequencing from Nanostring GeoMx DSP aspirate samples.
Steps
Transferring the DSP Collection Plate
PREPARING THE COLLECTION PLATE (1 HOUR)
Remove the collection plate from the DSP instrument by following the instructions at the end of the GeoMx DSP run or clicking the plate status icon.
Seal the collection plate with a permeable membrane. if delaying library preparation for over 24 hours, seal with an nonpermeable membrane and store at -20°C. If shipping to another facility, seal with a nonpermeable membrane and wrap plate in bubble wrap and ship on dry ice (direct contact with dry ice may cause the plate to crack).
Dry down the collection plate by incubating on a thermocycler at 65°C for up to 1 hour. If there is still liquid in some of the wells after this time, dry down until all liquid has evaporated.
Spin down the plate and check that there is no liquid remaining prior to rehydrating the samples in the next step.
Rehydrate the samples. Add 10 μL of nuclease-free water, pipette up and down 5 times and allow the collected targets to solubilize for 10 minutes at room temperature. Use an adhesive plate seal to keep the sample from re-evaporating.
Pulse centrifuge the plate to 1000 x g to ensure all liquid has been collected at the bottom.
Library Preparation
PCR setup (2 hours)
BEFORE YOU START
-
Program a thermocycler with a 100°C heated lid according to table (see Table 4).
-
Clean workspace with 10% bleach or RNase Away. Rinse with distilled H2O, followed by 70% EtOH.
-
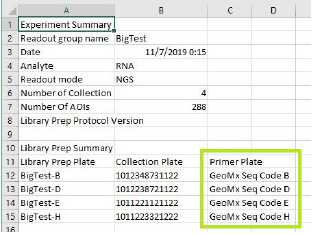
Refer to the Lab Worksheet (see Figure 4) to choose the correct letter of GeoMx Seq Code Primer Plate for your DSP collection plate. Thaw the primer plate on ice or on cooling block.

Figure 4: Lab Worksheet -
Keep all PCR reagents as well as the PCR plate on ice or on cooling block during setup.
-
Once thawed, pulse centrifuge 5x PCR Master Mix, primer plate, and DSP collection plate to 1000 X g. Do not vortex at any point.
This PCR protocol begins with uracil-DNA glycosylase (UDG) incubation and deactivation.
| A | B | C | D |
|---|---|---|---|
| Step | Temp. | Time | Cycles |
| UDG incubation | 37 °C | 30 min | 1 X |
| UDG deactivation | 50 °C | 10 min | 1 X |
| Initial denaturation | 95 °C | 3 min | 1 X |
| Denaturation Anneal Extend | 95 °C 65 °C 68 °C | 15 sec 60 sec 30 sec | 18 X |
| Final extension | 68 °C | 5 min | 1 X |
| Hold | 4 °C | ∞ | 1 X |
Table 4: Cycling conditions
PROCEDURE
The instructions here assume a 96-well plate. If running more or fewer aspirates, adjust the procedure
and volumes accordingly.
Prepare a new 96- well PCR plate Table 5: PCR reaction according to the table (see Table 5) and the steps below. Use of a multichannel pipette is recommended. Ensure that each component is added to the bottom of the well and that your Primer Plate , DSP collection plate and PCR plate are all in the correct orientation (well A1 at upper left).
| A | B |
|---|---|
| PCR amplification reaction components | Volume (µL) |
| 5x PCR Master Mix | 2 µL |
| Primer mix (F & R, 2.5 µM each) | 4 µL |
| DSP aspirate | 4 µL |
| TOTAL VOLUME per reaction | 10 µL |
Table 5: PCR reaction
Add 2 μL of 5x PCR Master Mix to each well of the new PCR plate. It is acceptable to reuse pipette tips for each column during this step.
Transfer 4 μL of primer from each row/column of the GeoMx SeqCode primer plate to each row/column of the PCR plate. Use of a multichannel pipette is encouraged. Change pipette tips for every row/column.
Add 4 μL of DSP aspirate from each row/column of the DSP collection plate to each row/column of the PCR plate. Change pipette tips for every row/column.
Pipette up and down 10 times to mix.
Heat-seal PCR plate according to manufacturer instructions. Pulse centrifuge to 1000 x g.
Incubate PCR plate in a thermocycler with program specified in Table 1(see Table 4).
The PCR plate may be stored at 4°C overnight, or -20°C for up to 72 hours.
Pooling and AMPure cleanup (45 minutes)
IMPORTANT: The following are post-PCR steps and should be performed in a separate lab space
from the pre-PCR steps.
Pool and purify PCR products using the steps below. The instructions below are for a single 96-well plate.
Once PCR is complete, pulse centrifuge PCR plate to 1000 x g.
Pool 4 μL of each PCR well into one 1.5 mL tube (see Figure 6).
Using a multichannel pipette (8-channel), combine each column of samples into one 8-well strip tube. Once all columns have been combined into the strip tube, the contents of each strip tube well can then be pooled into a single 1.5 mL tube. If running multiple 96-well plates, pool each plate into its own 1.5 mL tube. However, if less than 12 reactions are on a plate, you may combine that pool with another plate's pool.
Measure the volume in the 1.5 mL tube using a pipette.
Add 1.2x volume of the measured volume of AMPure XP beads to the pooled PCR product. Mix well by pipetting up and down 10x. Pulse centrifuge.
It is important to measure the exact volume of the pool.
Example: pooling 4 μL from 96 wells of PCR product results in a ~384 μL pool. Measure the actual volume using a pipette, then add 1.2x this measured volume of AMPure XP beads to the pool.
Incubate 5 minutes at room temperature.
Prepare 20 mL fresh 80% EtOH by combining 16 mL 100% EtOH and 4 mL PCR-grade H2O.
Pellet beads on a magnetic stand for 5 minutes or until the solution is clear.
Carefully remove the supernatant. Avoid disturbing the beads, as they contain the library at this stage.
Wash beads with 1 mL of freshly-prepared 80% ethanol, incubating on magnetic stand for 30 seconds.
Discard the supernatant, being careful not to disturb the beads.
Wash beads a second time with 1 mL of freshly- prepared 80% ethanol, incubating on magnetic stand for 30 seconds.
Discard the supernatant, being careful not to disturb the beads.
Visually inspect the beads to ensure that as much ethanol as possible is removed without disturbing the beads. Use a low volume pipette (e.g., P20) to remove any residual ethanol, if necessary.
Dry beads on magnetic stand for ≤ 5 minutes. Remove from the magnetic stand.
Resuspend in 54 μL Elution Buffer. Mix well by pipetting.
Pellet beads on a magnetic stand for 5 minutes until the solution is clear.
Extract 50 μL of supernatant to a new tube. Leave 2–4 μL of supernatant in tube, if necessary, to avoid disturbing beads. This supernatant contains the sequencing library.
Add 60 μL of Ampure XP beads to the 50 μL supernatant. Mix well by pipetting up and down 10x. Pulse centrifuge.
Incubate 5 minutes at room temperature.
Pellet beads on a magnetic stand 5 minutes or until the solution is clear.
Carefully remove the supernatant. Avoid disturbing the beads.
Wash beads with 1 mL of freshly-prepared 80% ethanol, incubating on magnetic stand for 30 seconds.
Discard the supernatant, being careful not to disturb the beads.
Wash beads a second time with 1 mL of freshly- prepared 80% ethanol, incubating on magnetic stand for 30 seconds.
Discard the supernatant, being careful not to disturb the beads.
Visually inspect to ensure that as much ethanol as possible is removed without disturbing the beads. Use a low volume pipette (e.g., P20) to remove any residual ethanol, if necessary.
Dry beads on magnetic stand for ≤ 5 minutes. Remove from magnetic stand.
Resuspend beads in Elution Buffer according to the table below . Mix well by pipetting.
| A | B |
|---|---|
| # reactions | Elution Buffer volume (µL) |
| 96 | 48 µL |
| 48 | 36 µL |
| 24 | 24 µL |
| 12 | 18 µL |
Table 6: Elution Buffer volume
Incubate 5 minutes at room temperature.
Pellet the beads on the magnetic stand 5 minutes or until the solution is clear.
Extract the supernatant to a new tube. Leave 2 μL of supernatant in tube, if necessary, to avoid disturbing beads. This supernatant contains the sequencing library.
STOPPING POINT: The purified library may be stored in a DNA LoBind tube at -20°C until ready for sequencing.
Quality control
Combine 2 μL of library and 14 μL of Elution Buffer to create a 1:8 dilution .
Assess quality of library stock and 1:8 dilution quality using a capillary electrophoresis device such as the Agilent Bioanalyzer. Follow manufacturer instructions for use.
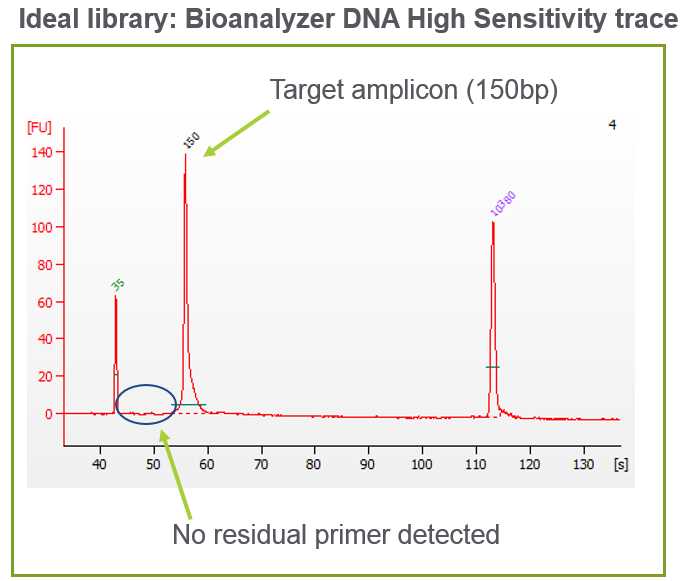
Check for the expected size of the amplicons and absence of primers, primer-dimers, or high molecular weight overamplification products (see Figure 8).
Expected library amplicon size is 162 bp. Using the Agilent Bioanalyzer, the library will appear as ~150bp.
Verify that the concentration of the ~150bp amplicon peak of either the undiluted library or the 1:8 dilution falls within the Bioanalyer assay’s quantitative range (5 – 500 pg/ul). Use the molarity value (pM) from the Bioanalyzer to calculate library concentration.

Sequencing Setup
Libraries should be sequenced on Illumina® sequencing platforms with the following workflow
specifications:
- Generate FASTQ
- Dual-indexing
- Paired-end with reads 2 x 27
- 5% PhiX spike-in by volume
Use the Sample Index List downloaded from the GeoMx DSP Instrument. Copy and paste the Sample Index
List into your Illumina Sample Sheet. Confirm the sequencing details entered here. If corrections
are needed, you may correct the sheet and re-download the readout package, which includes the
Sample Index List.
Set up the run according to the respective Illumina platform instructions (see respective Illumina
platform user manuals at support.illumina.com). Suggested loading concentrations are listed below
(see Table 7).
| A | B | C |
|---|---|---|
| Illumina platform | Flow cell | Loading concentration |
| MiSeq | v3 | 9 pM |
| NextSeq550 | High-output | 1.6 pM |
| NextSeq2000 | P2 | 650 pM |
Table 7: Suggested loading concentration per Illumina platform These values may be adjusted empirically based on internal workflow/specific sites/instruments.
Transferring from the Illumina NGS Run
Transferring the NGS raw data (FASTQ) files
Sequencing output FASTQ files will need to be transferred and processed by NanoString's GeoMx
NGS Pipeline (DND) software program before being uploaded back to the GeoMx DSP system for
Data Analysis. See the GeoMx-NGS DND Software User Manual for additional guidance.

