Female reproductive organs procurement
Kate O'Neill
Disclaimer
DISCLAIMER – FOR INFORMATIONAL PURPOSES ONLY; USE AT YOUR OWN RISK
The protocol content here is for informational purposes only and does not constitute legal, medical, clinical, or safety advice, or otherwise; content added to protocols.io is not peer reviewed and may not have undergone a formal approval of any kind. Information presented in this protocol should not substitute for independent professional judgment, advice, diagnosis, or treatment. Any action you take or refrain from taking using or relying upon the information presented here is strictly at your own risk. You agree that neither the Company nor any of the authors, contributors, administrators, or anyone else associated with protocols.io, can be held responsible for your use of the information contained in or linked to this protocol or any of our Sites/Apps and Services.
Abstract
Description of procurement of non-pregnant female reproductive tract from deceased donor for HuBMAP.
Steps
Modification of donor procurement
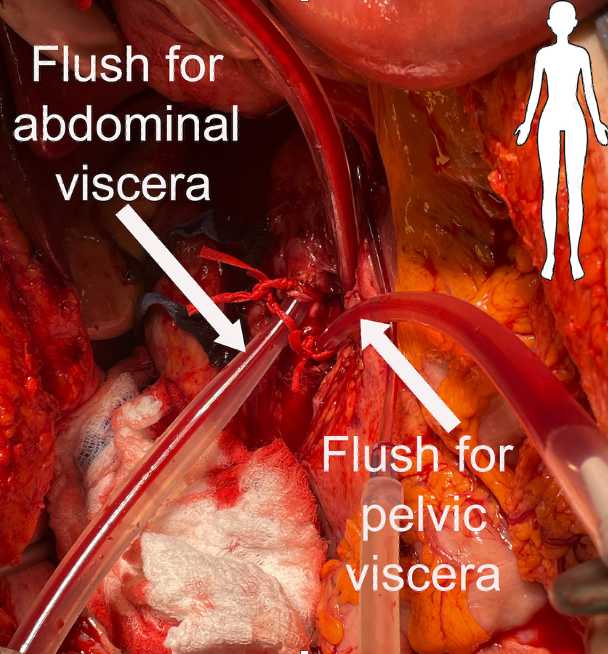
During the typical aortic cannulation in a standard abdominal organ procurement, the inferior aorta distal to the cannulation site is ligated. This occurs usually at the level of the bifurcation of the aorta with the common iliac arteries. This ligation is necessary in order to provide effective retrograde perfusion of the abdominal viscera (kidneys, pancreas liver) through the abdominal aorta at the time of aortic cross clamp.
This cannulation scheme will not be able to provide flush to the uterus given that the arterial circulation of the uterus derives from the internal iliac arteries.
In order to flush the uterus with preservation solution at the time of aortic cross clamp, the site of aortic cannulation will be made approximately 2-3 centimeters above the bifurcation of the aorta. Two cannulas will be inserted; one standard 24 gauge cannula (may need 22G if smaller aorta) directed cephalad that will perfuse the abdominal viscera and a smaller 12 gauge cannula directed caudad that will perfuse the pelvic organs (see figure). 1L organ preservation solution will be flushed through the pelvic viscera and the pelvis will be packed with ice.
After recovery of the liver, kidneys, and pancreas, the hysterectomy and bilateral salpingoophorectomy will commence as detailed below.
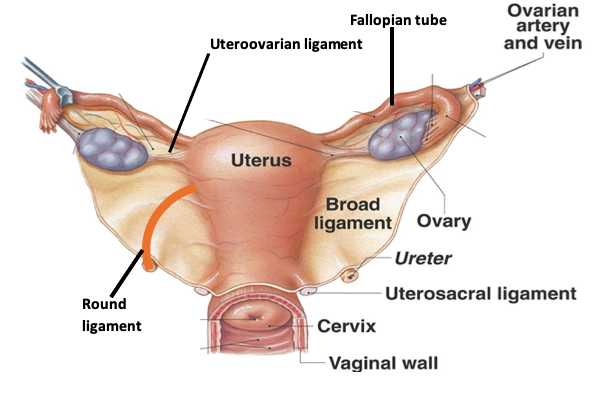
Female reproductive system graphic
Hysterectomy and bilateral salpingoophorectomy
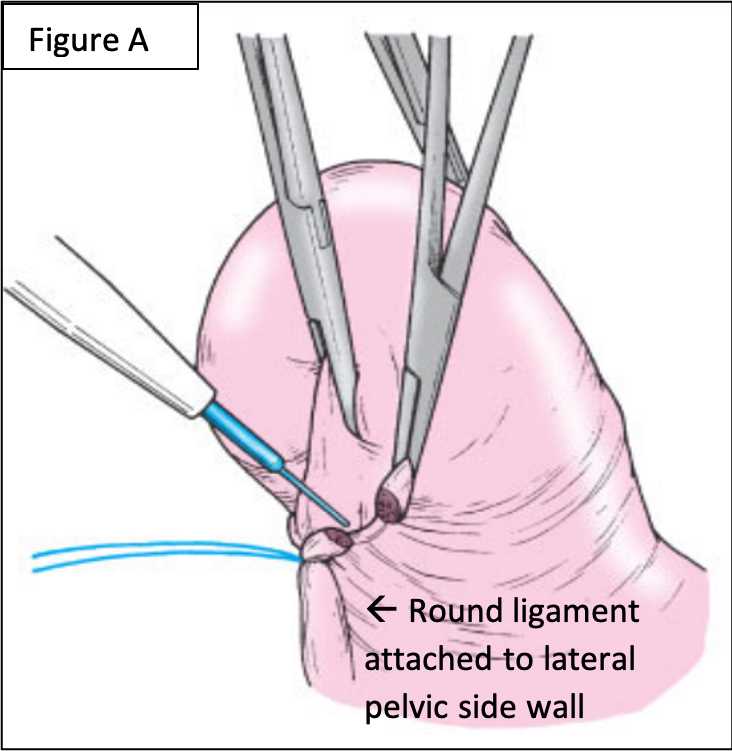
Identify right round ligament and suture ligate laterally (see Figure A).
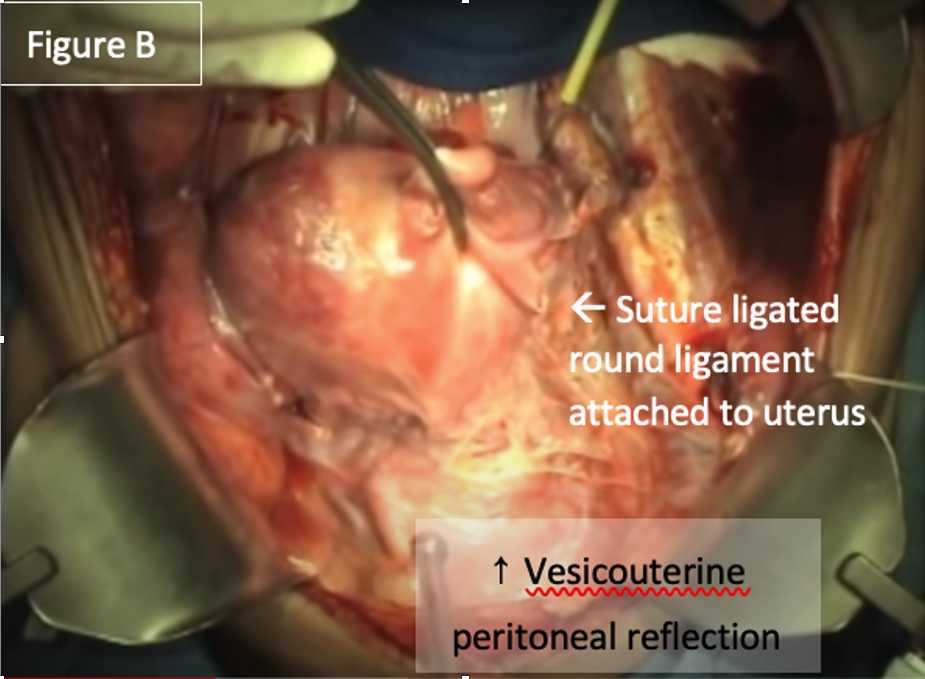
Divide right round ligament and continue dividing broad ligament cephalad towards the vesicouterine peritoneal reflection (Figure B).
Similarly identify, ligate and divide left round ligament and incise broad ligament cephalad towards the cervix to meet the right side.
Using two fingers push bladder cephalad in order to separate it from the uterus and cervix. Prior cesarean deliveries can make this difficult.
Identify, clamp and cut the right and left ovarian arteries and veins (aka the infundibulopelvic ligaments).
Divide the broad ligament laterally--keeping the ovaries and Fallopian tubes medially with the uterus.
Further mobilize bladder off cervix and proximal vagina.
Clamp and cut the uterine artery and vein and surrounding parametrium bilaterally.
Clamp and cut the uterosacral ligaments.
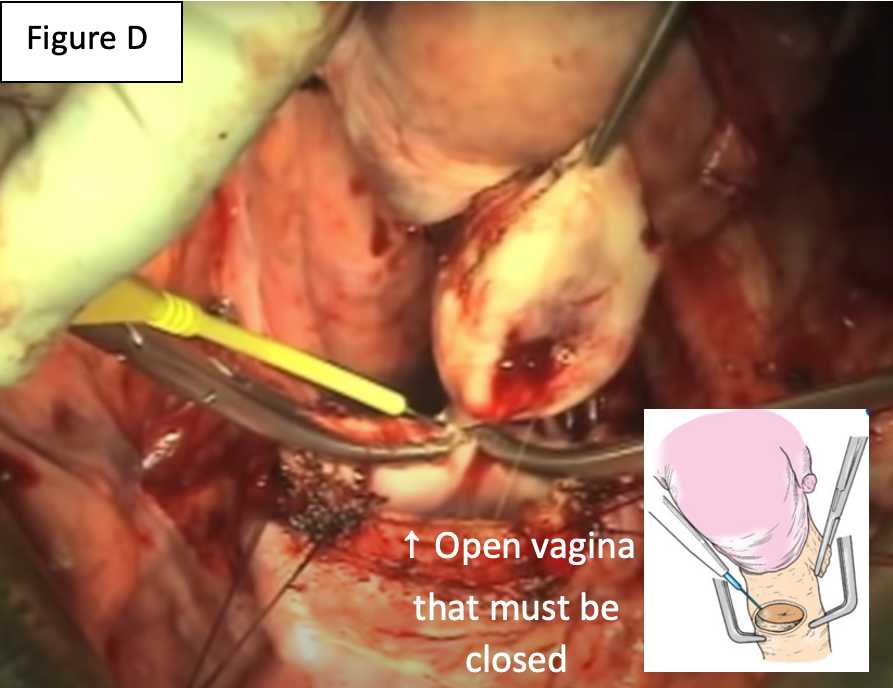
Palpate the bottom of the cervix between the bladder and rectum using the thumb and forefinger (See Figure C).

Place clamp below the cervix and cut above the clamp through the vagina. This should be underneath the cervix in order to ensure the entire cervix remains with the uterus. This often requires heavy scissors or a scalpel (see Figure D).
Place cervix, uterus, Fallopian tubes and ovaries on ice.
Close vagina with interrupted figure of eight stitches (0 vicryl).
Bilateral salpingoophorectomy
Clamp and cut the ovarian artery and vein.
Clamp and cut the uteroovarian ligament.
Clamp and cut the Fallopian tube at the level of the uterus.
Divide the broad ligament to excise the ovary and Fallopian tube and place on ice.
Additional specimens
Blood
a. 3 lavender top tubes (i.e. EDTA, for plasma and PBMCs)
b. 1 red top tube (for serum)
Adipose tissue
Time points collected
-
Time of blood draw
-
Cross clamp
-
Infusion of perfusion solution
-
Organ out
Miscellaneous
Take pictures of front and back of preservation solution used in order to obtain lot number and expiration date.

