Fast Agarose Gel Electrophoresis-Chem 384/584

Addgene The Nonprofit Plasmid Repository, Ken Christensen

Published: 2022-01-22 DOI: 10.17504/protocols.io.b36iqrce

Abstract

This protocol is for agarose gel electrophoresis. To see the full abstract and additional resources, visit the Addgene protocol page.

Steps

Pouring a Standard 1% Agarose Gel

1.

Measure .6g of agarose.

Note
Pro-Tip Agarose gels are commonly used in concentrations of 0.7%-2% depending on the size of bands needed to be separated -see FAQ section of this protocol. Simply adjust the mass of agarose in a given volume to make gels of other agarose concentrations (e.g., 2g of agarose in 100mL of TAE will make a 2% gel).

2.

Mix agarose powder with 60mL 1xTAE in a microwavable flask. See TAE Recipe.

Note
Pro-Tip TBE can be used instead of TAE, labs usually use one or the other, but there is very little difference between the two.

Note
Note, make sure to use the same buffer as the one in the gel box (do not mix different buffers and do not use water).

3.

Microwave for 0h 1m 0s to 0h 3m 0s until the agarose is completely dissolved (but do not overboil the solution, as some of the buffer will evaporate and thus alter the final percentage of agarose in the gel. Many people prefer to microwave in pulses, swirling the flask occasionally as the solution heats up.)

Safety information
CAUTION: HOT! Be careful stirring, eruptive boiling can occur.

Note
Pro-Tip It is a good idea to microwave for 0h 0m 30s-0h 0m 45s, stop and swirl, and then continue towards a boil. Keep an eye on it the solution has a tendancy to boil over. Placing saran wrap over the top of the flask can help with this, but is not necessary if you pay close attention.

4.

Let agarose solution cool down to about 50°C (about when you can comfortably keep your hand on the flask), about 0h 5m 0s.

5.

Add Midori Green (25,000x) to a final concentration of 1x (about 2µL -3µL of lab stock solution per 60mL gel). EtBr binds to the DNA and allows you to visualize the DNA under ultraviolet (UV) light.

6.

Pour the agarose into a gel tray with the well comb in place.

Note
Pro-Tip Pour slowly to avoid bubbles which will disrupt the gel. Any bubbles can be pushed away from the well comb or towards the sides/edges of the gel with a pipette tip.

7.

Place newly poured gel at 4°C for 0h 10m 0s-0h 15m 0s OR let sit at room temperature for 0h 20m 0s-0h 30m 0s, until it has completely solidified.

Note
Pro-Tip If you are in a hurry, the gel will set more quickly if you place the gel tray at 4°C earlier so that it is already cold when the gel is poured into it.

Loading Samples and Running an Agarose Gel

8.

Add loading buffer (e.g., to6x Purple Loading Dye from NEB) to each of your DNA samples.

loading a gel
loading a gel

Note
Note: Loading buffer serves two purposes: 1) it provides a visible dye that helps with gel loading and allows you to gauge how far the DNA has migrated; 2) it contains a high percentage of glycerol that increases the density of your DNA sample causing it to settle to the bottom of the gel well, instead of diffusing in the buffer.Note: Some samples will already contain loading buffers and running dyes (e.g., some PCR master mixes, some DNA ladders), so you do not need to add loading dye to these samples.

9.

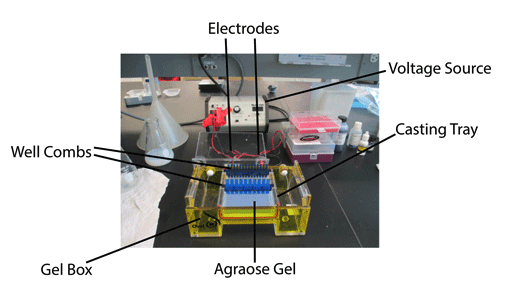
Once solidified, place the agarose gel into the gel box (electrophoresis unit).

10.

Fill the gel box with 0.25xTAE (or TBE) until the gel is covered.

11.

Carefully load a molecular weight ladder into one lane of the gel.

Note
Note, when loading the sample in the well, maintain positive pressure on the sample to prevent bubbles or buffer from entering the tip. Place the very top of the tip of the pipette into the buffer just above the well. Very slowly and steadily, push the sample out and watch as the sample fills the well. After all of the sample is unloaded, push the pipettor to the second stop and carefully raise the pipette straight out of the buffer.

12.

Carefully load your samples into the additional wells of the gel.

gel loaded with samples
13.

Run the gel at 250-300 V until the dye line is approximately 75-80% of the way down the gel. A typical run time is about 0h 15m 0s-0h 25m 0s, depending on the gel concentration and voltage.

Note
Note: Black is negative, red is positive. The DNA is negatively charged and will run towards the positive electrode. Always Run to Red.

14.

Turn OFF power, disconnect the electrodes from the power source, and then carefully remove the gel from the gel box.

15.

Using any device that has UV light, visualize your DNA fragments. The fragments of DNA are usually referred to as ‘bands’ due to their appearance on the gel.

Safety information
CAUTION: When using UV light, protect your skin by wearing safety goggles or a face shield, gloves and a lab coat.

Note
Pro-Tip If you will be purifying the DNA for later use, use long-wavelength UV and expose for as little time as possible to minimize damage to the DNA.

推荐阅读

Nature Protocols
Protocols IO
Current Protocols
扫码咨询