Electrochemical analysis of laser-inscribed graphene electrodes using cyclic voltammetry (ferri/ferrocyanide redox couple)
Geisianny AM Moreira, Eric S McLamore, Yifan Tang, Lisseth Casso Hartmann, David Bahamon Pinzon, Diana Vanegas
Disclaimer
The authors acknowledge the National Institute on Alcohol Abuse and Alcoholism of the National Institutes of Health under Award Number U01AA029328, the National Institute of Food and Agriculture (2018-67016-27578) and the National Science Foundation (CBET no. 1805512). The content is solely the responsibility of the authors and does not necessarily represent the official views of the National Institutes of Health, National Institute of Food and Agriculture, or National Science Foundation.
Abstract
This protocol describes use of the cyclic voltammetry (CV) method for electrochemical analysis of laser-inscribed graphene (LIG) electrodes. The protocol requires approximately 1 hour (excluding electrode fabrication).
Before start
Always wear proper PPE during experiment (gloves, eyewear, lab coat, proper clothing)
Steps
Preparation
Prepare LIG electrodes
- Use protocol for LIG fabrication to prepare a batch of electrodes (link here).
- For quality control process to prepare large batches of LIG electrodes, contact the corresponding author (emclamo@clemson.edu).
Note
Wear eyewear protection, gloves, and a lab coat during all experiments.
Expected results from step 1:
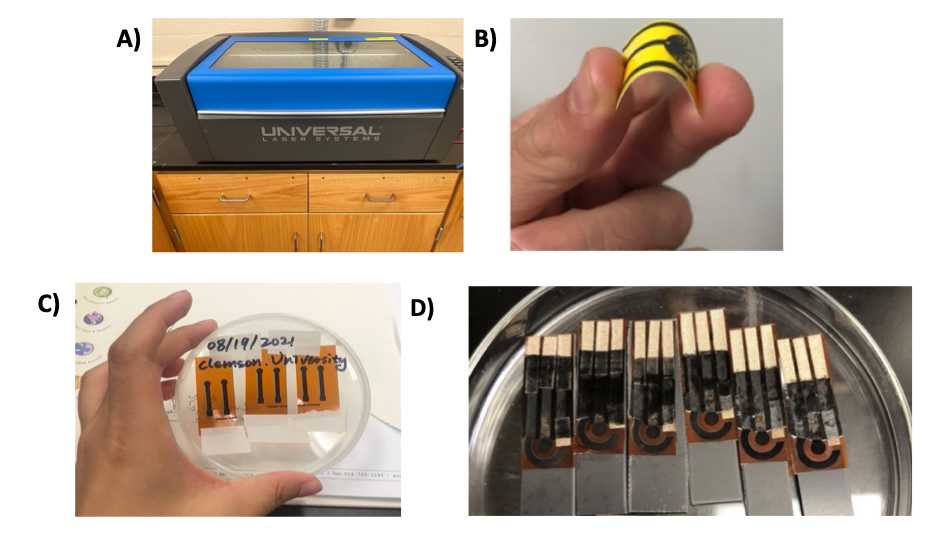
- Fig 1 shows photographs of the instrument and the expected results from a batch fabrication of six replicate electrodes based on the LIG fabrication protocol here

Figure 1. LIG fabrication protocol used to produce a batch of electrodes. A) Universal laser system used in the fabrication of LIG electrodes. B) Flexible LIG electrode. C) Representative batch of six replicate LIG electrodes. D) Representative batch of six replicate LIG biochips.
Prepare solution
-
Gather a sealed glass storage bottle or Falcon tube with at least 50 mL of capacity and label as 2.5 mM ferri/ferrocyanide + 100mM KCl. The masses below are for preparation of a 50mL solution.
-
In a separate weigh boat/paper, prepare the following: 1-Weigh 52.8 mg potassium ferricyanide (2.5 mM K4[Fe(CN)]6) on a scale.
2-Weigh 41.2 mg potassium ferrocyanide (2.5 mM K₃[Fe(CN)]₆) on a scale. 3-Weigh 373 mg potassium chloride (KCl) on a scale. -
Add the three powders to the labeled glass bottle
-
Fill glass storage bottle to 50mL with DI water (or nano-pure water)containing 10mL
- Place clean magnetic stir bar in bottle and place on a stir plate
- Stir for 5 minutes at 1,500 rpm
- After mixing, inspect the bottle to ensure dissolution
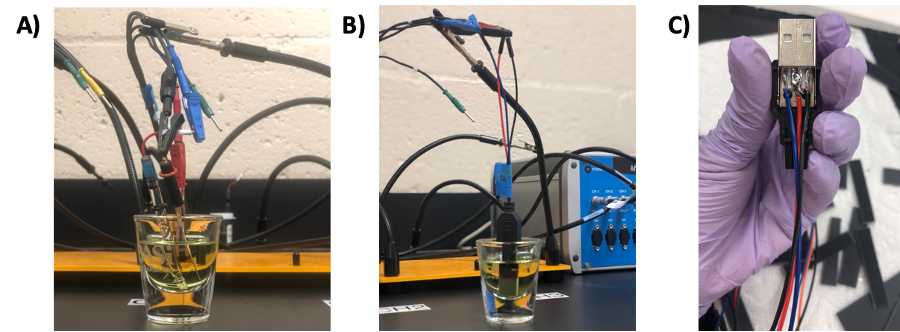
- Transfer 20 mL of the solution to the electrochemical cell (20 mL cell shown in Fig 2 )
- Prior to analysis, inspect the solution to ensure the color is appropriate. The solution should be yellow in color (not clear). If preferred, a cell phone app may be used to detect the color of the electrolyte. For example, Color Name AR is a helpful tool for color analysis that is available for both iPhone and Android systems (https://apps.apple.com/us/app/color-name-ar/id906955675).
Electrochemical testing
Connect electrodes
Assemble electrochemical cell (Benchtop Palmsens4 system):
Single electrode system
- Connect the single LIG electrode with the potentiostat via the bonding pads using alligator clips
- Ensure the electrodes are not touching, and the distance between the auxiliary and working electrodes is consistent.
- Fig 2A shows the correct assembly of the electrochemical cell for a single LIG "dip-style" electrode, where a Ag/AgCl reference electrode and Pt wire are used as reference and counter electrode, respectively
Three electrode (chip) system
- Connect the USB adapter to the chip directly, and position the LIG chip in the electrochemical cell using the QuadHands magnetic workbench ( Fig 2B ).
- For connecting the chip system, a female USB type A connector is used as described in the LIG fabrication protocol (see Fig 2C ).

Assemble electrochemical cell (ABE STAT portable system):
- The ABE-STAT contains indicators for connections of working (W), counter (C) and reference (R) electrodes ( Fig 3A ).
- Connect the electrodes accordingly, as described previously. Fig 3B shows an example of an experimental setup using a three-electrode chip.
- The electrodes are positioned in the electrochemical cell using the QuadHands magnetic workbench.
- A single electrode, or chip system may be developed for ABE-STAT, as shown in Fig 2.

Conduct scan (PalmSens4 benchtop system)
- Turn on Palmsens hardware and the computer.
- Open the PalmSens software (MultiTrace4 software).
- Users may operate 3 channels simultaneously or individually ( Fig 4C )Select Cyclic Voltammetry as the Technique ( Fig 4D ). After selecting the mode, set up all parameters. For example, see settings below (see MultiTrace manual for details; link here)
Expected results from PalmSens4 benchtop potentiostat
- Fig 4 shows the channels connections to the PalmSens, mode selection panel, and operation panel.
- When the experiment finishes, click export to excel icon to export data.
- When exporting data, make sure all channels' data are exported.
Data analysis
Analyze CV data
- CV data are commonly analyzed to produce the following outcomes. References are provided for details of calculations.
- Electroactive surface area 8
- Charge, if a pseudo-capacitor or capacitor 9
Expected results
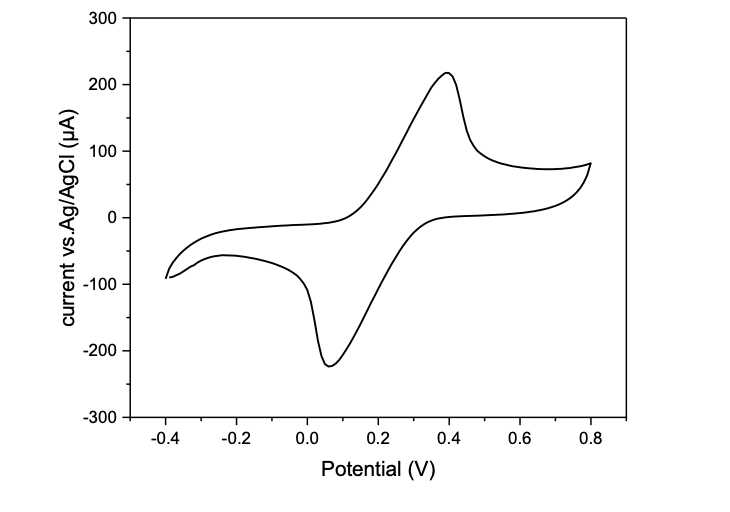
- Fig 8 shows a representative cyclic voltammogram for a single LIG electrode.

Figure 6. Representative cyclic voltammogram for a single LIG electrode.
Clean up
Clean workspace (Timing: 5 min)
- Ensure chemicals are stored or discarded correctly, and turn off Palmsens and the computer.
- If using external reference and auxiliary electrodes, clean them up with DI water and store them in the appropriate place. Reference electrodes should be stored with a 3M KCl solution.
- Wipe the working desk with 75 % alcohol.
- Store electrodes when not in use.
Data Management
File naming : For files from CV analysis, the following naming system was utilized:
DATA_CV1.1
File storage : Store all methods in the Desktop folder with the operator's name clearly identified in the folder name.
Backup files : At least once per year, ensure that the folder is backed up on the lab's external hard drive.

