Brain slicing
rabdelha
Abstract
This protocol details brain slicing.
Attachments
Steps
Embedding the brain:
Perform a gross coronal cut using the 1 mm matrix at a site either anterior or posterior of the region of interest, ~2mm distal from the region of interest.
Dry the flat part of the brain repeatedly on a kimwipe.
Place in the plastic square mold, with the now flat portion of the brain lying face-down, and press against the mold to eliminate any bubbles.
Dry the flat part of the brain repeatedly on a kimwipe.
Place in the plastic square mold, with the now flat portion of the brain lying face-down, and press against the mold to eliminate any bubbles.
Using the plastic dropper, put the agarose/azide solution around the brain until completely submerged.
Once submerged, place on ice or place in the fridge until completely solid.
Once solid, pop out of the molds and dry off.
Take a sharp razor and slice the excess agar off to make a small cube.
On the circular stage, paint a generous layer of superglue generously in the middle.
Place the brain in the pool of superglue, face down, and swirl around to eliminate any bubbles and make full contact.
Let dry.
Mounting the Stage
Lock the rectangular stage pool in the place by moving the clamp straight up from its left-pointing position.
Screw the razor blade into the clamp.
Load the blade in first and then screw it tightly in.
Use the screw to attach the blade holder into the vibratome.
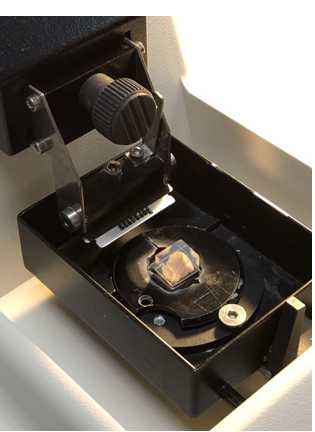
Screw the circular stage on and orient it such that the cube of agarose is parallel to the razor blade.
Submerge everything in PBS (no azide) to cover the brain cube.
The knob to the top left increases the speed of slicing. The vibration frequency should be between 8 and 10.
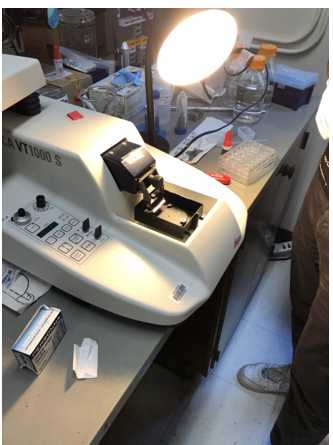
-/+ control the thickness (z) direction of slices.
∑ is the cumulative microns since the start of the slicing.
Single – one slice
Continuous – continuous slicing
Slicing
Orient the stage using the upper switch such that the razor blade’s path just barely grazes the top of the agarose cube.
Definitely aim start cutting >1mm anterior/posterior of your region of interest (depending on the direction your slices are starting from), and aim to finish >1 mm beyond your region of interest.
Use the button containing an up arrow and a down arrow to set the upper and lower limits of the razor path.
The first press of the button sets the upper limit (above the agarose) and the second press of the button sets the lower limit (below the agarose).
Using the individual arrow keys, set the thickness of the slice (in microns) and hit start.
Pause can be used, provided a slice is not in progress.
To change the slice thickness, hit stop, then change the thickness, then hit start.
Cleanup
Hit stop.
Manually change the stage height and push the razor back.
Unscrew the blade holder and remove the blade (these are disposable).
Remove the circular stage, and use a razor blade to shave off residual agarose and glue.
Unlock the rectangular stage and pour out the PBS into the catch container.
If not slicing another brain, place the circular stage, screw for the blade holder, and the blade holder in the rectangular pool and fill with MQ H2O.
While the parts are soaking, spray a paper towel with ethanol and wipe down the vibratome.
Pour out the water from the bath.
Cleanup all mess, turn off the vibratome, and replace the cover.
Sectioning Notes
Going to section the following brain regions
CB – no activation
SN- activation; focus on the SnPr
STR – activation
Frontal cortex- no activation
Want to have 5-8 brains per experimental group.
Antibodies to use:
- TH
- IBA1
- A-synuclein (Ps129)
- DAPI
Making gross cut of brain:
Plan is to cut at the anterior portion of the hypothalamus; one half will contain the striatum and frontal cortex and the other will contain the SN and the cerebellum.
From there we will do coronal slicing at 50 µm slices.
Mount both halves of the brain and then slice them together.
Splitting brain:
A good approach would be to split the brain into 4 wells.
First slice in well 1, second slice in well 2, etc.
This way each well will represent a whole brain (more or less) with the space between slices being 200uM.
For an experiment you pick one well and do the staining on all the slices of that one well; that way you can go back and re-stain the other 3 wells at a future time point if necessarily.
Next you need to mount the slices and they must be mounted in the correct order that they appear in the brain.
of slices to look at per region:
Its really important to be consistent with the regions you are looking at and taking data from; need to be consistent among images and between brains.
The best thing to do is find 2-4areas for each region of the brain that are in sequential order and take several pictures of each area.
For taking pictures, you should first take a low mag pic of the area to look for any obvious global changes between different experimental groups.
Next, take a high mag pic and then quantify microglial activation, a-syn aggregation, etc. from that high mag picture.
Data collection:
Take a zoomed in picture of the 2-4 different slices per brain area and you can then combine data from those 2—4 different sections.
Can combine data from several sections that are several bregma points apart.
