α-Synuclein Protein Preparation (Large scale)
Michael X. Henderon, Lindsay Meyerdirk
Abstract
This protocol details α-synuclein protein preparation in a large scale.
Attachments
Steps
Day 1: Transformation
Thaw E. coli (BL21(DE3)RIL) and DNA On ice.
Mix 1µL-2µL DNA (α-synuclein in pRK172 plasmid) with 20µL competent cells and incubate 5-10 minutes On ice.
Heat-shock cells for 0h 0m 45s in 42°C water and place back On ice for 0h 2m 0s.
Add 200µL LB (no antibiotics) and shake at 37°C for 1h 0m 0s. Warm Amp100 plate @ 37°C.
Plate 200µL on agar bacteria plate with ampicillin and spread with glass cell spreader.
Incubate the plate inverted at 37°C 1h 0m 0s.
Day 1: Transformation- Buffer Preparation
Make 4L of TB and 400mL of 10x phosphate buffer.
Add 450mL of TB + 50mL 10x phosphate buffer into 8x 2 L flasks. Add 200mL to a 1L flask. Cover the tops with foil, and autoclave on the liquid setting.
Make sure to let flasks cool for at least 1h 0m 0s after they have been autoclaved, or if you’re in a hurry, cool in the cold room for at least 0h 30m 0s.
Day 2: Making Starter Culture
Add 5µL of 100mg/mL Ampicillin to 5mL SOC/TB/LB in a round bottom tube.
Pick a colony with a 20µL pipet tip and drop the tip into the starter culture. Swirl around to ensure the colony detaches from the pipet tip.
Shake at 200rpm,0h 0m 0s at 37°C 0h 30m 0s.
Add 0.5mL of the starter culture to each500 mL flask of TB/phosphate buffer and allow to shake in the incubator @ 200rpm,0h 0m 0s for 0h 30m 0s without antibiotic.
After 0h 30m 0s, add 0.5mL ampicillin (100mg/mL) and grow 24h 0m 0s at 37°C. Expression will occur without induction 0h 30m 0s. With such a small starter culture, the goal is for at least 24h 0m 0s growth.
Day 3: Protein Isolation
Transfer bacteria cultures to large centrifuge bottles (provided by glassware), make sure the bottles are balanced and centrifuge for 0h 20m 0s at 5000x g,0h 0m 0s and 4°C (rotor F10S).
Pour out the supernatant after each spin and keep adding more of the culture to the bottles (balanced) until all culture is centrifuged.
If so, scrape out the pellets and transfer to a labeled 50mLconical and store at -20°C. Otherwise:
Pour off the supernatant and carefully scrape out pellet with a spatula into a 500 ml beaker. Re-suspend pellets using cold High Salt Buffer. Use 15mL of the buffer to re-suspend the pellet, pour off into the beaker, and then use 5mL of the buffer to rinse out the bottle. About 50mL of High Salt Buffer per liter of cell culture will be used (total after the next step).
Break down pellets in beaker with manual agitation. Pour roughly 40mL at a time into a 40 mL dounce homogenizer.
Homogenize with pestle A (>15 times), making sure that you have broken up all clumps. Repeat with remaining bacteria until all is homogenized and poured into a small plastic beaker.
Rinse the homogenizer with the high salt buffer 2-3 times to get the remaining clumps and cell lysate out of the homogenizer
Heat electric deep fryer on high heat until water is rapidly boiling, being sure to fill the pot up so that a tube rack can be submerged.
Sonicate On ice (in a plastic or metal beaker) at 35% for 0h 1m 20s total ON time (5 sec ON, 25 sec OFF, 8 min total time).
You will have to attach the tip to the sonicator, make sure the tip is 1-2cm from the bottom of the cup taking care not to hit/break the tip.
Transfer the homogenate to 50 mL conical tubes (~3/4 full).
Boil the homogenate for 0h 20m 0s.
Make5L gel filtration dialysis buffer and put in the cold room.
After boiling, bury homogenate tubes in ice and place them in the cold room for at least 0h 30m 0s or until they feel cold.
Centrifuge cold lysate for 0h 20m 0s at 11800x g,0h 0m 0s and 4°C (rotor F21).
OPTIONAL: Take an aliquot of the supernatant. Add 5X sample buffer and run on a 15% gel.
Cut dialysis tubing (12-14 kD tubing) and wash in the dialysis buffer to soften the tubing.
Pipet supernatant into the tubing, close with clamps (**leave an air bubble to promote floatation of the tubing), put the tubing in dialysis buffer and leave in cold room on the stirrer (stir slowly!).
If you are doing gel filtration tomorrow, prep the ÄKTA (S.1) , and start the program for the gel filtration column for loading tomorrow. (S.2) Lines should be set up as:
- A1-Size Exclusion Buffer
- A2-Sterile Distilled Water
- B1-20% Ethanol
- B2-20% Ethanol
Clean-up: wash all beakers and tubes with bleach and water. Wash dounce homogenizer with DI water and methanol.
Day 5: Gel filtration
Filter the protein through a 0.22 µm filter (1000mL filter unit due to large surface area).
Concentrate down to 2-4 mL/L of cell culture in Amicon Ultra Centrifugal Filter devices at 4000x g,0h 0m 0s, 4°C, 0h 15m 0s/cycle or Sartorius Vivaspin 15R at 5000x g,0h 0m 0s.
Once all the protein is concentrated down to 10mL total, filter through a 0.45 µm syringe filter into a 50mL conical tube.
Load the protein sample onto the column using the A1 inlet, MAX of . 13mL.
When the sample is getting close to the bottom of the red stopper, pause the ÄKTA and add 1-2mL of Gel Filtration Buffer into the 50mL conical so you can pull up more protein, continue the program and stop it when it is close to the bottom again.
Once the sample is all loaded, continue to the “next breakpoint” to start the elution
a. Manual->Execute Manual Instructions
i. Other-> Next Breakpoint->Insert->Execute
**1.** Select **continue**
a. The program should start up again
Make 4L of Buffer A, and place in the cold room.
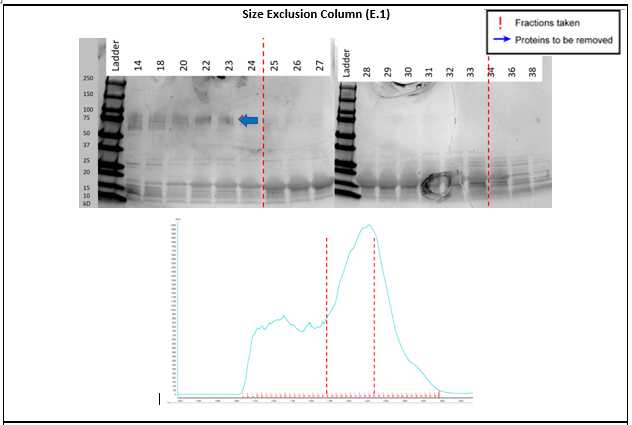
Take 10µL of the even fractions, mix with 2.5µL 5x sample buffer run on 15% acrylamide gels (will need 2 to see all the fractions of interest).
Coomassie stain (or Instant Blue) the gels and collect the clean fractions from the gel filtration, primarily avoiding the high molecular weight protein that has a similar charge to α-synuclein (E.1).
Cut dialysis tubing (12-14 kD tubing) and wash in Buffer A to soften the tubing.
Pipette the fractions into the tubing and dialyze the fractions against Buffer A 0h 15m 0s.
After the elution, the program will continue automatically to wash the column, and store it in 20% Ethanol.
Day 6: MonoQ Column (1)
Connect the MonoQ column between ports 2A (top) and 2B (bottom) (S.1)
Switch inputs A1, A2 and B1 and start the MonoQ program (S.3). Lines should be set up as:
- A1-Buffer A
- A2-Sterile Distilled Water
- B1-Buffer B
- B2-20% Ethanol
Load the sample using A1. While the sample is loading collect the flow through to test so you know you are not losing protein that is not sticking to the column.
When the sample is getting close to the bottom of the red stopper, pause the ÄKTA and add 3mL of buffer A into the 50 mL conical so you can pull up more protein, continue the program and stop it when it is close to the bottom again.
Once the sample is loaded, continue to the “next breakpoint” to start the wash and anion exchange.
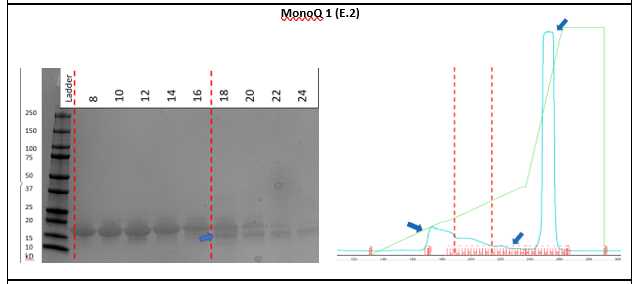
Take 10µL of the even fractions as they come off, mix with 2.5µL 5x sample buffer run on two 15% acrylamide gels. If you will run a second day of MonoQ, you can pick the fractions to keep based on the UV trace alone.
Coomassie stain the gels and collect the clean fractions from the gel filtration, primarily avoiding proteins that are not α-synuclein (E.2). This will primarily manifest right before and right after the main peak.
Dialyze the fractions against Buffer A (or DPBS if this is pure enough) 0h 15m 0s.
Day 6: MonoQ Column (2)
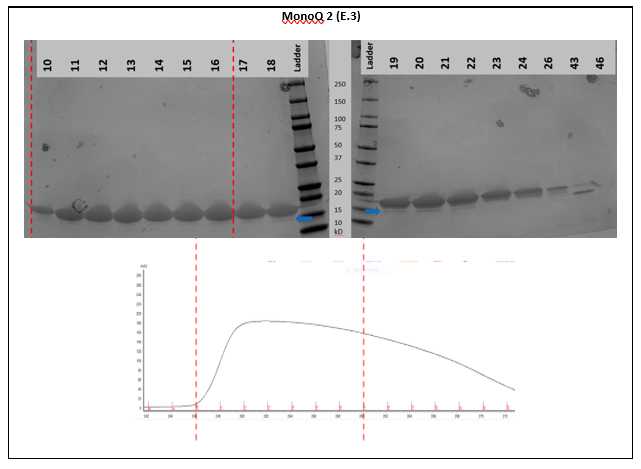
Repeat steps 44-48 above, and keep fractions based on coomassie and UV trace and dialyze into DPBS, 7.0 0h 20m 0s.
The primary goal is to get rid of truncated α-synuclein. This shows up as a hump on the later end of the a-synuclein peak and can be visualized as truncated forms on the Coomassie-stained gel (E.3).
Day 7: Concentrate and Aliquot
Concentrate down to approximately 2mL of α-synuclein or molar equivalent in Amicon Ultra Centrifugal Filter devices at 4000x g,0h 0m 0s, 4°C, 0h 10m 0s/cycle.
Measure the protein concentration by a BCA assay with sample dilutions of 1:10, 1:20, 1:40, 1:60, 1:80, 1:160, 1:320, 1:640.
Load only 10µL of each sample into the BSA assay.
Take the average of the concentration estimations for which values are in the linear range of the BSA curve.
Filter the protein through a 0.22 µm filter. Since this is a small volume, the small blue syringe filters are ideal to minimize sample loss.
Aliquot the protein into tubes with the protein type, concentration, date and initials.
Freeze at -80°C (monomer) or proceed with aggregation (fibrils).
For aggregation, aliquot the protein out into low binding tubes.
Place tubes in a heated shaker at 1000rpm,0h 0m 0s at 37°C for 168h 0m 0s.
After 7 days, aliquot the fibrils into small aliquots to avoid freeze thaw cycles, and store in the mid/back of the -80°C freezer.
For quality control the sedimentation assay and thioflavin T assay should be done after they fibrillization (see additional protocols).
Examples of Mouse Alpha Synuclein Prep done on 12.2020
Supplemental Information: S.1 Preparing the AKTA Chromatography System - How to pull the lines through with the new buffer
Place all the lines in their corresponding bottles.
Using the 25 mL Syringe pull 20 mL through the lines at the correct pump location, do this slowly, if you go too quick you can introduce air into the system die to back pressure. To do this:
Go to Manual->Execute Manual Instructions->Flow path a. Then you can choose Inlet A or Inlet B
9.     Then choose your flow path ( **A1**  or  **A2**  for A,  **B1**  or  **B2**  for B)


1.     Select **Insert**


        ii.     Hit the **Execute**  button
You can now pull the liquid out of the corresponding pumps you just turned on. Do this by:
- Turning the knob on the outside of the pump and inserting the syringe tip into the opening and slowly pulling back
- Make sure to tighten the pump knobs once you have finished pulling the lines
Supplemental Information: S.1 Preparing the AKTA Chromatography System - How to change out the Columns - Detaching the Q column
Manual->Execute Manual Instructions- Insert the following instructions
i. Pumps
- System Flow: 2 ml/min
- Pressure control: System Pressure a. INSERT
ii. Flow Path
- Inlet B-> B2-> INSERT
- Column Position-> select 1-> INSERT
iii. Alarms
- Alarm system pressure-> Enabled
- High alarm = 0.5 mPA a. INSERT
Confirm on the screen that the B2 path is highlighted and flowing over the column to waste at 2 mL/min or slower.
Unscrew the bottom connector from the Q column (20% Ethanol should be dripping out) and cap the bottom.
Loosen the connector at the top of the column, and hit continue on the program.
Fill the top of the Q column with 20% Ethanol and screw the top cap on.
Supplemental Information: S.1 Preparing the AKTA Chromatography System - How to change out the Columns - Attaching the Superdex Column (top to bottom)
If you just detached the Q column you can continue on, if the system was off perform the steps above (1.i->1.iii), their should be 20% Ethanol dripping from the top connecting line.
Insert the column into the holders on the ÄKTA carefully (bottom should be in line with the bottom of the pumps).
Remove the cap from the top of the column, 20% Ethanol should start dripping out of the tubing from the column. Remove the tubing from 1A location on the ÄKTA (this is the location the 20% Ethanol should be dripping from), connect the column to the port on the machine in a drip to drip fashion.
Detach the buffer reservoir from the bottom of the superdex column, you should see It dripping out now.
Attach the tubing to the line coming from the 1B position on the ÄKTA.
Buffer should be flowing and the column should be ready to go.
Supplemental Information: S.1 Preparing the AKTA Chromatography System - How to change out the Columns - Detaching the Superdex Column (bottom to top)
Manual-> Execute Manual Instructions -Insert the following instructions
i. Pumps
-
System Flow: 2 ml/min
-
Pressure control: System Pressure
- INSERT
ii. Flow Path
1. Inlet B-> B2-> INSERT
2. Column Position-> select 1 -> INSERT
iii. Alarms
-
Alarm system pressure-> Enabled
-
High alarm = 0.5 mPA
a. INSERT
When you see 20% Ethanol dripping from system, you can detach the bottom connector and attach the buffer reservoir, allow the ÄKTA to flow over the column until the reservoir is filled so that the stopper is pass the line.
Detach the top of the column, 20% Ethanol should be dripping out, quickly cap the top of the tubing off.
Carefully remove the column and store it in the bottom of the fridge.
Supplemental Information: S.1 Preparing the AKTA Chromatography System - How to change out the Columns - Attaching the MonoQ column (top to bottom)
If you just detached the Superdex column you can continue on, if the system was off perform the steps above (1.i->1.iii), there should be 20% Ethanol dripping from the top connecting line.
Attach the tubing to the port 1A on the machine, when 20% Ethanol starts dripping from the tubing, remove the cap from the Q trap.
Fill the top of the Qtrap with Ethanol so that it is bubbled up at the top and attach the connector to the column.
Remove the cap from the bottom of the column and continue to run the program on the computer.
Connect the line from port 1B to the column.
The column should now have the 20% Ethanol running over it.
S.2 Size Exclusion Chromatography Program- No Wash Size Exclusion Asyn Purification Day2
Method settings:
- column selected (HiLoad 26/600 Superdex 200pg)
- pressure limit should be 0.5 MPa,
- column volume (CV): 318.557ml
- column position: 1
- flow rate 2.6 ml/min
- control the flow to avoid overpressure should be selected.
System prep:
- A2 is selected
- Injection valve with capillary loop is selected to be washed
- Fraction collector is selected to be washed
Column Wash:
- 2.6 ml/min (select use the same flow rate as in methods setting)
- A2 is shown 0% B1
- Wash is 1 CV sent to waste (~
320mL)
Equilibration:
- 2.6 ml/min (select use the same flow rate as in methods setting)
- A1 is shown, 0% B
- Equilibrate until 2 CV (~
640mL)
Miscellaneous
Message is selected “load sample”.
Pause after message is selected.
Load sample
Select “reset UV monitor”.
Select “use the same flow rate as in method setting”.
A1 should be shown with 0% B.
Equilibrate until “the total volume is 0.2 CV” is selected.
Elution
Select “use the same flow rate as in method settings”.
A1 should be shown.
Isocratic elution should be selected Volume: 1.5 CV 0% B.
Fractionate: select using fraction collector
- Fraction type: Peak Fractionation
- Peak Frac settings: 50.00 mAu for both start and end level
- Peak fractionation volume
5mL
Select start fractionation after 0.2 CV.
Water wash
Select use the same flow rate as in method settings.
A2 should be shown as the inlet A.
Wash until: select “the total volume is 2 CV.
Fractionate: select “in waste”.
Ethanol equilibration B2.
S.3 Henderson Lab MonoQ Qtrap HP Protocol
This method will include the following steps
System prep
- Wash the system with
20mLvolume per position at10mLper min from inlet A1. Make sure the column position “by-pass” is selected.
Equilibration
- 5 ml/min wash of column with A1 inlet for 5CV
Miscellaneous
- pauses the system with the message “load sample”
Load sample
- 2 ml/min through A1 for 20 CV
Column wash
- 2 ml/min wash of column with A1 inlet for 5 CV
Elution-15%
- 2 ml/min linear gradient elution from 100% A1 inlet to 15% B1 inlet over 10 CV.
- Collecting
2mLfractions after UV goes to 25.00mAu
Elution-30%
- 2 ml/min linear gradient elution from 15% B1 to 30% B1 over 10 CV.
- Collecting fixed
2mLfractions starting at 15%
Elution-100%
- 2 ml/min linear gradient from 30% B1 to 100% B1 over 5 CV.
- Collecting
2mLfixed fractions
Column wash
- 5 ml/min 100% B1 inlet over 5 CV
Equilibration of Column
- 5 ml/min A1 inlet for 5 CV
Ethanol wash
- 5 ml/min 100% B2 inlet line for 5CV
