RootBot Image Scoring Instructions
Mia Ruppel, Sven K. Nelson, Grace Sidberry, Madison Mitchell, Daniel Kick, Shawn K. Thomas, Katherine E. Guill, Melvin J. Oliver, Jacob D. Washburn
Abstract
Instruction for scoring RootBot images.
Steps
Installation and setup
Download and install Image J (https://imagej.net/software/fiji/downloads)
Download the Smart Root Explorer plugin by following the website instructions
a) Website - https://smartroot.github.io/SmartRoot-Installation/
b) Instructions - on the SR Explorer website click SmartRoot quickstart under downloads
Process root images
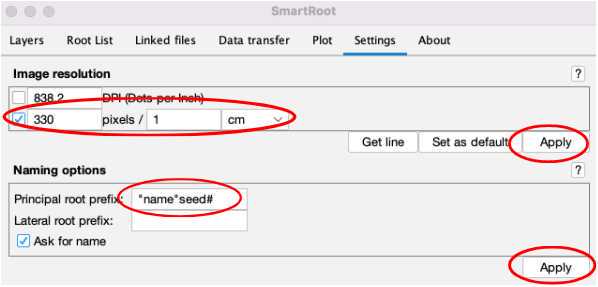
Once the SR Explorer plugin is active go to the SmartRoot window and click on the Settings tab.
Under Image resolution select pixels/cm and change the values to 330 pixels/1cm -> click apply.
Move to the SmartRoot Explorer window and select your .jpg image (a “wrong image type…” warning will appear -> click okay).
Copy the name of your file.
Save the image as a .tiff into the "Already Scored" folder. This is simply a folder used to keep the scored images organized. If it does not exist, create it.
The image will appear in greyscale. You can increase display brightness on your computer for greater contrast between roots and soil.
Click on the magnifying glass icon in the (Fiji is Just) ImageJ window. With the magnifying glass selected, click the center of the image once to zoom in.
While holding down the shift key, left-click on the top of the root and trace downwards using clicks to fix the tracing line to the root (Double-click to end the tracing).
Repeat steps 8 and 9 for all roots.
An input window will appear with “name”seed#0 change the 0 to the corresponding seed number in the plate (1-10) -> then click okay.
#尊敬的用户,由于网络监管政策的限制,部分内容暂时无法在本网站直接浏览。我们已经为您准备了相关原始数据和链接,感谢您的理解与支持。
https://lh6.googleusercontent.com/YrCkPPn23K8sXQn9zCmsvYYoDbaWJpI3Q48CsXVqQMbeAtmkOR-YMPEZf_EfDW3kE29ouhVLvPlxGlm1wdNeUasx48VFtQ0zys5UX0yy9a-rcidTppNJ-Ox-nTWOGKv5vYU3ezeeo1jLxgBUpEIGJPLMw8Gv49N0GsI4fZlaTZ6Ef1sz_y1oyhs_mRALnA
Save the output data
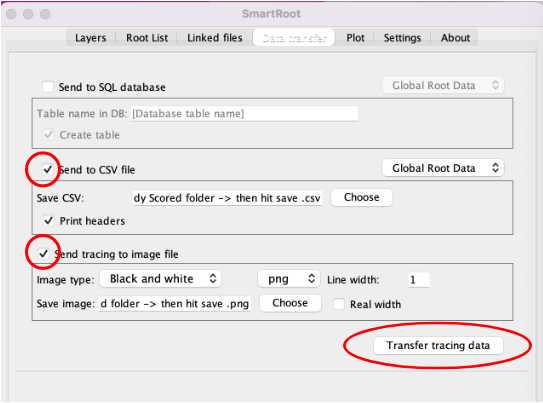
To save the data go to the SmartRoot Window and click on the Data transfer tab.
Unselect Send to SQL database.
Select Send to CSV. Click "Choose" and paste the name of your original image as the name. Then save to the "Already Scored" folder as a comma-separated value -> then hit save.
Select Send tracing to image file. Under image type select Black and White and png. Click "Choose" and paste the name of your original image as the name. Then save to the "Already Scored" folder -> then click save.
Go to your "Already Scored" folder and open the .csv file, check to make sure that all 10 roots are properly named and scoring data is present.
Close the .tif image and ensure that it appears in the Already Scored Folder. There should be four files in the folder: .csv, .png, .rsml, and .tif.


