Microindentation of Fresh Soft Biological Tissue: A Rapid Tissue Sectioning and Mounting Protocol
Clíona M. McCarthy, Kevin L. McKevitt, Sinéad A. Connolly, Isabel Andersson, Fiona C. Leahy, Michael A. Moloney, Eamon G. Kavanagh, Eoghan M. Cunnane, Kieran D. McGourty, Michael T. Walsh, John J.E. Mulvihill
Disclaimer
The video below is a supplement with extra context and tips, as part of the protocols.io Spotlight series, featuring conversations with protocol authors.
#尊敬的用户,由于网络监管政策的限制,部分内容暂时无法在本网站直接浏览。我们已经为您准备了相关原始数据和链接,感谢您的理解与支持。
<iframe title="YouTube video player" src="https://www.youtube.com/embed/Ni3IYXACjCg?si=zpiVHmIRkGmsgSOw" height="315" width="560"></iframe>
Abstract
Microindentation of fresh biological tissues is necessary for the creation of 3D biomimetic models that accurately represent the native extracellular matrix microenvironment. However, tissue must first be precisely sectioned into slices. Challenges exist in the preparation of fresh tissue slices, as they can tear easily and must be processed rapidly in order to mitigate tissue degradation. In this study, we propose an optimised mounting condition for microindentation and demonstrate that embedding tissue in a mixture of 2.5% agarose and 1.5% gelatin is the most favourable method of tissue slice mounting for microindentation. This protocol allows for rapid processing of fresh biological tissue and is applicable to a variety of tissue types.
Before start
Equipment set up and reagent preparation is performed prior to receiving tissue into the laboratory.
Steps
Preparation of Phosphate Buffered Saline (PBS)
Phosphate Buffered Saline (PBS) is used as a buffer for tissue sectioning and as a solvent for the agarose and gelatin embedding solution. Prepare 1L of a 10X concentration of PBS stock solution by dissolving 80g NaCl, 2g KCl, 17.8g Na2HPO4 and 2.7gKH2PO4 into 1L of deionised water. The pH of the PBS is set at 7.4 with a pH meter by adding 5M NaOH to the solution. For the experiment, prepare 1L of 1X PBS by adding 900mL of deionised water to 100mL 10X PBS. The solution is kept at0-4°Con melting ice. 1X PBS is also used as a solvent for the embedding solution.
Preparation of 2.5% (wt/vol) agarose and 1.5% (wt/vol) gelatin for tissue embedding
Weigh 1g agarose and 0.6g gelatin in a 50mL glass bottle and add 40mL of 1X PBS to make a 2.5% concentration of agarose and 1.5% gelatin solution. According to the Compresstome® VF-210-0Z (Precisionary Instruments, Massachusetts USA)manual 2.5% agarose is the optimum concentration for cutting soft biological tissues such as cardiac, kidney and intestinal tissue. Heat the bottle in the microwave until the agarose and gelatin have dissolved, stopping the microwave
every 10-15 seconds to mix the solution with a spatula spoon to ensure the agarose and gelatin are fully dissolved. Once ready, place the bottle in a water bath between34-37°C until required for embedding. Do not leave the embedding solution for longer than0h 30m 0s , as the embedding solution will solidify after this time point.
Equipment Setup: Vibratome
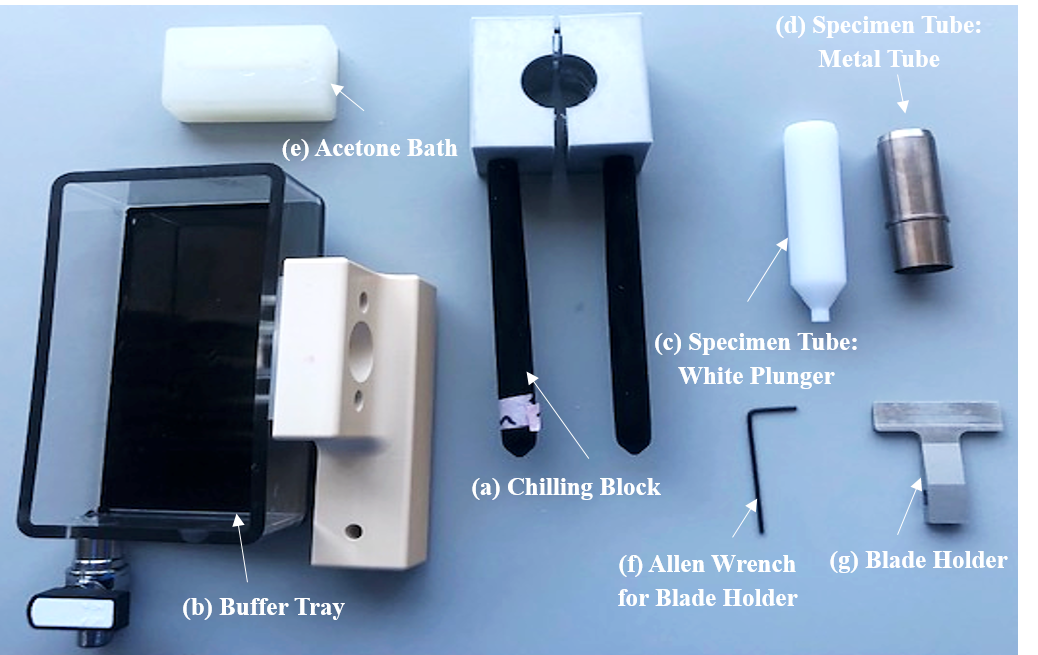
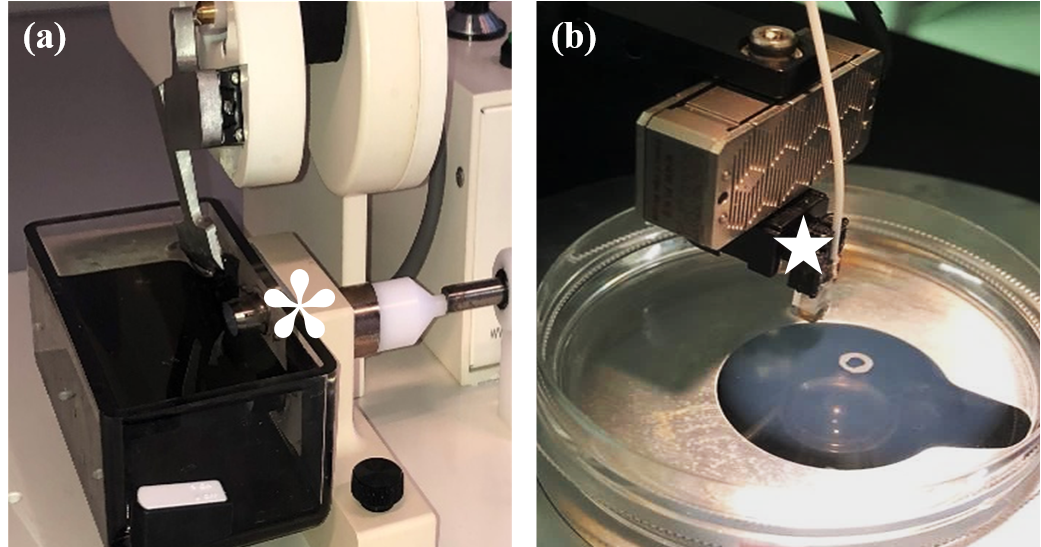
The Compresstome® VF-210-0Z (Precisionary Instruments, Massachusetts USA) is set up according to the manufacturing guidelines and is shown in Figure 2a. Briefly, this vibratome uses controllable oscillations and speed to slice through tissue without the use of freezing or fixation of the fresh biological tissue. The oscillation frequency and speed settings are 14 Hz and 14 mm/s respectively. The razor blade is prepared with scissors as per the user manual and attached to the blade holder using superglue (Figure 1g). The chilled 1X PBS is added to the buffer tray just before sectioning commences (Figure 1b).


Preparation of fresh human tissue for sectioning with vibratome
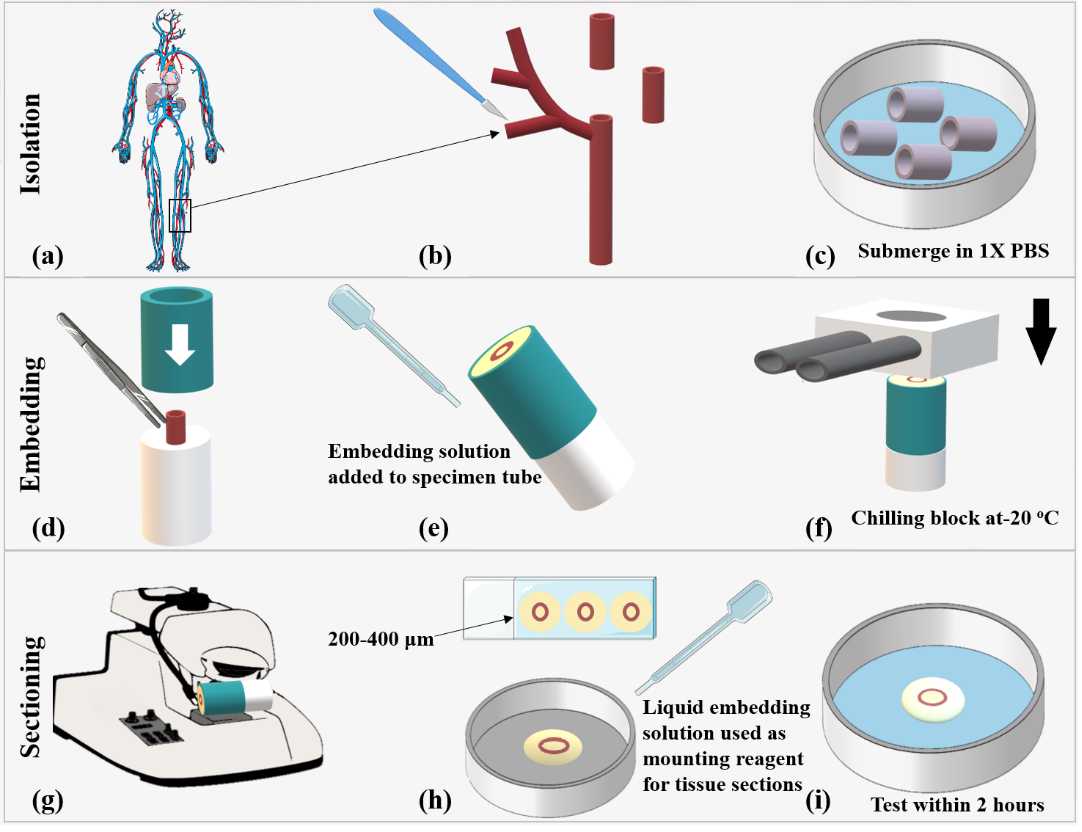
Human vascular tissue is sourced from the Department of Surgery, University Hospital Limerick, Limerick, Ireland. The study is approved by the institutional review board and conducted in accordance with ethical guidelines (Research Ethics Committee #118/18 and 100/15 (vascular tissue) and #031/2021 (colorectal tissue). Patient recruitment is carried out with informed consent. Segments of tissue specimens for testing are selected by the operating surgeon and placed into 0-4°C 1X PBS immediately post-surgical excision from the patient as this mitigates tissue degradation (4, 5). The tissue specimens are transferred into 1X PBS and transported to the University of Limerick in an insulated cooler box, to maintain a temperature of approximately0-4°C The tissue is cut with the scalpel into 10 mm2 sections and placed onto a petri dish. The tissue sections are submerged in 1X PBS and placed on melting ice between 0-4°Cto cool for approximately 0h 5m 0s, Figure 3a-c.
Preparation of porcine human tissue for sectioning with vibratome
Porcine tissue is sourced from a local abattoir (Ballylanders, Co. Limerick, Ireland), which allows for testing within 2-3 hours of sacrifice (animals are already sacrificed for consumption and not for the purpose of this experiment). It is then placed into 0-4°C 1X PBS immediately post harvest, as this promotes tissue viability (4,5). From the tissue samples, using the scalpel, an approximately 40 mm length of tissue is cut and excess fat is removed from this section. Next, the section is cut longitudinally and washed multiple times in 1X PBS to remove mucous, bile and excrement etc. The tissue is cut into 10 mm2sections and placed onto a petri dish. The tissue sections are submerged in 1X PBS and placed on melting ice between 0-4°C to cool for approximately 0h 5m 0s.
Procedure for the fresh biological tissue sectioning with the Compresstome® VF-210-0Z
Turn on the water bath and ensure that the temperature is between 34-37°C
Prepare 1X PBS for use as a solvent for the embedding solution and as a buffer during tissue sectioning.
Place the chilling block (Figure 1a) into the -20°C freezer for approximately 0h 30m 0s prior to use.
Prepare embedding solution in 40mLof 1X PBS and heat in a microwave to dissolve. When the agarose and gelatin have dissolved, place in the preheated water bath between 34-37°C to cool the solution down before embedding.
Cut the tissue into 10 mm2sections using the scalpel and place onto a petri dish. Cover the tissue in 1X PBS and place it On ice for approximately 0h 10m 0s (Figure 3c). Once the tissue is ready to be embedded, gently dab the tissue with blotting paper to remove excess moisture (6).
Apply a small amount of superglue to create a thin layer on the surface of the white plunger of the specimen tube (Figure 1c) and carefully adhere one side of the tissue to the base of the white plunger using a tweezers, Figure 3d. Take care to orientate the tissue so that the area of interest is sectioned appropriately. This secures the tissue in place before the embedding solution is added to the tissue. Allow to dry for approximately 0h 1m 0s.
Once dry, slide the metal tube of the specimen tube (Figure 1d) over the white plunger so that it is level with the height of the tissue, Figure 3d. The tissue is now ready for embedding with the embedding solution.
Hold the combined specimen tube containing the tissue sample at a 45o angle and slowly pipette in the agarose and gelatin embedding solution until the specimen tube is full. Ensure that no air bubbles are in the solution, Figure 3e.
Remove the chilling block from the -20°C freezer and slide over the specimen tube for approximately 0h 1m 0s until a hard gel is formed, Figure 3f.
Place the specimen into the holder on the buffer tray and secure in place using the thumbscrew. Add the chilled 1X PBS to the buffer tray, Figure 3g.
Attach the blade holder to the vibrating head unit by sliding it onto the axial bar and secure in place with an Allen wrench.
As per the manual guidelines of the Compresstome®, begin with bigger cutting thicknesses e.g. 1 mm and work in reducing increments to the required thickness in approximately three cuts.
To mount the tissue for microindentation, gently remove sections from the buffer tray with a paintbrush and place on a drop of liquid agarose and gelatin in a petri dish. The tissue is kept hydrated in 1X PBS at approximately 0-4°C before indentation to mitigate tissue degradation, Figure 3h,i. The fresh tissue sections should undergo microindentation within 2 hours of receiving the tissue into the laboratory. Disassemble as per the manual and clean glue off the embedding block and blade mount with acetone.

Microindentation
Microindentation is performed using the Chiaro Nanoindenter (Optics 11, the Netherlands), Figure 2b. Before each experiment, the probe is calibrated by submerging the cantilever in 1X PBS and using a glass calibration dish. The study is performed at room temperature to prevent measurement error due to temperature drift. The Petri dishes containing the tissue sample are mounted onto an Olympus IX73 microscope, thus allowing visualisation of the tissue during the experiment under the 10X brightfield setting. 1X PBS is added, via pipetting, to keep the tissue samples hydrated during the indenting process. Areas of damaged or torn tissue are avoided and indenting is performed away from the edge of the tissue. The probes used to perform this microindentation are within the 0.25 N/m cantilever stiffness and 50 µm radius spherical tip range of probes. An automated 3x3 matrix scan, spaced in 100 μm increments to avoid overlapping, is performed (3) . Ultimately, this process allows for the suitable microindentation of fresh soft biological tissue.

