MR imaging of the mouse hindlimb musculature (T2 weighted and T2 map)
Emily Waters
Abstract
This is a procedure for imaging the musculature in the hind limb of a mouse. The protocol was designed for imaging of edema in mouse models of muscular damage, but could be adapted to other applications.
Steps
Prepare mouse for imaging
Place mouse in an induction chamber and induce anesthesia using 3% isoflurane and 1 L/min O2. The induction chamber should be placed on a warm water circulating blanket set at 37ºC to maintain the mouse's body temperature. Use a charcoal canister to collect waste gases from the induction chamber.
When mouse is fully anesthetized, record weight and apply eye lubricant. Ear punch if needed for identification - metal ear tags cannot go in an MRI scanner. (If mouse has a metal ear tag, it can be removed with suture wire cutting scissors similar to these.)
Return mouse to induction chamber for approximately 1 minute to ensure depth of anesthesia, then transport to MRI scanner. We use a Bruker 9.4T Biospec with 30 cm bore and 12 cm gradient insert, running Paravision 6.0.1.
Set up mouse in scanner
Place mouse prone in bed suitable for mouse body coil. Ensure snout is firmly situated in anesthetic nosecone. Isoflurane should be flowing at approximately 2% initially and adjusted during the scan as needed to maintain respiratory rate. We use a Bruker bed compatible with the Bruker 38mm rat head/mouse body volume coil.
Position warm water circulating blanket around mouse. We prefer to place it under the mouse as this is more effective in maintaining body temperature.
Check depth of anesthesia (e.g. using toe pinch) prior to positioning mouse limbs for imaging. If the mouse is too lightly anesthetized it may move and disrupt positioning.
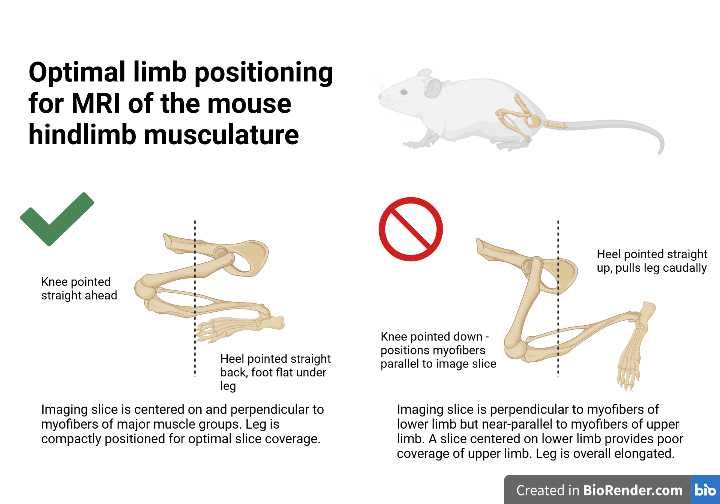
Tuck the mouse's legs underneath its body, folded so that the knees and toes are pointing forward and the heels are pointing backward. Although it is difficult to see, the knees should be aligned with each other. Ensure that the feet are as flat as possible under the mouse. Avoid having heels pointed upwards. This positioning is necessary to reduce susceptibility artifacts and acquire bilateral cross-sectional images of the thigh and calf muscles.
The mouse should be positioned so mid-thigh aligns with the center of the coil.

Position respiratory pad on the animal's back at the level of the abdomen, to the left or right of the spine. Secure with masking tape. Take care not to make the tape too tight or it will disrupt the leg positioning. Check monitoring system for a clean respiratory signal.
Tune and match coil
The Bruker 38mm rat head/mouse body volume coil must be tuned and matched outside the bore of the magnet. Adjust tuning and matching using the wobble interface in the Paravision software, then position the bed and coil in the center of the magnet.
Acquire localizer images
Run auto calibrations and acquire the first image using the Tripilot sequence. In our experience, additional shimming beyond the linear auto-shim is not required (and higher-order shimming can be a challenge due to the heterogeneous tissue composition of the mouse hindquarters).
Acquire an axial scout image using the RARE sequence with the following parameters: TR/TE = 4000 / 32 ms, Rare Factor 8, field of view 35 x 35 mm, matrix 128 x 128, 19 slices, 1 mm slice thickness, and 1 average. Readout direction should be oriented left to right. Fat saturation should be on. Position the slice stack to cover the legs as best as possible based on the tripilot image.
Acquire a coronal scout image using the RARE sequence with the following parameters: TR/TE = 4000 / 32 ms, Rare Factor 8, field of view 35 x 35 mm, matrix 128 x 128, 19 slices, 1 mm slice thickness, and 1 average. Readout direction should be oriented head to foot. Fat saturation should be on. Position the slice package to cover the thighs based on the axial scout. It may be necessary to rotate the slices to be coronal to the mouse, if the mouse is slightly rotated in the bed. Check slice position in the head-foot direction using the tripilot scan as a reference.
Acquire high-quality images
Acquire a T2 weighted anatomical image using the RARE sequence with the following parameters: TR/TE = 4000 / 32 ms, Rare Factor 8, field of view 35 x 35 mm, matrix 256 x 256, 19 slices, 1 mm slice thickness, and 2 averages. Readout direction should be oriented left to right. Fat saturation should be on. Position the slice package so that the top is aligned with the knee joint (upper bound of the tibia). The slice package should cover the full extent of the calf muscles.
Acquire a T2 map using the T2map_MSME sequence with the following parameters: TR = 4000 ms, 25 echoes with initial TE = 9 ms and 9 ms echo spacing, field of view 35 x 35 mm, matrix 256 x 256, 5 slices, 1 mm slice thickness, and 1 average. Readout direction should be oriented left to right. Fat saturation should be OFF. Copy the slice orientation from the previous scan.
Be careful to copy the slice orientation, NOT the slice geometry.
If the previous slice package was well positioned, the center 5 slices should provide good coverage of the major muscle groups. However, it is wise to confirm before proceeding. Shift the slice package by 1 mm in the slice direction if needed for better coverage.
Recover mouse
Remove mouse from scanner and transport to recovery area. Mouse should be returned to cage, which should be placed on a warm water circulating heating blanket until it recovers. Once the mouse is sternal and ambulatory it can be returned to standard housing.

