Human CD34+ cell isolation from fetal liver, and fetal thymus preparation
Mohsen Khosravi-Maharlooei, Markus Holzl, Austin Chen, Megan Sykes, Nichole Danzl, Chris Parks, Elizabeth Waffarn
Abstract
This protocol details the steps for isolating human CD34+ cells from human fetal liver. It also explains how to prepare human fetal thymus for immediate use or for freezing, as well as the process for thawing. The CD34+ cells are hematopoietic progenitor cells and can be used to generate humanized mice through reconstitution of immune cells via IV injection after bone marrow ablation. These cells can also be used for mixed lymphocyte reaction experiments.
Before start
All procedures have to be performed under sterile conditions!
Steps
Digestion method for CD34+ isolation
Start water bath and heat to 37°C if not already on.
Spray the fetal organ test tube before putting it into the hood
Fill beaker w/ 70% EtOH. Soak your tools in this.
Lay out tools onto petri dish to evaporate the EtOH off of them (EtOH will fix the tissue). Open fetal liver test tube and pour out all contents into a big petri dish.
Separate the white connective tissue from the rest of the tissue and place onto the lid of the original petri dish. Also remove the gall bladder if present (and discard this).
a. The white connective tissue should still be saved b/c it can be used for HLA typing (will place this by itself into a cryovial. Do not add media. Then place into -20°C freezer into box that says “fetal tissue for HLA typing”)
b. Remove the gall bladder and as much connective tissue as possible (and the ligaments), as they cannot be digested and would clot the pipette
Prepare pre-diluted Liberase solution in BM media or AIM-V media) in a 15mL Falcon tube:
a. Add 5mL AIM-V medium (or BM media) to a 50mL falcon tube – will say BM media for rest of protocol, but seems like you can use AIM-V + 10% human serum too.
**i.** Add `125µL` DNAse **only** if using AIM-V.
b. Add 200µLLiberase (0.5mg ) – found in -20°C freezer in 200µL aliquots.
Transfer the non-connective tissue liver pieces from the petri dish to a 50mL Falcon tube with 5mL Liberase + BM media.
a. Take big pieces and cut it into smaller pieces above the 50mL Falcon tube so that the cut pieces drop directly back into the Falcon tube.
**i.** This way, you do not need to take more time later to transfer the smaller pieces from the petri dish.
b. Can then use a pipette to transfer the remaining pieces and media from the petri dish back into the 50mL Falcon tube
i. Don’t add this directly to the Liberase. Put into a different falcon tube, centrifuge, aspirate supernatant, and then resuspend with Liberase (or solution already containing Liberase) to avoid diluting the Liberase.
   ♦ Centrifuge settings: 4 C | 1650 RPM | 3 minutes

        ◊◊ Discard supernatant by pipetting off the solution
Vortex this tube for 20 seconds.
Place in a rack and place in 37°C water bath. (The rack should already be in the bath)
a. Let it sit for 6 minutes.
b. Vortex for 20 seconds again and pipette up and down with 10mL pipette. Then place back in 37°C water bath for another 6 minutes.
 **i.**  Repeat this step a few times until you can pipette up and down easily with a `5mL` pipette


    (1). Must spray down with EtOH each time before placing it back into the hood. Return to `37°C` water bath each time.


    (2). usually completely digested within 10-15 minutes.

 **ii.**  The liver should now be disrupted to a single cell solution. The pipette should not clot anymore (except for ligaments, etc).
c. At some point, if not done already, also cut up the connective tissue that you reserved for HLA typing and place it into a yellow/blue top container (without media) while the tissue is digesting in the water bath.
Grab at least two 70 um filters and place 1 on top of 2 new 50mL Falcon tubes.
Once solution is easily pipettable through 5mL pipette and “feels” like a single cell suspension, top off Falcon tube with BM media.
Transfer 25mL of the solution to each new 50mL Falcon tube through the 70 um filter. (should have 2 Falcon tubes with filtered 25mL cells)
Centrifuge both of these 50mL Falcon tubes
a. Centrifuge settings: 4 C | 1650 RPM | 3 minutes
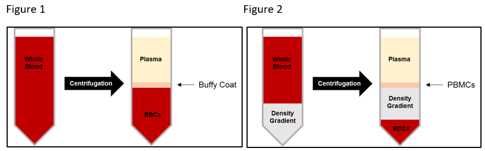
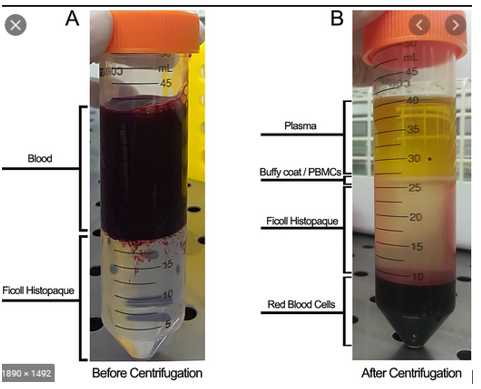
While centrifuging, prepare four 50mL Falcon tubes with 13mL Histopaque (use a 10mL pipette)
When centrifuge done, aspirate supernatant, then resuspend each pellet in 50mL BM media.
Add 25mLof cells + BM media to each tube with 13mLHistopaque (4 total) by slowly dripping the cells onto the top of the Histopaque. Can tilt the tube and support it on any structure for stabilization (e.g. Styrofoam holder for the 50mL falcon tubes, a 50mLfalcon tube holder, etc.)
a. Weigh the tubes in the centrifuge containers to make sure they are balanced. Add water into the container if it is not balanced.
b. Centrifuge all 4 tubes: if using histopaque: 25 °C | 0 prog | 2000 rpm | 25 minutes, accel: 1, brake: 0
c. Grab some lunch!
Collect the buffy coat into two 50mL Falcon tube (each 2 tubes goes into 1 tube) – then fill up the 50mL ube with BM media:
a. Use 10mLor 25mLpipette and suck up the “ring”/layer right above the Histopaque. Will inevitably suck up Histopaque as well, but try to suck up all of the layer right above it.
b. Collect all of the layer/Histopaque until you get close to the RBCs to make sure you have obtained all of the buffy coat (which contains PBMCs)
Centrifuge the tubes that you have just collected
a. 4 C | 1650 RPM | 4 minutes
b. Discard the supernatant by aspirating with pipette
c. Optional: RBC Lysis – Add 5ml ACK Lysis buffer, incubate 5min RT.
i. If RBC lysis, wash with BM media, then centrifuge and resuspend in MACS buffer (step 19)
Resuspend in 15mL MACS buffer.
Take and add to a 1.5 round bottom blank tube labeled “Pre” for flow cytometry 100µLand add to a 1.5 round bottom blank tube labeled “Pre” for flow cytometry
Count the cells: do serial dilution to 1:25 dilution factor
a. 40µL Trypan blue + 10µL cells (1:5 dilution factor). Then 10µLof this combination (1:5 dilution factor) into another 40µL Trypan blue = 1:25 dilution factor
MACS isolation:
Centrifuge cells 4 C | 1650 RPM | 3-4 minutes
a. While centrifuging, grab CD34+ microbeads + FcR blocker (MACS Miltenyi Biotec CD34 Microbread kit)
b. Calculate volumes needed for addition of FcR Block and Beads
-
1 volume FcR Block= _______ul (1x volume of beads)
-
1 volume CD34 microbeads= _______ul (10ul per 107 cells)
-
8 volumes Macs Buffer= _______ul (8x volume of beads)
-
Max volumes: 200 uL FcR blocker, 200 uL CD34 microbeads, 1.6 mL MACS buffer ♦ Example calculation: for 339.375E6 cells à 33.9E7 cells =
339µL. But since max =200µL, we used200µLCD34+ microbeads,200µLFcR blocker, and200µLMACS buffer. -
Usually we get around 500E6 cells. For this amount, we don’t use 500 uL of beads (it’s too much). Usually between 100 to 200 uL is enough. ♦
150µLCD34+ beads♦ `150µL`FcR blocker ♦ `1.2mL` MACs buffer
Resuspend cells with amount of MACS buffer first.
a.Then add FcR blocker (must add FcR blocker before microbeads!!)
b. Then add CD34 microbeads
c. Pipette up and down
Incubate for 30 minutes at 4°C
Wash cells by adding 5-10ml MACS buffer. Centrifuge cells 1650 RPM, 3-4 min , 4C. Aspirate and discard supernatant. ***** Important to stick to this centrifuge speed because at higher speeds beads that have NOT bound cells will also be spun down into pellet.
a. Prepare MACS set up while centrifuging:
b. LS filter placed into MACS set up “multi stand” with fin tips pointing toward you; place 15mL falcon tube underneath LS filter; place 70 uM filter on top of the LS filter
**i** .Label the falcon tube “CD34-“
c. a.Add 3mL MACS to the 70 uM filter + LS filter after you put it together to wet the filter
Resuspend the sample in 1mL MACS and add this to the MACS filter tube through the 70 uM filter
Once liquid has flowed through the filter, wash 3 times with 3mL MACS each
a. For the first wash, put the 3mL into the original 15mL tube that held the tissue. Pipette up and down and add to the LS filter
b. Can then toss the original tissue tube and the 70 uM filter on top of the LS filter
c. For the next 2 washes, add 3mL MACS straight to the LS filter
Remove the CD34- tube, and switch it with a tube labeled CD34+.
Remove the LS filter from the magnet, place it over the CD34+ tube, add 5 mL MACS buffer , take the plunger, and force out the CD34+ cells.
Add of CD34+ and CD34- to separate round bottom, blank tubes for flow cytometry later 100µL of CD34+ and 100µL CD34- to separate round bottom, blank tubes for flow cytometry later
Count the CD34- and CD34+ cells
a. For CD34-: use 1:125 dilution (12-13 mL)
b. For CD34+: use 1:25 dilution (5 mL)
Determine how many vials to freeze
a. For CD34+: freeze 2 million per vial. Use AIM-V + 10% HS in 10% DMSO
b. For CD34-: freeze ~50 million per vial. Use AIM-V + 10% HS in 10% DMSO
Stain the small aliquots taken before for purity check by flow cytometry:
a. hCD3 BV650
b. hCD19 APC
c. hCD45 PE-CF594
d. hCD34 PE
e. DAPI
f. Human serum as blocker
Alternative: CD34+ isolation by smashing the fetal liver
-
Put fetal liver in a petri dish and smash it gently with a sterile plunger of a 3 or 6ml syringe. Transfer cell suspension into
50mLconicals through a 40 um cell strainer -
Place cell suspension on
14mLof Histopaque 1.077 of a50mLtube. -
Centrifuge 600 g, 25 min, 25 C, acc 3, break 0
-
Collect buffy coats and filter through 40 um cell strainer. Fill up with MACS buffer
-
Count cells
-
Spin 6 min 400 g, 4 C,
-
Resuspend in MaCs buffer according to protocol
-
Perform MACS
Fetal thymus isolation and freezing
-
Cut thymus in
2 mm3 big pieces in a petri dish -
Transfer counted pieces (e.g. 10) into a cryotube. Remove medium
-
Fill up with
1mLof cryomedium -
Let the cells incubate for 5 minutes (DMSO has to diffuse into the tissue in order to mediate cryoprotection)
-
Alternatively, thymus can immediately be transplanted
Thymus thaw
-
Take vials and transfer them to a
37°Cwater bath. Let them sit there for 10 minutes -
Pour the thymic pieces into
15mLBM medium (warm) and let them sit for 10 minutes -
Before transfer to a new Falcon, vigorously pipette the thymic pieces up and down to remove excess of thymocytes. Transfer the cells to new
15mLBM -
Let the cells sit for 10 minutes. Before transfer into a new falcon, pipette vigorously up and down to remove excess of thymocytes. Transfer the cells to new
15mLBM -
The cells are now ready for transplantation
