Tissue collection
Oksana Polesskaya, Abraham Palmer, Gabriel J. J. Barrero
Abstract
This protocol describes how to dissect a rat to collect various tissue from an animal. Collected tissue is intended to be used for phenotypic characterization of various traits. Tissues also can be used for DNA extraction
Steps
Setting up
Setting up
Animals are fasted ~14h 0m 0s 16h 0m 0s (16h 0m 0s), water should be provided.
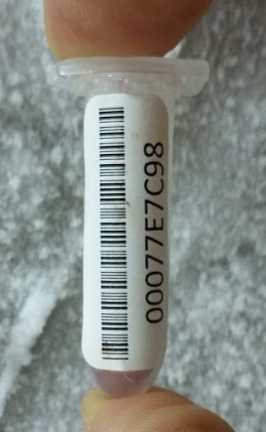
. Prepare labels for tissue collection tubes/vials. All nesessary files are in “Barcoding package” folder.
Take the rats which are going to be processed this day and scan their RFIDs to prepare the file for tissue collection.
Read the RFIDs into RFID worksheet (the yellow area) of the barcodes-text-ratGWAS.xlsx . (No inputting of a #-sign or ‘ necessary, the sheet is formatted as text and will automatically interpret everything as text). The program will enter five identical barcodes to the each row on the next sheet named “Barcodes for printing”. Five identical barcodes are printed in each row.
Print labels with barcode and RFID number using the Barcodes for printing worksheet and the Printing Cryo Babies.docx instructions. Print each sheet 6 times to get the 30 identical barcoded labels you need.
Label freezer boxes (2”, 3”, or 5” high) with the Center (MI, TN, NY), type of tissue, the box number, and the date (e.g.TN-Batch 08 Feb-17).
Prepare containers for tissue collection.
Prepare a bucket with dry ice with a glass beaker filled with isopenten for flash-freezing tissue.
Have a computer ready for data entry. Create a new file for each batch using a template RatSampleCollection_BatchNN_MI_DDMonYYYY_Template_v3, e.g. RatSampleCollection_Batch02_MI_04Jun2015.xlsx , for data entry. When collecting tissues from a rat, read the rat’s RFID again (keep cursor on the yellow cell B2 on the worksheet “Check numbers”). Then read the barcodes on the tubes to check whether they are readable and match (cursor position B3, B4...), the program gives a warning if the numbers don’t match.
Glucose Measurement
Glucose Measurement
Put a test strip in the glucose meter (man by Contour NEXT)
Test the meter using the control solution; make sure the reading is within the range (ranges listed on the bottom of the strip box).
Put a test strip in the glucose meter.
Restrain the rat. Cut off ~1mm of the tip of the rat’s tail. Gently milk/stroke the rat’s tail from the base near the butt to the tip of the tail. Discard the first drop of blood.
Place a drop of blood on the glucose strip. Record the reading.
Note: if glucose measurement is collected at a different time than sacrifice, create a new row in the RatSampleCollection...xlsx spreadsheet, record the data into columns A through H, and copy “NA” into every other cell of that row. RatSampleCollection...xlsx spreadsheet, record the data into columns A through H, and copy “NA” into every other cell of that row.
Weight
Take the weight in grams, at a 0.1 g precision.
Fecal pellet collection
Fecal pellet collection
Place animal securely on the researcher’s arm. Assess if there are pellets in the rectum by gently feeling the rectal canal (externally, gently pinch the anus between index finger and thumb and massage gently back 1-2cm from the anus). If pellets are present, they will feel like small solid masses (1cm in length).
The pellet is gently pushed towards the anus, and immediately placed in the sterile tube, by holding the tube in position immediate to the anus.
The pellets are snap frozen on dry ice and stored at-80°Cfor later processing. This procedure should be performed as rapidly as possible to ensure integrity of the microbiota.
If pellets are not present, repeat pellet extraction in a few minutes. If still no pellet, do not collect it and proceed to anesthesia.
Isoflurane Anesthesia
Isoflurane Anesthesia
Turn oxygen on to about 1L / minute.
Place rat in induction chamber that has oxygen and isoflurane lines attached to it.
Turn on the isoflurane at about 5%.
Wait a few minutes until the rat is lying down and eyes are slightly shut.
Take cover off container and pinch the toes to ensure surgical plane of anesthesia.If rat reacts, put it back in the chamber for a little bit longer.If no reaction, take the rat out.
Length
Length
tape the ruler to the table so it doesn’t move around.
Head to butt
-Measure in cm the length from tip of the nose to the end of the butt (0.1cm precision).
Head to tail
-Measure in cm the length from tip of the nose to the end of the tail. (0.1 cm precision)
Blood Collection via Cardiac Puncture (NY, TN)
Blood Collection via Cardiac Puncture
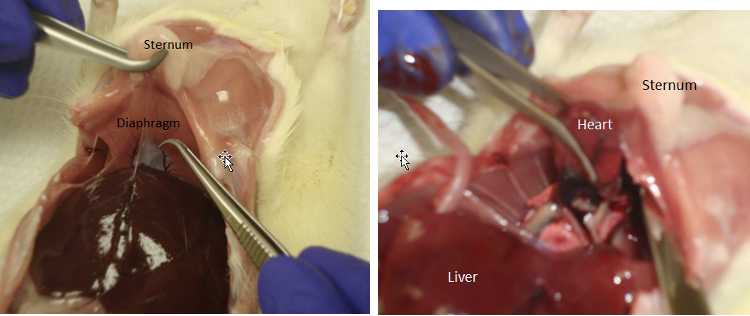
Cutting open
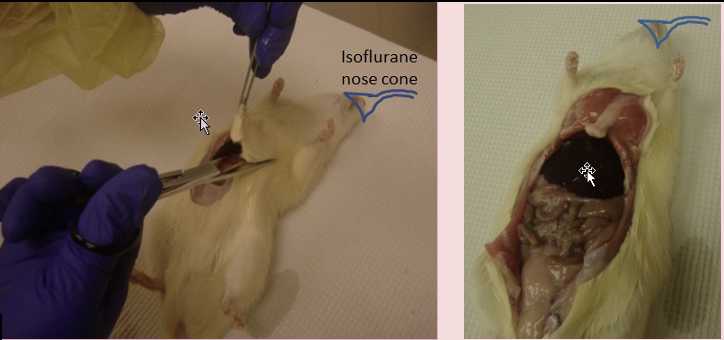
Place the rat on its back on the table.
Place the isoflurane nose cone on the rat
Spray fur with 70% (v/v) EtOH
Using a forceps, grab a section of skin right above the abdominal cavity, and pull itup towards you while making a “Y” incision in the rat. Remove extra skin to expose the peritoneal cavity
Blood Collection
Open up a new needle and 5mL syringe.
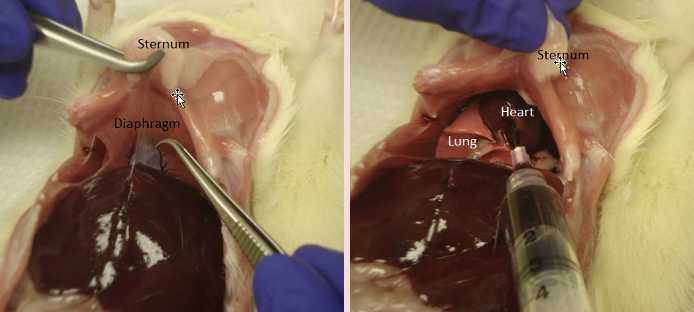
Holding sternum with forceps,cut through the diaphragm with scissors.
Insert the needle into the tip of the heart and draw up blood. Move the needle around to find a good position.
Inject blood into the serum separation tube.
Keep collecting until collect ~5mlCap the blood tube, invert 5 times, and place on ice until centrifugation.
Trunk Blood Collection (MI)
Trunk Blood Collection
Uncap a serum separation tube, put it on wet ice, and insert a funnel
Put rat into holder and into guillotine, decapitate animal over funnel
Hold animal over funnel, head side down. Collect all trunk blood coming out of the animal
Take out funnel and recap tube. Invert tube 5 times and put back on ice until tissue harvest is done. -
Brain
Brain
Cut off the head and hand over to the second person to perform a brain dissection. Record the time at the start of brain dissection.
If only one person is collecting the tissues and the brain, put the head on ice and dissect the brain after the liver tissue is frozen.
Open the skull and remove the whole brain. Submerge it in the bucket of isopenten coooled in the container with dry ice (-30°C). When tissue is completely frozen (0h 0m 30s), gently wrap it in aluminum foil and transfer into the ½ oz jar and keep on dry ice.
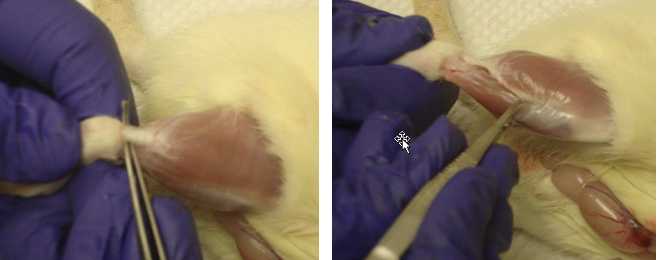
liver
Liver
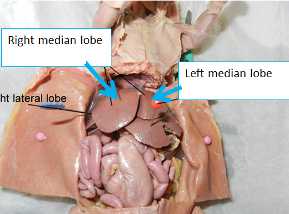
Grab the top left liver lobe (left median lobe) with the forceps.
Pull the lobe up and cut it out being careful not to cut the large vein/artery that runs towards the back.
Place a labeled ½ oz. jar on the scale and tare.
Place the liver lobe in the jar.Weigh (to 1mg), record the weight, cap the container and place it on dry ice.
Likewise, excise the right median liver lobe.
Place a labeled ½ oz. jar on the scale and tare; Place liver lobe into vial, weigh (to 1mg), record weight, and place jar on dry ice
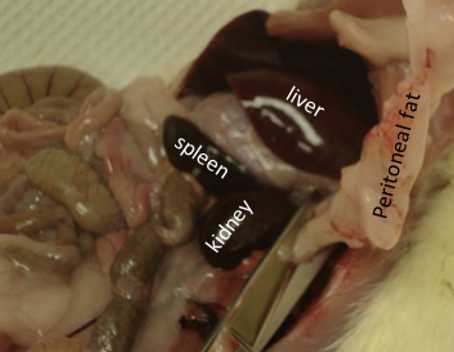
Retroperitoneal Fat
Retroperitoneal Fat
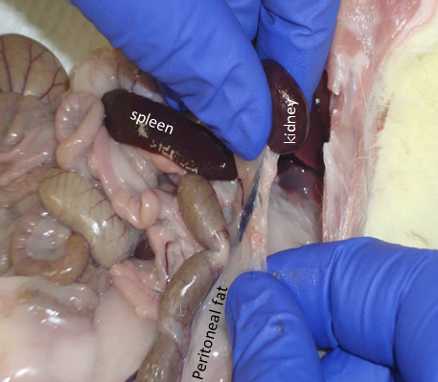
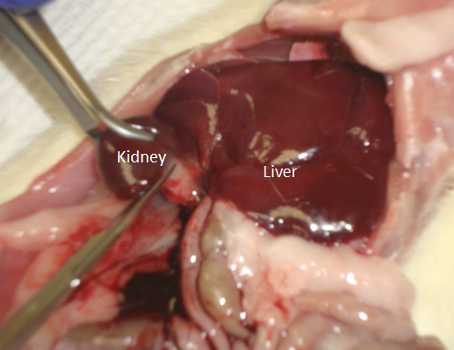
Move intestines/organs out of the way and locate the left kidney.
Place the right side fat in the same container that contains the left side fat, weigh in grams (to 1 mg).
Record the weight, cap the container and place it in dry ice
Grab the kidney with your finger and pull away the fat that is attached to it.
Once kidney is disconnected, let go of the kidney and continue cutting/removing the fat from the cavity.
As you move closer to the testicles, you will see a faint “line” of fat.This is a landmark to determine where the fat pad ends.
Cut along that line and remove the fat out of the rat
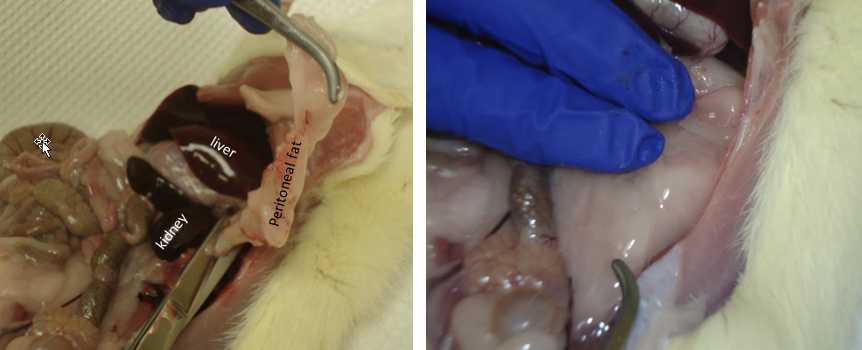
Place a labeled 1/2oz. jar on the scale and tare;
-dd the fat to the jar
Move the intestine/organs out of the way and locate the right kidney.
Repeat the procedure above and remove the peritoneal fat on the right side.
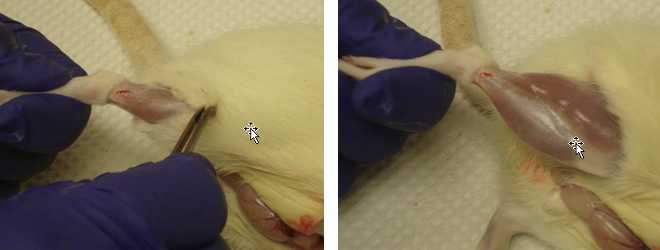
Epididymis Fat (Male Rats)
Epididymis Fat (Male Rats)
Pull both testicles out of the body cavity.
Take one testicle and look for the epididymis (curved area directly above the testicle)
Hold the fat in one hand and carefully cut the fat away from the epididymis with scissors
Place a labeled ½ oz. plastic jar on the scale and tare; add the fat to the container.
Remove the epididymis fat from the other testicle.
Add the new piece of epididymis fat in the same container with the first piece.
Record the weight in grams (to 1 mg), cap the container and place it on dry ice.
Parametrial Fat (Female Rats)
Parametrial Fat (Female Rats)
Locate the two ovaries which are on top of the uterine horns.
While holding the ovary on the left side, cut the parametrial fat away from the kidney.The fat should only be attached to the uterine horn now.
Continue to hold the ovary and trim the fat away from the uterine horn.Be sure to cut around the ovary.
Place the storage container on the sale and tare it;
Place the left parametral fat in the container.
Repeat the above steps for the right parametral fat.
With both fat pads in the storage container, record the weight in grams (to 1 mg).
Cap the container and place on dry ice.
heart
Heart
Cut though the diaphragm with scissors (if no cardiac puncture).
Carefully grab the heart with forceps.
Cut the heart off by holding the heart with forceps, and cutting the aorta.
Blot the heart on bench paper/gauze to get rid of extra blood.
Place a labeled ½ oz. plastic jar on the scale and tare.
Place the heart in the jar, weigh in grams (to 1mg), record the weight.
Cap the container and place it on dry ice
Left Kindey
Left Kidney
Move intestines/organs to locate the left kidney.
Grab kidney with forceps.
Pull up towards yourself and cut the renal artery, vein, and urethra away from the kidney.
Remove any extra fat that may be attached to the kidney
Place a labeled ½ oz. jar on the scale and tare.
Place the kidney in the jar.
Weigh in grams, record the weight, cap the container and place on dry ice.
Right Kidney
Right Kidney
Dissect out the right kidney the same way the left kidney was dissected out.
Place a covered and labeled container with 10% (v/v)ZBF Zinc formalin on the scale and tare (contains come pre-filled).
Remove the cover of the container, add the kidney to the container, cap the container, weigh it, and record the weight in grams.
Dissect out the right kidney the same way the left kidney was dissected out.
Place a covered and labeled container with 10% ZBF Zinc formalin on the scale and tare (containes come pre-filled).
Remove the cover of the container, add the kidney to the container, cap the container, weigh it, and record the weight in grams.
Cecum
Cecum
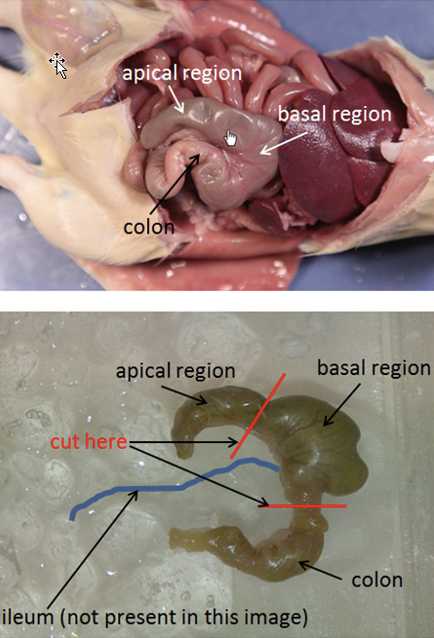
Identify cecum in abdominal cavity. The cecum is found where the small and large intestines meet. It appears as a “dead end” structure.
Remove cecum by cutting immediately at the entrance of the small intestine to caecum and immediately below the exit of the caecum to large intestine.
Place isolated caecum and its contents into a sterile collection 50 ml tube.
-Place container on dry ice and store at -80°C for.
This procedure should be performed as rapidly as possible to ensure integrity of the cecal contents.
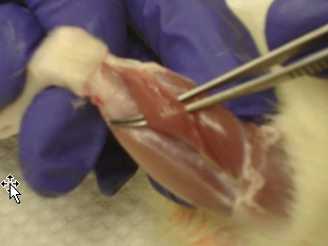
Right soleus
Right soleus
Grab the rat’s right foot.
Place a hemostat on the tendon. Make sure it’s on the tendon and not the muscle!
Using small scissors, cut the tendon to release the muscle from the leg.
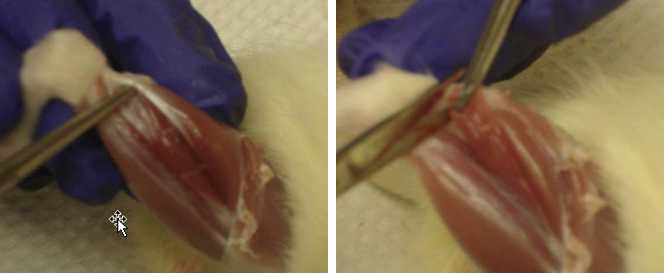
Leaving the hemostat connected, pull the hemostat up towards you to reveal the location of where the soleus is connected by the knee.
Cut the tendon connected to the soleus to completely remove the soleus from the leg.
Remove the hemostat
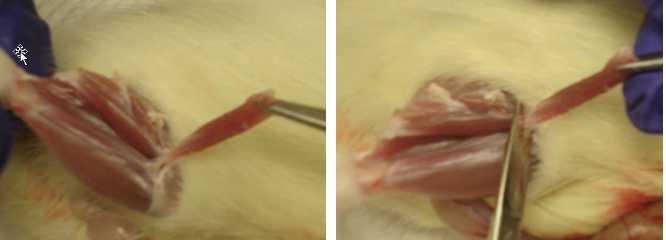
Place the soleus in a labeled ½ oz. jar and place on dry ice, there is no need to weigh it.
Carefully cut a circle around the ankle being extra careful to only cut the skin and not any tendons underneath, using scissors.
Remove the skin of the leg by grabbing a piece of the skin near the circle you just cut with forceps and pulling up towards the knee.
Take a thin tipped forceps and poke a hole in the space between the Achilles tendon and connecting tissue.
Look at the rat’s lower leg; you’ll see a white line running the length of the gastrocnemius muscle.
Place thin tipped forceps in the hole you just made by the Achilles tendon, and remove the outer covering of the gastrocnemius by pulling up along the white line.
Directly below that white line is the soleus. It appears as a brighter red color than the gastrocnemius and has tendons that attach to the area of the Achilles tendon and to the knee.
Use the thin tipped forceps and pull forward the soleus by using the forceps as a spoon
Find the end of the soleus tendon that attaches near the Achilles tendon.
Spleen
Spleen
Return to the spleen.
Remove spleen and place into 2 ml tube containing 0.5 ml saline.
Locate the RFID tag in the rat (it may have moved from its original subcutaneous location).
Place the RFID tag into the ½ oz. jar along with the spleen.
Place tube on dry ice.
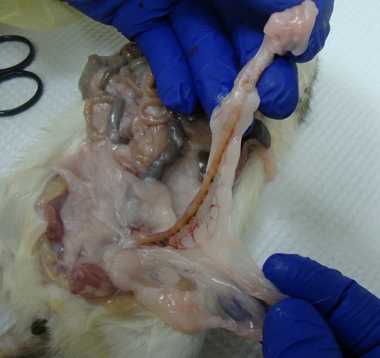
Baculum
Baculum
With your thumbs, push into the abdomen on either side of the penisuntil the penis pokes out, grab the penis with forceps, pull it out some more, cut off with scissors at the base.
Put directly in the labeled2mL tube and freeze.
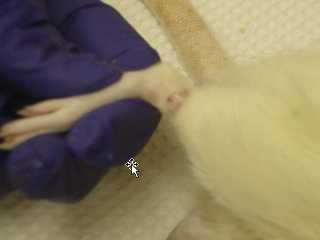
Right Eye
Right eye
Use scissors to make incisions at lateral and medial canthi at the right eye.
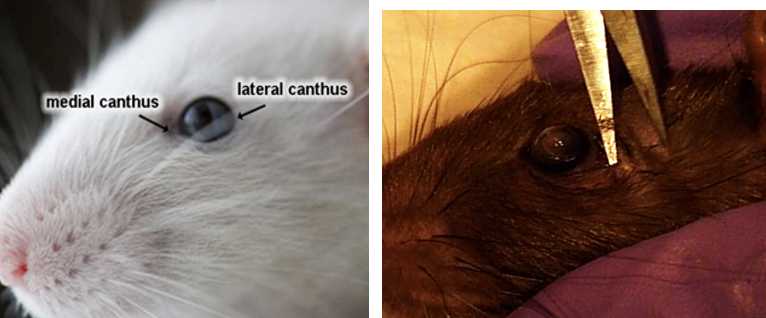
Ship on wet ice.
Insert forceps with curved tips (Dumont #5, angled) under eye being careful not to puncture eye.
Gently pull up on tightly closed forceps to stretch extraocular muscles. Be careful not to pinch or crush eye.
Gently pull until eye is pulled from socket.

Eye should be spherical and have optic nerve attached.
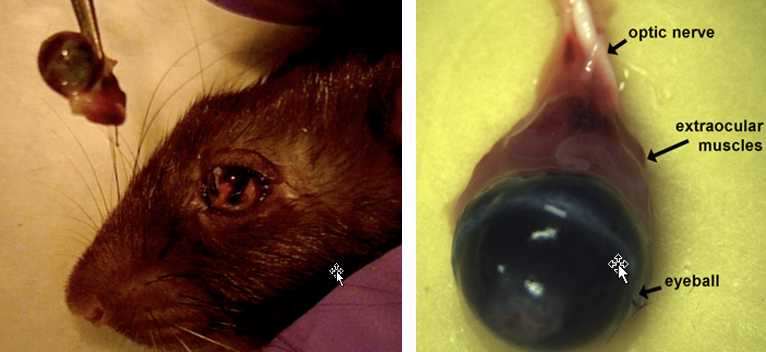
If dissection is unsuccessful, dissect the left eye, make a note in the file.
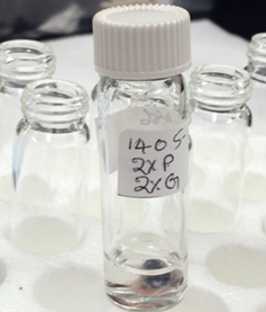
Put 1mL of Karnovsky’s fix in labeled 7mLvial.
Put eye into the vial.
Store at 4°C.
hindlimb
Hindlimb
-Put rat in the prone position, head facing away from you,
Retract left leg (left leg works better for the right handed person) away from the body and approach with the scissors from the back of the thigh. Cut through the skin and soft tissues (muscle) as close to the body as possible. Aim to locate the femur, but don’t cut it. Instead, move the tip of the scissors along the femur in the direction of the hip joint ). You will be able to find the capsule of the hip joint if you go ~1/8 of an inch from the proximal tip of the shaft of the femur towards the tail (if you think of your forearm as a shaft of the femur, the neck of the femur sticks out as a thumb of your left hand when its palm faces down). It will be easier to spot the joint if you keep moving that hip with your left hand.
Cut through the capsule of the joint with the tips of the scissors and that will release the head of the femur.
Cut through the soft tissues and the skin in the front of the thigh.
Put the entire leg into barcoded 50mL tube and put it on dry ice.
Transfer it to a freezer.
Rest of carcass
Rest of carcass
Remove the whole digestive tract and any other remaining internal organs
Remove remainder of tail (3/4 inch of tail was collected earlier) and discard.
Remove remainder of head and discard (if head has not been removed previously).
Affix a barcode label inside of a Ziploc bag (sandwich or quart size, as available) and affix a second label on the outside.
Place carcass into Ziploc bag and freeze at -20°C.
blood tubes
bloodtubes
Centrifuge blood whithn 1 hour after collection. If dissection takes 15 min, blood can be processed in butches of 4.
Put the serum separation tube intoa 50 ml conical tube. Put into4 degree centrifuge and spin at 3,000 rpm for 18 minutes
This step can be adjusted: depending on centrifuge you can spin the original SST tube; you can spin longer at lower speed.
Once finished spinning, the beige colored “plug” in the blood tube will separated out the serum from the red blood cells.If the plug hasn’t moved yet, spin again for a few minutes.
Place microcentrifuge tubes in labeled boxes and freeze at -80°C.
