Protocol for micro-sheet pocket 1: Detailed operation manual of six requirements
Keiichi Iwaya, H-Arai, Nanao Takatou, Yuka Morita, Rinko Ozeki, Hirofumi Nakaoka, Masaru Sakamoto, Tsutomu Kouno, Masayoshi Soma
Abstract
This protocol details micro-sheet pocket 1 and detailed operation manual of six requirements.
Attachments
Steps
Average diameter of filter opening
Examine the average diameter of filter opening by referring to the catalog of the sheet.
Observe under a polarized light microscope for sheets with a diameter of filter opening of less than 10μm.
Confirm opening size by using scanning electron microscopy (SEM), if possible.
Thickness
Examine the thickness by referring to the catalog of the sheet.
Prepare 10 test sheets (cut with scissors to 20cm x 20cm square ).
Put 10 test sheets on a horizontal worktable.
Lay a glass plate (200 ± 2 mm square, a mass of 82 ± 2 g, a thickness of 0.7 mm ) on the test sheets.
After about 0h 0m 10s , measure the test pieces to 0.1mm using a vertical ruler.
Chemical resistance
Cut in half the sheet in order to compare each other.
Immerse the whole part of one cut sheet in the test solution (xylene).
Cover the sheet with a lid and kept at Room temperature for about 8h 0m 0s .
Wash with water, dried, and observe both samples.
If no obvious change is observed, repeat the procedure 9-12 by changing the test solution (formalin, methanol).
Water permeability test
Make-up for water permeability test device
Create a water storage tank
Cut off the suction opening of the 50mL disposable measuring pipette with a plastic cutter.
Create drainage tank 1
Drill a hole to make an overflow port at a height of about 12cm from the bottom of the container 1 (inner diameter of hole, about 15mm) .
Create a sample reservoir
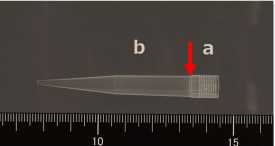
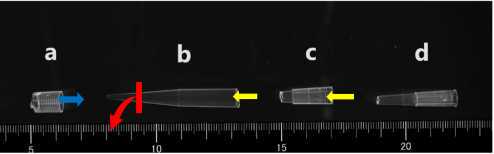
Cut the attachment part (a) of the tip of the P1000 pipette with scissors from the tip body (b) indicated by red arrow.
Seal and fix the connected parts with Parafilm.


For one sheet, cut off at 2cm from the tip of (b). In the case of two or more sheets, cut off 1.5cm from the tip. (Red line).
Measure the inner diameter (cm) of the cut side of (b) and calculate the cross-sectional area (inner diameter x inner diameter x 3.14) (Cross-sectional area of test sheet).
Cut a 2 cm area from the opening of the tip of the P200 pipette with scissors (c).
Cut a 3 cm area from the opening of the other P200 pipette tip with scissors (d).
Connect (b) Connect (c) and (d) (yellow arrow).
Cover (b) with the test sheet (3cm×3cm) on the red line.
Fix the sheet by fitting (a) (blue arrow).
Cut the sheet that protrudes from (a).
Vertical installation of a water storage tank on the workbench using a Burette stand.
Assemble water storage tank, drainage tank 1, drainage tank 2, according to the reference above diagram.
Adjust the height of the overflow opening to "5mL" on the scale of a 50mL disposable measuring pipette.
Attach the sample reservoir to the end of the reservoir.
Wrap the parafilm to prevent liquid leakage.
Operation Procedure
Fill drainage tank 1 with water until it flows out of the overflow port.
Fill water storage tank with water by using a funnel.
Measure transit time (t2-t1 value) it takes for the water in a water storage tank to pass from the "40mL" scale to the "20mL" scale using a stopwatch.
Repeat the operation in steps 21.1 and 21.2 and confirm that the t2-t1 value was almost constant.
Measure t2-t1 value 5 times.
Calculation
The permeability coefficient was calculated by the following formula, applying JIS A 1218:2020.

Water retention test
Prepare 3 sheets cut in 100 mm x 100 mm sized square.
Measure the mass of a cut sheet in the standard condition to 1mg-level.
Immerse 3 sheets in the water for at least 0h 15m 0s.
Remove 3 sheets from the water with tweezers.
Allow the water to drip off for at least 0h 1m 0s
Measure the mass of a cut sheet after wetting and dripping off the water (m2).
Calculate the water retention rate by the following formula
                               m=(m2-m1)/m1 x 100


                       m: water retention rate (%)


                       m1: mass of the specimen in the standard condition (mg)


                      m2: mass of the specimen after wetting and dripping off the water (mg)
Calculate the average value in accordance with JIS A 5209:2014, Rule B (rounding method).
Cell transit test
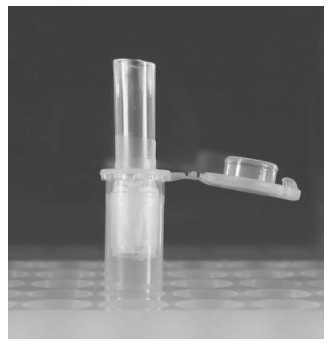
Preparation of sample reservoir
Preparation of sample reservoir (consisting of part (a) and (b), we named“filter assembly”) is explained in step 15.1
Set sample reservoir onto 2mL microtube.
Preparation of cell suspension (collection of cells from ascites and/or pleural fluid)
Centrifugation residual specimens (ascites and/or pleural effusion)at 2000rpm,0h 0m 0s for 0h 5m 0s.
Gently remove the supernatant with an aspirator.
Collect more than 1mL of cell pellet.
Add 30mL to 35mL of PBS and mix by inverting.
Stand still for 0h 15m 0s.
Gently remove the supernatant with an aspirator.
Repeat PBS wash (step 32.4 - 32.6 ).
Counts all cells in a cell suspension
- Add
90µLof 0.4% trypan blue solution to10µLof cell suspension (10-fold dilution). - Gentle vortex for
0h 0m 2s-0h 0m 3s. - Inject
6µLsamples with a P20 pipette through the sample inlet of the cell counter plate. - Count the number of cells in 4 compartments using the cell counter plate.
- Calculate the number of cells per
1µLof stock solution {(average number of cells of 4 compartments) × 10 × (dilution factor)}.
Adjust to 1 x 10⁶- 10 7 cells/ml in 10% neutral buffered formalin solution.
Operation Procedure
Apply 600µL of cell suspension (1 x 10⁶-107 cells/ml) to the sample reservoir (filter assembly) with a P1000 pipette.
Allow to natural filtration.
Measure the number of cells in the filtrate
- Write an enclosure on a glass slide with an alcohol-resistant marking pen.
- Add
15µLdrops of 95% ethanol in the enclosure, followed promptly by15µLdrops of filtrate. - Allow to natural drying.
- Perform Papanicolaou staining.
- Count cells in 10 fields of view at 400x under the microscopy.
