Protocol L2.3 (LIG fabrication)
Eric S McLamore, Yifan Tang, Diana Vanegas, dbahamo, kmccour
Disclaimer
Abstract
Before start
Critical step: Critical step :
●Wear eyewear protection at all time
●Wear gloves to avoid transferring fingerprints to the Kapton tape
Steps
LIG on polyimide film
Step 1) Prepare image file for processing and send to tool
- Verify that the Universal Control Panel (UCP) is running in the taskbar by looking for the square red icon with a diamond ( Fig 1A )
- Using CorelDraw, Open the image called “LIG working electrode_triple_COVID” and press Cntrl+P and select VLSprinter (VLS3.50/60DT) ( Fig 1B ). This electrode has the following dimensions, verified with the digital caliper under the inspection microscope
Electrode diameter= 3.0 mm (diameter)
Stem area= 14.3 mm X 2.0 mm (length X width)
Bonding pad area= 2.9 mm X 2.5 mm (length X width)
Feature size of “Clemson University” = 60 μm (4-point Arial font in CorelDraw)
- Select properties in print screen and change the following settings ( Fig 1C )
- Click Apply, OK ( Fig 1D )
- Click Print to send job to laser
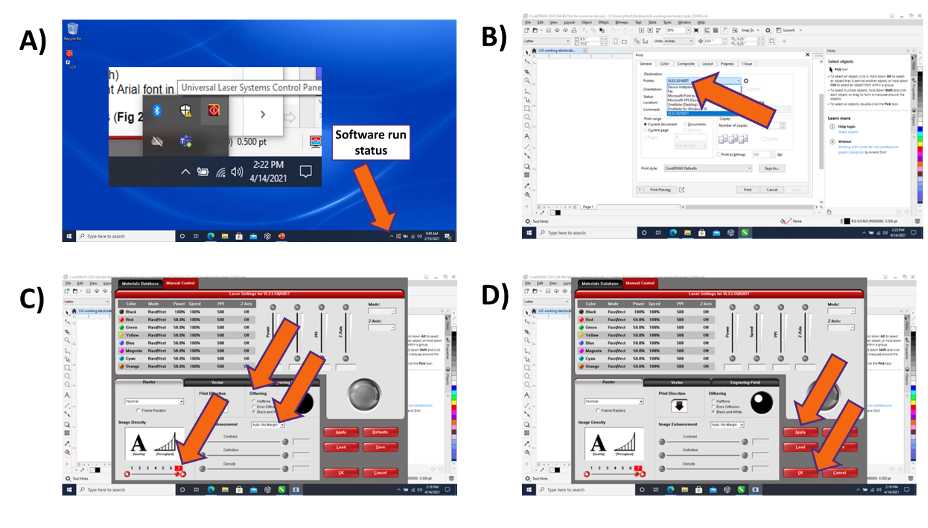
Select properties in print screen and change the following settings ( Fig 1C )
Image density=7
Image enhancement=Auto No Margin
Dithering=black and white
Step 2) Set up print job
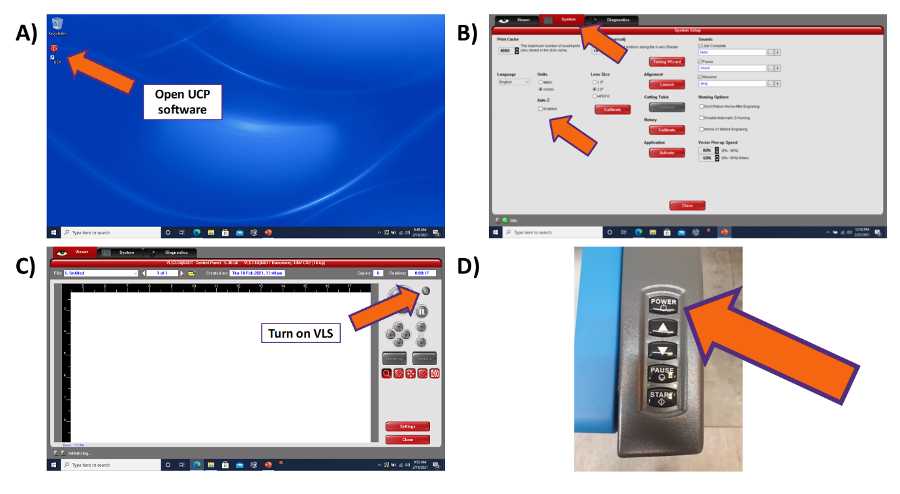
- Launch UCP software ( Fig 2A ).
- Select the System Tab and verify that the Auto Z box is checked ( Fig 2B ).
- Return to Viewer Tab and turn on the instrument or turn on manually ( Fig 2C).
- Alternatively, turn on the instrument manually ( Fig 2D ).
Step 3) Check image quality
- After sending the print job to UCP, check image for quality.
- If using color, ensure that all features are transferred correctly.
Step 4) Align substrate on table and prepare laser
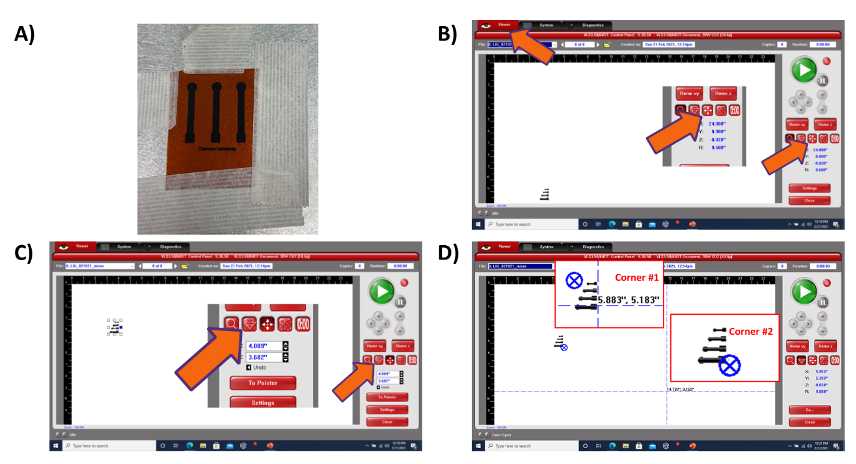
- Prepare a 4” by 4” (10cm X 10 cm) sample of Kapton film
- Tape the sample onto the table (see Fig 3A )
- Ensure that the workpiece is flat. Any bends must be accounted for in the “Z axis setting” (this advanced feature is not discussed in this protocol)
Note: If the workpiece is not flat, use the heat press (see protocol HP1.1)
- Place a few drops of isopropyl alcohol on a Kimwipe and clean the surface.
Critical step:
DO NOT PUT ALCOHOL DIRECTLY ONTO THE SAMPLE WHEN IT IS INSIDE THE INSTRUMENT. NO LIQUIDS IN THE INSTRUMENT AT ANY TIME. THE ALCOHOL SHOULD BE SPAYED ONTO A KIMWIPE , NOT THE SAMPLE
Step 5) Enter laser settings
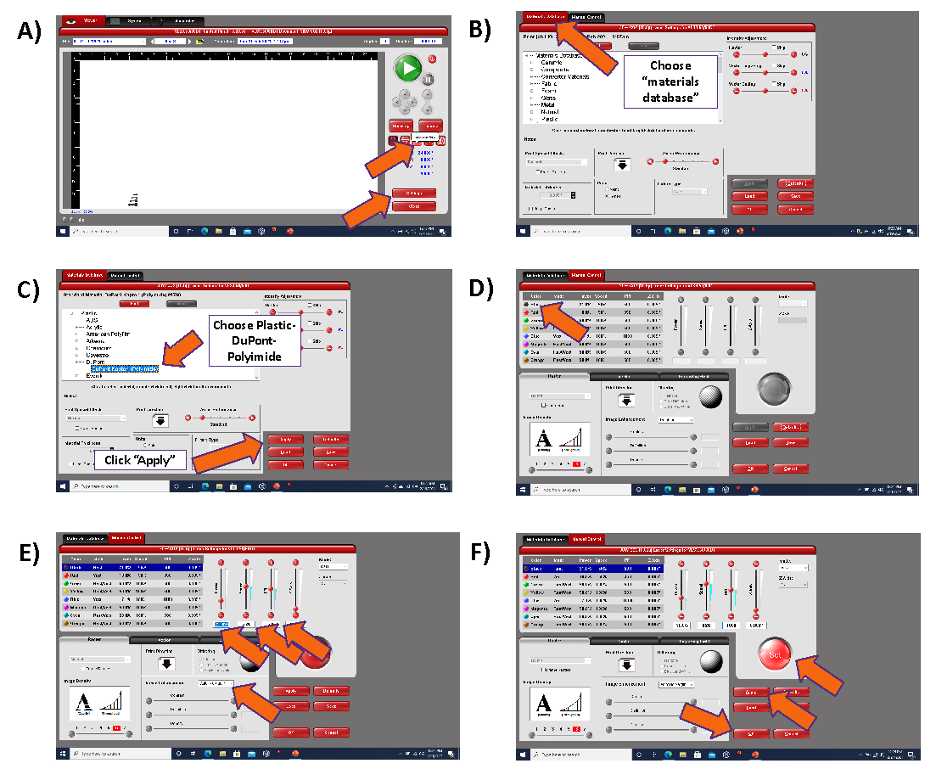
- Select “settings” in the menu near the bottom right (top arrow, Fig 4A ).
- Be sure that the “move laser to” button is NOT engaged, this will close the “Settings” button (bottom arrow, Fig 4A ).
- Choose the materials database in the tab section (top left) ( Fig 4B ).
- Choose DuPont Kapton tape as a starting point and click apply then Click “OK”( Fig 4C)
- Select “settings” in the menu near the bottom right (top arrow, Fig 4A ).
- Click on “Manual Control” in the tab section (top left) ( Fig 4D ).
- Set the power, speed and PPI as shown below ( Fig 4E ).
Power=40
Speed=75
PPI=1000
Zaxis=0.005’
- Click “SET”, then Click “Apply” then Click “OK”( Fig 4F )
- After returning to the print screen, return to the manual control screen to be sure the settings were saved
Step 6) Process job, pause if necessary
- Press the go button to start the job (Fig 5A).
- The time for the job is shown in the top right area of the screen ( Fig 5B ).
- Do not directly look at the plasma during the process, a photo is below if you are curious ( Fig 5C ).
- The job can be paused using the software or the manual control ( Fig 5D ).
Pushing the green button will restart job from the beginning
Pushing the resume button will continue job where it was paused
- Do not open the hood during a job unless it is an emergency
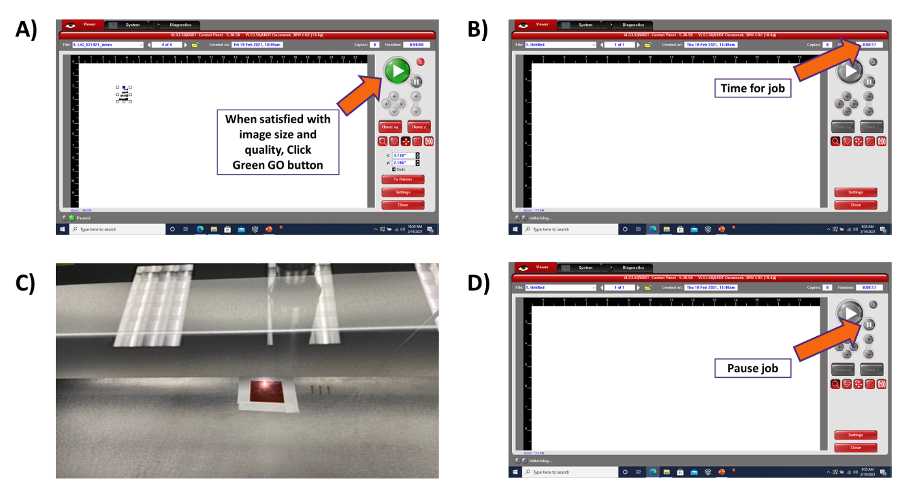
Figure 5. Pausing a job or stopping a job. A) Green button will restart the job from the beginning. B) Time of the job is shown in the top right corner. C)Photo of laser carbonizing Kapton film. Unless needed, do not open the hood to stop a job, this is an emergency feature and can cause the sample to be ruined. D) Pause button should be used if necessary but will likely cause irregularities in the sample.
Note: See protocol LQC for quality control analysis of electrodes
Step 7) Turn off computer
- The auto-power function is disabled on the computer, PLEASE TURN COMPUTER OFF WHEN JOB IS COMPLETE
Step 8) Data Management
File naming : For saving all versions of this protocol, use the following file structure:
LIG1.1_091721.ai
File storage : Store all methods in the Desktop folder.
Backup files : At least once per year, ensure that the folder is backed up on the lab external hard drive.


