NDEx: Accessing Network Models and Streamlining Network Biology Workflows
Jing Chen, Jing Chen, Sophie Liu, Sophie Liu, Christopher Churas, Christopher Churas, Dexter Pratt, Dexter Pratt, Rudolf T. Pillich, Rudolf T. Pillich, Keiichiro Ono, Keiichiro Ono, David Otasek, David Otasek
Cytoscape
enrichment analysis
JavaScript
NDEx
neighborhood query
network biology
network models
pathway
python
R
REST API
subnetwork
systems biology
Abstract
NDEx, the Network Data Exchange (https://www.ndexbio.org) is a web-based resource where users can find, store, share and publish network models of any type and size. NDEx is integrated with Cytoscape, the widely used desktop application for network analysis and visualization. NDEx and Cytoscape are the pillars of the Cytoscape Ecosystem, a diverse environment of resources, tools, applications and services for network biology workflows. In this article, we introduce researchers to NDEx and highlight how it can simplify common tasks in network biology workflows as well as streamline publication and access to data. Finally, we show how NDEx can be used programmatically via Python with the ‘ndex2’ client library, and point readers to additional examples for other popular programming languages such as JavaScript and R. © 2021 The Authors. Current Protocols published by Wiley Periodicals LLC.
Basic Protocol 1 : Getting started with NDEx
Basic Protocol 2 : Using NDEx and Cytoscape in a publication-oriented workflow
Basic Protocol 3 : Manipulating networks in NDEx via Python
INTRODUCTION
Networks are a powerful and flexible paradigm that facilitate communication and computation about interactions of any type, whether social, economic, or biological. In recent years, the vast amount of biomedical data generated through omics approaches has contributed to a massive increase in publications featuring biological network models of cancer and other human diseases. This data is often provided as figures and tabular data files in supplementary materials, thus making its access and re-use laborious and time consuming. NDEx, The Network Data Exchange (Pillich, Chen, Rynkov, Welker, & Pratt, 2017; Pratt et al., 2017; Pratt et al., 2015) is an online commons providing infrastructure and data resources to facilitate the use of biological networks in research. NDEx enables new modes of collaboration and publication using biological networks, and simplifies access to and re-use of network models.
Scientists can use NDEx to find networks to use in analysis applications: with 5913 publicly available networks, NDEx provides easy access to a wide variety of biological network data, including but not limited to resources such as BioGRID (Oughtred et al., 2021), SIGNOR (Licata et al., 2020), Wikipathways (Kutmon et al., 2016), DrugBank (Wishart et al., 2018), and BioPLEX (Huttlin et al., 2021).
Individuals and organizations can store and manage networks in their NDEx accounts, and can also make their networks publicly available, providing an easy distribution channel for both small pathways and very large interaction data sets. NDEx users can request DOIs (Digital Object Identifiers) for their networks and use them to link to the data from publications. Unlike a spreadsheet of interaction data in supplementary materials, readers can immediately visualize and inspect the data interactively in NDEx. Since 2017, NDEx has been an official repository for Springer Nature and the PLoS family of journals.
In addition, NDEx is fully integrated with Cytoscape (Shannon et al., 2003), a desktop application for network visualization and analysis, thus enabling networks to seamlessly flow from a journal article to a user's NDEx account straight into Cytoscape for subsequent data integration and analysis. Therefore, storing and distributing networks with NDEx promotes FAIR data principles, where networks become archival resources that are Findable, Accessible, Interoperable, and Re-usable.
Notebooks in Python and R have become a preferred software environment for bioinformaticians and experimental biologists; NDEx exposes a powerful REST API allowing Jupyter notebooks and other programs in Python to access NDEx via the ndex2 Python package, as shown in Basic Protocol 3. Client libraries are also available in R, Java, and JavaScript, positioning NDEx to serve as a framework for integration between bioinformatics applications and content resources. Examples of use of NDEx by applications include NAGA (Network Assisted Genomic Analysis) (Carlin et al., 2019), a web application and supporting service that uses NDEx in multiple capacities, and CRAVAT (Cancer-Related Analysis of Variants Toolkit; Masica et al., 2017), a toolkit for the interpretation of variants in the context of known mechanisms.
As scientific analysis systems increasingly shift to the cloud, NDEx and Cytoscape are moving to a primarily cloud-based network analysis ecosystem, where containerized services, applications, and data resources are easily accessible and fully interoperable.
Basic Protocol 1: GETTING STARTED WITH NDEx
In this first protocol, we will introduce the fundamental aspects of the NDEx web user interface (hereafter, NDEx UI) and prepare the ground for the “real world” use cases presented in Basic Protocols 2, 3, and 4.You will learn to use the NDEx UI to search for networks, become familiar with the NDEx Network Viewer (NNV), and create your own NDEx account. NDEx accounts are free to use and provide you with 10 gigabytes of cloud storage space for your networks. It is not necessary to install the Cytoscape desktop application for this protocol, but it is required in Basic Protocol 2, so we recommend that you install the software now to avoid interruptions in the workflow. Here is a breakdown of the topics covered in this protocol:
1.Overview of the NDEx landing page 2.Network search feature 3.The NDEx Network Viewer (NNV) 4. Querying a network to extract subnetworks of interest 5.Convenience features: Open in Cytoscape 6.Creating and managing an NDEx account 7. Saving a network to your NDEx account.
Necessary Resources
Hardware
A computer with stable internet connection
Software
Web browser (recommended: Google Chrome or Mozilla Firefox)
Cytoscape desktop application (optional but recommended)
Other
- Please add support@ndexbio.org to your e-mail contacts before proceeding. This is particularly important if you use a Gmail address, and necessary to ensure that you receive e-mails from the NDEx server to validate your account or reset your password (if necessary).
1.Overview of The NDEx landing page.
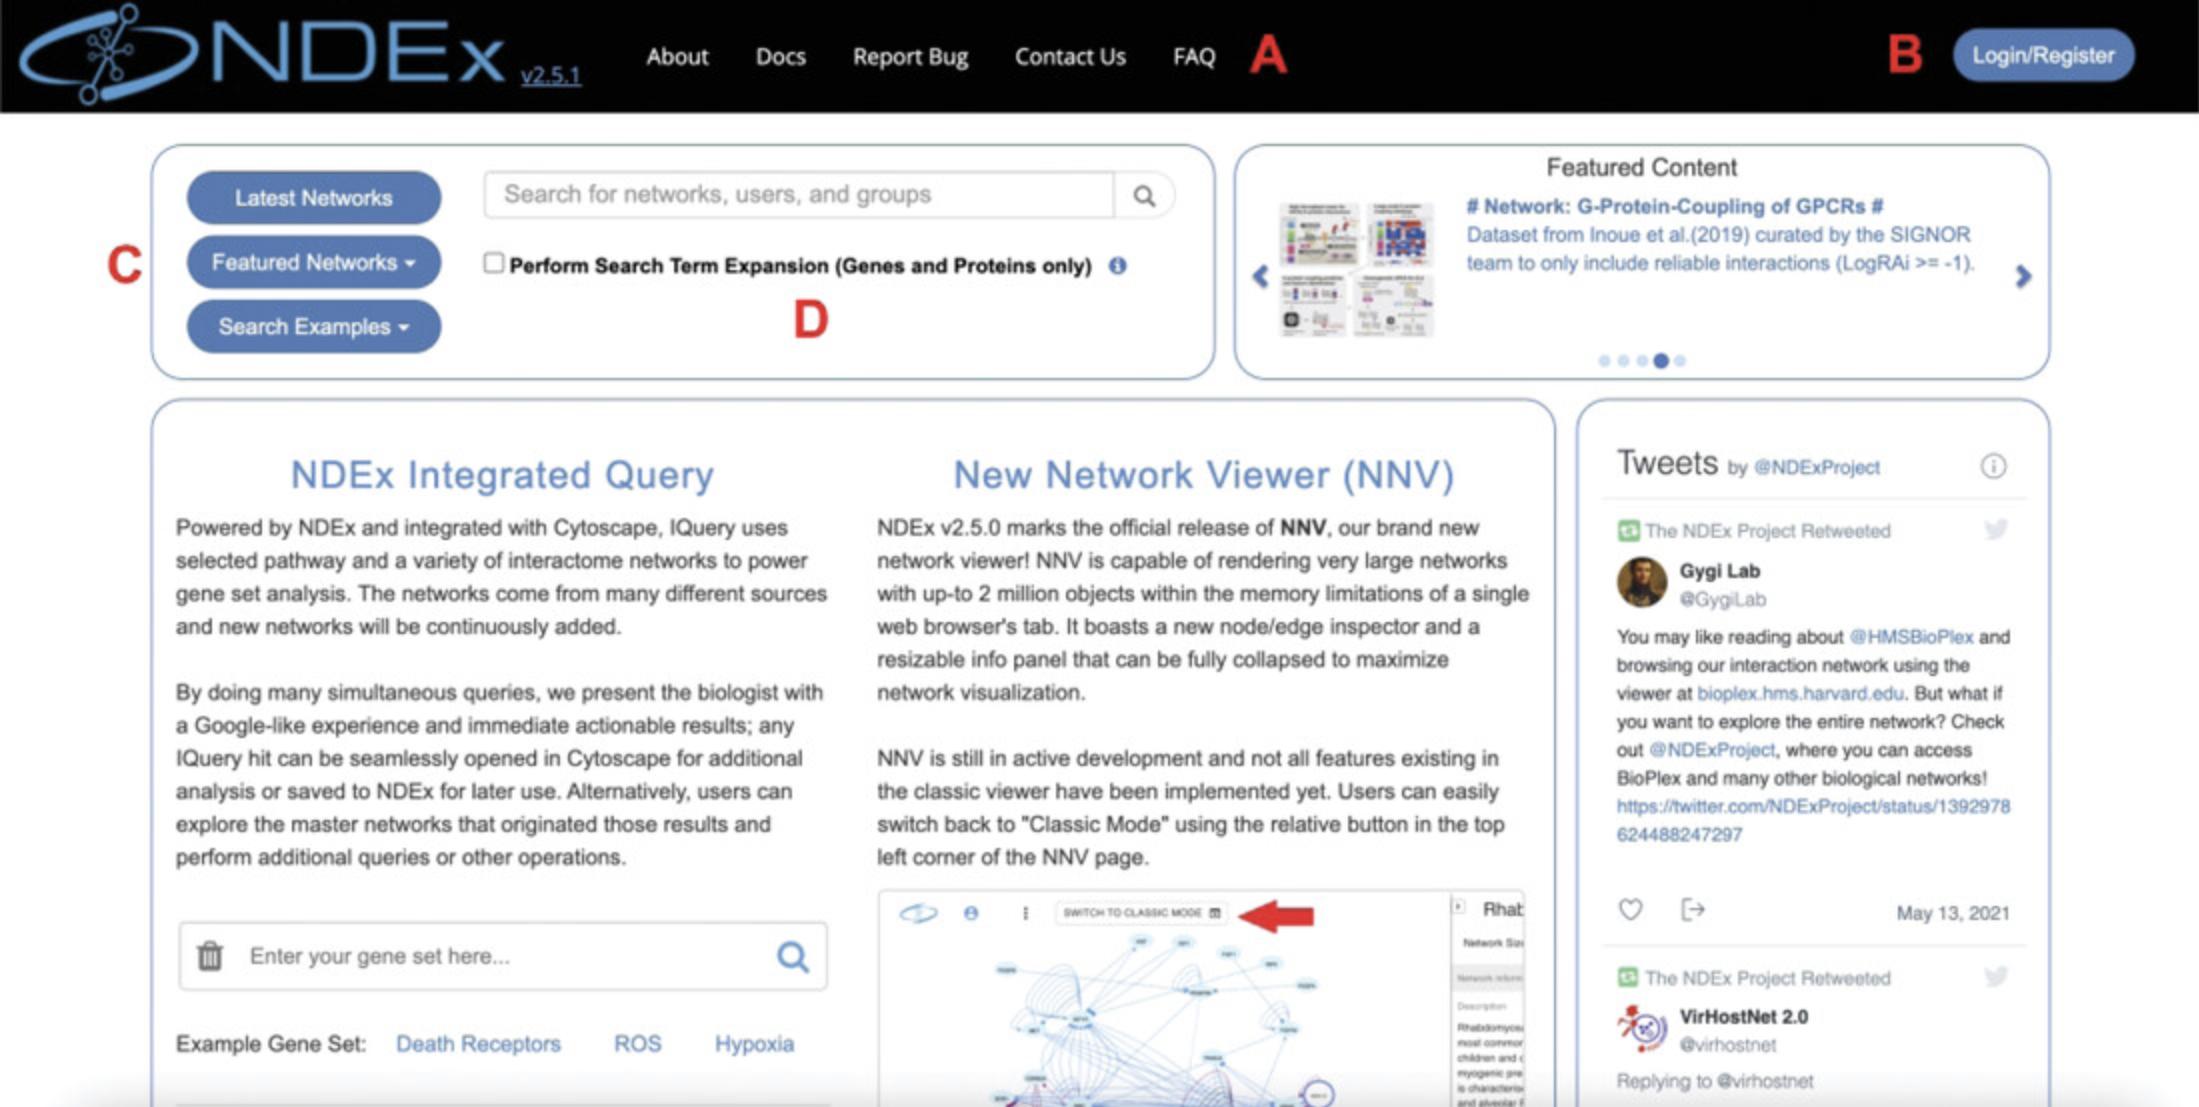
To begin, launch a browser window and navigate to https://www.ndexbio.org to load the NDEx landing page (Fig. 1).
In the left corner of the top bar, the NDEx logo shows the current software version (2.5.1). Next, several menu items provide access to documentation, bug report/contact forms, and the FAQ page (Fig. 1A). Finally, in the top right corner, you can find the Login/Register button (Fig. 1B), which you will use later in this protocol to create your account.
Below the logo, a cluster of three buttons (Fig. 1C) allows you to browse the latest network, explore the collection of NDEx featured networks, and visualize search examples. Click the Featured Networks button to open a dropdown menu with a variety of high-quality network models of different types and from different sources.
2.Network search feature.
You can run a custom network search using the textbox (Fig. 1D). The most popular ways to search for networks are by keyword or gene name.
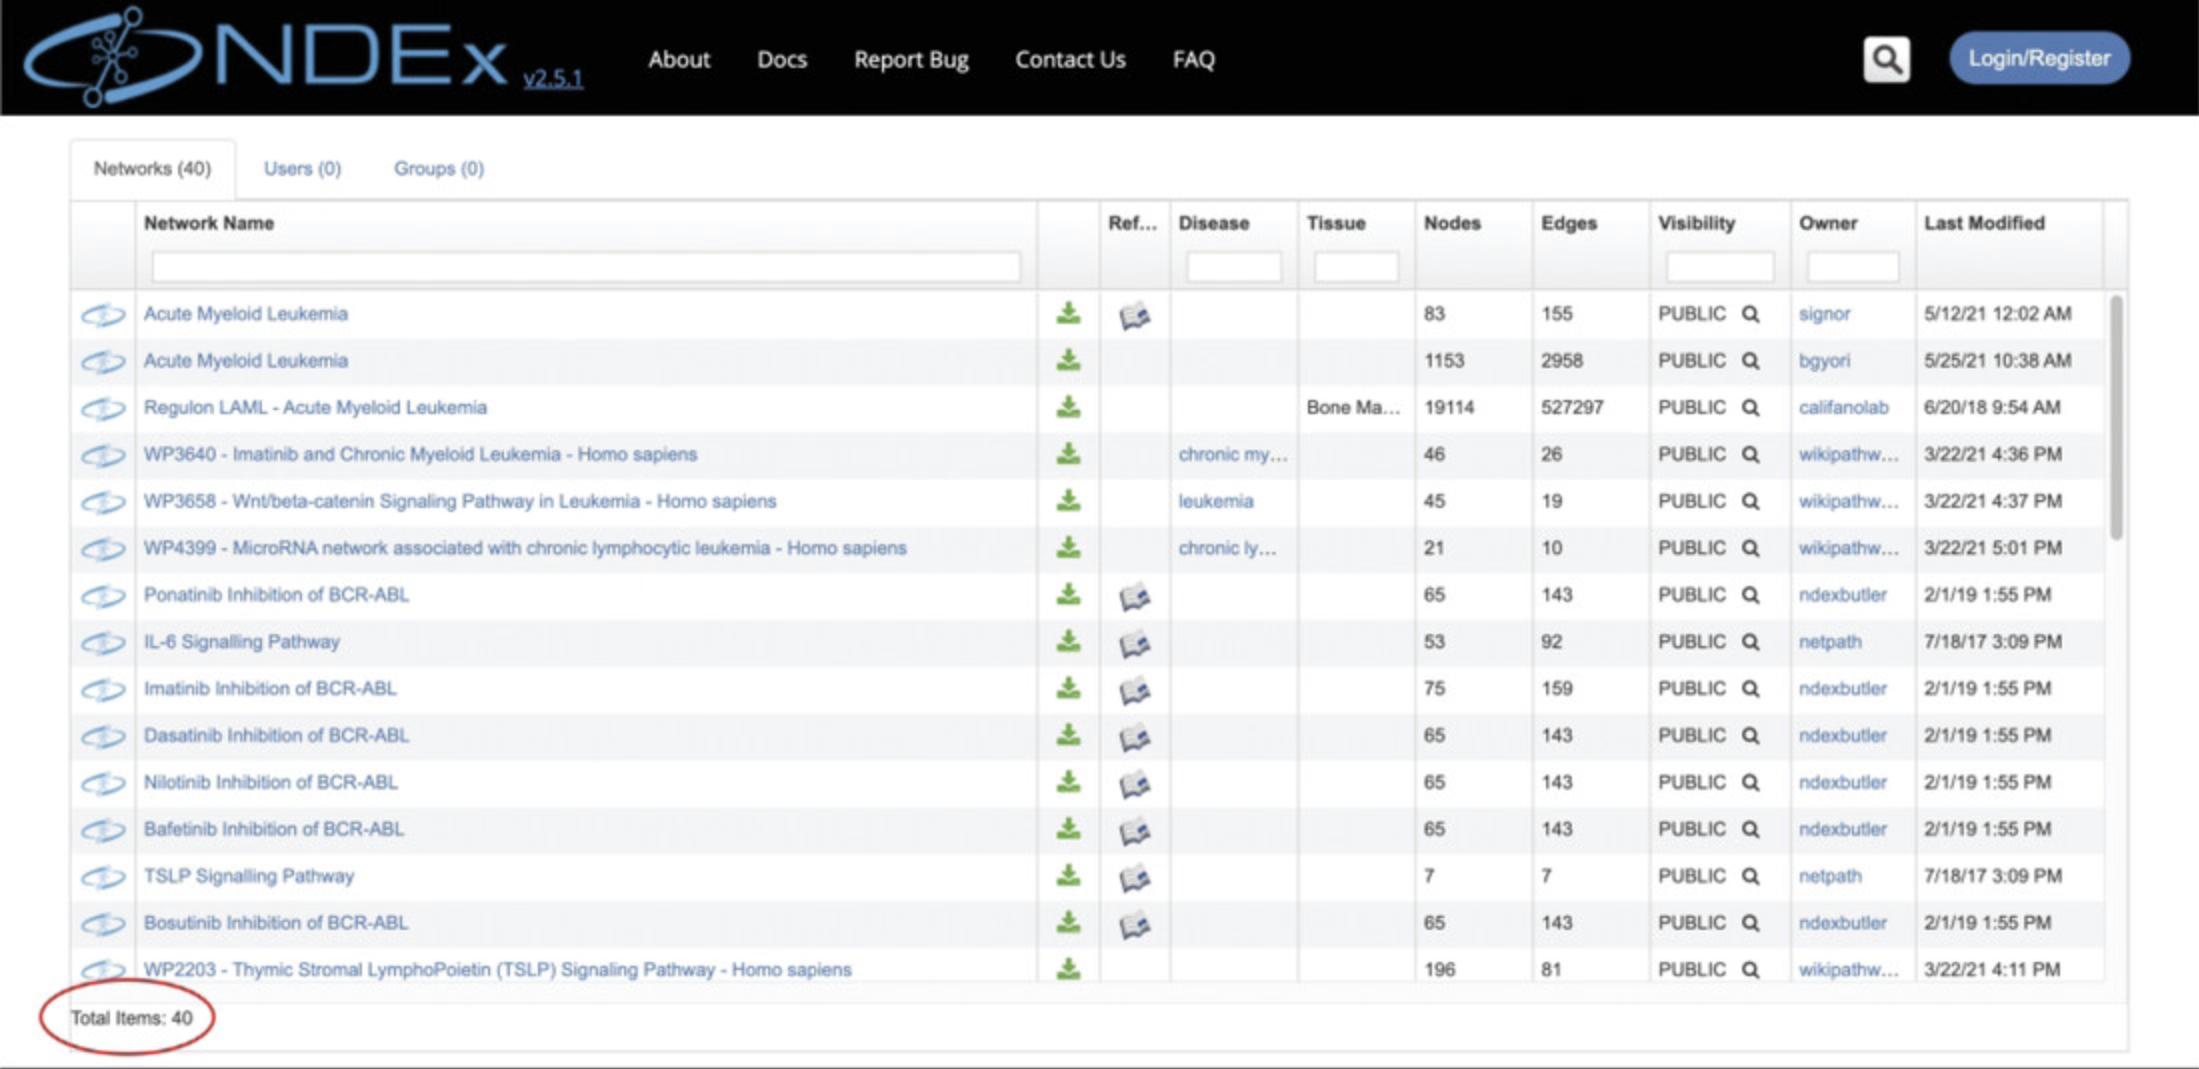
Keyword search: Type leukemia in the textbox and click the magnifier (or press Enter) to run the search: the results will be displayed as a table of networks that include leukemia in the network's name or description, or in a node name (Fig. 2).
The number of search results is displayed at the bottom left corner of the table (red oval).
For each network, you can see several property columns (such as number of edges, owner or date last modified).
Mouse over the network name to display a tooltip with a detailed network description (if applicable): try this with the first network in the results page, Acute Myeloid Leukemia.
Click the browser's Back button to go back to the NDEx landing page.
Gene search: Now type FLT3 in the textbox and run the search: the results page will contain all networks that include FLT3 in that network's name or description, or in one of its node's name or alias properties. Please make note of the number of Total Items in your search results.
Go back to the landing page and repeat the same search, but this time mark the checkbox to perform Search Term Expansion (Fig. 1D): if you compare the Total Items in the expanded search results with what you noted earlier, you'll notice that you now find a few additional networks that refer to FLT3 by one of its aliases.
For additional types of searches, please select the Search Examples button to view examples and access the advanced search documentation. The NDEx Search Feature is case-insensitive.
3.The NDEx Network Viewer (NNV).
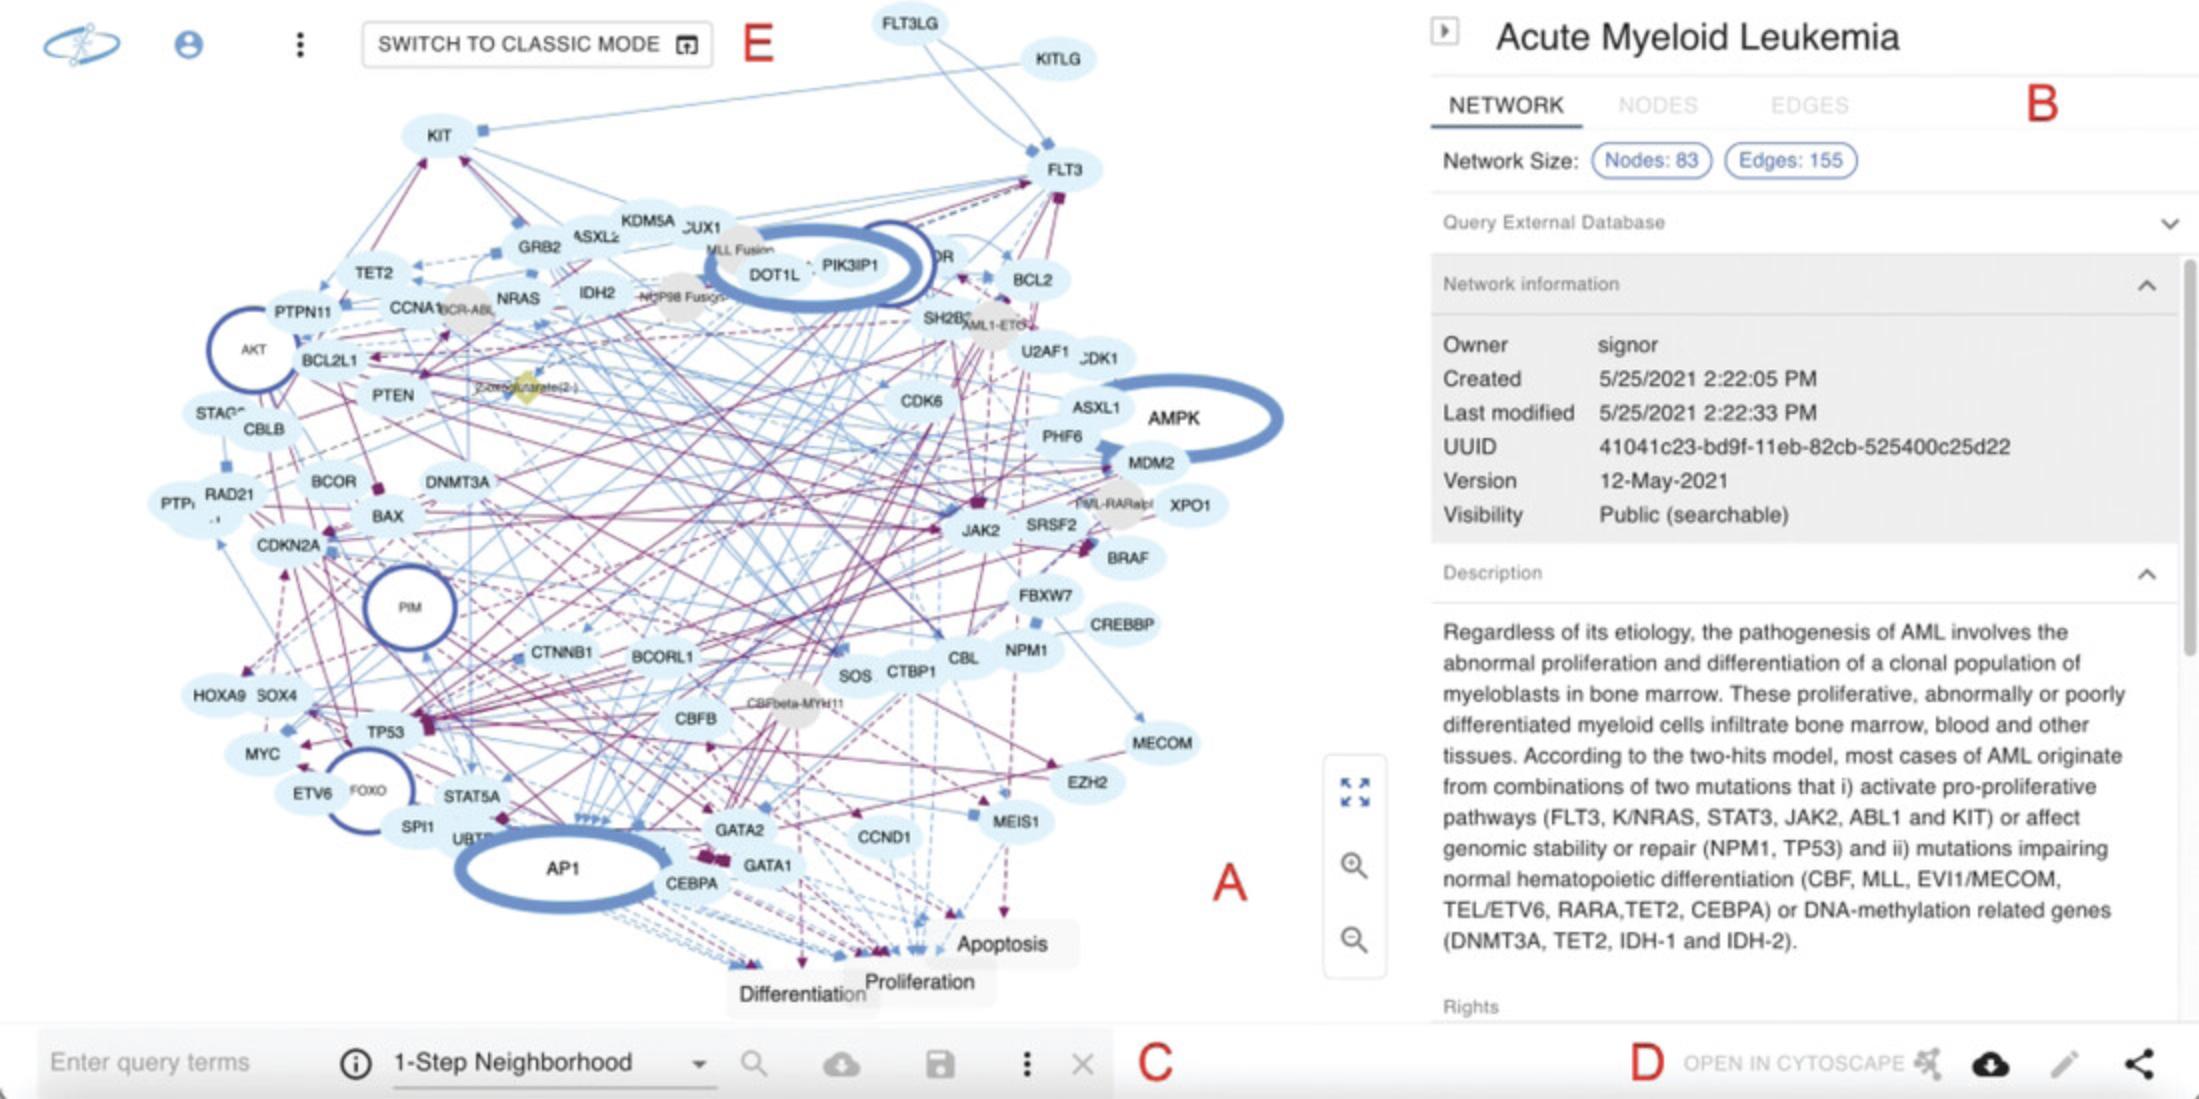
Click the network called Acute Myeloid Leukemia to open the network view page. The network view page is shown in Figure 3 and consists of Main Canvas, Info Panel, Query Feature, Action Buttons, and Menu Buttons.
Main Canvas : This area occupies about two thirds of the screen and is where the network model is drawn and visualized (Fig. 3A). Use the navigation buttons to zoom in/out and re-center the graphic view.
Click a graphic element (node or edge) to open a pop-up window and inspect the data.
Hold the Ctrl key on your keyboard and use your mouse or touchpad to perform a multiple selection (nodes and edges): with a multiple selection, you can inspect the data associated to nodes and edges by clicking the relative tabs in the info panel (Fig. 3B).
Info panel: This is located on the right-hand side, next to the Main Canvas, and occupies about one third of the screen (Fig. 3B). By default, the Info Panel shows the Network tab that provides information about the displayed network, including its description, reference publication, licensing information, and other properties.
Query feature: It is located at the bottom left of the network view page (Fig. 3C). The Query Feature lets you search the displayed network for a subnetwork (or neighborhood) of interest.
Type TP53 in the query textbox and click the magnifier (or press Enter) to run the query. The screen will split and display the original network and the retrieved subnetwork.
Click the X in the Query Feature to close the result and restore the original network page
Action buttons: These buttons are located at the bottom right corner of the network view page and let you perform several actions on the displayed network (Fig. 3D), e.g., edit network properties, share the network with others, or request a DOI. However, the most convenient action is the possibility to open your network in the Cytoscape desktop application with just one click.
If the requirements to use this feature are satisfied, the Open in Cytoscape button will be enabled (colored orange); otherwise, it will be disabled (colored gray). Mouse over the button to display a tooltip with info.
Menu buttons: These buttons are located at the top left corner of the screen (Fig. 3E) and perform the same functions as the items in the top menu bar of the NDEx landing page: clicking the logo will bring you back to the landing page. The user avatar allows you to login/register an account while the three vertical dots provide access to the top menu items (contact form, FAQ, etc.).
Finally, the largest button, “SWITCH TO CLASSIC MODE” lets you view the network using our legacy network viewer where you can access a few features that haven't been ported over to NNV yet, such as the ability to clone a network and automatically save the copy to your account.
4.Create an account.
Now that you are familiar with the NDEx landing and NNV pages, let's guide you through the process of creating your own NDEx account.
You can do this by clicking the Login/Register button (Fig. 1B) in the landing page or by clicking the User Avatar button (Fig. 3E) on any NNV page.
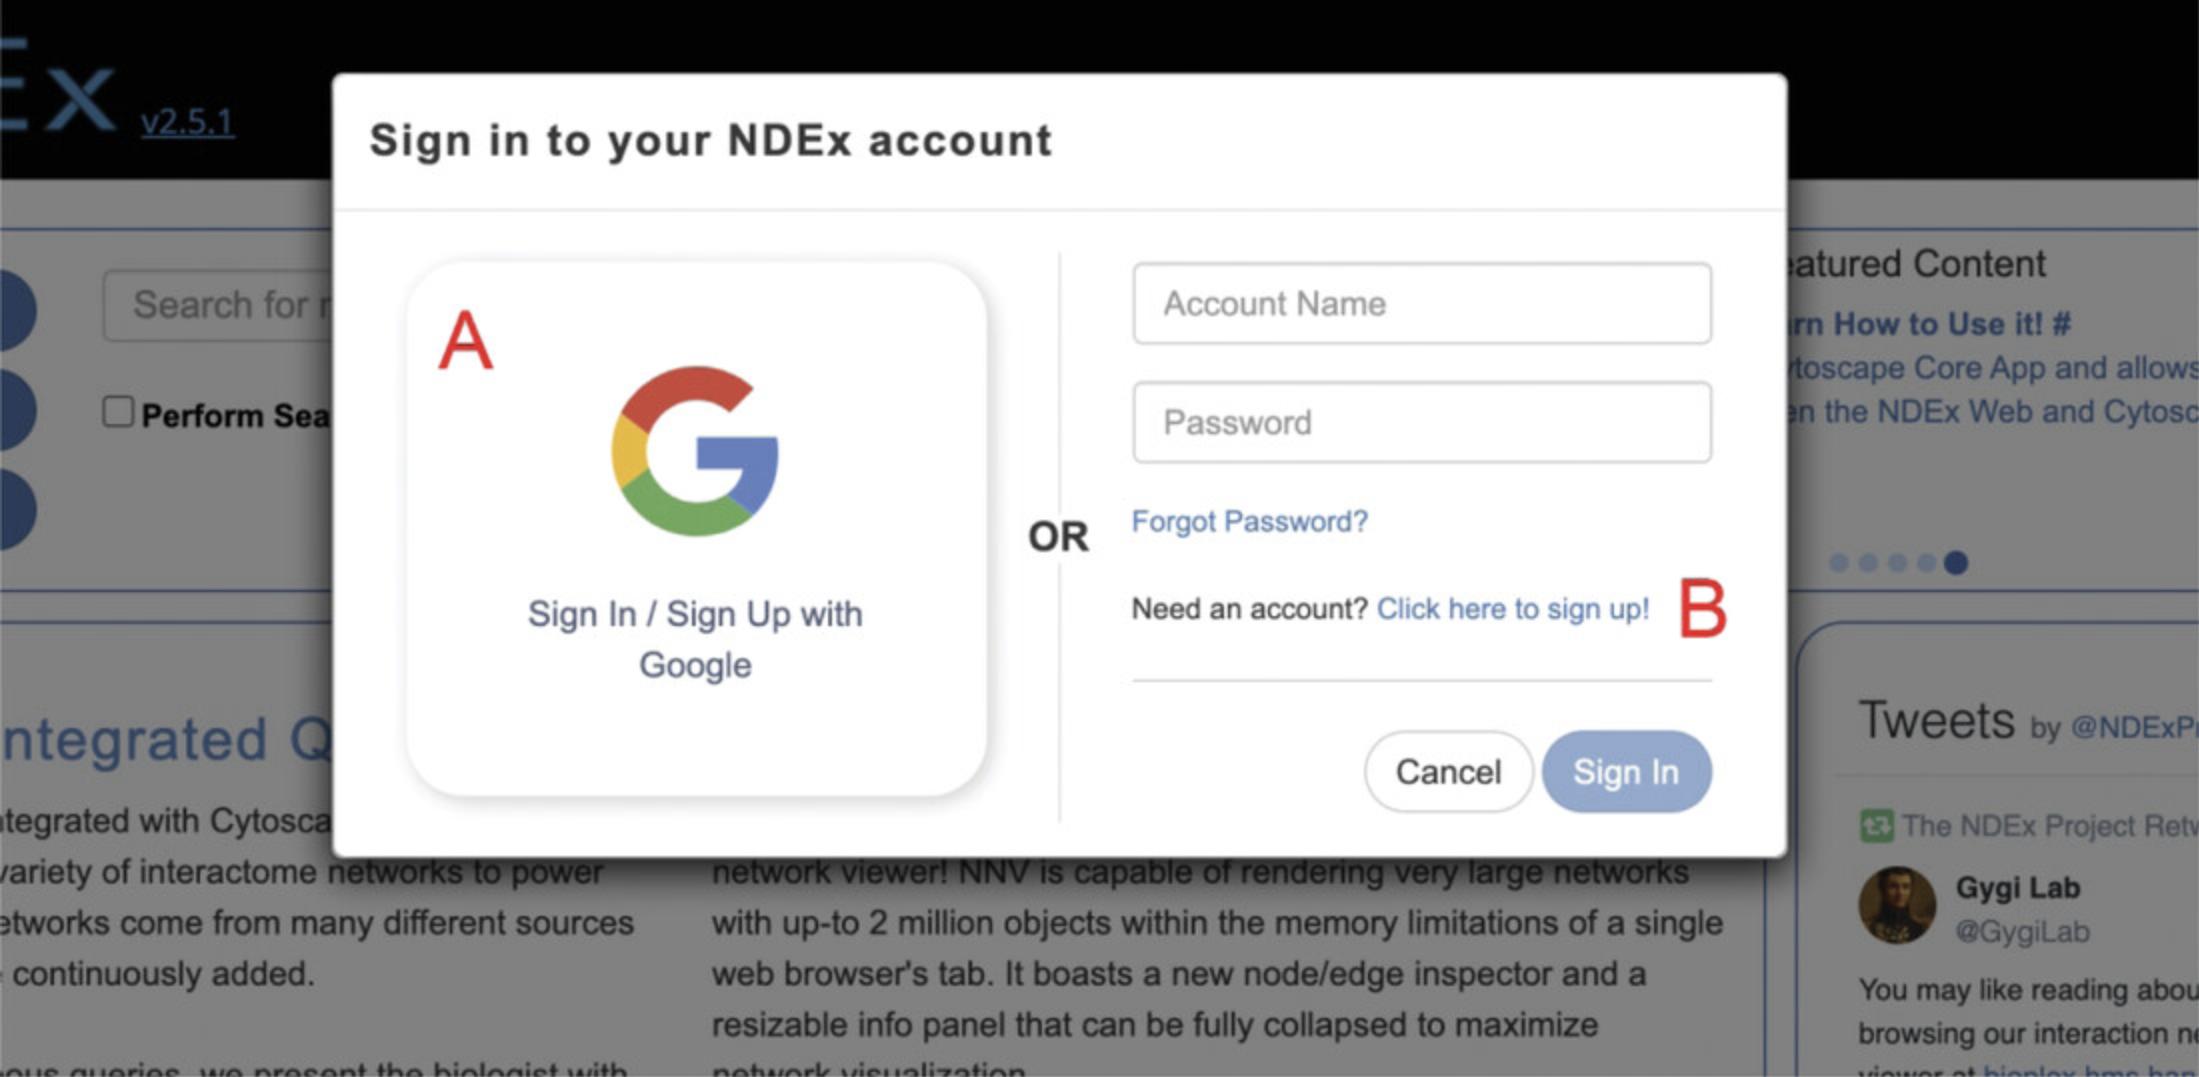
In the pop-up window, choose whether you want to Sign in/Sign Up with Google (Fig. 4A) or if you prefer to proceed manually (Fig. 4B).
If you have a Google account, we highly recommend that you Sign In/Sign Up with Google, as it makes the process simpler and faster. With this option, you will create your account with two clicks, and don't need to verify your e-mail address to activate the account.
If you don't have a Google account or prefer to create your NDEx account manually, click the link as shown in Figure 4B, fill out the registration form, accept the Terms & Conditions, and click the Sign Up button.
Next, check your e-mail and verify your e-mail address by clicking the activation link you received.
You can now go back to the NDEx landing page or NNV page and sign in to your new NDEx account with the username and password you have chosen.
5.Manage your account.
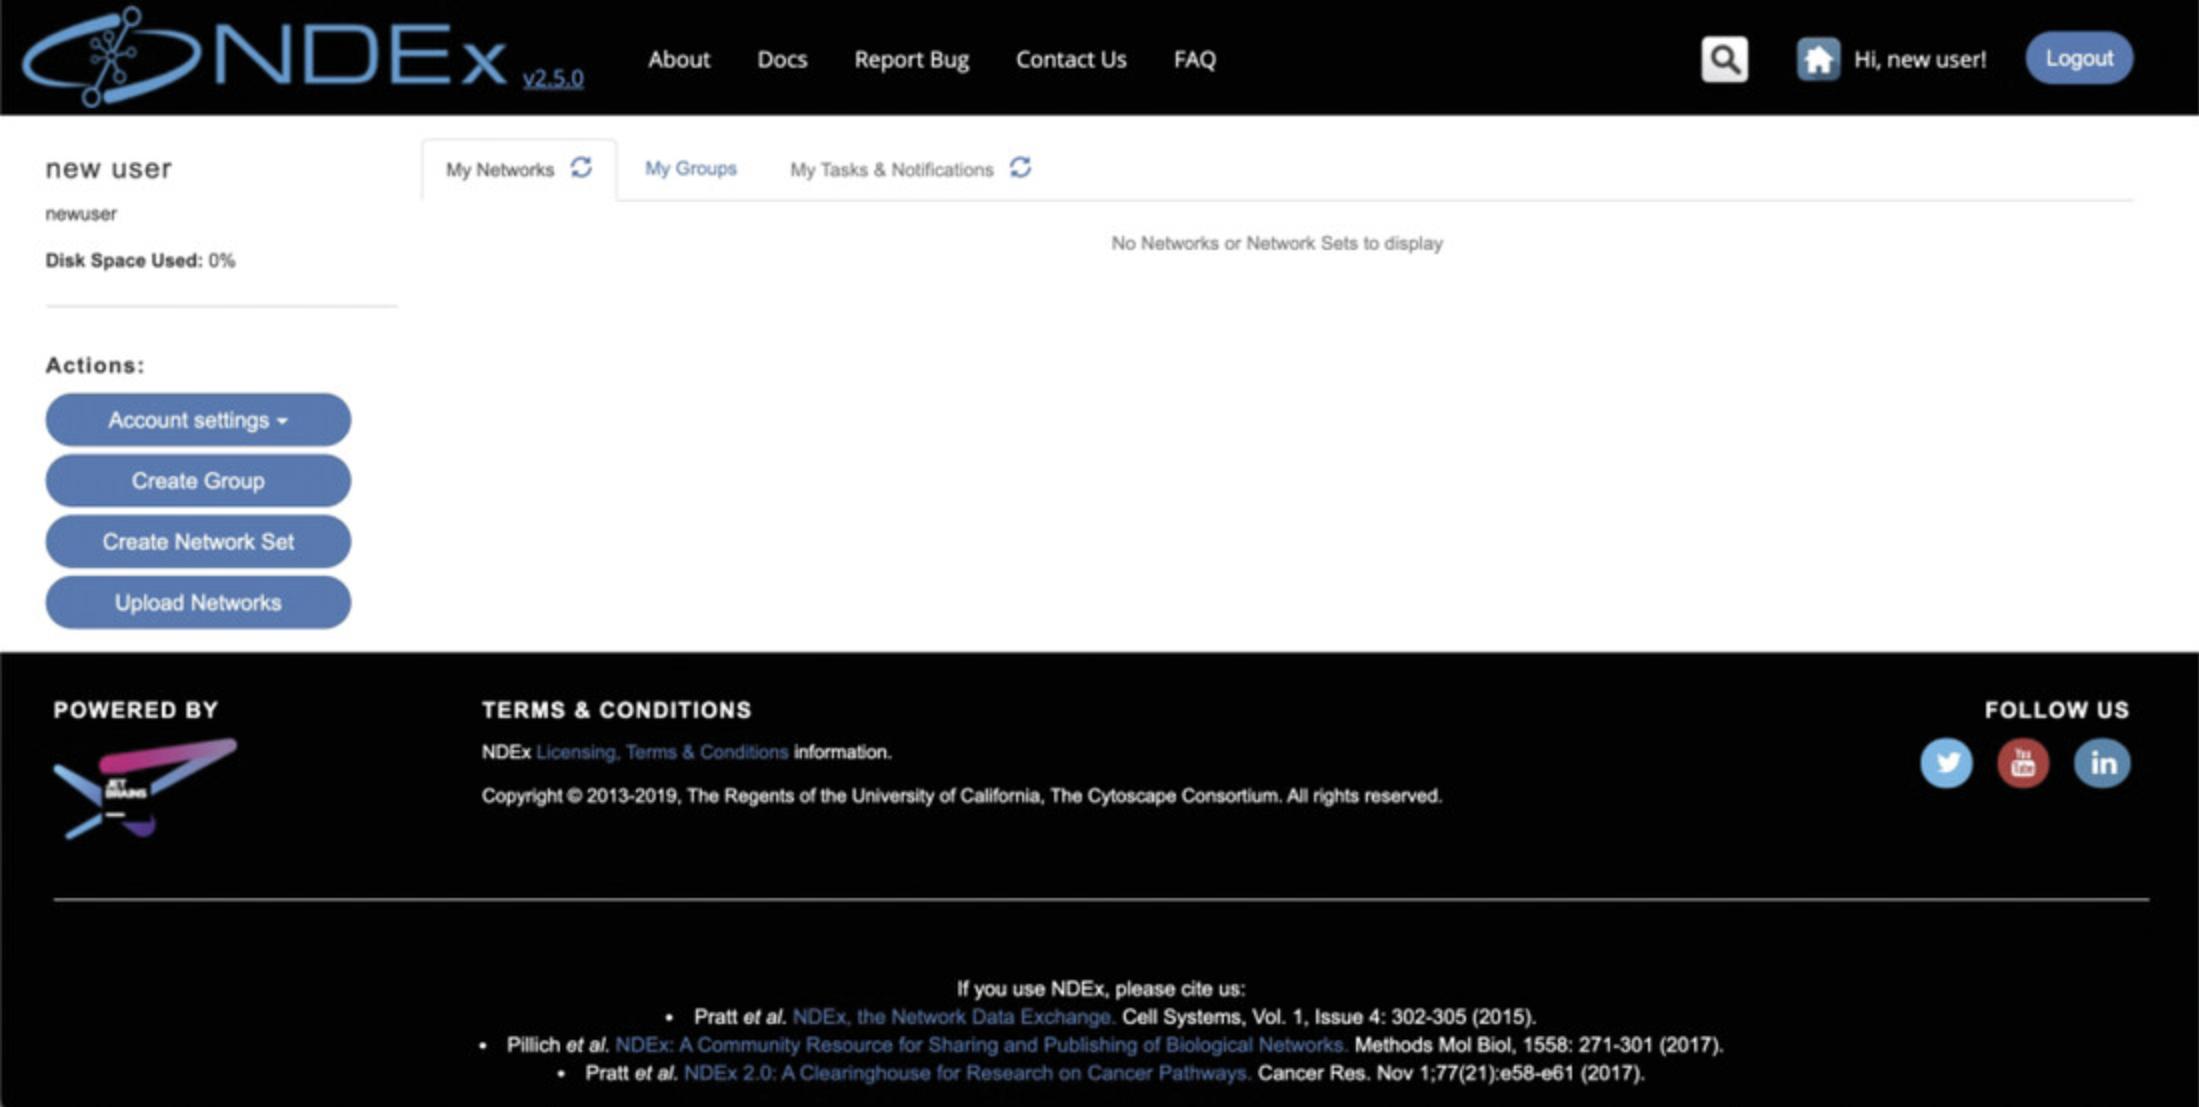
Once logged in, your account page will look like Figure 5. On the left-hand side, expand the Account Settings button, then choose Change Password : in the pop-up window, you can change the password to access your account.
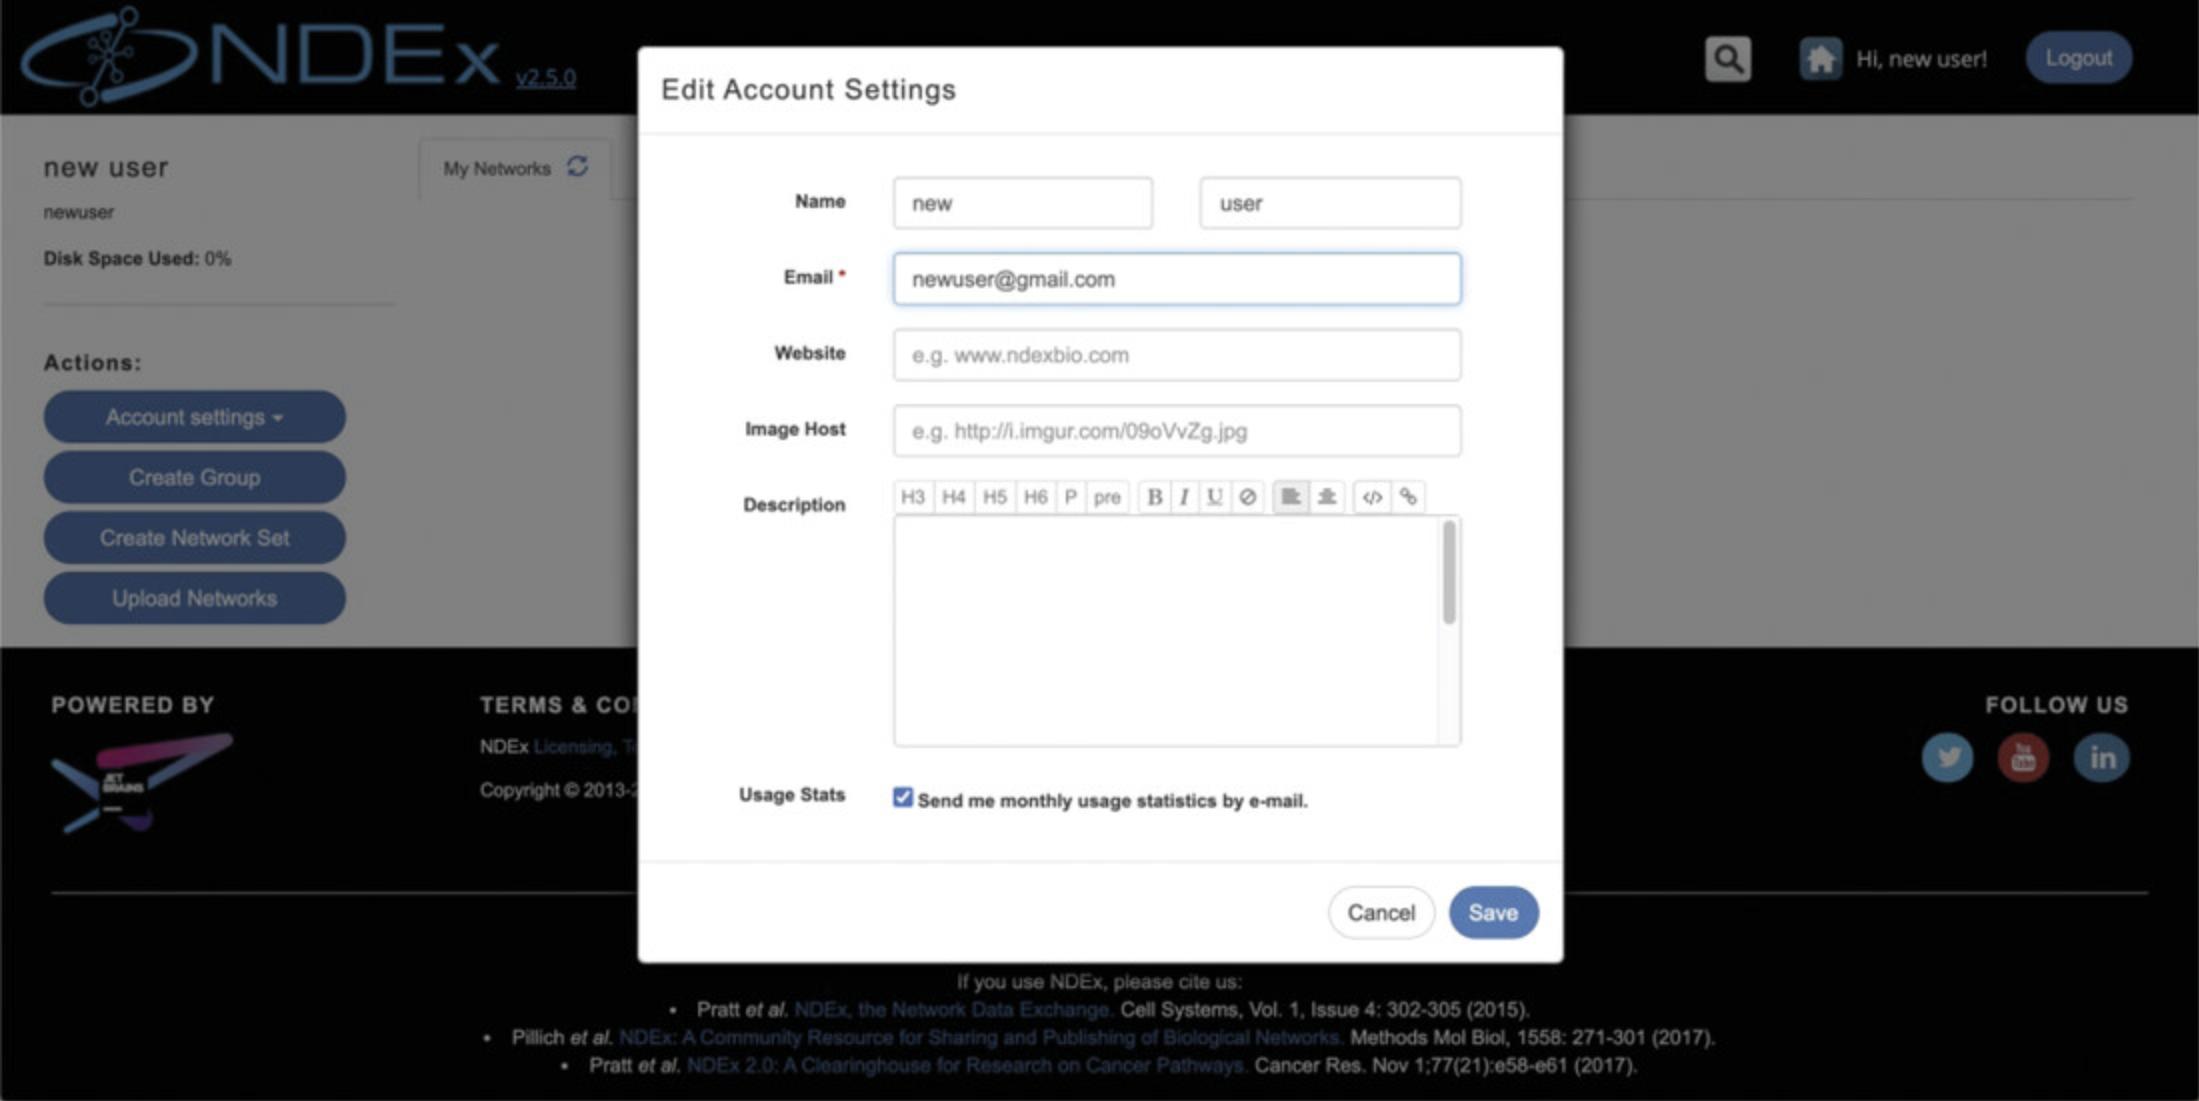
Now expand the Account Settings button again, then choose Edit Settings : in the pop-up window, you can adjust several settings including changing the e-mail address associated to your account, add a personal image or opt-out of monthly usage statistics e-mails for your networks (Fig. 6).
6.Add your first network.
Now that you have an account and 10 gigabytes of free cloud storage for your networks, let's add a network to your account.
From your account's page, click the magnifier in the top right corner (Fig. 5) to open the Search modal window, which has the same features as the Search interface on the landing page.
Type leukemia in the textbox and run the search.
In the results page, click the Acute Myeloid Leukemia to display the network.
Now type MDM2 TP53 in the query textbox (Fig. 3C) and press Enter.
When the query result is displayed in split screen, you will notice that a blue floppy disk icon is now available in the query control bar: click it to save the query result to your account, then navigate back to your account page using the User Avatar in the top left of the page.
Now you should see your account page populated with one network, the query result that you just saved.
Your network's visibility is PRIVATE, which means your network is only visible to you.
Now click the network's name to open its page and display it.
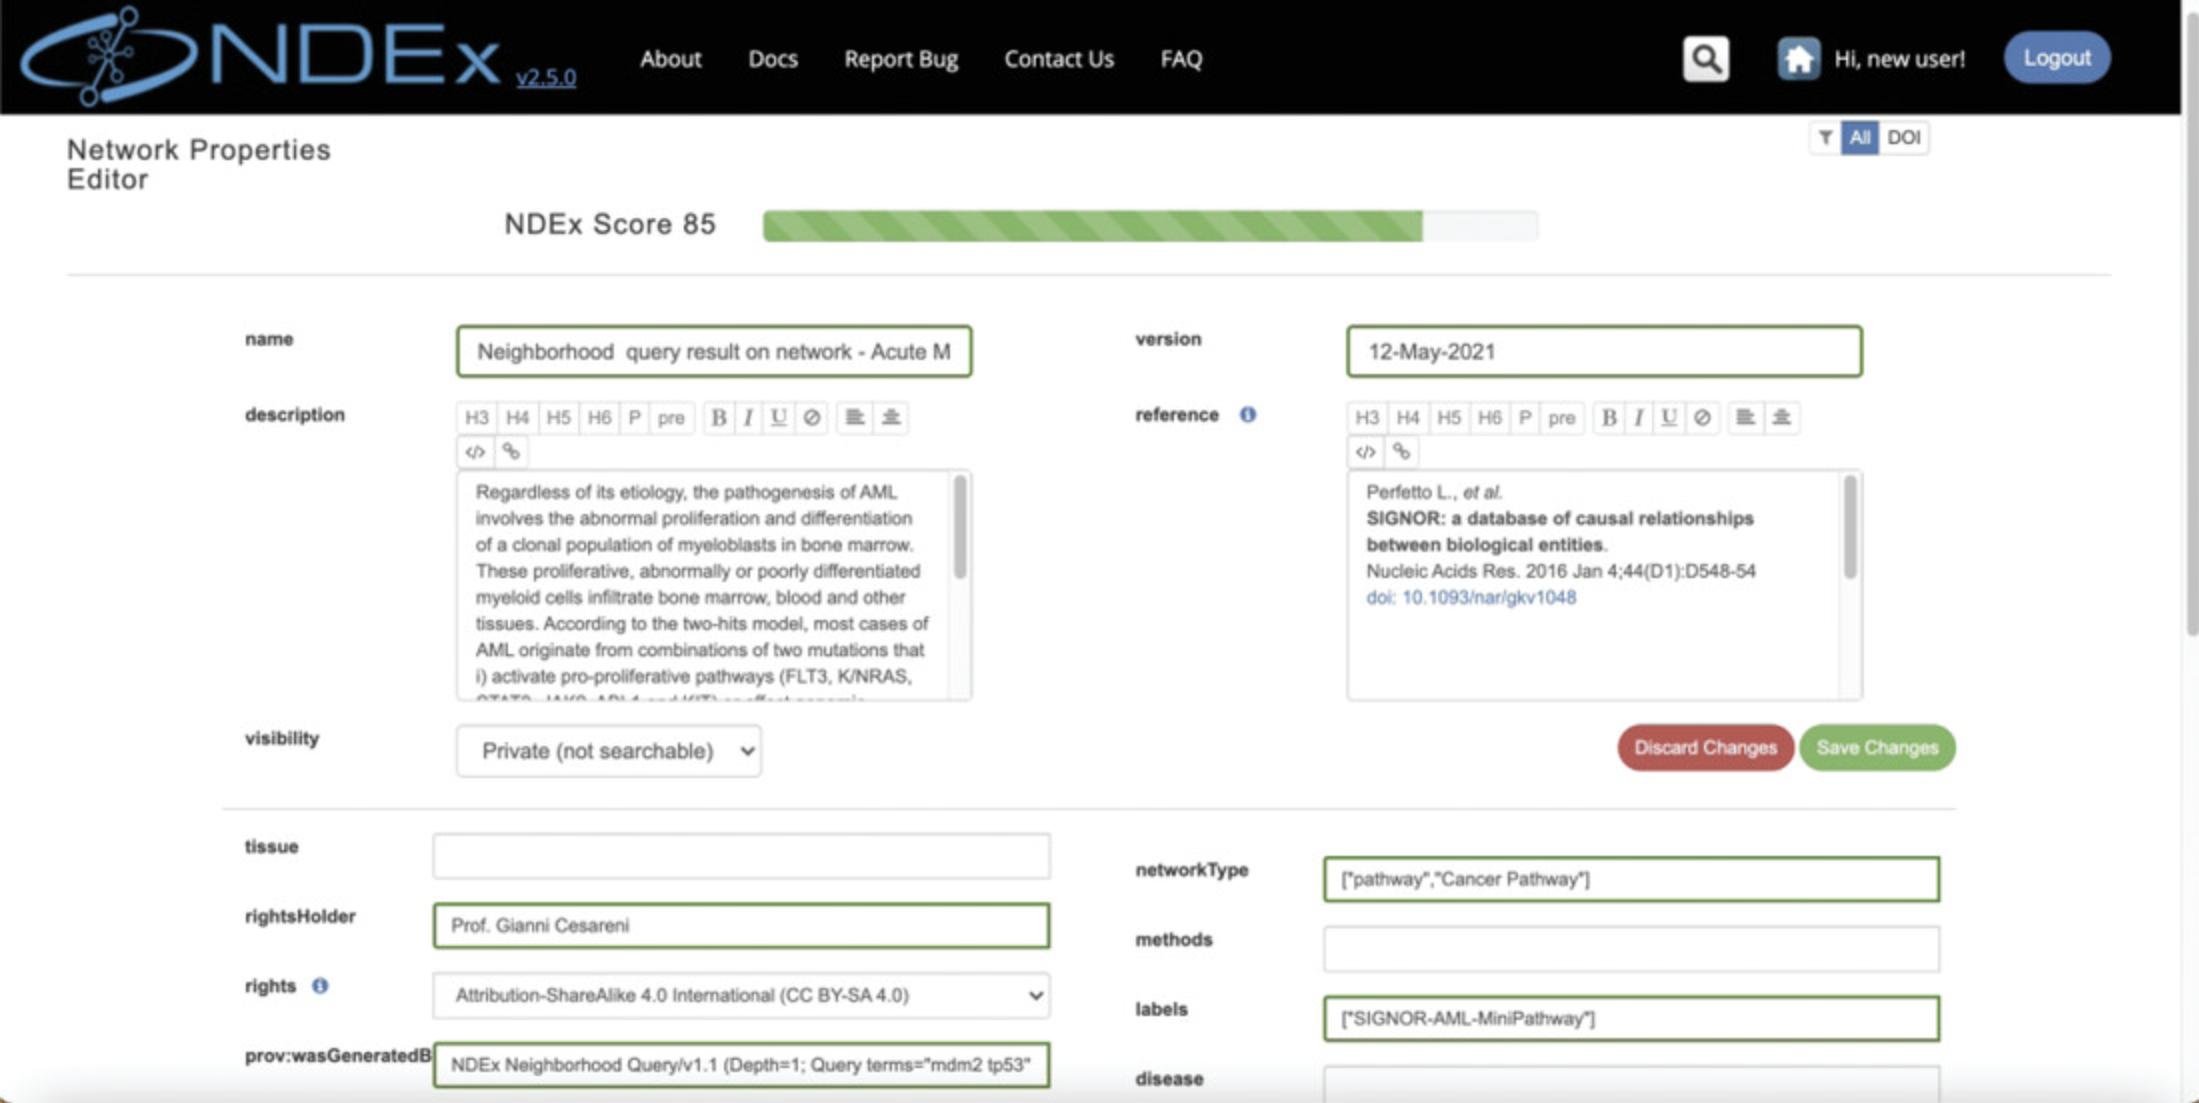
In the bottom right corner where the Action Buttons are located, you can click the “pencil” button and access the network property editor (Fig. 7), where you can modify a variety of network properties, including the network's visibility.
Make the network PUBLIC using the visibility dropdown, then click the green button to save your changes.
Now that you are familiar with the NDEx UI, let's move on to Basic Protocol 2 go through a typical workflow to prepare your networks for submission, peer-review and publication in a scientific journal.
Basic Protocol 2: USING NDEx AND CYTOSCAPE IN A PUBLICATION-ORIENTED WORKFLOW
As seen in the previous protocol, an NDEx account unlocks several features not available to anonymous users such as the ability to save networks, manage their visibility, or open them in Cytoscape for subsequent analysis, visual styling, and layout. In this second protocol, we will describe the NDEx features that support collaboration, peer-reviewed publication, and distribution of network models. You will learn how to connect Cytoscape with NDEx and export (save) a network to your NDEx account, share it with collaborators, and finally request a DOI to make your network accessible as a stable reference resource. Basic Protocol 2 uses one of the sample networks available in Cytoscape; however, we encourage you to follow the protocol using your own research network model if possible. If you are not familiar with the Cytoscape Desktop application, please refer to the manual at https://manual.cytoscape.org/en/stable/. Here is a breakdown of the topics covered in this protocol:
1.Launch Cytoscape. 2.Open the sample network 3.Use the Cytoscape NDEx interface to sign into your account from Basic Protocol 1. 4.Export the network to your NDEx account. 5.Go to the NDEx website and select the new network. 6.Annotate the network. 7.Enable the network's “Share URL” 8.Request a DOI.
Necessary Resources
Hardware
A computer with a stable internet connection
Software
Web browser (recommended: Google Chrome or Mozilla Firefox)
Cytoscape desktop application
1.To begin, launch the Cytoscape desktop application on your computer and wait for startup.
2.Once Cytoscape has loaded, you will see a Welcome Screen (Fig. 8A) as well as a Control Panel on the left-hand side (Fig. 8B).
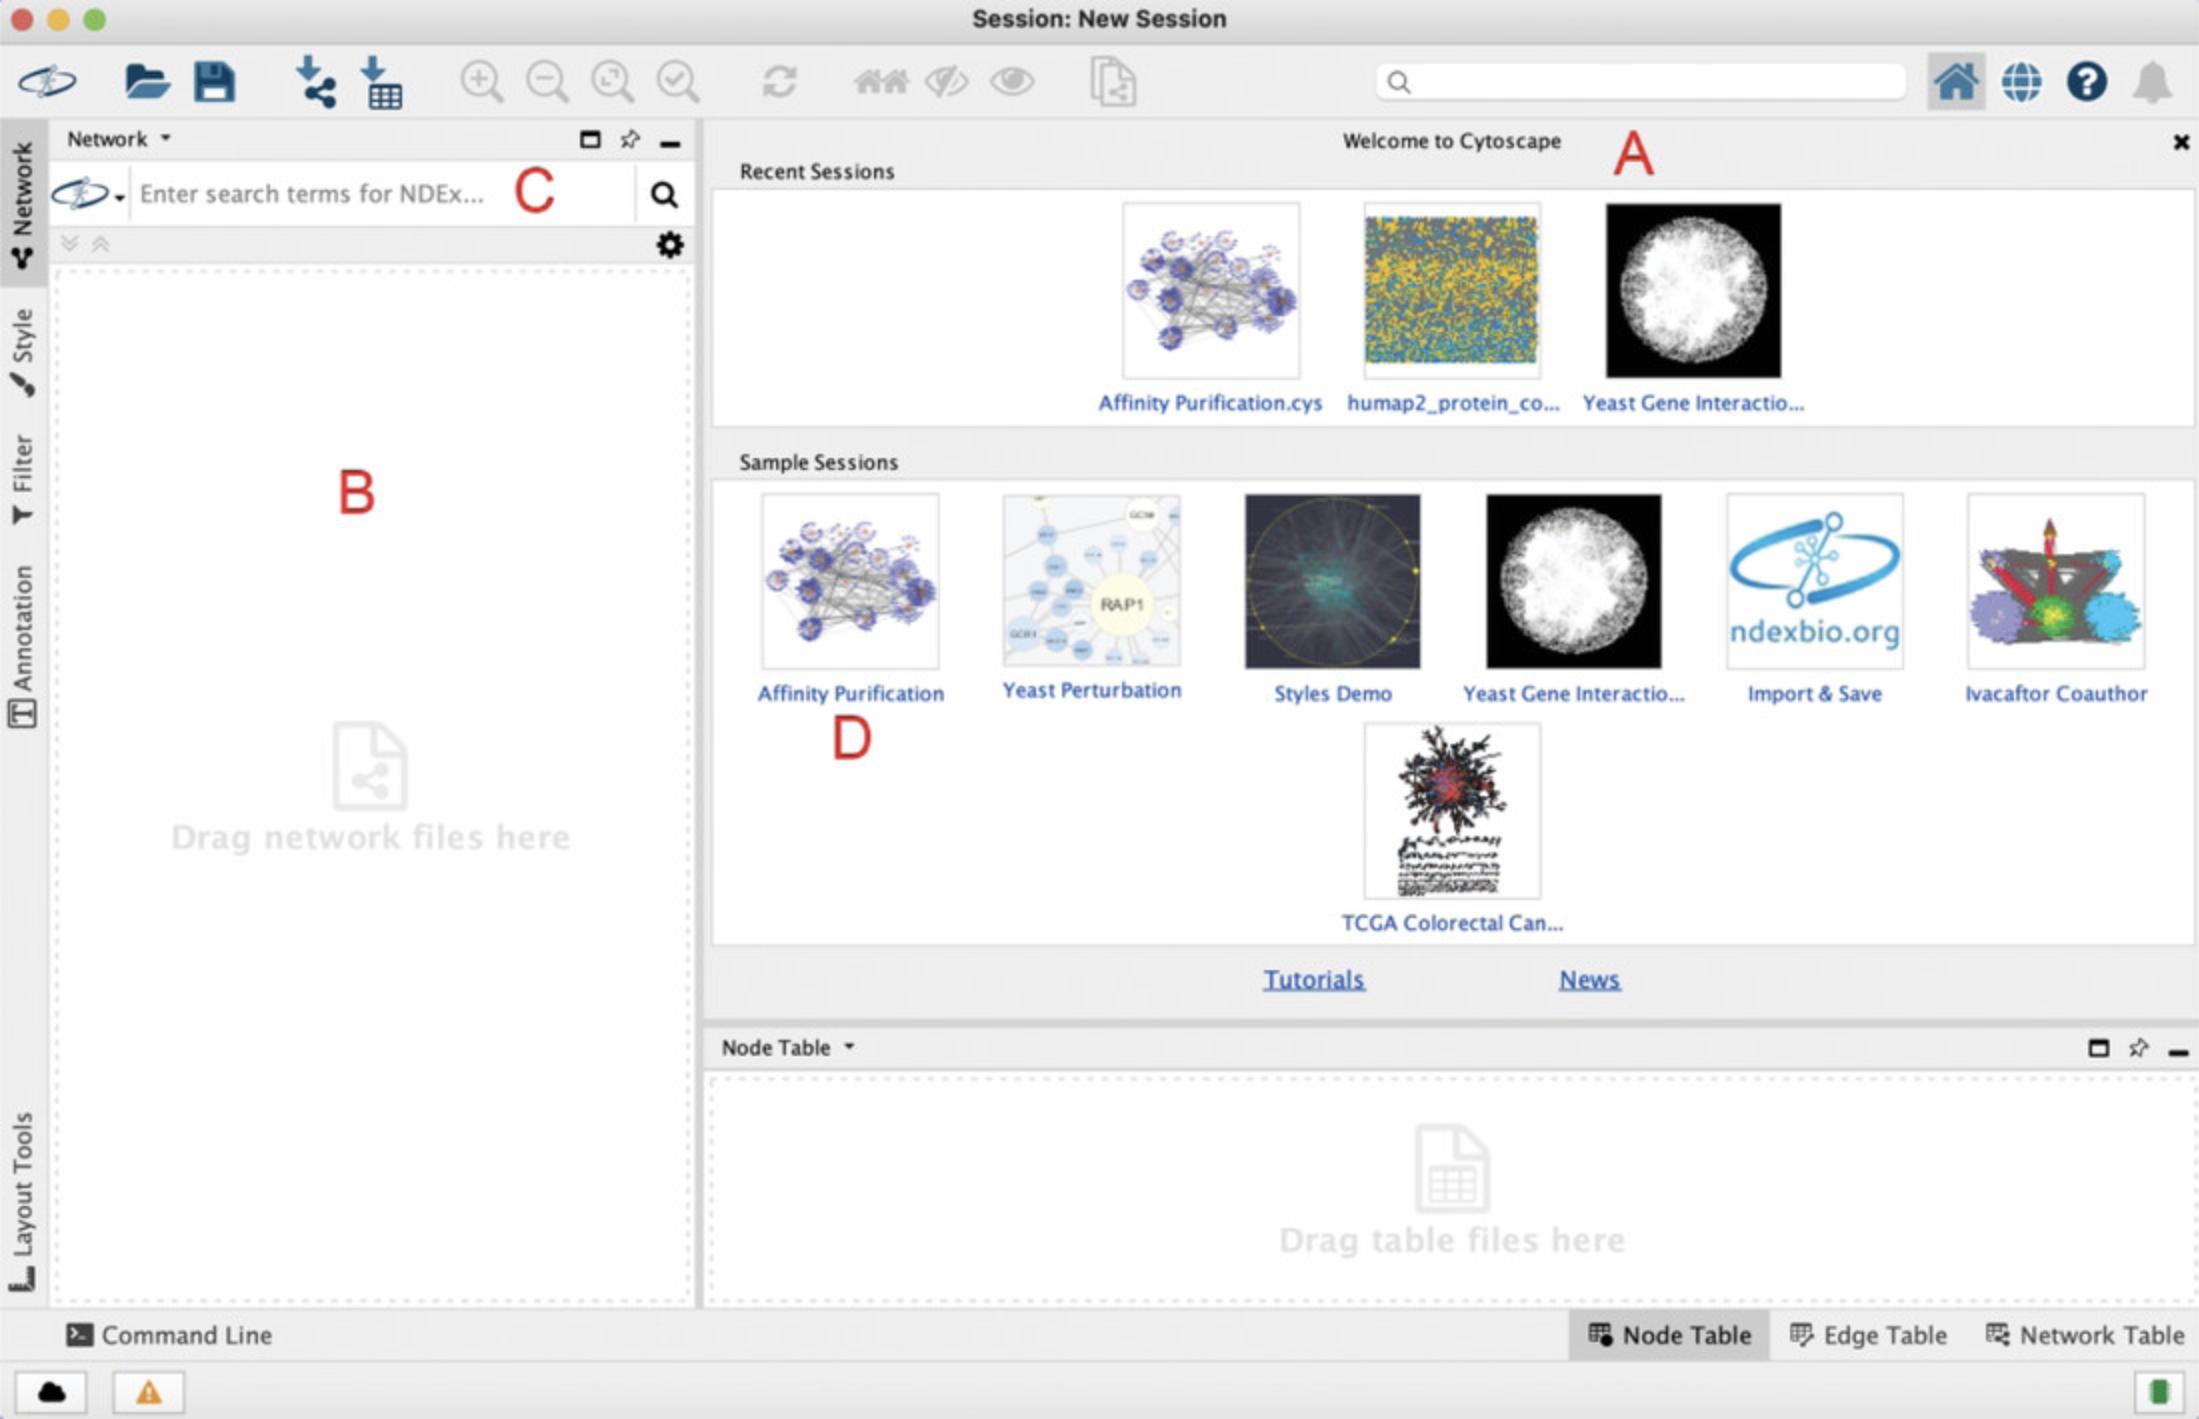
3.In the Welcome Screen , click the “Affinity Purification” sample session tile (Fig. 8D) to open and display the network.
4.Click the NDEx Button in the Cytoscape toolbar and choose Sign In/Sign Up (Fig. 9).
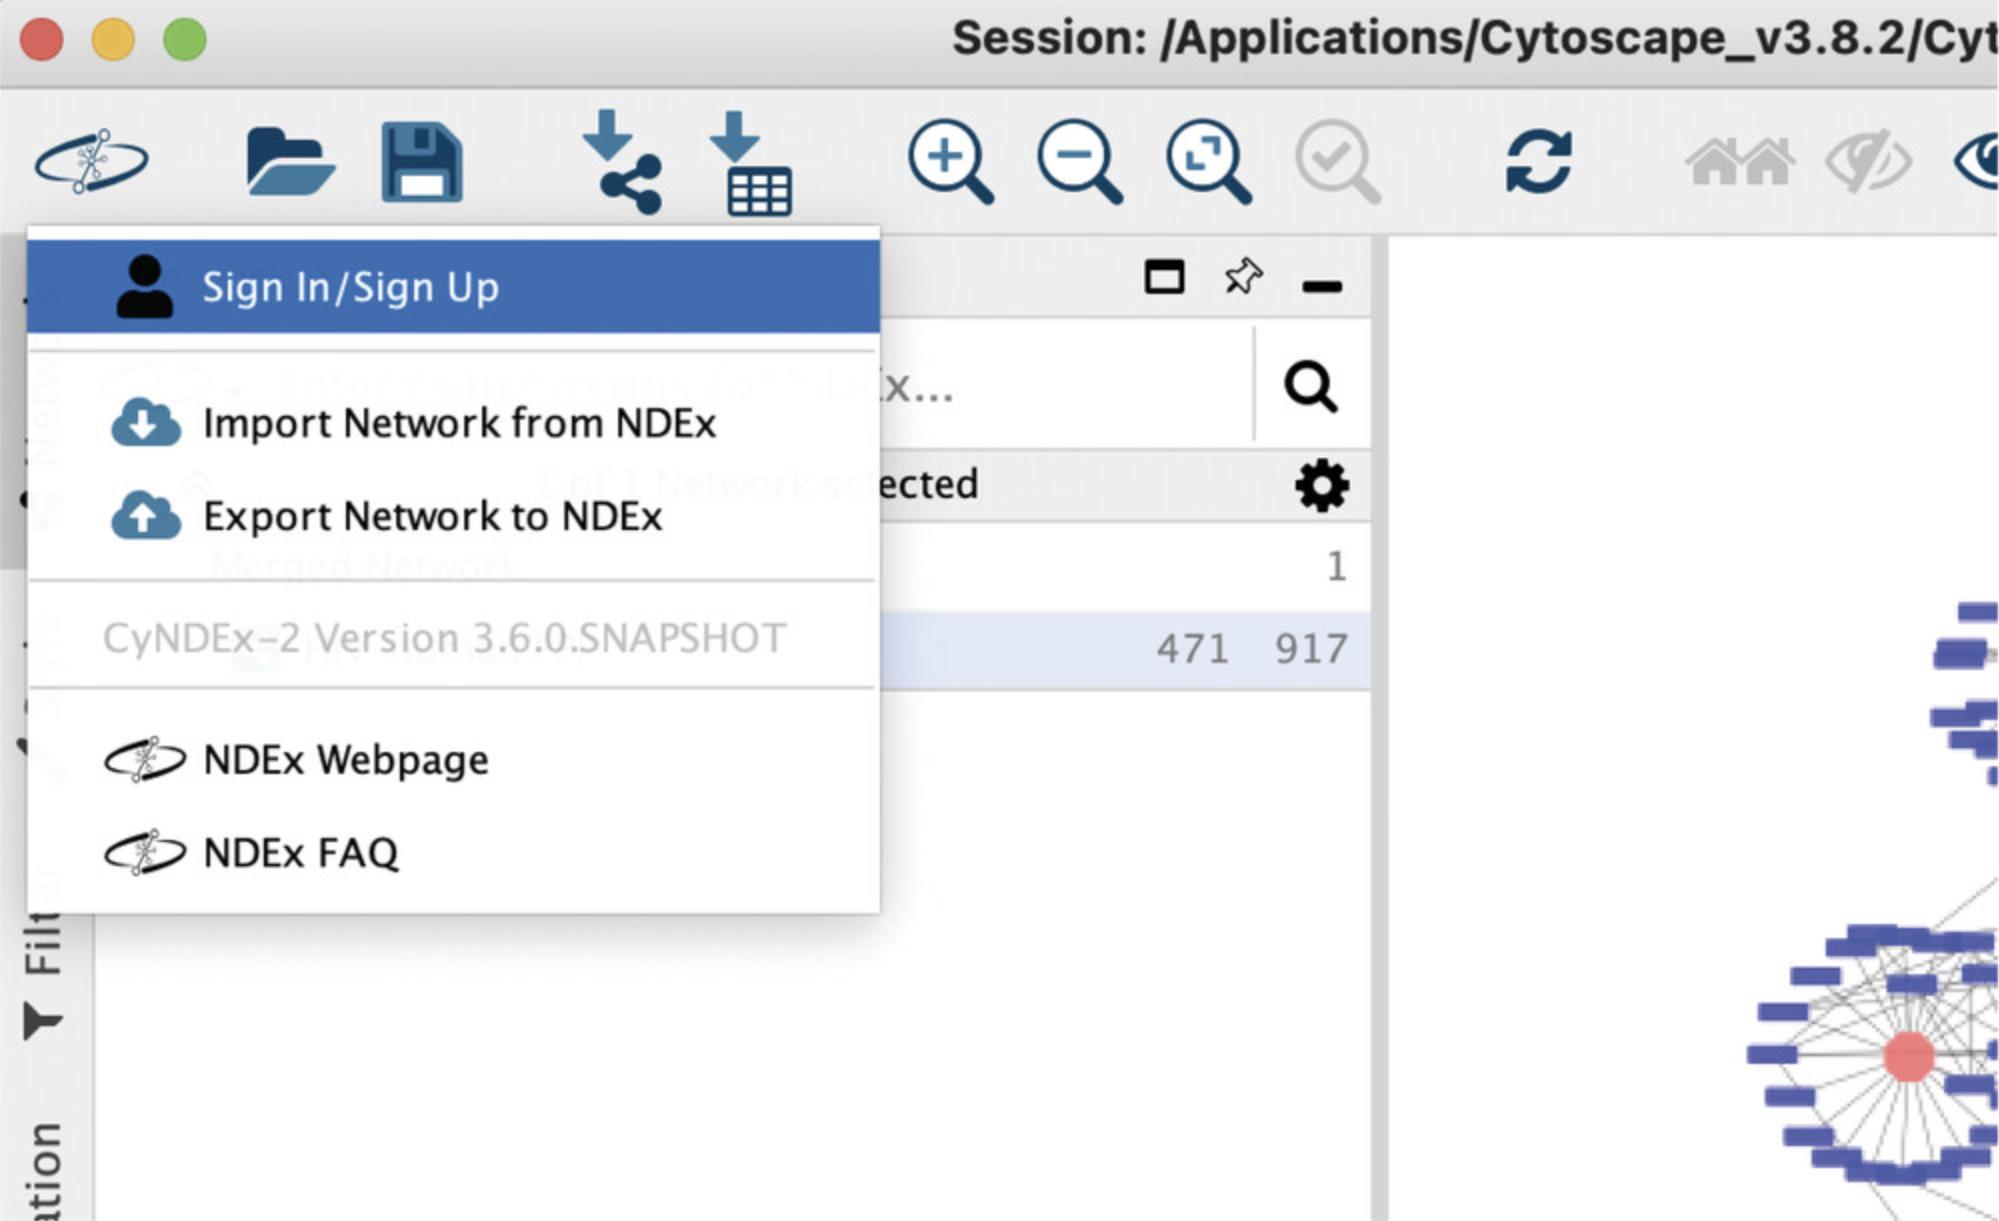
5.In the pop-up window, input your username and password (created earlier in Basic Protocol 1) and click the Sign In button to connect Cytoscape with your NDEx account.
6.Once signed in, Cytoscape will display the network browser window displaying all the networks stored in your NDEx account (Fig. 10). The My Networks checkbox (Fig. 10A) lets you choose what networks are displayed; removing the check mark will show all public networks available in NDEx. When you do that, the search box above (Fig. 10B) is enabled and allows you to search networks in NDEx by keyword or gene name, as we have already seen in Basic Protocol 1. Finally, the tile in the top right corner (Fig. 10C) shows the NDEx account (profile) you are currently connected to, lets you to set up additional profiles, or sign out of the currently connected profile.
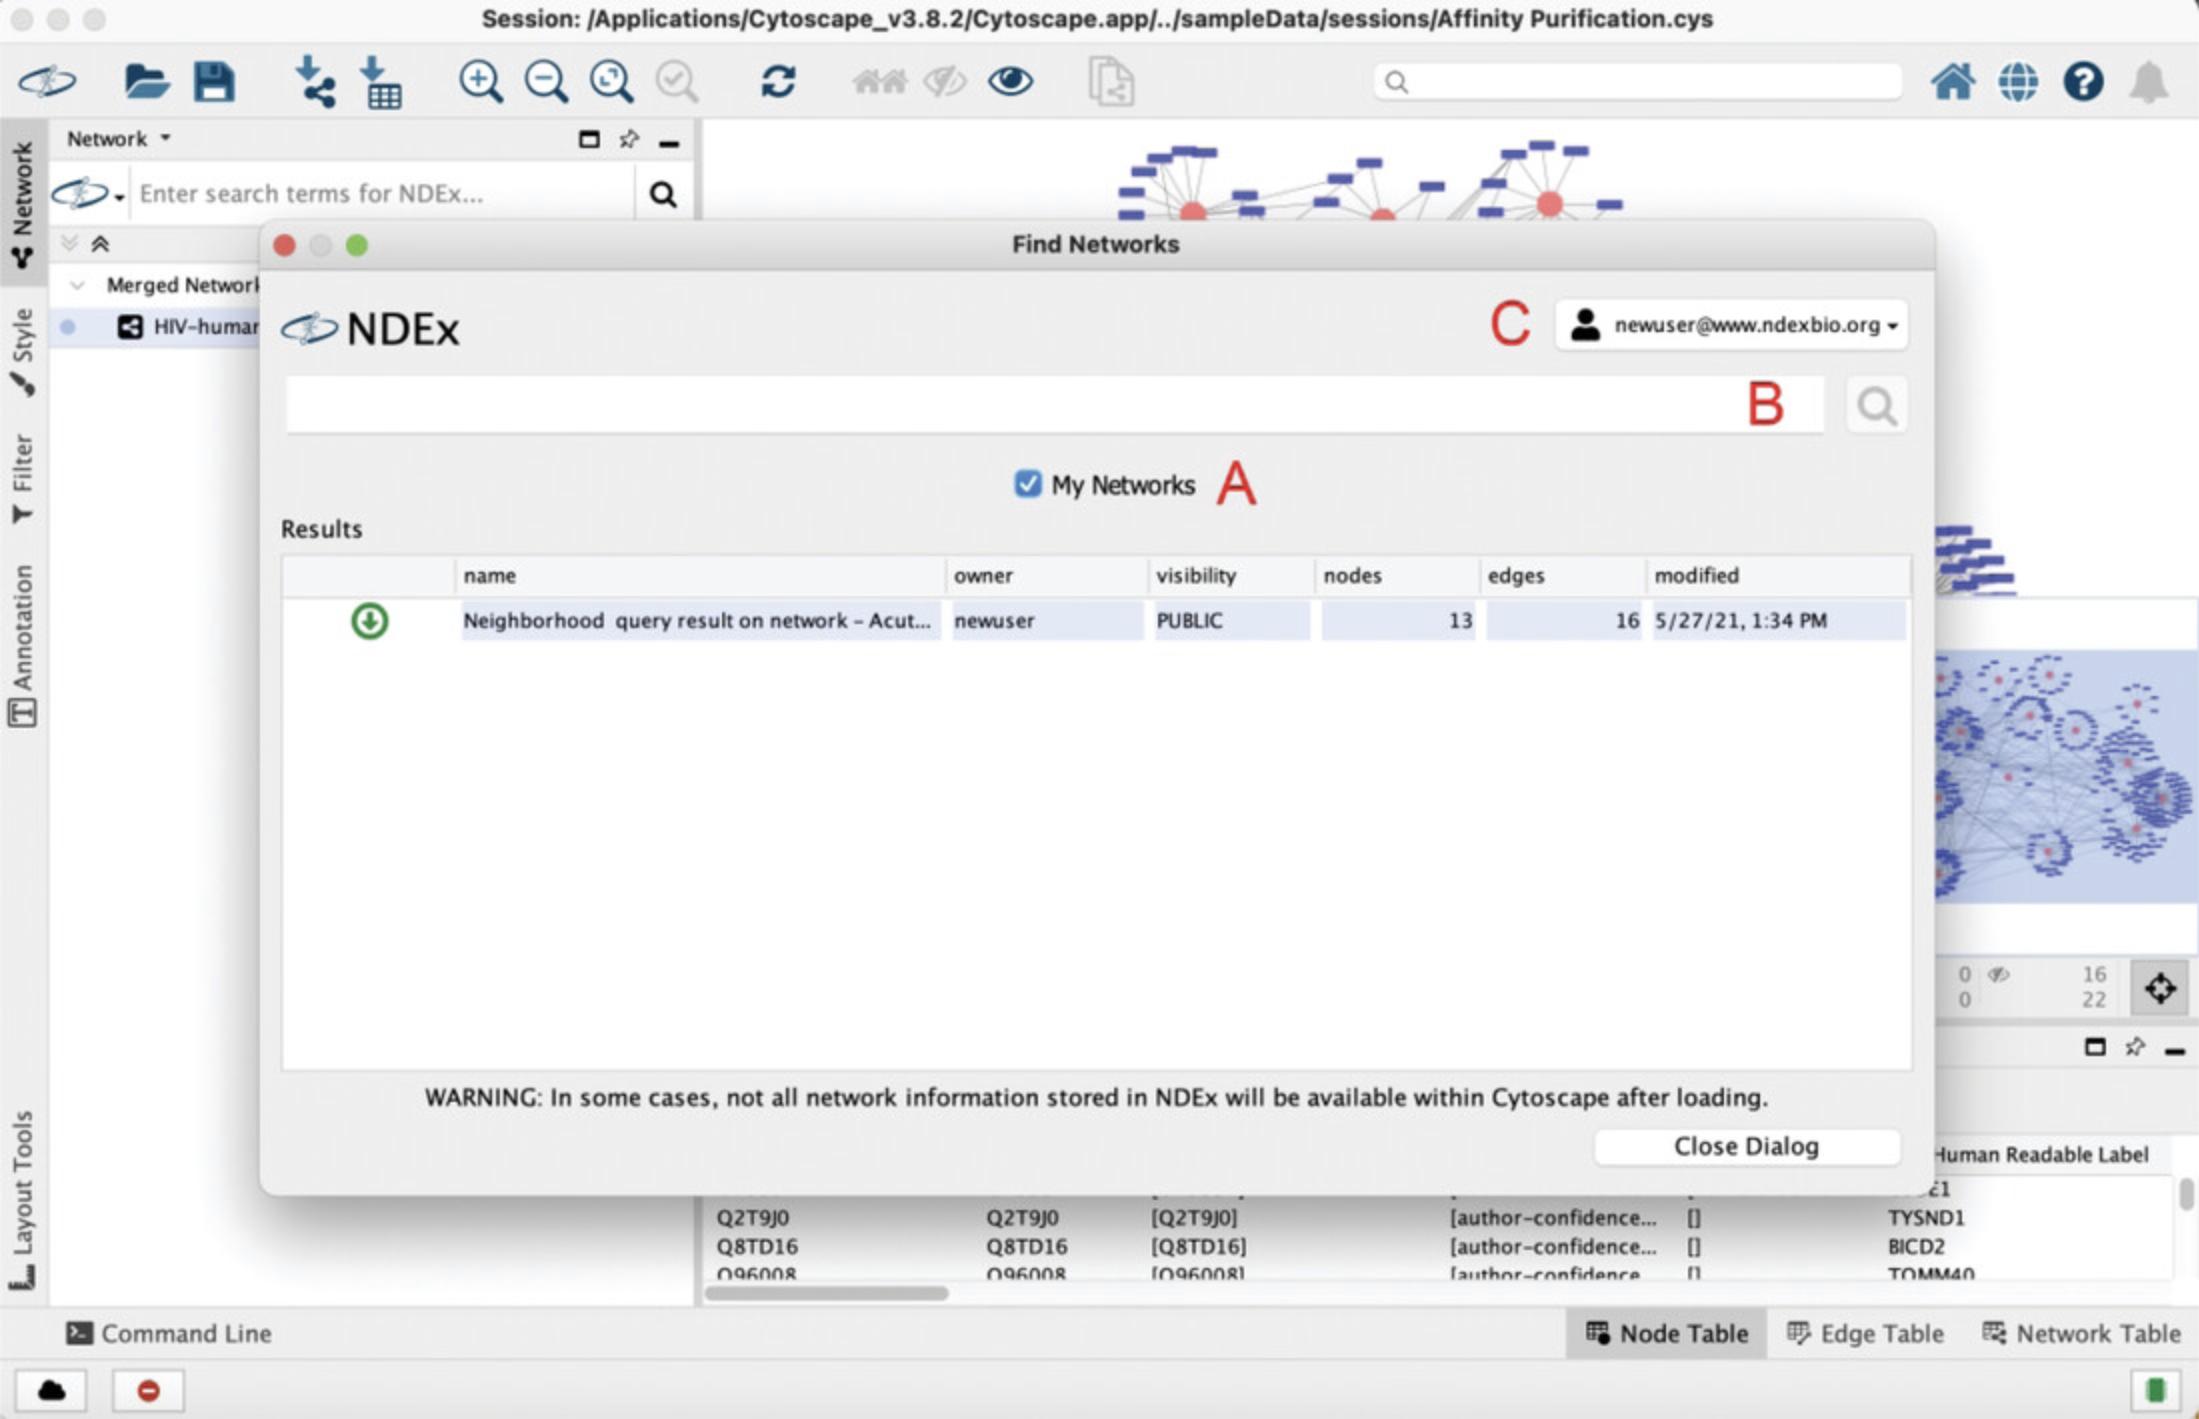
7.Click the Close Dialog button at the bottom right to close the window and go back to Cytoscape.
8.Now that Cytoscape and NDEx are connected, you are ready to save the Cytoscape sample network to your NDEx account: click the NDEx Button in the Cytoscape toolbar (Fig. 9) and this time choose Export Network to NDEx.
9.A new window will be opened as shown in Figure 11.If desired, you can add information to the network using the available property fields. When done, click the blue button at the bottom right corner to save the network to your NDEx account.
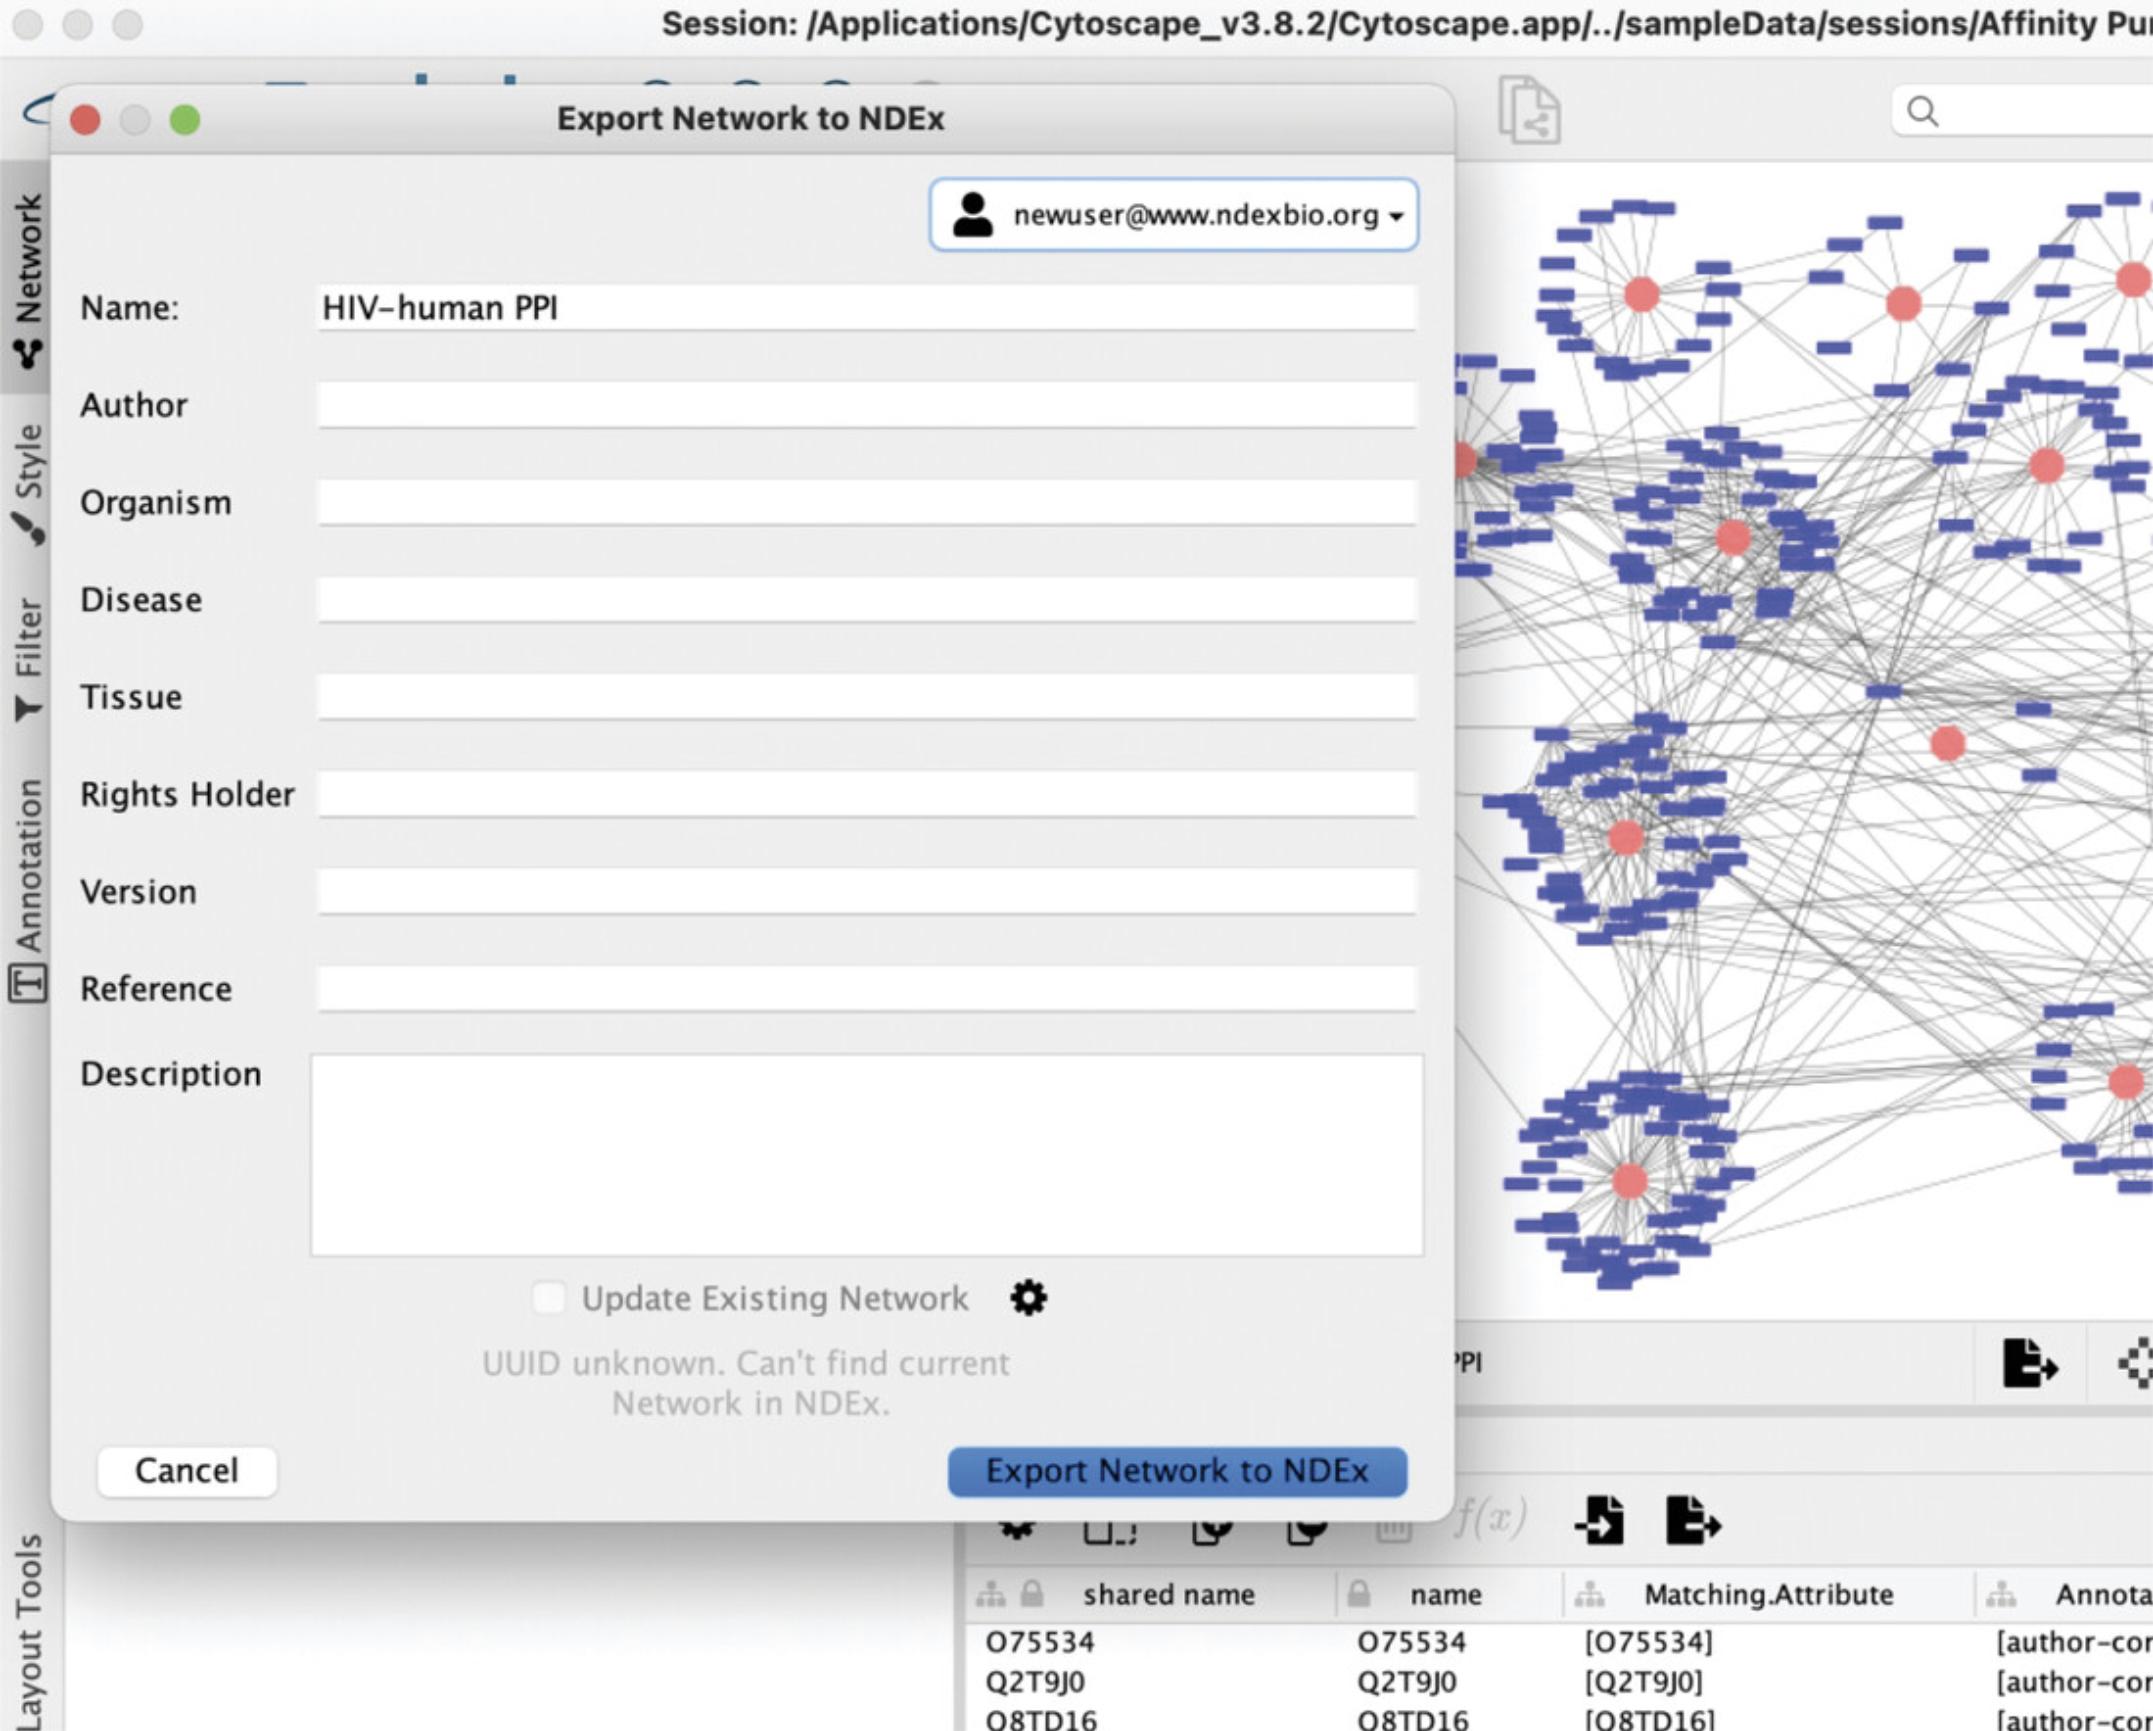
10.Use the web browser to visit your NDEx account page. Select the network you just saved to display it in the network viewer. Your network is PRIVATE; you are the only one who can view it.
11.To share this network with collaborators or include it in a peer-reviewed article submission, click the Share action button (Fig. 3D) in the bottom right corner of the NNV page, and choose Share.
12.The NDEx UI will show the permission management screen; here, click the Enable Share URL button to activate a sharable link that you can copy and paste in documents, e-mails, slide decks, etc.
13.When collaboration on the network is finished or the peer-review process has formally accepted your submission and your network model is ready for publication and distribution, you can request the assignment of a Digital Object Identifier (DOI) that will turn your network model into a permanent, stable reference dataset. To request a DOI, click the Share action button (Fig. 3D) in the bottom right corner of the NNV page, and this time choose Request DOI.
14.The NDEx UI will show the Request DOI page (Fig. 12), where you need to populate all the network property fields. Please double check the “Contact Email” field, as this is the e-mail address we will use to communicate with you. When done, click the green Request DOI button at the bottom right of the screen.
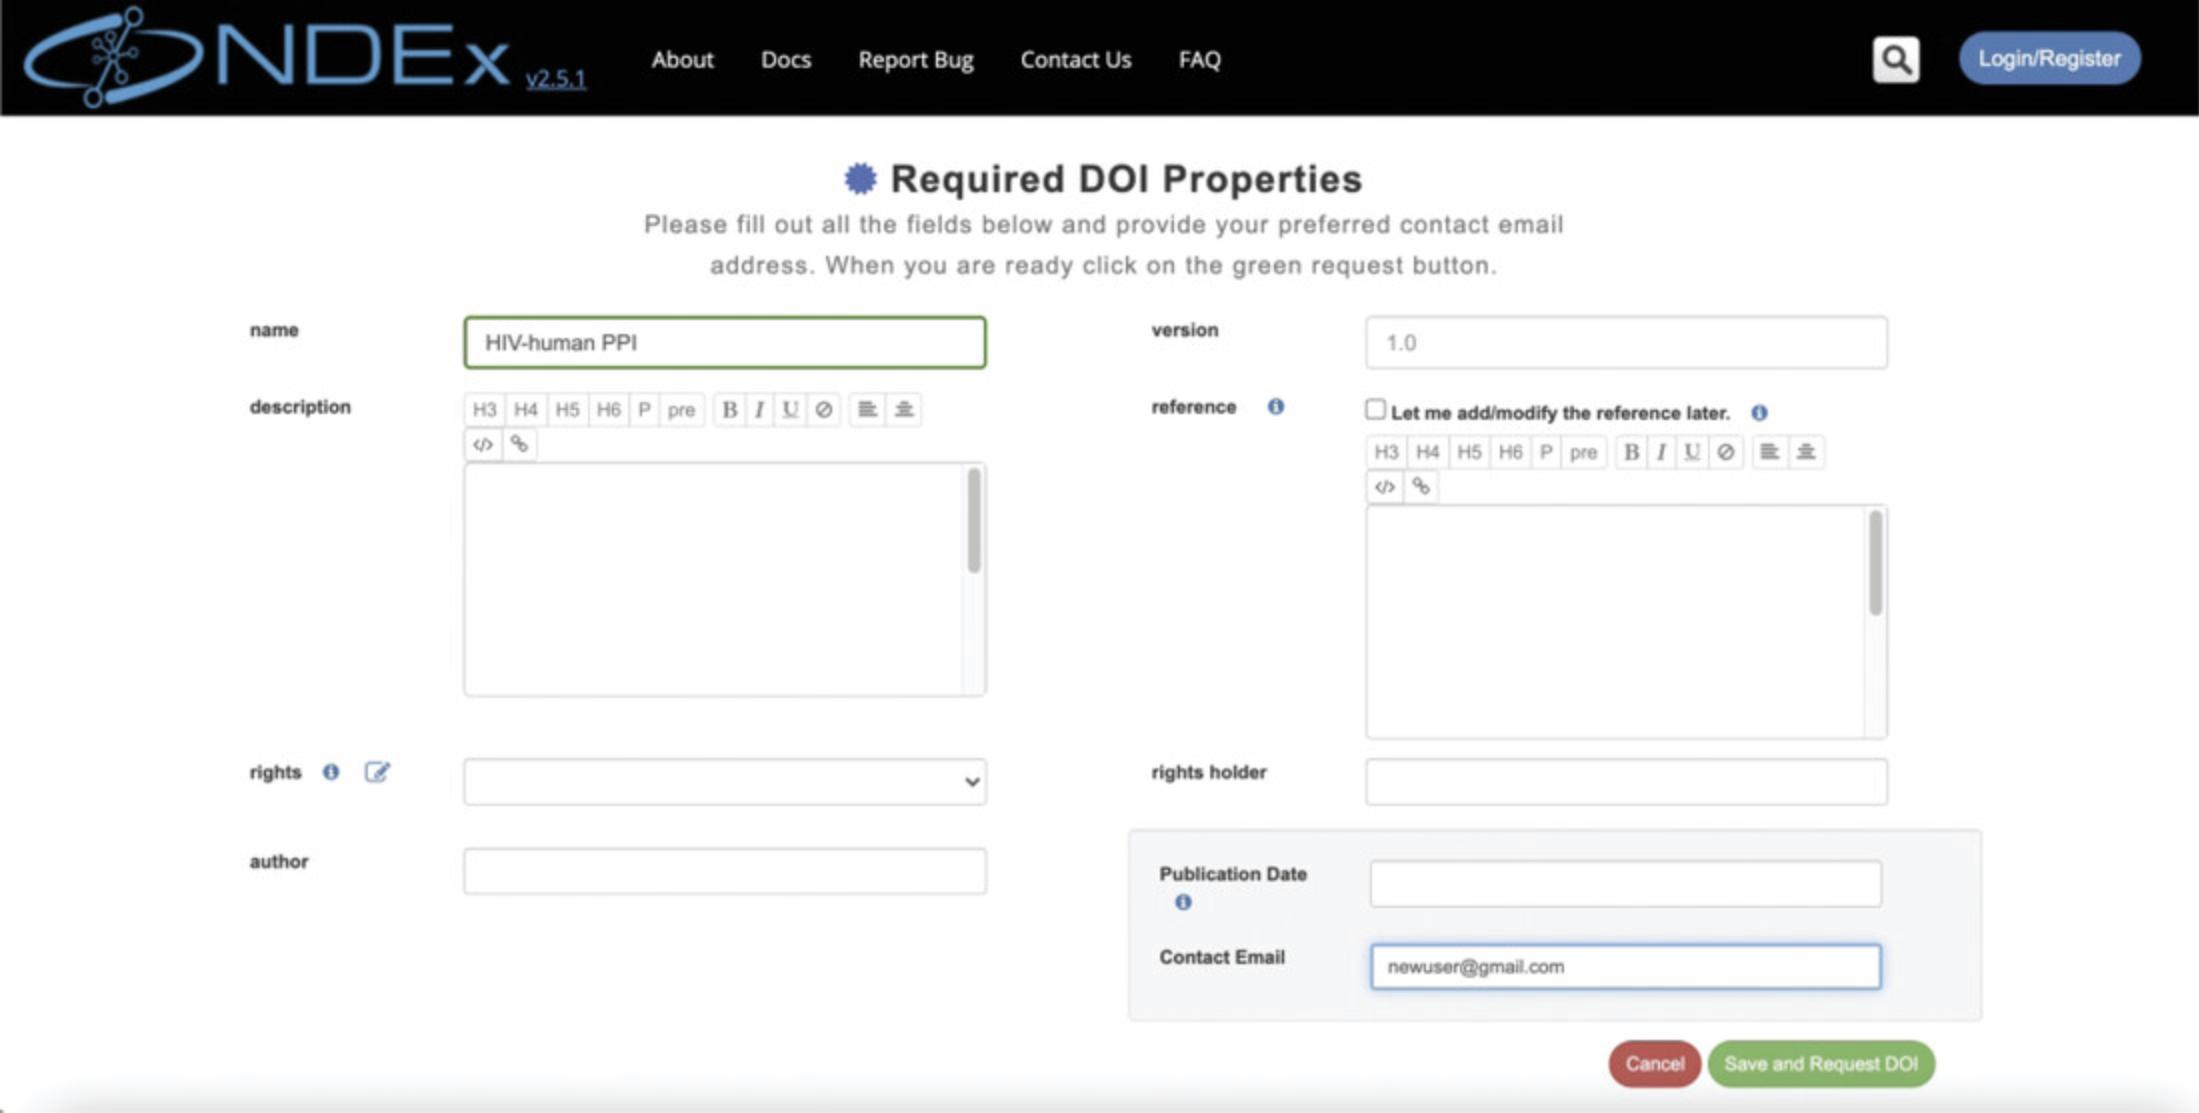
15.A final pop-up window will be displayed: please review all information, then click the blue button to submit your DOI request. After the request is submitted, you'll be sent back to the network's NNV page: at the top of the info panel, below the network's name, you'll see a badge that says DOI Status: Pending. If necessary, you can delete the DOI request by clicking the gray trashcan icon next to the badge.
Basic Protocol 3: WORKING WITH NDEx NETWORKS IN PYTHON
Programmatic access and interactive display via Python, R, and JavaScript enable a broad range of applications in network analysis and visualization. The ndex2 Python client library provides a convenient wrapper around the NDEx server API: NDEx networks are transferred using the CX (Cytoscape Exchange) format and ndex2 includes the NiceCX Python object to simplify the use of CX data. As NiceCX does not provide common network manipulation functionality, for this purpose data is cast into other data models such as NetworkX or iGraph. This protocol consists of a Jupyter Notebook that demonstrates how to use the ndex2 Python client and NiceCX class to perform the following operations:
1.Load a network starting from an existing network in NDEx and display it in the notebook 2.Copy and apply a style from an existing template in NDEx 3.Apply a layout using NetworkX 4.Save a network to your account in NDEx.
The Sphinx documentation for the ndex2 client is available at https://ndex2.readthedocs.io/en/latest/.
The CyJupyter documentation is available at https://github.com/cytoscape/cytoscape-jupyter-widget.
Additional Jupyter Notebook examples are available at https://github.com/ndexbio/ndex-jupyter-notebooks.
Examples for JavaScript and R can be found in the tutorial “Automation in the Cytoscape Ecosystem” available at https://github.com/cytoscape/cytoscape-ismb-2020/blob/master/README.md.
Necessary Resources
Hardware
A computer with stable internet connection
Software
Python 3.6 or higher
ndex2 Python Client
CyJupyter Widget
Jupyter Notebook installed
Web browser (recommended: Google Chrome or Mozilla Firefox)
Files
Jupyter Notebook file “Working with NDEx Networks in Python”
1.Load network from NDEx.
In this first step, you will import a public network from NDEx into the python environment. Every network in NDEx is assigned a Universal Unique ID (UUID) that can be used to reliably reference a specific network. You will load the network called "Sonic hedgehog" available at http://ndexbio.org/viewer/networks/cfd3528f-a7a4-11eb-9e72-0ac135e8bacf. Please click the link to look at the network before we move forward with the next steps.
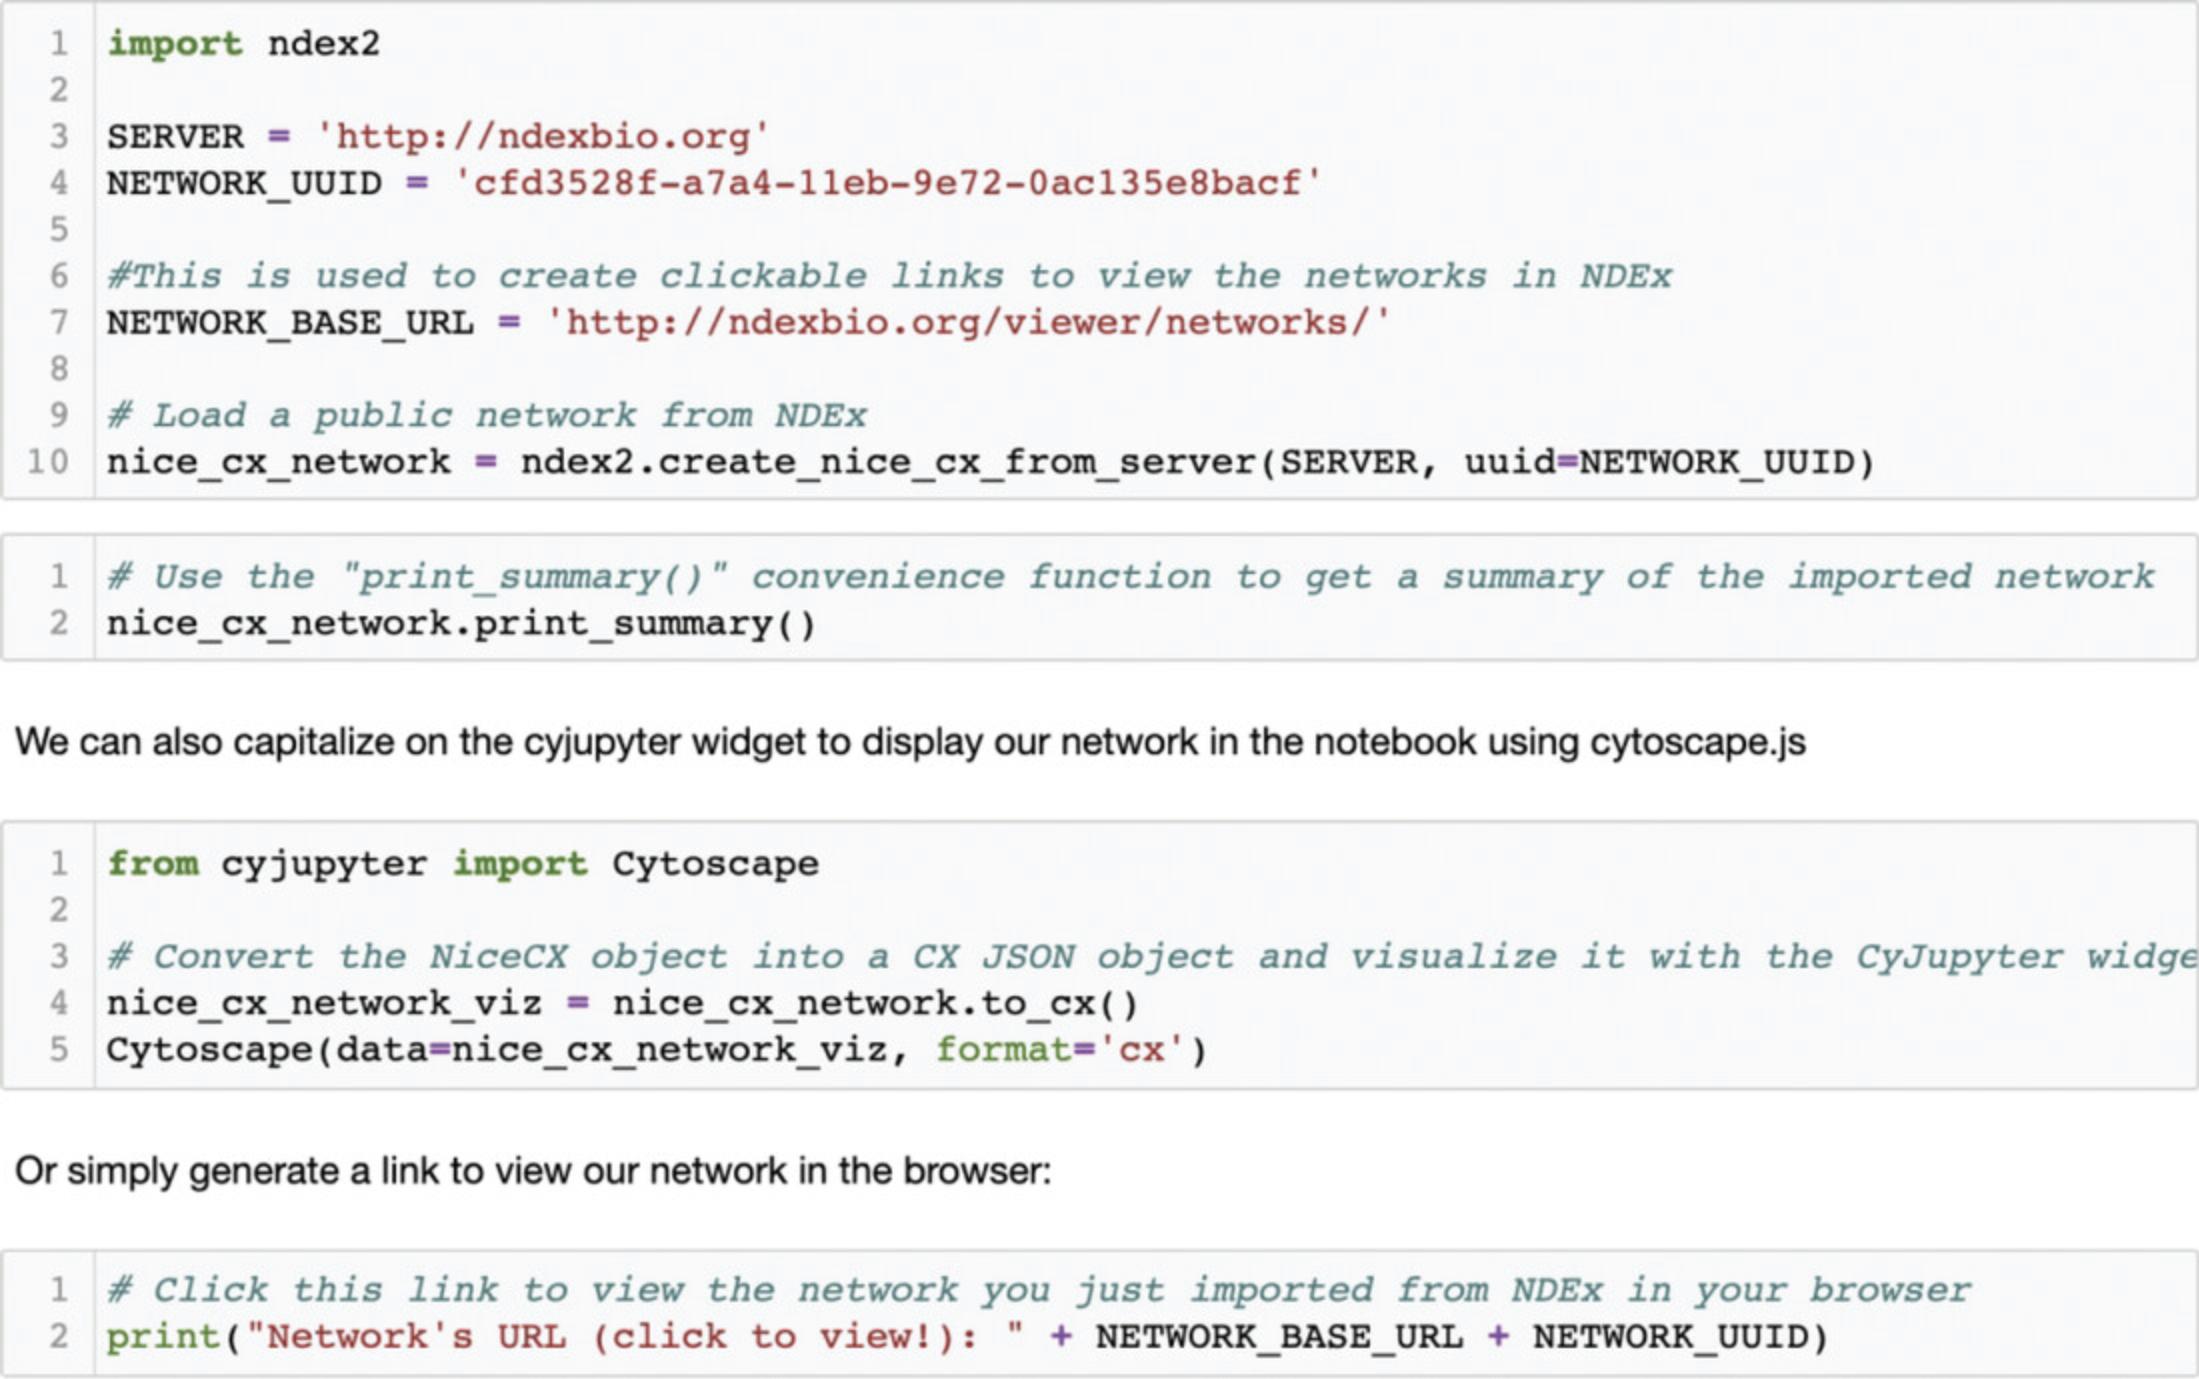
The first block of code (Fig. 13) shows how you can make a request to the specified NDEx server using the UUID of the network using the ndex2.create_nice_cx_from_server() call. The server returns the network in CX format which is used to create a NiceCX object.
The second block of code lets you print out a summary of the network.
The third block of code allows you to display the network within the notebook using the CyJupyter widget, while the fourth block generates a clickable link that you can use to view the page of the network you just imported from NDEx (for convenience, this same link is provided earlier in this paragraph).
2.Copy and apply visual style.
One of the easiest ways to apply a visual style to a network is to copy that style from another network. This allows you to work on the style of your network in Cytoscape using the interactive style editor, then save the network to NDEx for future use as a template. The NiceCX class provides a special method for this common operation, both downloading the template and copying the style to the target network. You specify the network to use as template by defining its UUID, and the apply_template() method copies the visual style and applies it to the 'Sonic Hedgehog' network you imported from NDEx in the previous step (Fig. 14).

3.Save (upload) network to NDEx.
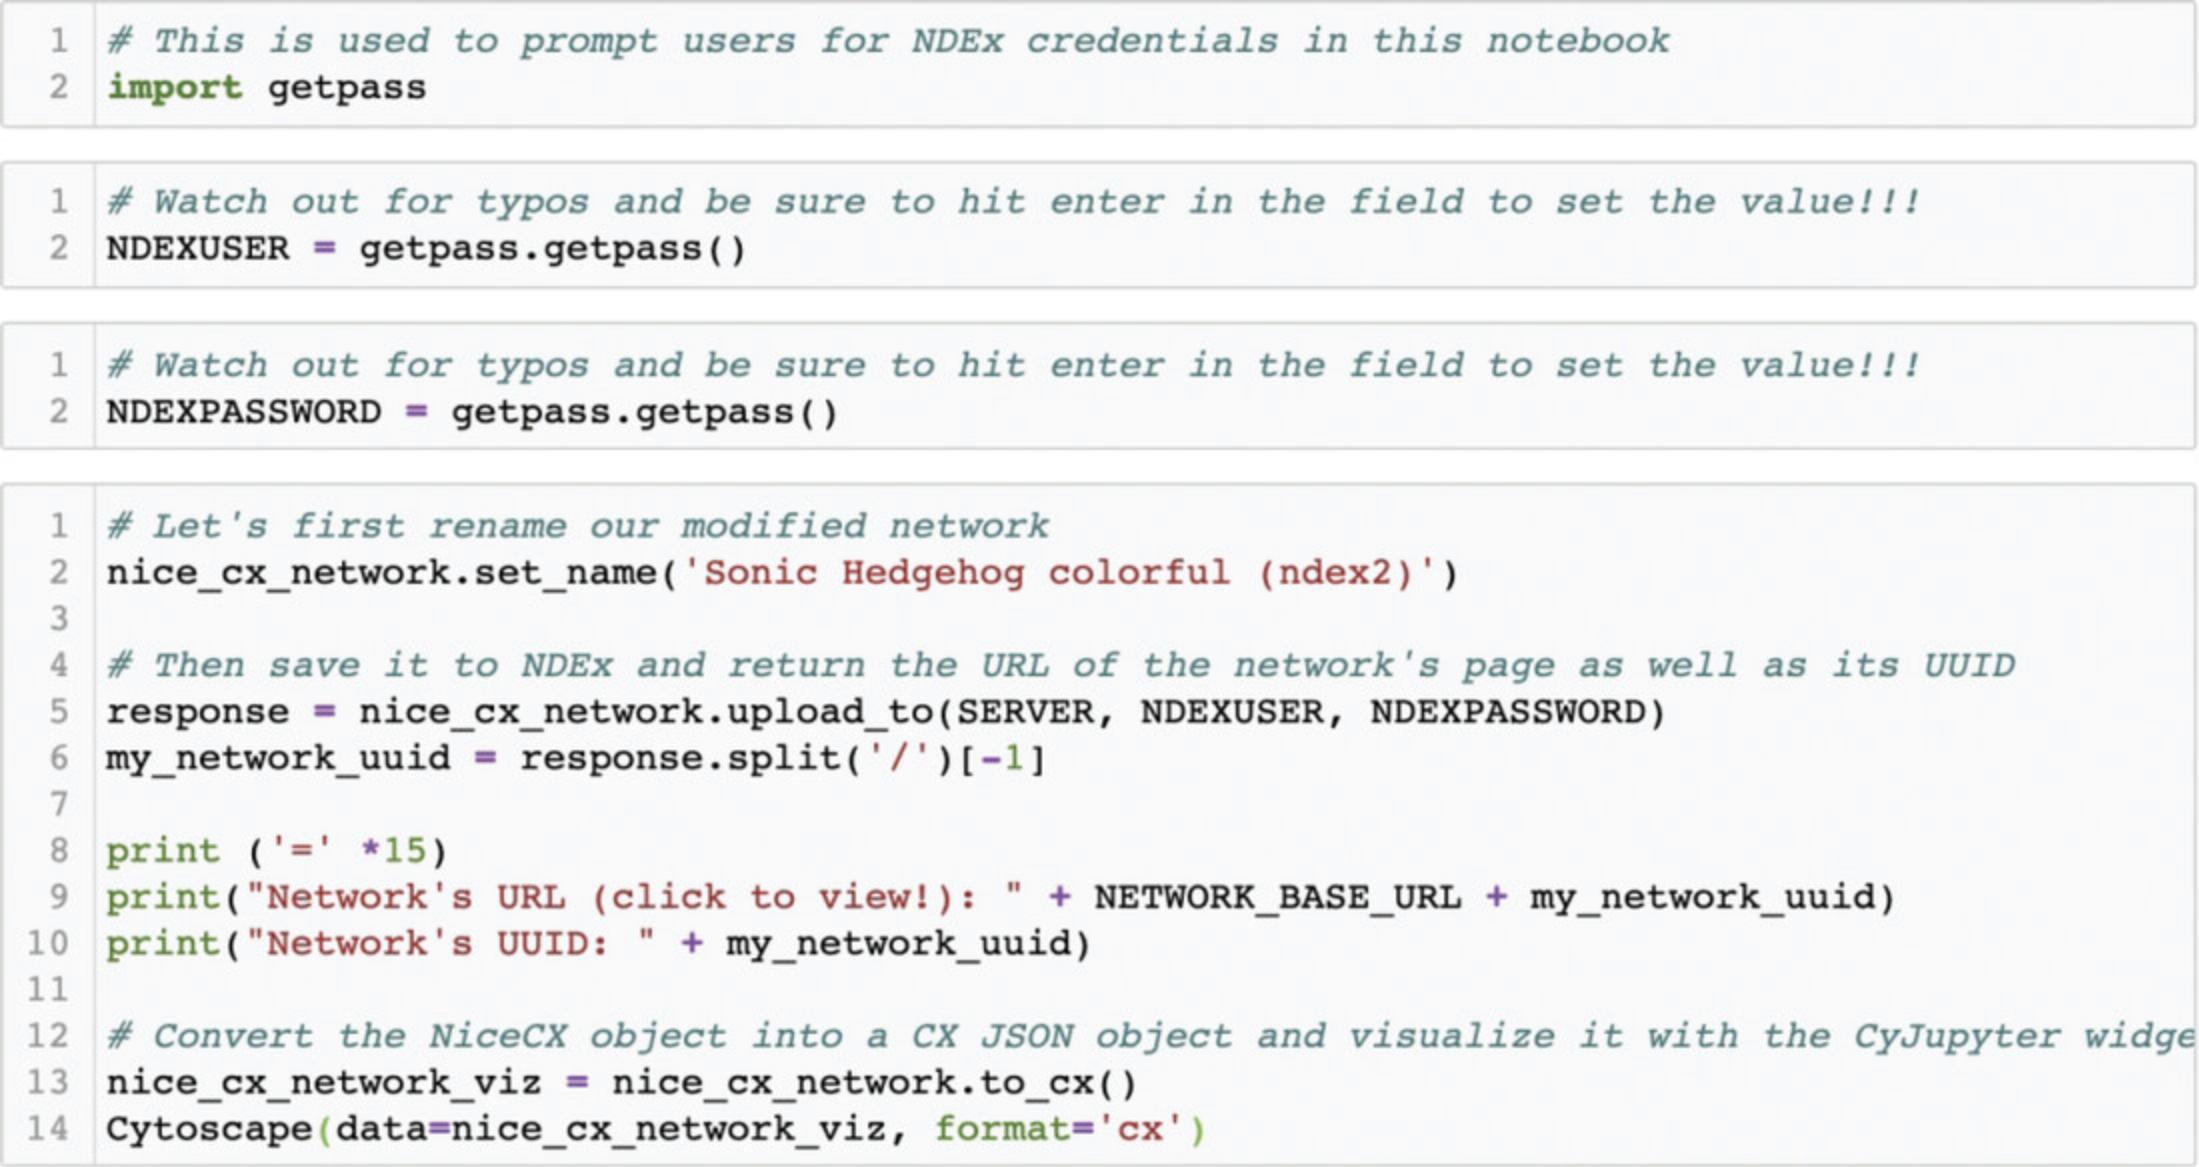
NiceCX networks have a convenient one-step upload method. Saving a network to your account requires you to provide your NDEx 'username' and 'password'. You will now save the 'Sonic Hedgehog' network with its colorful visual style to the NDEx account you created earlier on, in Basic Protocol 1.
You use the first three blocks of code (Fig. 15) to set the credentials required to access your NDEx account.
The fourth block of code assigns a new name to your network and saves it to your account using the upload_to() method. The function returns the URL of the network's RAW JSON, which you can use to generate a clickable URL to visualize your new network.
Using the CyJupyter widget, you can also display your new 'Sonic Hedgehog colorful (ndex2)' networks and compare the visual style differences with the original 'Sonic Hedgehog' network imported at the beginning of this notebook.
4.Apply a layout.
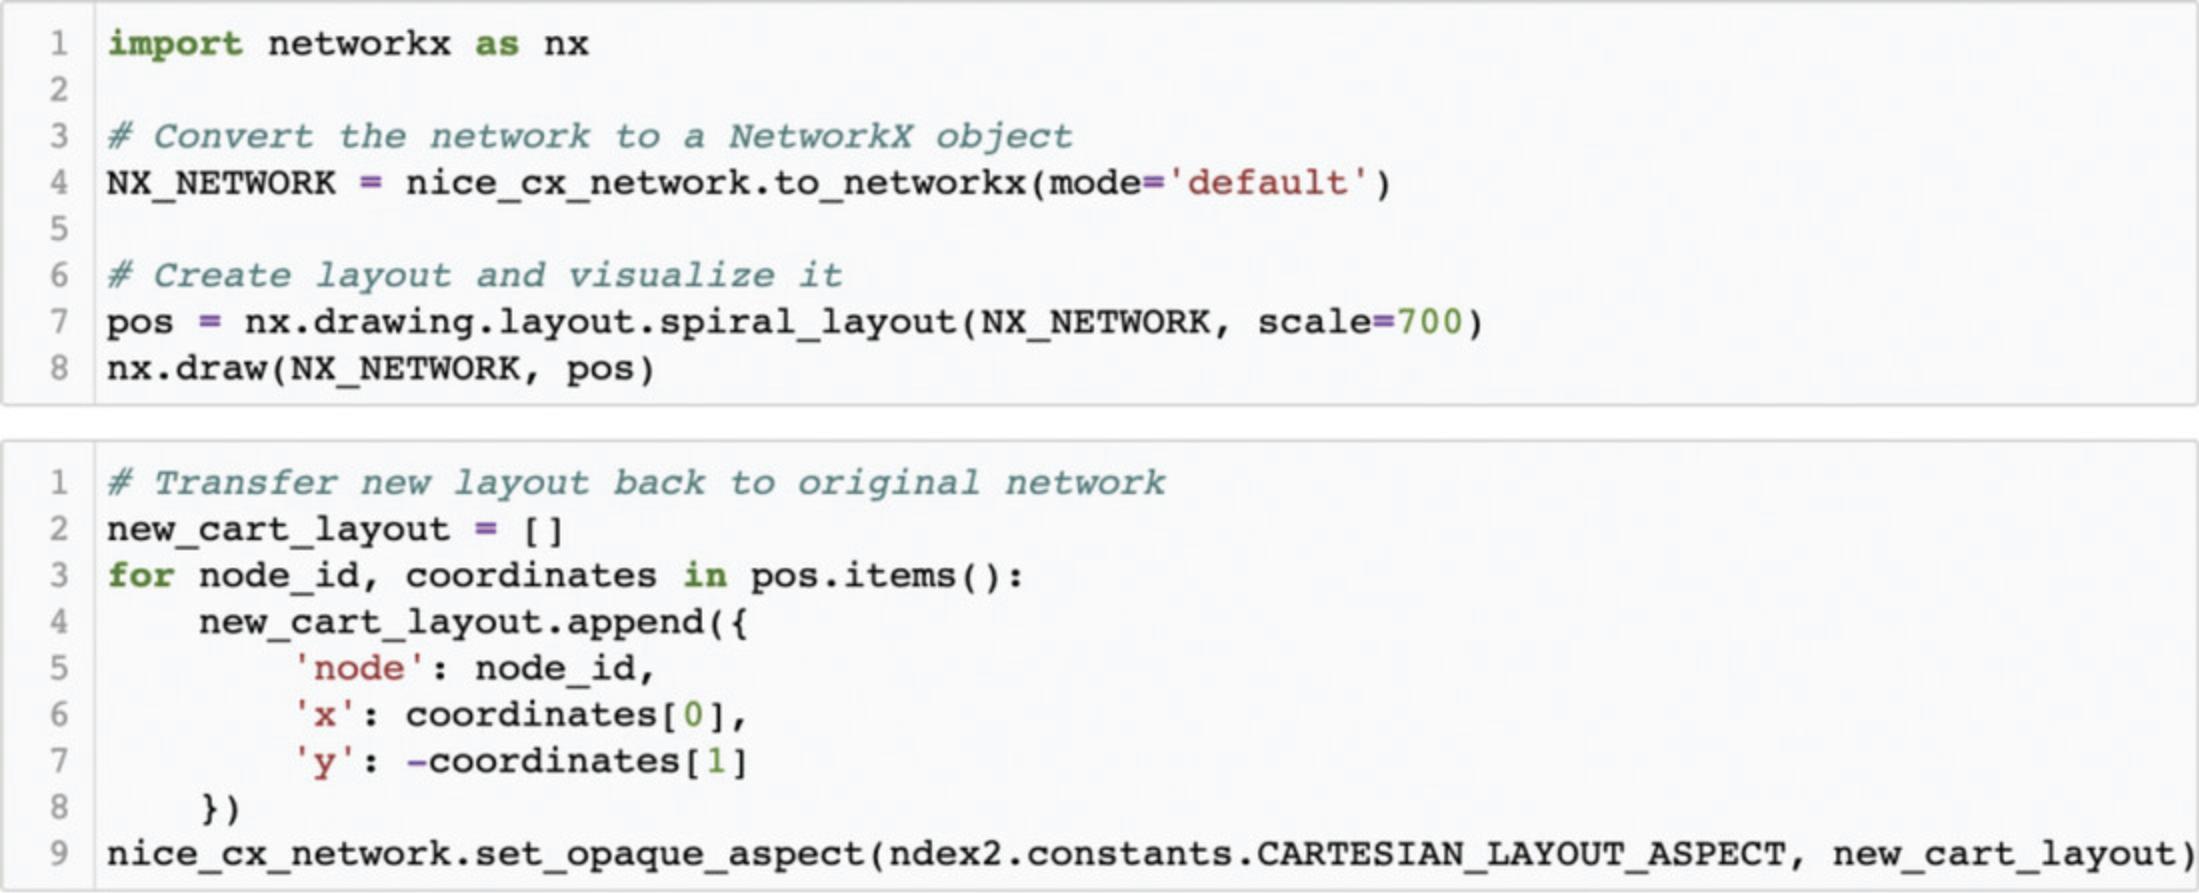
The ndex2 client and NiceCX class do not provide network manipulation functionalities; for such operations, the data must first be cast into a different data model, in this case a NetworkX object (Fig. 16).
In the first block of code, you start from our NiceCX network and generate a NetworkX object using the NiceCX to_networkx() method; then, you use the NetworkX spiral_layout() method to assign positions to the nodes. The result of the layout operation is a Python dictionary of positions keyed by node IDs that you assign to the variable ‘pos’. You can display the network with the new layout using the NetworkX draw method, passing in the NetworkX object and dictionary of positions.
To apply the new layout to our NiceCX network, you need to transform the NetworkX positions into a CX cartesianLayout aspect. This is achieved in the second block of code by iterating through the dictionary of positions to create a list of Cartesian coordinates that you then apply to the NiceCX network via the set_opaque_aspect() method.
5.Save (update) network to NDEx.
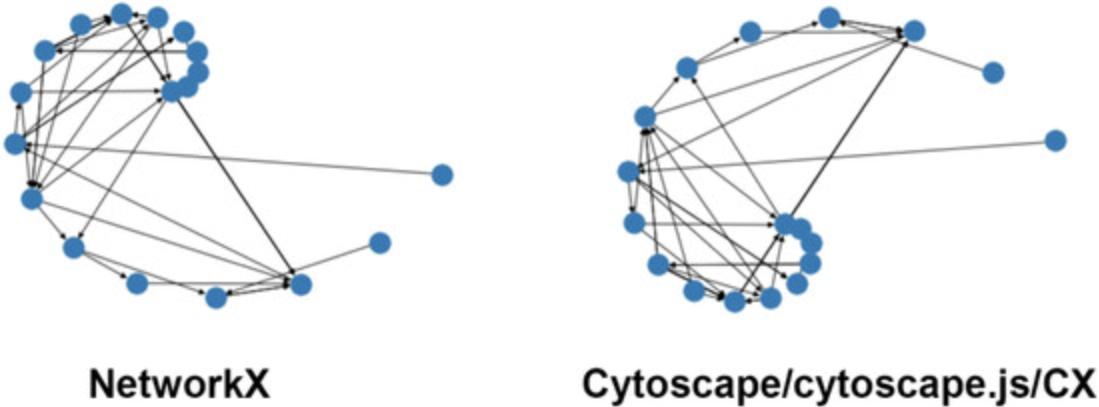
NiceCX networks also have an update_to() method to update an existing network instead of creating a new one. You will now update the 'Sonic Hedgehog colorful (ndex2)' network you saved in step 3 above with its updated version boasting the new spiral layout (Fig. 18) and display it in the notebook.
You can now verify that the 'Sonic Hedgehog colorful (ndex2)' network in your account has been replaced (updated) by the latest version that contains the spiral layout we added using NetworkX.

COMMENTARY
Background Information
As seen in the three protocols described above, NDEx provides a convenient way to store network models in the cloud in a safe and easily accessible manner. Users can decide to use NDEx anonymously, as a resource where they can find and query a variety of networks; alternatively, they can create a free account, get 10 gigabytes of cloud storage space, and unlock many additional features only available to registered users. All these features aim to simplify network biology workflows by allowing seamless communication between data resources and other services/applications, by providing interactive access to data, and by promoting its immediate use and re-use in an intuitive, transparent manner. In this respect, NDEx advocates and fully supports FAIR data principles. One of the most important workflows for scientists is that related to publishing their research findings; NDEx can simplify pre-publication collaboration between researchers, provide live data access to reviewers during the peer-review process, and turn network models into permanent, archival resources by minting DOIs. Hence, the NDEx infrastructure is a useful asset not only for the individual researcher, but also for the larger organization that can use it as publishing and distribution channel for its scientific data output.
Critical Parameters
The NDEx UI and ndex2 Python client communicate with the NDEx server via the internet; it is therefore of critical importance that you use a fast, stable broadband connection to the internet when working with networks in NDEx. The NDEx UI and Python client are capable of catching errors and exceptions, and present users with clear, understandable error messages; however, sometime networking errors happen that neither the user nor the software have control over; if you encounter any problems while executing operations that you have already executed successfully before, please try resetting your internet connection, or try again later. In addition, some convenience features in the NDEx UI require certain conditions to be met. For example, in order to use the “Open in Cytoscape” feature, you must have Cytoscape installed on your machine, running and accessing its default port (1234).
Troubleshooting
For troubleshooting information, please refer to Table 1.
| Problem | Possible cause | Solution |
|---|---|---|
| I didn't receive my account activation e-mail | E-mail blocked by spam filter | Check your spam folder. Add support@ndexbio.org to your contacts |
| Error when typing your e-mail address during account creation | Repeat the account creation process and type your e-mail address carefully | |
| ‘Open in Cytoscape’ is grayed-out and unavailable | The Cytoscape desktop application is not running on your computer | Start up the Cytoscape desktop application and wait for it to loads |
| The Cytoscape desktop application is not listening on its default port (this is uncommon) | In case you modified this previously, reset Cytoscape to access its default port (1234) | |
| My search in NDEx doesn't return any results | Error when typing your search term(s) | Check the spelling of your search term(s). Review the search documentation at https://home.ndexbio.org/finding-and-querying-networks/#searchexamples. |
| There are no results matching your search term(s) | Try searching with a different term(s) | |
| I can't log into my account | Wrong password | Reset your password |
Acknowledgments
This work was supported by the National Institutes of Health (U24CA184427). The funder had no role in study design, data collection and analysis, decision to publish, or preparation of the manuscript.
Author Contribution
Rudolf Pillich : conceptualization, data curation, writing original draft; Jing Chen : software, validation; Chris Churas : resources, software, validation; Sophie Liu : resources, software, validation; Keichiro Ono : resources, software, validation, visualization; David Otasek : resources, software, validation; Dexter Pratt : funding acquisition, project administration, supervision, writing review and editing
Conflict of Interest
The authors declare no competing interest.
Open Research
Data Availability Statement
Data sharing is not applicable to this article as no new data were created or analyzed in this study.
Supporting Information
| Filename | Description |
|---|---|
| cpz1258-sup-0001-SuppMat.ipynb13.3 KB | Supplementary Information |
Please note: The publisher is not responsible for the content or functionality of any supporting information supplied by the authors. Any queries (other than missing content) should be directed to the corresponding author for the article.
Literature Cited
- Carlin, D. E., Fong, S. H., Qin, Y., Jia, T., Huang, J. K., Bao, B., & Ideker, T. (2019). A fast and flexible framework for Network-Assisted Genomic Association. iScience , 16, 155–161. doi: 10.1016/j.isci.2019.05.025.
- Huttlin, E. L., Bruckner, R. J., Navarrete-Perea, J., Cannon, J. R., Baltier, K., Gebreab, F., … Gygi, S. P. (2021). Dual proteome-scale networks reveal cell-specific remodeling of the human interactome. Cell , 184(11), 3022–3040. doi: 10.1016/j.cell.2021.04.011.
- Kutmon, M., Riutta, A., Nunes, N., Hanspers, K., Willighagen, E. L., Bohler, A., … Pico, A. R. (2016). WikiPathways: Capturing the full diversity of pathway knowledge. Nucleic Acids Res , 44(D1), D488–94. doi: 10.1093/nar/gkv1024.
- Licata, L., Lo Surdo, P., Iannuccelli, M., Palma, A., Micarelli, E., Perfetto, L., … Cesareni, G. (2020). SIGNOR 2.0, the SIGnaling Network Open Resource 2.0: 2019 update. Nucleic Acids Research , 48(D1), D504–D510. doi: 10.1093/nar/gkz949.
- Masica, D. L., Douville, C., Tokheim, C., Bhattacharya, R., Kim, R., Moad, K., … Karchin, R. (2017). CRAVAT 4: Cancer-related analysis of variants toolkit. Cancer Research , 77(21), e35–e38. doi: 10.1158/0008-5472.CAN-17-0338.
- Oughtred, R., Rust, J., Chang, C., Breitkreutz, B. J., Stark, C., Willems, A., … Tyers, M. (2021). The BioGRID database: A comprehensive biomedical resource of curated protein, genetic, and chemical interactions. Protein Science , 30(1), 187–200. doi: 10.1002/pro.3978.
- Pillich, R. T., Chen, J., Rynkov, V., Welker, D., & Pratt, D. (2017). NDEx: A community resource for sharing and publishing of biological networks. Methods in Molecular Biology , 1558, 271–301. doi: 10.1007/978-1-4939-6783-4_13.
- Pratt, D., Chen, J., Pillich, R., Rynkov, V., Gary, A., Demchak, B., & Ideker, T. (2017). NDEx 2.0: A clearinghouse for research on cancer pathways. Cancer Research , 77(21), e58–e61. doi: 10.1158/0008-5472.CAN-17-0606.
- Pratt, D., Chen, J., Welker, D., Rivas, R., Pillich, R., Rynkov, V., … Ideker, T. (2015). NDEx, the Network Data Exchange. Cell Systems , 1(4), 302–305. doi: 10.1016/j.cels.2015.10.001.
- Shannon, P., Markiel, A., Ozier, O., Baliga, N. S., Wang, J. T., Ramage, D., … Ideker, T. (2003). Cytoscape: A software environment for integrated models of biomolecular interaction networks. Genome Research , 13(11), 2498–2504. doi: 10.1101/gr.1239303.
- Wishart, D. S., Feunang, Y. D., Guo, A. C., Lo, E. J., Marcu, A., Grant, J. R., … Wilson, M. (2018). DrugBank 5.0: A major update to the DrugBank database for 2018. Nucleic Acids Research , 46(D1), D1074–D1082. doi: 10.1093/nar/gkx1037.
Internet Resources
The NDEx landing page.
The NDEx FAQ page.
The NDEx user manuals and technical documentation pages.
The NDEx Jupiter notebook tutorials repository (includes the notebook described in Basic Protocol 3).
The Sphinx documentation for the ndex2 Python client.
The CyJupiter documentation.
The Cytoscape homepage.
The Cytoscape user manual.
The tutorial “Automation in the Cytoscape Ecosystem”.
Citing Literature
Number of times cited according to CrossRef: 8
- Federico Gago, Computational Approaches to Enzyme Inhibition by Marine Natural Products in the Search for New Drugs, Marine Drugs, 10.3390/md21020100, 21 , 2, (100), (2023).
- Dexter Pratt, Rudolf T. Pillich, John H. Morris, Translating desktop success to the web in the cytoscape project, Frontiers in Bioinformatics, 10.3389/fbinf.2023.1125949, 3 , (2023).
- Rudolf T Pillich, Jing Chen, Christopher Churas, Dylan Fong, Benjamin M Gyori, Trey Ideker, Klas Karis, Sophie N Liu, Keiichiro Ono, Alexander Pico, Dexter Pratt, NDEx IQuery: a multi-method network gene set analysis leveraging the Network Data Exchange, Bioinformatics, 10.1093/bioinformatics/btad118, 39 , 3, (2023).
- Reagon Karki, Yojana Gadiya, Andrea Zaliani, Philip Gribbon, Mpox Knowledge Graph: a comprehensive representation embedding chemical entities and associated biology of Mpox, Bioinformatics Advances, 10.1093/bioadv/vbad045, 3 , 1, (2023).
- Oliver Treeck, Florian Weber, Juergen Fritsch, Maciej Skrzypczak, Susanne Schüler-Toprak, Christa Buechler, Olaf Ortmann, DSCAM-AS1 Long Non-Coding RNA Exerts Oncogenic Functions in Endometrial Adenocarcinoma via Activation of a Tumor-Promoting Transcriptome Profile, Biomedicines, 10.3390/biomedicines10071727, 10 , 7, (1727), (2022).
- Kim Wager, Dheepa Chari, Steffan Ho, Tomas Rees, Orion Penner, Bob JA Schijvenaars, Identifying and Validating Networks of Oncology Biomarkers Mined From the Scientific Literature, Cancer Informatics, 10.1177/11769351221086441, 21 , (117693512210864), (2022).
- Prisca Lo Surdo, Marta Iannuccelli, Silvia Contino, Luisa Castagnoli, Luana Licata, Gianni Cesareni, Livia Perfetto, SIGNOR 3.0, the SIGnaling network open resource 3.0: 2022 update, Nucleic Acids Research, 10.1093/nar/gkac883, 51 , D1, (D631-D637), (2022).
- Wenyi Zhao, Xun Gu, Shuqing Chen, Jian Wu, Zhan Zhou, MODIG: integrating multi-omics and multi-dimensional gene network for cancer driver gene identification based on graph attention network model, Bioinformatics, 10.1093/bioinformatics/btac622, 38 , 21, (4901-4907), (2022).

