E7805 NEBNext® Ultra™ II FS DNA Library Prep Kit for Illumina® Protocol to use with Inputs ≥ 100 ng (Chapter 2)
New England Biolabs, Juliet Bonnevie
Abstract
The NEBNext Ultra II FS DNA Library Prep Kit for Illumina contains the enzymes and buffers required to convert a broad range of input amounts of DNA into high quality libraries for next-generation sequencing on the Illumina platform. The fast, user-friendly workflow also has minimal hands-on time.
Note: The Ultra II FS Kit is not compatible with bisulfite conversion workflows.
Each kit component must pass rigorous quality control standards, and for each new lot the entire set of reagents is functionally validated together by construction and sequencing of indexed libraries on an Illumina sequencing platform.
For larger volume requirements, customized and bulk packaging is available by purchasing through the OEM/Bulks department at NEB. Please contact OEM@neb.com for further information.
Before start
Note: Follow this protocol for inputs ≥ 100 ng and size selection for inserts up to 550 bp.
Follow the protocol in Chapter 1 for inputs ≤ 100 ng, as size selection is not recommended for this input range. https://www.protocols.io/view/e7805-nebnext-ultra-ii-fs-dna-library-prep-kit-for-14egnypmv5dy/v2
Follow the protocol in Chapter 3 for inputs ≥ 100 ng and fragment sizes > 550 bp. https://www.protocols.io/view/e7805-nebnext-ultra-ii-fs-dna-library-prep-kit-for-n2idgce
For 100 ng inputs, either the no size selection protocol (Chapter 1) or a size selection protocol (Chapter 2 or 3) can be followed.
Starting Material: 100–500 ng purified, genomic DNA. We recommend that the DNA be in 1X TE (10 mM Tris pH 8.0, 1 mM EDTA), however, 10 mM Tris pH 7.5–8, low EDTA TE or H2O are also acceptable. If the input DNA is less than 26 μl, add TE (provided) to a final volume of 26 μl.
Steps
Fragmentation/End Prep
Fragmentation occurs during the 37°C incubation step. Use the chart below to determine the incubation time required to generate the desired fragment sizes. Incubation time may need to be optimized for individual samples. See Figure 2.1 for a typical fragmentation pattern.
| A | B | C |
|---|---|---|
| Fragmentation Size | Incubation @ 37°C | Optimization |
| 100 bp-250 bp | 30 min | 30-40 min |
| 150 bp-350 bp | 20 min | 20-30 min |
| 200 bp-450 bp | 15 min | 15-20 min |
| 300 bp-700 bp | 10 min | 5-15 min |
| 500 bp-1 kb | 5 min | 5-10 min |
Figure 2.1: Example of size distrubibtion on a Bioanalyzer®. Human DNA (NA19240) was fragmented for 5-40 min.

Ensure that the Ultra II FS Reaction Buffer is completely thawed. If a precipitate is seen in the buffer, pipette up and down several times to break it up, and quickly vortex to mix. Place on ice until use.
Vortex the Ultra II FS Enzyme Mix 5-8 seconds prior to use and place on ice.
Add the following competents to a 0.2 ml thin wall PCR tube on ice:
| A | B |
|---|---|
| COMPONENT | VOLUME PER ONE LIBRARY |
| DNA | 26 μl |
| (yellow) NEBNext Ultra II FS Reaction Buffer | 7 μl |
| (yellow) NEBNext Ultra II FS Enzyme Mix | 2 μl |
| Total Volume | 35 μl |
Vortex the reaction for 0h 0m 5s and briefly spin in a microcentrifuge.
In a thermal cycler, with the heated lid set to 75°C, run the following program:
| A | B |
|---|---|
| Duration | Temp |
| 5-30 min | 37°C |
| 30 min | 65°C |
| Hold | 4°C |
Adaptor Ligation
Add the following components directly to the FS Reaction Mixture:
| A | B |
|---|---|
| Component | Volume |
| FS Reaction Mixture (Previous Step) | 35 µl |
| (red) NEBNext Ultra II Ligation Master Mix * | 30 µl |
| (red) NEBNext Ligation Enhancer | 1 µl |
| (red) NEBNext Adaptor for Illumina** | 2.5 µl |
| Total Volume | 68.5 µl |
-
Mix the Ultra II Ligation Master Mix by pipetting up and down several times prior to adding to the reaction.
** The NEBNext adaptor is provided in the NEBNext Oligos kit. NEB has several Oligo kit options which are supplied separately from the library prep kit. Please see www.neb.com/oligios for additional information.
Set a 100 μl or 200 μl to 50µL and then pipette the entire volume up and down at least 10 times to mix thoroughly. Perform a quick spin to collect all the liquid from the sides of the tube.
Caution: The NEBNext Ultra II Ligation Master Mix is very viscous. Care should be taken to ensure adequate mixing of the ligation reaction, as incomplete mixing will result in reduced ligation efficiency. The presence of a small amount of bubbles will not interfere with performance.
Incubate at 20°C for 0h 15m 0s in a thermal cycler with the heated lid off.
Add 3µL of (red or blue) USER® Enzyme to the ligation mixture from the previous step.
Mix well and incubate at 37°C for 0h 15m 0s with the heated lid set to ≥ 47°C.
Size Selection of Adaptor-ligated DNA for DNA Input ≥ 100 ng
Caution: If the starting material is ≥ 100 ng, follow the protocol for size selection below. For inputs < 100 ng, size selection is not recommended. Follow the protocol for cleanup without size selection in Chapter 1: Section Size Selection or Cleanup of Adaptor-Ligated DNA in the Ultra II FS DNA manual. If you want fragment sizes > 550 bp and your input is ≥ 100 ng follow the entire protocol in Chapter 3 in the Ultra II FS DNA manual. manual. If you want fragment sizes > 550 bp and your input is ≥ 100 ng follow the entire protocol in Chapter 3 in the Ultra II FS DNA manual.
Caution: The following size selection protocol is for libraries with 150-200 bp inserts only. For libraries with different size fragment inserts, refer to Table 2.3.1. below for the appropriate volumes of beads to be added. The size selection protocol is based on a starting volume of 100 μl. Size selection conditions were optimized with SPRIselect or NEBNext Sample Purification Beads; however, AMPure XP beads can be used following the same conditions. If using AMPure XP beads, please allow the beads to warm to room temperature for at least before use. 0h 30m 0s before use.
To select a different insert size than 200 bp, please use the volumes in this table:
Table 2.3.1: Recommended conditions for bead based size selection:

Bring the volume of the reaction up to 100µL by adding 28.5µL 0.1X TE (dilute 1X TE Buffer 1:10 with water).
Vortex SPRIselect Beads or NEBNext Sample Purification Beads to resuspend.
Add 40µL (~ 0.4X) of resuspended beads to the 100µL sample from Step 12. Mix well by pipetting up and down at least 10 times. Be careful to expel all of the liquid out of the tip during the last mix. Vortexing for 3-5 seconds on high can also be used. If centrifuging samples after mixing, be sure to stop the centrifugation before the beads start to settle out.
Incubate samples for at least0h 5m 0s at room temperature.
Place the tube/plate on an appropriate magnetic stand to separate the beads from the supernatant. If necessary, quickly spin the sample to collect the liquid from the sides of the tube or plate wells before placing on the magnetic stand.
After 5 minutes (or when the solution is clear), carefully transfer the supernatant (~140µL) containing your DNA to a new tube (Caution: do not discard the supernatant.) Discard the beads that contain the unwanted large fragments.
Add 20µL (~0.2 X) resuspended SPRIselect or Sample Purification Beads to the supernatant and mix at least 10 times. Be careful to expel all the liquid from the tip during the last mix. Incubate samples on the bench top for at least 0h 5m 0s at room temperature.
Place the tube/plate on an appropriate magnetic stand to separate the beads from the supernatant. If necessary, quickly spin the sample to collect the liquid from the sides of the tube or plate wells before placing on the magnetic stand.
After 0h 5m 0s (or when the solution is clear), carefully remove and discard the supernatant that contains unwanted DNA. Be careful not to disturb the beads that contain the desired DNA.
Caution: Do not discard the beads .
Add 200µL of 80% freshly prepared ethanol to the tube/plate while in the magnetic stand. Incubate at room temperature for 0h 0m 30s, and then carefully remove and discard the supernatant. Be careful not to disturb the beads that contain DNA targets.
Repeat the previous step once for a total of two washes. Be sure to remove all visible liquid after the second wash. If necessary, briefly spin the tube/plate, place back on the magnet and remove traces of ethanol with a p10 pipette tip.
Air dry the beads for up to 0h 5m 0s while the tube/plate is on the magnetic stand with the lid open.
Caution: Do not over-dry the beads. This may result in lower recovery of DNA. Elute the samples when the beads are still dark brown and glossy looking, but when all visible liquid as evaporated. When the beads turn lighter brown and start to crack, they are too dry.
Remove the tube/plate from the magnetic stand. Elute the DNA target from the beads into 17µL 0.1X TE (dilute the 1X TE Buffer 1:10 in water).
Mix well on a vortex mixer or by pipetting up and down 10 times. Incubate for at least 0h 2m 0s at room temperature. If necessary, quickly spin the samples to collect the liquid from the sides of the tube or plate wells before placing back on the magnetic stand.
Place the tube/plate on a magnetic stand. After 0h 5m 0s (or when the solution is clear), transfer 15µL to a new PCR tube.
Proceed to PCR Enrichment or Adaptor-ligated DNA in the next section: PCR Enrichment of Adaptor-ligated DNA .
PCR Enrichment of Adaptor-ligated DNA
Use Option A for any kit where NEBNext index primers are supplied in tubes. These kits have the forward and reverse primers supplied in separate tubes. Primers are supplied at 10 μM each.
Use Option B for any NEBNext Oligo Kit where index primers are supplied in a 96-well plate format. These kits have the forward and reverse (i7 and i5) primers combined. Primers are supplied at 10 μM combined (5 μM each).
Add the following components to a sterile tube:
Option A: Forward and Reverse Primers NOT already combined:
| A | B |
|---|---|
| Not Combined Primers | Amount |
| Adaptor Ligated DNA Fragments (Step 28) | 15 μl |
| (blue) NEBNext Ultra II Q5 Master Mix | 25 μl |
| (blue) Index Primer/i7 Primer *, ** | 5 μl |
| (blue) Universal PCR Primer/i5 Primer*, ** | 5 μl |
| Total Volume | 50 μl |
- NEBNext Oligos must be purchased separately from the library prep kit. For oligo purchasing options refer to "Required Materials Not Included" section (Materials section). Refer to the corresponding NEBNext Oligo Kit manual for determining valid barcode combinations.
** Use only one i7 primer/ index primer per sample. Use only one i5 primer (or the universal primer for single index kits) per sample.
Option B: Forward and Reverse Primers Already combined:
| A | B |
|---|---|
| Combined Primers | Amount |
| Adaptor Ligated DNA Fragments (Step 28) | 15 µl |
| (blue) NEBNext Ultra II Q5 Master Mix | 25 µl |
| (blue) Index Primer Mix* | 10 µl |
| Total Volume | 50 µl |
- NEBNext Oligos must be purchased separately from the library prep kit. For oligo purchasing options refer to "Required Materials Not Included" section (Materials section).
Set a 100 μl or 200 μl pipette to 40µL and then pipette the entire volume up and down at least 10 times to mix thoroughly. Perform a quick spin to collect all liquid from the sides of the tube.
Place the tube on a thermal cycler with the heated lid set to 105°C and perform PCR amplification using the following PCR cycling conditions:
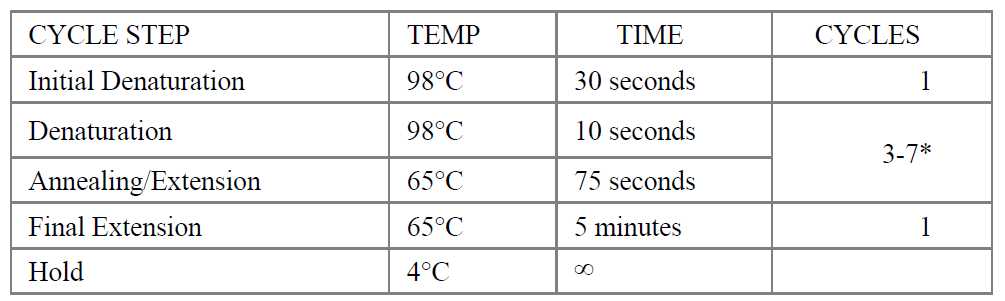
-
The number of PCR cycles recommended in Table 2.4.1 are to be seen as a starting point to determine the number of PCR cycles best for standard library prep samples. Use Table 2.4.2 for applications requiring high library yields, such as target enrichment. The number of PCR cycles should be chosen based on input amount and sample type. Thus, samples prepared with a different method prior to library prep may require re-optimization of the number of PCR cycles. The number of cycles should be high enough to provide sufficient library fragments for a successful sequencing run, but low enough to avoid PCR artifacts and over-cycling (high molecular weight fragments on Bioanalyzer).
Table 2.4.1.

- Cycle number was determined for size selected libraries.
** NEBNext adaptors contain a unique truncated design. Libraries constructed with NEBNext adaptors require a minimum of 3 amplification cycles to add the complete adaptor sequences for downstream processes.
Table 2.4.2.

-
Cycle number was determined for size selected libraries.
Proceed to Cleanup of PCR reaction in the next section.
Cleanup of PCR Reaction
Note: The volumes of SPRIselect or NEBNext Sample Purification Beads provided here are for use with the sample contained in the exact buffer at this step. AMPure XP beads can be used as well. If using AMPure XP beads, allow the beads to warm to room temperature for at least before use. These volumes may not work properly for a cleanup at a different step in the workflow. For cleanups of samples contained in different buffer conditions, the volumes may need to be experimentally determined. 0h 30m 0s before use. These volumes may not work properly for a cleanup at a different step in the workflow. For cleanups of samples contained in different buffer conditions, the volumes may need to be experimentally determined.
Vortex SPRIselect or NEBNext Sample Purificiation Beads to resuspend.
Add 45µL (0.9X) resuspended beads to the PCR reaction. Mix well by pipetting up and down at least 10 times. Be careful to expel all of the liquid out of the tip during the last mix. Vortexing for 3-5 seconds on high can also be used. If centrifuging samples after mixing, be sure to stop the centrifugation before the beads start to settle out.
Incubate samples on bench top for at least 0h 5m 0s at room temperature.
Place the tube/plate on an appropriate magnetic stand to separate the beads from the supernatant. If necessary, quickly spin the sample to collect the liquid from the sides of the tube or plate wells before placing on the magnetic stand.
After 0h 5m 0s (or when the solution is clear), carefully remove and discard the supernatant. Be careful not to disturb the beads that contain DNA targets.
Caution: Do not discard the beads .
Add 200µL of 80% freshly prepared ethanol to the tube/plate while in the magnetic stand. Incubate at room temperature for 0h 0m 30s, and then carefully remove and discard the supernatant. Be careful not to disturb the beads that contain DNA targets.
Repeat the previous step once for a total of two washes. Be sure to remove all visible liquid after the second wash. If necessary, briefly spin the tube/plate, place back on the magnet and remove traces of ethanol with a p10 pipette tip.
Air dry the beads for up to 0h 5m 0s while the tube/plate is on the magnetic stand with the lid open.
Caution: Do not over-dry the beads. This may result in lower recovery of DNA. Elute the samples when the beads are still dark brown and glossy looking, but when all visible liquid has evaporated. When the beads turn lighter brown and start to crack they are too dry.
Remove the tube/plate from the magnetic stand. Elute the DNA target from the beads by adding 33µL of 0.1X TE (dilute 1X TE Buffer 1:10 in water).
Mix well by pipetting up and down 10 times, or on a vortex mixer. Incubate for at least 0h 2m 0s at room temperature. If necessary, quickly spin the sample to collect the liquid from the sides of the tube or plate wells before placing back on the magnetic stand.
Place the tube/plate on the magnetic stand. After 0h 5m 0s (or when the solution is clear), transfer 30µL to a new PCR tube and store at -20°C.
Assess Library Quality on a Bioanalyzer
Dilute library (from previous step) 5-fold in 0.1X TE Buffer.
Run 1µL on a DNA High Sensitivity Chip.
Check that the library size shows a narrow distribution with an expected peak size based on fragmentation time (See Figure 2.2).
Figure 2.2: Example of final library size distributions with size selection. Human DNA (NA 19240) was fragmented for 5 or 15 minutes.


