Targeted NGS feline respiratory panel including SARS-CoV-2 for Ion Torrent platform
Rebecca P Wilkes, Jobin J Kattoor
Disclaimer
Reference to any commercial materials, equipment, or process does not in any way constitute approval, endorsement, or recommendation by the Food and Drug Administration.
Abstract
The current procedure is for NGS of feline respiratory pathogen panel including SARS-CoV-2 for Ion Torrent platform. Note, sensitivity of the method greatly depends on type and quality of samples.
Before start
Prior to chip loading and sequencing:
Upload the reference and bed files provided below into the Ion S5 Torrent Server under Reference Sequences (.FASTA) and target files (.BED) using Import Custom Reference.
Steps
Nucleic acid extraction
KingFisher Flex MagMAX Core extraction protocol
In the extraction room, prepare the sample as follows.
Add 2mL of DMEM to 5 mL tube.
Swirl the anterior nasal or throat swab and break off the swab tip.
Vortex vigorously for 0h 2m 0s or until the sample is suspended.
Use 200µL of supernatant for the downstream process.
Prepare the Lysis/Binding solution.
In the clean room, combine the following components for the required number of samples.
| A | B |
|---|---|
| Component | Volume per sample |
| MagMAX Core Lysis solution | 350µL |
| MagMAX Core Binding solution | 350µL |
| Total Lysis/Binding solution* | 700µL |
*Later used in step 4.4. in the extraction room
Vortex at maximum speed for 0h 0m 10s.
Store at room temperature for up to24h 0m 0s
Prepare the Bead/ Proteinase K mix.
In the clean room, prepare the following to be added to the lysis plate.
Vortex the MagMAX Core Magnetic Beads thoroughly to ensure the beads are fully resuspended
| A | B |
|---|---|
| Component | Volume per sample |
| MagMAX Core Magnetic Beads | 20µL |
| MagMAX Core Proteinase K | 10µL |
| Total bead mix | 30µL |
The bead/ Proteinase K mix can be stored at 4ᵒC for up to one week. Proceed to the next step.
Prepare the sample plates.
In the clean room, grab four deep well plates and prepare them as follows.
| A | B | C | D |
|---|---|---|---|
| Plate position | Plate ID | Reagent | Volume per well |
| 1 | Lysis Plate | Bead mix | 30µL |
| 2 | Wash Plate | MagMAX Core Wash Solution 1 | 500µL |
| 3 | Wash Plate 2 | MagMAX Core Wash Solution 2 | 500µL |
| 4 | Elution Plate | MagMAX Core Elution Buffer | 90µL |
Take the prepared plates to an extraction hood in the extraction room and add 200µL of each sample in the Lysis Plate.
Mix the sample with the Bead mix by pipetting up and down several times. Let the mixture incubate for 2 minutes.
Add 700µL of Lysis/Binding solution (from step 2) to each sample in the first plate (Lysis plate).
Turn the power on to the magnetic particle processor
Using the up and down arrow key, select the program MagMAX Core Flex.
Press the start key. When prompted, load the appropriate plate on the instrument. Properly orient the plates
Press the start key to advance the carousel to the next plate position to load.
When the final plate is loaded, place a deep well comb on the top of the first plate (Lysis Plate) and press the start key. When the program is complete, the instrument will prompt to remove elution plate. Remove the elution plate and set it in an extraction hood. Press start to advance the carousel and remove all other plates as prompted. Dispose of all the wash /lysis plates by placing in a biohazard bag.
The eluted product can be used immediately or stored in a labelled 1.5mL tube or sealed elution plate (96 well) at -10ᵒC until use.
Reverse transcription (RT) using Ion Torrent NGS Reverse Transcription Kit
Reaction is set up for each sample using the following table:
| A | B |
|---|---|
| Component | |
| Ion Torrent NGS 5X reaction buffer | 2 µL |
| Ion Torrent NGS 10X RT Enzyme Mix | 1 µL |
| Total RNA | ≤7 µL |
| Nuclease free water | To 10 µL |
| Total volume | 10µL |
Mix the reaction mixture well and seal the plate/close PCR tubes
Execute the following thermocycling conditions on a thermocycler.
| A | B |
|---|---|
| Temperature | Time |
| 25ᵒC | 10 minutes |
| 50ᵒC | 10 minutes |
| 85ᵒC | 5 minutes |
| 10ᵒC | Hold |
Short spin the PCR tube/plate to bring down the contents (cDNA) to the bottom of the tubes.
Proceed to the section Option 1 or section Option 2 or store at -30 ᵒC to -10
Option 1: Library prep using Ion AmpliSeq Library Kit Plus (Manual library prep method)
Preparing cDNA target amplification reaction
A master mix is prepared according to the following table
| A | B |
|---|---|
| Component | Volume |
| 5X Ion Ampliseq HiFI mix (red cap) | 5 µL |
| cDNA | 7.5 µL |
| Nuclease free water | to 12.5 µL |
| Total volume | 12.5 µL |
Aliquot 5µL of master mix into two PCR tubes.
Add 5µL of primer pool 1 to first tube and primer pool 2 to the second tube. Mix the reaction using pipette.
Note: For SARS CoV-2 two different primer pools are used (WGAG19041_PRD_CFPv01 CFP_with_SARS_2 pool 1 and WGAG19041_PRD_CFPv01 CFP_with_SARS_2pool 2)
Seal the tubes and proceed with the thermocycling shown in the following table
| A | B | C |
|---|---|---|
| Stage | Temperature | Time |
| Hold | 99ᵒC | 2 minutes |
| Denature* | 99ᵒC | 15 seconds |
| Anneal and extend* | 60ᵒC | 4 minutes |
| Hold | 10ᵒC | Hold |
*The cyclic condition is repeated 30 times
Combine the target amplification reaction and partial digestion of the targets
Short spin the reaction tubes after thermocycling to collect the contents to the bottom of the wells.
Combine the 10µL target reactions into a single tube and proceed for partial digestion using FuPa reagent.
Add 2µL of FuPa reagent to the combined targets to make the volume to 22µL. Mix well with pipette and proceed for thermocycling as shown in the following table.
| A | B |
|---|---|
| Temperature | Time |
| 50ᵒC | 10 minutes |
| 55ᵒC | 10 minutes |
| 60ᵒC | 20 minutes |
| 10ᵒC | Hold (max to 1 hour) |
* Partially digested targets can be stored -20ᵒC for longer periods
Ligate adaptors to the amplicons and purification.
Following reaction is set up for each sample
| A | B |
|---|---|
| Component | Volume |
| Switch solution (yellow cap) | 4 µL |
| Ion P1 adapter | 0.5 µL |
| IonXpress barcode* | 0.5 µL |
| Nuclease free water | 1 µL |
| DNA Ligase (blue cap) | 2 µL |
| Target from the partial digestion step | 22 µL |
| Total volume | ~30 µL |
*IonXpress barcodes are available from 001-096. Separate barcodes are used to differentiate libraries from individual samples.
After the incubation keep the tubes back to the magnetic rack.
Remove the clear solution to a new 1.5 mL microcentrifuge tube and proceed with the next steps.
The mixture was then incubated in the following conditions.
| A | B |
|---|---|
| Temperature | Time |
| 22ᵒC | 30 minutes |
| 68ᵒC | 5 minutes |
| 72ᵒC | 5 minutes |
| 10ᵒC | Hold (maximum 24 hours) |
The contents in the tube were briefly centrifuged after the incubation to collect it to the bottom of the wells.
Add 45µL of Agencourt™ AMPure™ XP Reagent to each tube. Pipet up and down to mix it properly.
Incubate the mixture for 3-5 minutes at room temperature and keep the magnetic rack. Incubate for 2 minutes or until solution becomes clear.
Remove the supernatant and wash the pellet with 150µL of fresh 70% ethanol. Rotate the tubes or move the position of the tubes so that there will be maximum contact of magnetic beads with the wash solution.
Repeat the washing step one more time and air dry the beads in the tube by keeping it open at room temperature for 2-3 minutes.
Add 20-25µL of low ionic buffer/TE buffer/ nuclease free water to the dried magnetic beads and mix it well.
Keep the mixture in room temperature for approx. 2 minutes.
Quantify and equalize the library.
Quantification of the prepared libraries can be done using Qubit fluorometer according to manufacturer’s protocols.
Dilute the libraries to a concentration of ~100pM (50 µL total volume for each chip to be loaded) for using Ion 510/520/530 chip loading.
Proceed to section creating chip plan on Ion Chef
Option 2: Library prep using Ion AmpliSeq™ Kit for Chef DL8 (Automated library prep method)
Perform the RT step as described in section 5.1 to 5.4.
Thaw all the Ion AmpliSeq™ Kit for ChefDL8 reagent (in -20ᵒC), DL8 solution cartridge (in 4ᵒC) and primers (WGAG19041_PRD_CFPv01 CFP_with_SARS_2 pool 1 and 2) (in -20ᵒC) after putting the RT reaction in the thermocycler.
The program is set, and the chef will start in under 1 minute time
The program will generally go for above 7 hours according to the length and number of the cycle.
Take out all the consumables from the Ion Chef and go for clean the instrument.
After completion of library prep, 700µL of pooled library at 100pM is obtained in the 4th tube in the reagent cartridge.
according to the number of samples
A total of 50 µL from step 10.12 is used to load the Ion Chip in the chip loading steps, and equal volumes of multiple barcoded libraries are used to load the Ion chip in the following steps (25 µL each if two sets of libraries are mixed together in a single chip)
Proceed to section creating chip plan on Ion Chef
Make the sample plan in Torrent suite software (TSS) in http://10.160.129.7/ after logging in to the server using credentials. Make sure to put the Ioncode PCR plate serial number and the sample numbers correctly. Preferably, the control form number should be marked. The sample numbers should be marked correct with the corresponding Ioncode barcodes. All the optional menus can be left as such in the plan. Mark the plan name with the ongoing library name (e.g.: COVID lib 51A).
Make up the volume of cDNA from step 2.4 to 15µL before adding to the Ioncode plate in the next step.
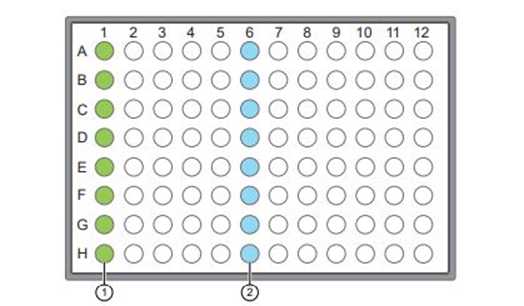
Add 15µL of the cDNA into the A-H (Fig 1) well in the Ioncode plates according to the plan made in the TSS.

Position 1(A-H): Positions for adding 15µL of cDNA.
Position 6 (A-H): Positions of lyophilized precoated Ioncode barcodes.
Add 150µL of each primer pool 1 and 2 to the first and second tubes, respectively, in the DL8 reagent cartridge. Vortex and spin down the primer pairs before placing them on the cartridge.
Take out the DL8 chef supplies.
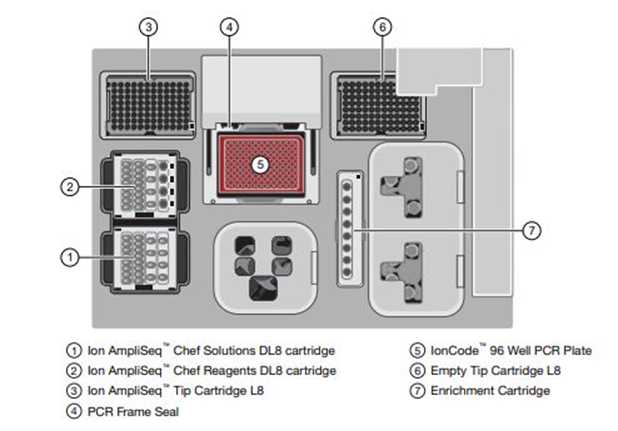
In the Ionchef, go to set up a Run> Prepare library> and Open the chef door. Keep all the chef supplies and solution/reagent cartridges in the correct position, as shown in Figure 2. Close the door of the Ion Chef and start with the deck check.

After the deck check, see for the server name and the saved sample plan name (e.g.: COVID lib 51 A). if the plan name is not coming on the display, refresh the screen. It may go up to 2-3 refresh.
Check the prompted boxes showing number of primer (2), number of cycle (27) and extension time (4 min) if shown correct.
Creating chip plan on Ion Chef
Create a chip plan on Ion Chef
Sign-in into the TSS using credentials (http://10.160.129.7/).
Select the previously uploaded Plugins for analysis, including Assembler SPAdes, and File exporter, and click Next .
Optionally, for saving results under a specific project, a project name can be created and selected in the Projects window or click on Next .
Fill in the Run Plan Name and already uploaded Reference Library- canine_feline_combo_with_SARS_2 and Target region- WGAG19041_PRD_CFPv01_edit.bed from the drop-down menu.
Fill in the required Number of barcodes and Chip Barcode (9-digit alphanumeric code).
Fill in the corresponding Barcode and Sample Name in the following table and click on Plan Run.
Repeat step 11.3. to create a plan for the second chip.
After creating plans for one or both the chips, proceed to section 12.
Keep the Ion 510, 520, & 530 Reagent cartridge stored at -20ºC at room temperature for at least 30 minutes.
In the Plan tab, click on Plan New Run.Select Ion Reporter Account as "None" and Sample Grouping as "Other" and click on Next.
Click on "DNA" in the Research Application and AmpliSeq DNA in Target Technique and click on Next.
Set the instrument type (e.g., Ion GeneStudioTM S5 System), Library kit (e.g.: Ion AmpliSeq Library kit plus) used accordingly and select Ion Chef.
In the Template Kit, select Ion 510, Ion 520 & Ion 530 Kit-Chef, and in Sequencing Kit, select Ion S5 Sequencing Kit from the drop-down menu.
In the Chip Type drop-down menu, select the chip accordingly to the number of different samples/barcodes used.
Barcode Set can be selected optionally depending on the type of barcode used
In the Flow tab, fill in 500 and click on Next .
Chip loading on Ion Chef
Load chip on Ion Chef
At least 0h 30m 0s after keeping the Ion 510, 520, & 530 Reagent cartridge at room temperature, proceed with the following steps
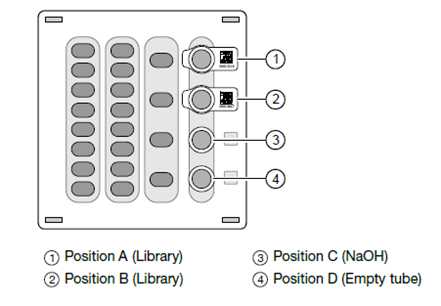
Add the diluted barcoded library pools from step 9.2 or step 10.12 into positions 1 and 2 of the Ion S5 Reagent cartridge. Position 1 of the Ion 510, 520, & 530 Chef Reagents cartridge corresponds to the libraries planned in Chip 1, and position 2 corresponds to those samples planned in Chip 2. (Figure. 3).

Uncap all the tubes in the Ion 510, 520, & 530 Chef Reagents cartridge.
Close the door after keeping the reagents and other consumables and proceed for Deck Scan .
After completing Deck Scan successfully, click Next and select the specific plans created in section D for each Chip; Chip 1 and Chip 2. In case of no plans are shown on the screen, click Refresh Plans and select the plans once they are shown. Click Next once the plan is selected.
On the next screen, click Timer and select the time to end the Chip loading function on Ion Chef. On completion, the chip will be stored in Ion Chef at 4ºC for a maximum of 24 hours. Otherwise, when the run is complete, unload the Ion Chef™ Instrument. Once taken out from the Ion Chef, and if two chips were loaded at the same time, the first chip goes directly into the sequencer for sequencing, and the second chip can be stored in a chip container at 4ºC until use.
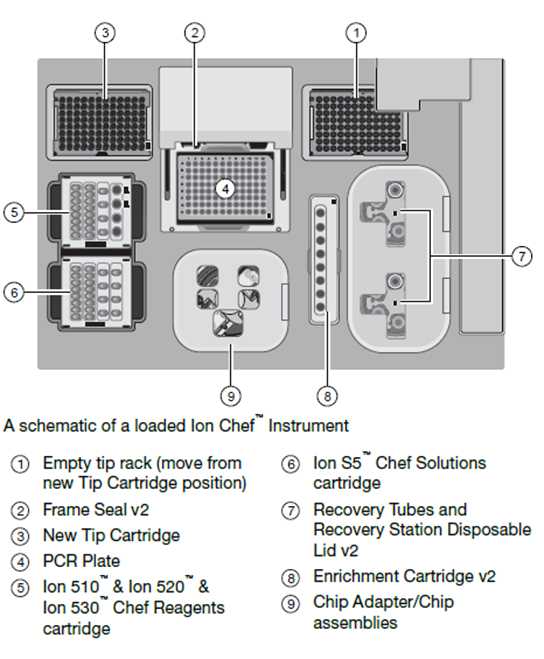
After unloading the used consumables except for the empty pipette tip holder (which will be moved from position 3 to position 1 as in Figure 4) from the Ion Chef, close the door of the Ion Chef and proceed with the “ Clean instrument” function when prompted.
Sequencing using Ion GeneStudio S5
Sequence using Ion GeneStudio S5
Each initialization with the Ion S5 sequencing kit is suitable for sequencing two chips (two sequencing runs). The Ion S5 sequencing cartridge should be brought to room temperature at least 2 hours prior , and initialization should start at least 1 hour before the end of Chip loading described in step 12.7.
Tap Start if the plan is shown correctly for the selected chip.
First chip sequencing will take 2h 30 mins and keep the second chip at room temperature at least 30 minutes prior to the end of first chip sequencing.
When the first run is finished, click on Run complete to open the dialogue window for the next run.
To start the initialization of the sequencer, click on Initialize on the home screen of the Ion S5 sequencer.
Remove the used Ion S5 wash solution bottle and empty the wash buffer waste tank.
Place a new Ion S5 wash solution and an Ion S5 cleaning solution in the designated positions.
Place the thawed Ion S5 Sequencing cartridge into the position in the sequencer.
Place a used chip on the chip holder, close the sequencer door, and start initialization.
Initialization will take approx. 45 minutes, and when completed, click on Home to open the Run option.
Click Run and proceed as prompted on the screen of the Ion S5 sequencer. Replace the chip on the sequencer with the new Chip (Chip 1) from step 8.7, close the door of the sequencer and proceed as prompted.
Click on the correct plan from the drop-down menu, uncheck the Enable post-run clean , and tap Review .
Analysis using Torrent suite software and Geneious prime
Analysis
Open the Torrent Suite Software (TSS) (http://10.160.129.7/) and in the Data tab, click on the plan name described in section 3.15, which was created for running the sequencing.
Aligned, trimmed files available as BAM files from the TSS can be downloaded into the local drive and can be opened in Geneious prime software (https://www.geneious.com/).
Based on the alignment to reference sequences in the TSS, sequence reads can be viewed in the Geneious prime software.
For additional confirmation, each sequence can be subjected to a BLAST analysis at https://blast.ncbi.nlm.nih.gov/ for the percent identity with SARS-CoV-2 sequences.


