T-4 TICK TESTING
REDI-NET Consortium
SEQUENCING LIBRARY PREPARATION
ONT Native Barcoding Kit v14
Total nucleic acid sequencing
gDNA sequencing
cDNA sequencing
Whole genome shotgun sequencing
Disclaimer
This work is supported by the US Army Medical Research and Development Command under Contract No.W81XWH-21-C-0001, W81XWH-22-C-0093 and HT9425-23-C-0059. The views, opinions and/or findings contained in this report are those of the author(s) and should not be construed as an official Department of the Army or Navy position, policy or decision unless so designated by other documentation.
Abstract
This protocol details standard operating procedure for tick testing.
Before start
BEFORE START
- Check the DNA and RNA concentrations in each sample of total nucleic acid (TNA) extraction.
- If the concentrations are detectable, choose the sequencing approach following the table below.
- If DNA or RNA concentration is not detectable, prepare the library for the detectable one.
- Use sections gDNA PREPARATION and TNA PREPARATION for gDNA and TNA preparation, respectively, then subject the prepared gDNA and TNA to Section SEQUENCING LIBRARY PREPARATION .
| A | B | C | D | E |
|---|---|---|---|---|
| DNA concentration (ng/ul) | ||||
| < 1 ng/ul | 1-10 ng/ul | > 10 ng/ul | ||
| RNA concentration (ng/ul) | < 4 ng/ul | TNA | DNA | DNA |
| 4-20 ng/ul | TNA | TNA | TNA | |
| >20 ng/ul | TNA | TNA | TNA |
Steps
gDNA PREPARATION
When the RNA concentration of the sample is lower than the detectable range of the Qubit High Sensitivity Assay (<0.01ng/ul), the sample is subjected to gDNA sequencing. The cDNA synthesis can be skipped.
When the DNA concentration >10ng/ul, calculate the required volume of 200ng DNA, then transfer the volume to a new 200μl PCR tube or a well of a 96-well PCR plate. Adjust the volume with nuclease-free water to a final volume of 20µL.
Prepare 100ng gDNA from positive control extraction in 20µL nuclease-free water in a new 200μl PCR tube or a well of a 96-well PCR plate.
Transfer 20µL negative control extraction to a new tube or a well of a 96-well PCR plate.
All samples are subjected to section SEQUENCING LIBRARY PREPARATION.
TNA PREPARATION
To prepare TNA for sequencing both cDNA and gDNA, cDNA needs to be prepared separately and then mixed with TNA from the original sample.
Prepare cDNA following section cDNA SYNTHESIS (positive control and negative control included) until step 40.
Transfer 10µL double-stranded cDNA of section cDNA SYNTHESIS step 40 to a new 200 μl PCR tube or a well of a 96-well PCR plate. Add 10µL of TNA from the original sample to make the final volume 20µL.
Subject the 20µL double-stranded cDNA/TNA mixture to section SEQUENCING LIBRARY PREPARATION .
cDNA SYNTHESIS: DNase treatment
If RNA concentration > 20ng/ul, calculate the required volume of 160ng RNA, then transfer the volume to a new 200μl PCR tube or a well of a 96-well PCR plate. Adjust the volume with nuclease-free water to a final volume of 8µL. If the concentration of the RNA < 20ng/ul, directly transfer 8µL of RNA to a new 200μl PCR tube or a well of a 96-well PCR plate. Keep the tube or plate On ice.
Prepare 40ng RNA from positive control extraction and adjust the volume to final 8µL with nuclease-free water in a new 200μl PCR tube or a well of a 96-well PCR plate.
Transfer 8µL negative control extraction to a new tube or a well of a 96-well PCR plate.
Remove contaminated DNA (~ 15 mins) : Thaw total nucleic acid, 10x ezDNase Buffer, and DTT on the ice at Room temperature. Vortex 10x ezDNase Buffer and DTT briefly, spin down by centrifugation for 0h 0m 5s, and place On ice. ezDNase is not frozen and should be placed On ice before use. Set up thermal cycler programs: 37°C, 0h 2m 0s, and 55°C, 0h 5m 0s.
Mix the following components in an RNase-free tube or plate. For processing multiple samples, make a master mix for 10× ezDNase buffer and ezDNase with 10% overage. Aliquot the master mix into the wells of a 96-well plate, then add TNAs.
| A | B |
|---|---|
| Component | Volume |
| 10× ezDNase Buffer | 1 μl |
| ezDNase | 1 μl |
| RNA from step 6 | 8 μl |
| Total volume | 10 μl |
Gently mix the samples then centrifuge the tube (Include a reaction for extraction positive control and negative control of each batch nucleic acid extraction).
Incubate the sample for 0h 2m 0s at 37°C.
Add 1µL 100mM DTT into the reaction tube.
Incubate the sample at 55°C for 0h 5m 0s to inactivate the enzyme.
Chill the tube On ice to bring the sample to Room temperature, then spin down and place the tube On ice.
cDNA SYNTHESIS: First strand cDNA Synthesis (~ 1hr)
BEFORE START : Thaw 60 μM stock Random Primer Mix (NEB, S1330S) at Room temperature. DO NOT USE the Random Primer provided by the NEBNext First Strand Synthesis Module. Thaw Random Primer Mix solution, NEBNext First Strand Reaction Buffer, NEBNext Second Strand Reaction Buffer at Room temperature then place On ice. Vortex the vials briefly, spin done by centrifugation for 0h 0m 5s, and place On ice. First and Second Strand Enzyme Mix are not frozen, should be briefly centrifuged and placed On ice before use.
Add the following reagents into the ezDNase-treated RNA from step 13.6. For processing multiple samples, make a master mix for the 60 μM Random Primer Mix and nuclease-free water with 10% overage.
| A | B |
|---|---|
| Component | Volume |
| ezDNase treated RNA | 10 μl |
| 60 μM Random Primer | 1 μl |
| Nuclease free water | 3 μl |
| Total volume | 14 μl |
Mix gently, spin down and incubate at 65°C for 0h 5m 0s. Chill On ice, spin down again and place On ice.
Add the following components in the indicated order, if multiple reactions will be processed at the same time, make a master mix with a 10% overage:
| A | B |
|---|---|
| Component | Volume |
| NEBNext First Strand Synthesis Reaction Buffer | 4 μl |
| NEBNext First Strand Synthesis Enzyme Mix | 2 μl |
| Total volume | 20 μl |
Mix gently and spin down.
APPENDIX 1. HOST DNA & rRNA DEPLETION for TNA from WHOLE BLOOD & BUFFY COAT
Mix the beads in a Hula mixer for 0h 3m 0s atRoom temperature.
Repeat steps 121.7 to 121.9. Beads are now resuspended in Depletion Buffer.
Briefly spin the tube and place on the magnetic rack for 2–5 minutes or until the beads have collected to the wall of the tube and the solution is clear.
Move the tube in the thermocycler at step 121.5 to a PCR tube rack.
Carefully remove the supernatant with a pipette without disturbing the beads.
Add 40µL beads from step 121.10 to the PCR tube and mix by pipetting.
Repeat steps 119.9 to 119.12.
Put the tube back into the thermocycler for incubation at 37°C for 0h 15m 0s, then 55°C for 0h 5m 0s.
Remove the tube from the rack and add 80µL of 1X Bind/wash Buffer (kept On ice) to resuspend the beads.
After incubation, briefly spin down droplets.
The MBD2-Fc-bound magnetic beads now are ready to use for host DNA depletion and stable for up to 7 days at . 7 days at 4°C.
Transfer 60µL sample-bead mix in the PCR tube to a new 1.5mL tube.
Place the 1.5mL tube on the magnet rack for 0h 2m 0s then carefully transfer the 60µL supernatant to a new 1.5mL tube. The supernatant now contains host rRNA-depleted TNA. Keep the supernatant On ice for the next section of Host DNA depletion.
Use 1µL for DNA/ RNA concentration measurement. Refer to REDI-NET SOP B-2 for the method of DNA/RNA quantification and storage. Recode the concentration on REDI-NET DCS B-4 Blood Testing .
Add 12mL Nuclease-free water into the 3mL 5X Bind/wash buffer in 15mL tube to make 1X Bind/wash buffer and relabel the tube as 1X buffer.
Resuspend NEBNext Protein A Magnetic Beads by gently pipetting the slurry up and down until the suspension is homogeneous; avoid bobbling.
In one 1.5mL tube, add 8µL of MBD2-Fc protein and 80µL of Protein A Magnetic Beads. Mix by pipetting up and down (avoid bobbling) until the beads are completely homogeneous, at least 5-10 times.
Mix the beads in a Hula mixer for 0h 3m 0s at Room temperature.
Spin the tube for 0h 0m 5s and use pipetting to resuspend the bottom beads if any. If the mix is prepared for multiple samples, aliquot 80µL mix to 1.5mL tubes.
Prepare streptavidin-coated magnetic beads (SMB): Vortex SMB beads at medium speed. Transfer 45µL bead suspension per sample to a new 1.5mL tube. For multiple sample processing, calculate the amount of SMB needed by multiple 45 with the sample number.
Briefly spin the tube and place in the magnetic rack for 2–5 minutes or until the beads have collected to the wall of the tube and the solution is clear.
Briefly spin down, place the tube on a magnetic rack and wait for 0h 1m 0s.
Carefully remove the supernatant with a pipette without disturbing the beads.
Aspirate and discard all supernatant.
Add 500µL of 1X Bind/wash Buffer (kept On ice) to the tube to wash the beads. Pipette up and down until the beads are completely homogeneous, at least 5-10 times.
Add 40µL Depletion Buffer per sample (i.e. 240µL for 6 samples, 480µL for 12 samples) and tap the tube to resuspend beads.
Incubate the tube for 0h 10m 0s at 25°C followed by 0h 15m 0s at 42°C.
Prepare MBD2-Fc Protein and Magnetic Beads in Microbiome DNA Enrichment Kit for host DNA depletion.
Prepare riboPOOL Pan-Mammal Kit.
Host rRNA depletion
Host DNA depletion.
AMPure XP Bead Cleanup.
APPENDIX 3. MinKNOW SOFTWARE INSTRUCTIONS
After Double-clicking the MinKNOW icon, the login page should show up. Use Oxford Nanopore Community username and password to login.

Place one tube of 3mL 5X Bind/wash buffer, NEBNext Protein A Magnetic Beads, and NEBNext MBD2-Fc Protein On ice.
Upon arrival, store the reagents in the kit as instructed on the bottles.
Before starting , set up 2 programs on a thermocycler.
68°C,0h 10m 0s, then slowly cool down to37°Cat a speed3°C/min (0.05°C/sec); when reached, keep the temperature at37°C.37°C,0h 15m 0s, then50°C,0h 5m 0s.
Add 60µL host rRNA depleted sample from the previous step (121.16) to a tube containing 80 μL MBD2-Fc-bound magnetic beads prepared at step 119.14.
Vortex AMPure XP Beads to resuspend.
Air dry the beads for 0h 2m 0s while the tube is on the magnetic rack with the lid open.
Adding 30µL of nuclease-free water to the beads.
Briefly spin the sample and mix well by pipetting up and down 10 times.
Incubate for 0h 2m 0s at Room temperature.
Briefly spin the sample, then place the tube on the magnetic rack for 2-5 minutes (or when the solution is clear).
Transfer the supernatant to a new 1.5mL tube.
When using the kit for the first time, centrifuge the riboPOOL probe tube (RP) at 11000x g before opening. Add 30µL kit provided nuclease-free water and vortex well to resuspend the riboPOOL probe. Aliquot the 5µLRP in 1.5ml tubes after resuspension. Store RP aliquots at -20°C. Avoid freeze-thaw cycles.
Transfer TNA containing around 500ng RNA to a 200μL PCR tube, adjust volume with nuclease-free water to 13.7µL. For example, if the RNA concentration of the TNA sample is 100 ng/ul, transfer 5µL of the sample to a 200μL PCR tube and add 8.7µL nuclease-free water. When the RNA concentration is lower than 36.5ng/µl use 13.7µL sample without volume adjustment.
Add 35µL 5X Bind/wash buffer from the 1mL aliquot prepared at step 118.1.
Add 175µL resuspended AMPure XP beads to the sample at step 122.5.
Probe Hybridization : add reagents as the following table for one sample. For processing multiple samples, make a master mix with a 10% overage.
| A | B |
|---|---|
| Component | |
| TNA | 13.7 |
| RP | 0.3 |
| 4X Hybridization Buffer (HB) | 5 |
| RNaseOUT (40U/ μL) | 1 |
| Total | 20 |
Mix the sample in the Hula mixer for 0h 15m 0s at Room temperature.
Mix well by pipetting up and down at least 10 times.
Mix by pipetting, then spin down briefly.
Briefly spin the tube and place it on the magnetic rack for 0h 5m 0s until the beads have collected to the wall of the tube and the solution is clear.
Incubate samples for at least 0h 5m 0s at Room temperature.
Place the tube in the thermocycler and run the first program 68°C cool down to 37°C set at step 121.1.
Carefully transfer 175µL supernatant with a pipette, without disturbing the beads to a clean 1.5mL microcentrifuge tube. The sample at this stage is host rRNA and DNA depleted in buffer. Store this sample at -20°C or proceed directly to the sample cleanup described in the section A6 before processed to the SOP of blood testing.
Quickly spin the sample, then place the tube on the magnet rack to separate the beads from the supernatant.
After 2-5 minutes (or when the solution is clear), be careful not to disturb the beads, and remove and discard the supernatant.
Add 400µL of freshly prepared 80% ethanol to the tube on a magnetic rack. Incubate at Room temperature for 0h 0m 30s, then carefully remove and discard the 80% ethanol without disturbing the beads.
Repeat the previous step.
Briefly spin the tube, place it back on the magnetic stand and remove traces of ethanol with a p10 pipette tip.
Terminate the reaction by heating at 70°C for 0h 15m 0s.
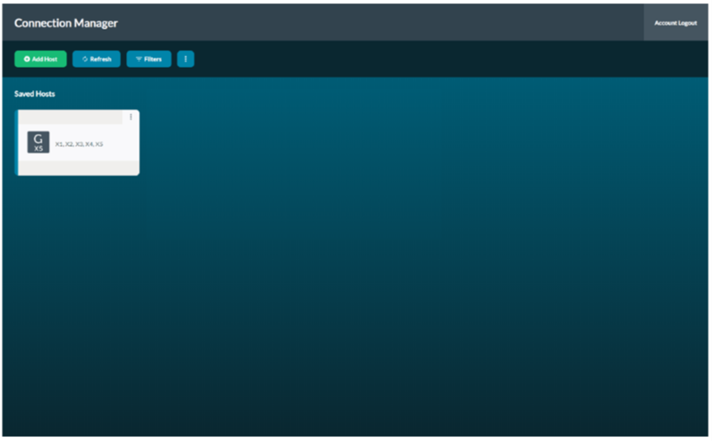
Select the device shown on the screen.
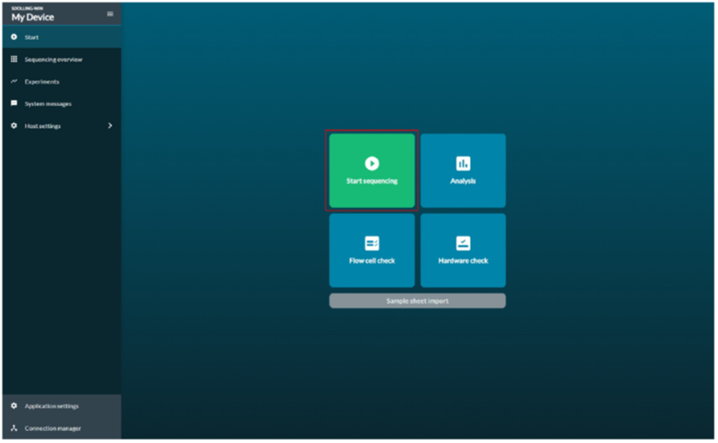
Go to Start tab, select the “Start Sequencing” option to choose the running parameters.
Place the tube On ice or pre-chilled freezer block.
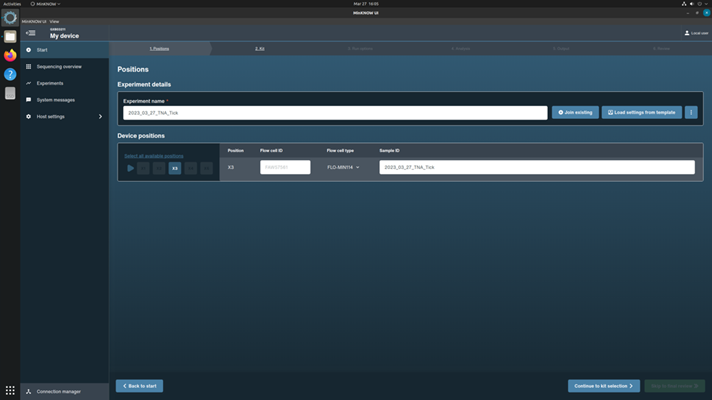
Type in the (1) experiment name, (2) sample ID and (3) choose flow cell type from the drop-down menu. Use (4) “Select all available” to select all the connected flow cells or use the diagram above to select specific flow cells to run. (5) Select Continue to Kit Selection to move to the next page.
Continue immediately with the second strand synthesis reaction as described below.
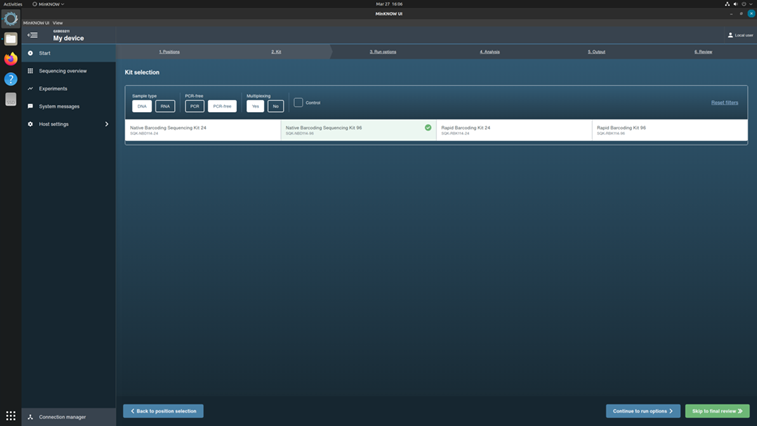
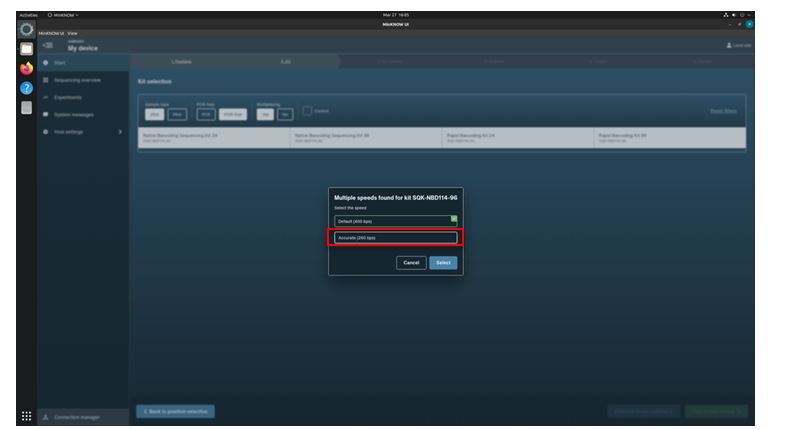
elect the kit SQK-NBD114-96 from the Kit Selection menu. Select Continue to Run Options to choose run parameters.
cDNA SYNTHESIS: Second strand cDNA Synthesis (~ 1hr)
Pipette the following components directly into the first strand reaction tube (with 20µL mixture) On ice in the indicated order, if multiple reactions will be processed at the same time, make a master mix with a 10% overage:
| A | B |
|---|---|
| Component | Volume |
| 5x NEBNext Second Strand Synthesis Reaction Buffer | 5 μl |
| NEBNext Second Strand Synthesis Enzyme Mix | 2.5 μl |
| Nuclease-free water | 22.5 μl |
| Final total volume | 50 μl |
Select the speed: Accurate (260bp).
Mix gently and centrifuge briefly.
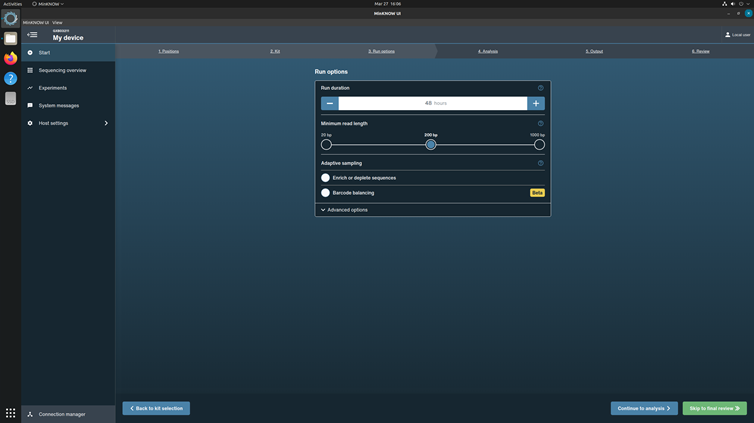
Set run length to 48h 0m 0s and Minimum read length 200 bp. Let adaptive sampling off. Select Continue to analysis for output setting.
Incubate at 16°C for 1h 0m 0s (heated lid set at ≤ 40°C).
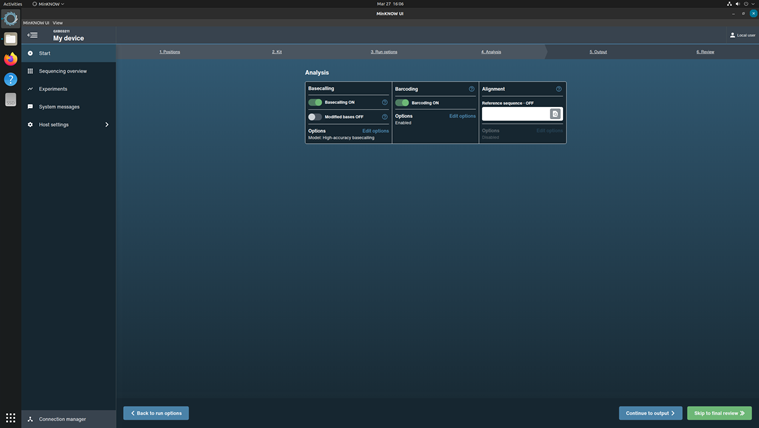
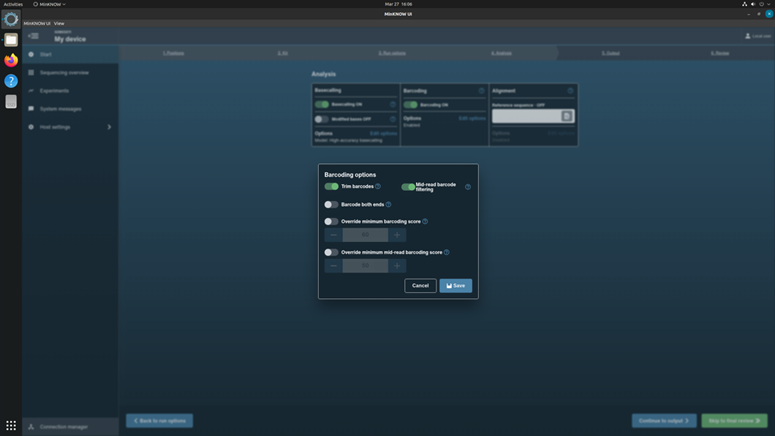
Turn on Basecalling and Barcoding.
Proceed with cDNA purification or store the reaction mixture at -20°C before the subsequent cDNA purification (the double-stranded cDNA is ready to be shipped to Gold Labs if necessary).
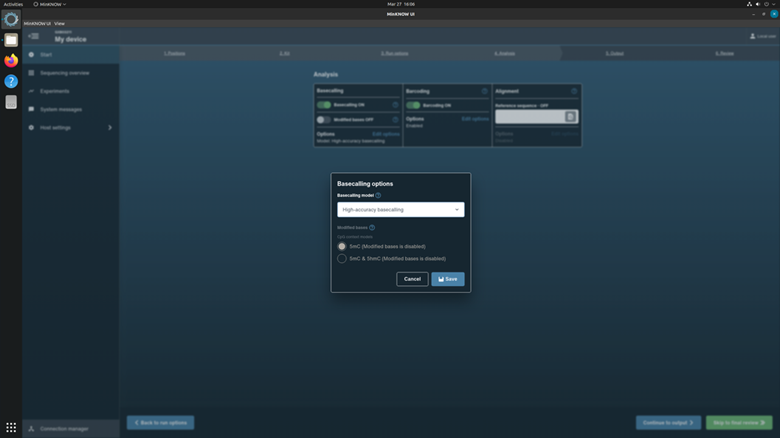
Set up Option of Basecalling model in High-accuracy basecalling. Save the setting.
cDNA SYNTHESIS: Purification of double-stranded cDNA (~ 15 mins)
Set up Barcoding options. Turn on Trim barcodes and Mid-read barcode filtering. Save the settings and Continue to output.
Transfer the sample (50µL) to a clean 1.5ml low DNA binding tube.
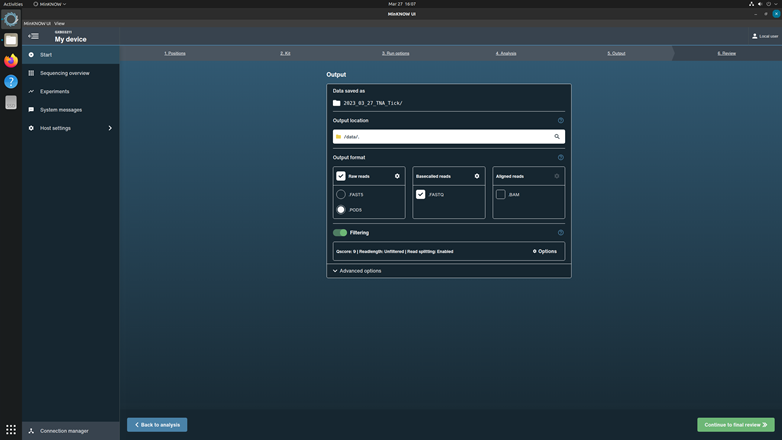
Select the output data location, format, and filtering options. Check the box for Raw reads and select POD5. Check the box FASTQ of Basecalled reads. Keep the filter score as the system default. Select “Continue to final review” to proceed.
Add 40µL of resuspended AMPure XP beads to the reaction and mix by flicking the tube.
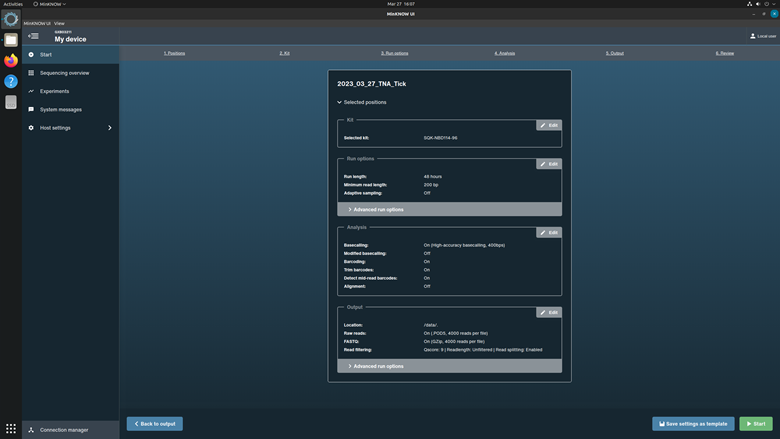
Review the settings listed in the Run Setup page. Correct any errors. Select 'Start' to run the experiment. The system will automatically navigate the Sequencing Overview when sequencing starts.
Incubate on a Hula mixer (rotator mixer) for 0h 5m 0s at Room temperature.
Spin down the sample and pellet on the magnet. Keep the tube on the magnet, and using a pipette, discard the supernatant.
Keep the tube on the magnet and wash the beads with 200µL of freshly prepared 70% ethanol without disturbing the pellet. Remove the ethanol using a pipette and discard.
Repeat the previous step X1.
Spin down and place the tube back on the magnet. Using a pipette, remove any residual ethanol. Allow to dry for ~0h 0m 30s, but do not dry the pellet to the point of cracking.
Remove the tube from the magnetic rack and resuspend the pellet in 13µL nuclease-free water.
Incubate on a Hula mixer (rotator mixer) for 0h 10m 0s at Room temperature.
Spin down and pellet beads on magnet until the eluate is clear and colorless.
Remove and retain 11µL of eluate into a clean 1.5ml low DNA binding tube.
Optional : Analyze 1µL of the purified double-stranded cDNA for quantity using Qubit fluorometer and Qubit 1X dsDNA HS Assay Kit.
Subject 10µL purified double-stranded cDNA for section SEQUENCING LIBRARY PREPARATION.
SEQUENCING LIBRARY PREPARATION
Before starting , prepare fresh 70% ethanol in nuclease-free water sufficient for your samples
(1mLper sample). Program the thermal cycler or use a heat block for 96 well plate: 20°C for 0h 5m 0s and 65°C for 0h 5m 0s. Thaw Ultra II End-prep reaction buffer, NEBNext FFPE DNA Repair Buffer, Barcode Plate(from SQK-NBD114.96 Kit),and Blunt/TA Ligase Master Mix On ice. After fully thaw, mix by vortex, spin down briefly, and place On ice. Check that there is no precipitate present (the Blunt/TA Master Mix can sometimes form a precipitate). Spin down Ultra II End-prep enzyme mix and place On ice.
SEQUENCING LIBRARY PREPARATION: End-prep (~ 50 minutes)
Mix the following reagents in a 0.2ml PCR tube. To process 24 samples, prepare a master mix by multiplying gradients except for cDNA by 24 with a 10% overage. Aliquot the master mix into a 96-well plate, then add cDNA or TNA (see Appendix 2 for master mix preparation):
| A | B |
|---|---|
| Component | Volume |
| DNA/TNA sample | 20 μl |
| Nuclease-free water | 4 μl |
| Ultra II End-prep reaction buffer | 1.75 μl |
| Ultra II End-prep enzyme mix | 1.5 μl |
| NEBNext FFPE DNA Repair Buffer | 1.75 μl |
| NEBNext FFPE DNA Repair Mix | 1 μl |
| Final total volume | 30 μl |
Mix gently by pipetting and spin down.
Using a thermal cycler, incubate at 20°C for 0h 5m 0s and 65°C for 0h 5m 0s.
Resuspend the AMPure XP beads by vortexing.
Add 50µL of resuspended AMPure XP beads to the end-prep reaction and mix by pipetting (use an 8-channel pipette for reagent transfer of multiple samples).
Incubate on a Hula mixer (rotator mixer) for 0h 5m 0s at Room temperature.
Spin down the sample and pellet on a magnet (DynaMag-2 for 1.5ml tube and DynaMag-96 for PCR plate). Keep the tube on the magnet, and using a pipette, discard the supernatant.
Keep the tube on the magnet and wash the beads with 200µL of freshly prepared 70% ethanol without disturbing the pellet. Remove the ethanol using a pipette and discard.
Repeat the previous step X1.
Spin down and place the tube back on the magnet. Using a pipette, remove any residual ethanol. Allow to dry for ~0h 0m 30s, but do not dry the pellet to the point of cracking.
Remove the tube from the magnetic rack and resuspend the pellet in 12µL nuclease-free water. Incubate for 0h 2m 0s at Room temperature.
Pellet the beads on a magnet until the eluate is clear and colorless.
Remove and retain 11µL of eluate into a clean 1.5ml low DNA binding tube.
SEQUENCING LIBRARY PREPARATION: Barcode ligation (~ 25 minutes)
Add the reagents in the order given below, mixing by flicking the tube between each sequential addition:
| A | B |
|---|---|
| Component | Volume |
| End-prepped DNA | 10 μl |
| Native Barcode (pick one form Native Barcoding Expansion 1-96) | 2 μl |
| Blunt/TA Ligase Master Mix | 12 μl |
| Final total volume | 24 μl |
Mix gently by flicking the tube and spin down.
Incubate the reaction for 0h 20m 0s at Room temperature.
Add 3µL of EDTA to each well and mix thoroughly by pipetting and spin down briefly.
SEQUENCING LIBRARY PREPARATION: Library pooling for multiplex sequencing
Pool every 24 barcoded samples 12µL from each sample, (total 288µL/pool) in a new 1.5ml low DNA binding tube.
Resuspend the AMPure XP beads by vortexing.
Add 518µL (1.8x volume of the pooled library) of resuspended AMPure XP beads to the pooled library and mix by pipetting.
Incubate on a Hula mixer (rotator mixer) for 0h 10m 0s at Room temperature.
Spin down the sample and pellet on a magnet. Keep the tube on the magnet for 0h 5m 0s, and using a pipette, discard the supernatant.
Keep the tube on the magnet and wash the beads with 700µL of freshly prepared 80% ethanol without disturbing the pellet. Remove the ethanol using a pipette and discard.
Repeat the previous step X1.
Spin down and place the tube back on the magnet. Using a pipette, remove any residual ethanol. Allow to dry for ~0h 0m 30s, but do not dry the pellet to the point of cracking.
Remove the tube from the magnetic rack and resuspend the pellet in 35µL nuclease-free water. Incubate for 0h 10m 0s at 37°C temperature.
Spin down and pellet the beads on a magnet until the eluate is clear and colorless.
Remove and retain 35µL of eluate into a clean 1.5ml low DNA binding tube.
SEQUENCING LIBRARY PREPARATION: Adapter ligation (~ 45 minutes)
BEFORE STARTING: BEFORE STARTING : Thaw Short Fragment Buffer (SFB), Elution Buffer (EB), and NEBNext Quick Ligation Reaction Buffer (5×) at Room temperature, mix by vortexing, spin down, and place On ice. Check that the contents or each tube are clear of any precipitate. Spin down the T4 Ligase and the Native Adapter (NA), and place On ice.
Taking the pooled and barcoded DNA, perform adapter ligation as follows, mixing by flicking the tube between each sequential addition.
| A | B |
|---|---|
| Pooled barcoded sample | 30 μl |
| Native Adapter (NA) | 5 μl |
| NEBNext Quick Ligation Reaction Buffer (5×) | 10 μl |
| Quick T4 DNA Ligase | 5 μl |
| Final total volume | 50 μl |
Mix gently by flicking the tube, and spin down.
Incubate the reaction for 0h 20m 0s at Room temperature.
Resuspend the AMPure XP beads by vortexing.
Add 90µL of resuspended AMPure XP beads to the reaction and mix by pipetting.
Incubate on a Hula mixer (rotator mixer) for 0h 10m 0s at Room temperature.
Place on the magnetic rack, allow beads to pellet and using a pipette, discard the supernatant.
Add 125µL of the Short Fragment Buffer (SFB) to the beads. Close the tube lid and resuspend the beads by flicking the tube. Return the tube to the magnetic rack, allow beads to pellet and using a pipette, discard the supernatant.
Repeat the previous step X1.
Spin down and place the tube back on the magnet. Using a pipette, remove any residual supernatant.
Remove the tube from the magnetic rack and resuspend the pellet in 13µL of Elution Buffer (EB).
Incubate on at 37°C for 0h 10m 0s at Room temperature, agitate the sample for 10s every 2 min.
Pellet beads on magnet until the eluate is clear and colorless.
Remove and retain 13µL of eluate into a clean 1.5ml low DNA binding tube.
Quantify 1µL of eluted sample using a Qubit fluorometer and Qubit 1X dsDNA HS Assay Kit (recovery aim ~ 430ng in total).
Make up the library to 12µL at 10-20 fmol.
Put the library On ice until ready to load or store the library at -20°C for future sequencing.
Priming and loading the SpotON Flow Cell
Check the number of pores in your flow cell.
Turn on GridION (or MinION Mk1C) device. Make sure all the connections for the display, mouse, keyboard, and internet are ready.
Click Start to begin the flow cell check.
Record the port number and date of checking on the original package of the flow cell. The flow cell with less than 800 pores should not be used for the sequencing. If the flow cell is not expired, contact Oxford Nanopore Company for customer service.
If the flow cell is going to be used immediately, keep it on the GridION or MinION Mk1C sequencer for priming. Otherwise put the flow cell back to the original pouch, store at 4°C for next day use. The opened flow cell should be used within one week.
Depending on the number of pooled samples, get one to four new flow cells from the fridge and check the expiration date.
Double-click the MinKNOW icon shown on the desktop to initiate the program.
Use Oxford Nanopore Community username and password to login.
Select the device shown on the screen.
Open the lid of GridION (or MinION Mk1C) and insert the flow cells under the clips, press down the flow cell to ensure good thermal and electrical contact.
The Sequencing Overview tab should show the flow cell not checked in each position in use.
Navigate to the Start tab and select Flow Cell Check .
Select the flow cells to assign the flow cell type FLO-MIN114 from the dropdown menu.
Priming and loading the SpotON Flow Cell: Flow cell priming
BEFORE STARTING :
Thaw the Sequencing Buffer (SB), Library Beads (LIB), Flow Cell Tether (FCT) and one tube of Flow Cell Flush (FCF) at Room temperature. Mix SB by tapping or pipetting (DO NOT Vortex) and vortex the other tubes. Spin down tubes at Room temperature.
Check the air bubble of priming pore.
Slide open the GridION lid (or MinION Mk1C) and insert flow cell with minimum 800 pores.
Slide the priming port cover clockwise to open the priming port.
After opening the priming port, check for a small air bubble under the cover. Draw back a small volume (20-30 μl) to remove any bubbles:
Set a P1000 pipette to 200 μl. Insert the tip into the priming port. Turn the volume adjustment wheel counter-clockwise until the dial shows 220-230 μl, or until you can see a small buffer volume entering the pipette tip.
Prepare the flow cell priming mix and prime flow cells.
Using a 2.0 mL low DNA binding tube, prepare flow cell priming mix with components as follows, mix by inverting the tube and pipetting.
| A | B |
|---|---|
| Component | |
| Bovine Serum Albumin (BSA) (50 mg/ml) | 5 μl |
| Flow Cell Tether (FCT) | 30 μl |
| Flow Cell Flush (FCF) | 1170 μl |
| Final total volume | 1205 μl |
Load 800µL of the priming mix into each flow cell via the priming port, avoiding the introduction of air bubbles. Wait for 0h 5m 0s.
Prepare the library for loading.
Thoroughly mix the contents of the Library Beads (LIB) by pipetting.
In a new tube, prepare each library for loading as follows:
| A | B |
|---|---|
| Component | Volume |
| Sequencing Buffer (SB) | 37.5 μl |
| Library Beads (LIB) | 25.5 μl |
| DNA library | 12 μl |
| Final total volume | 75 μl |
Complete the flow cell priming.
Gently lift the SpotON sample port cover to make the SpotON sample port accessible.
Load 200µL of the priming mix into the flow cell via the priming port (not the SpotON sample port), avoiding the introduction of air bubbles.
Loading samples.
Mix the prepared library gently by pipetting up and down just prior to loading.
Add 75µL of sample to the flow cell via the SpotON sample port in a dropwise fashion. Ensure each drop flows into the port before adding the next drop.
Gently replace the SpotON sample port cover, making sure the bung enters the SpotON port, close the priming port and replace the GridION lid.
Priming and loading the SpotON Flow Cell: Data acquisition and basecalling
Double-click the MinKNOW icon displayed on the desktop to initiate the program.
Use Oxford Nanopore Community username and password to login or continue as Guest.
Select the device shown on the screen.
Go to the Start tab, and click the Start Sequencing option to choose the running parameters.
Type in the Experiment Name using the scheme, [ YYYY_MM_DD_Approach(gDNA or TNA)_Sample type (soil, water,… etc.)]
Type in Sample ID (same as experiment name)
Choose flow cell FLO-MIN114 from the drop-down menu
Click Continue to Kit Selection to move to the next page.
Click the kit SQK-NBD114-96 from the Kit Selection menu.
Click Continue to Run Options to choose run parameters.
Set run length to 48h 0m 0s and minimum read length 200 bp. Let adaptive sampling be unchecked.
Click Continue to Analysis to choose basecalling and Barcoding parameters.
In the Basecalling options, checkup the basecalling with configuration: High accuracy basecalling.
In the Barcoding options, turn on the Trim barcodes and Mid-read barcoding filtering.
Do not turn on the Alignment option.
Click Continue to output to the next page.
Select the output data location, format, and filtering options. Check up the box for Raw reads in POD5 format and Basecalled reads in FASTQ format. Keep the filter score as the system default.
Click Continue to final review to proceed.
Review the settings listed in the Run Setup page. Correct any errors. Select Start to run the experiment.
The system will automatically navigate the Sequencing Overview when sequencing starts.
48 hrs later, check the sequencing data. Use 1 mL pipette to remove 1 mL waste solution in the waste channel via waste port 1 (see Appendix 1 under Guidelines & Warnings tab). Remove the flow cells on the device, put it back in the original package, and turn off the device.
