Protocol for use of Vertical Modified Moore Swab (VMMS) to Isolate Salmonella from Surface Water
Autumn L Kraft, Manan Sharma, James E Wells, Abasiofiok Mark Ibekwe, NARMS EWG, Jonathan G Frye
National Program 108
Environmental Microbial and Food Safety Laboratory
Vertical modified Moore swab (VMMS)
isolation
Salmonella
surface water
Abstract
This protocol describes the use of vertical modified Moore swab (VMMS) to recover and isolate Salmonella from surface water.
Attachments
Steps
VMMS Cartridge Assembly: End piece Assembly

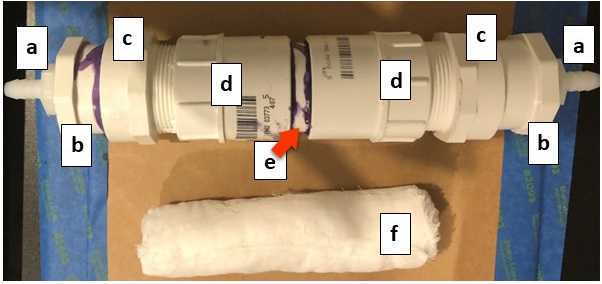
Apply Purple Primer (Oatey 30756) to ½ to ¾ in length of the bottom part of the cylindrical section of part b (bushing, 1 ½” x ½” PVC S40 SPxFIP Bush) .
Apply purple primer to the inside, non-threaded end of part c ( male adapter , 1 ½ PVC DWV Male Adapter).
Reapply purple primer to the bottom part of the cylindrical section of part b ( bushing ) so that it receives two coats of purple primer.
Apply PVC Cement to the non-threaded end of part c (male adapter) over the purple primer.
Apply PVC Cement to the cylindrical section of part b (bushing).
Reapply PVC Cement to the non-threaded end of part c (male adapter) .
Insert part b (bushing) into part c (made adapter) with force as far as bushing will insert. After inserting bushing, turn bushing ¼ turn to “lock” (solder) the bushing into the adapter, and leave upright to dry.
Repeat steps 1-7 for 2nd End piece Assembly.
Allow cement to dry .
VMMS Cartridge Assembly: Central Connector
Apply purple primer (Oatey 30756) to up to ½ to ¾ in end of the 2-in PVC piece ( part e ).
Apply purple primer to the non-threaded end of the SxF adapter ( part d , 1 ½ PVC S50 SxF).
Apply PVC cement to non-threaded end of SxF adapter ( part d ).
Apply PVC cement to 2-in PVC ( part e ).
Reapply a second coat of PVC cement to non-threaded end of S x F adapter ( part d ).
Push adapter ( part d ) on to 2-in PVC piece ( part e ) as far as it will go.
Using the other end of the 2-in PVC piece ( part e ), repeat steps 10-14.
While pushing/placing the second adapter ( part d ) on to 2-in piece ( part e ), the assembly should be vertically rested on the first SxF adapter ( part d ). The second adapter should be pushed from the top down on to 2-in piece ( part e ) (with force) until the entire Central Connector assemble measures 5.25 in. Adjustments to length can be made to in the first 1-2 minutes after the cement is applied.
Allow the whole assembly to dry in a well-ventilated space .
VMMS Cartridge Assembly: Barb to End piece
Insert the barbed bard ( part a ) into the threads of the bushing ( part b ) of the entire end piece assembly and turn by hand (screw) until no more turns can be made.
Repeat for 2nd end piece.
VMMS Cartridge Assembly: End piece to Central Connector
Screw the male adapter ( part c ) into SxF adapter ( part d ) of the central connector assembly.
Repeat for second end piece.
Prepare the VMMS Cheesecloth Filters
On a large flat clean surface cut a piece of grade #90 cheesecloth to 74 cm x 92 cm .
Fold the cheesecloth in half by 92 cm (now 74 cm x 46 cm).
Fold again into thirds, so the finished product will be 74 cm x 16 cm .
Tightly roll the cheesecloth, along the 16-cm side.
Tightly roll each filter in aluminum foil and fold the ends over so that the cheesecloth doesn’t lose its shape.
Autoclave the foil-wrapped filters on a dry cycle.
Disinfect the cartridges
Remove (unscrew) end pieces from central connector piece.
Remove barbed nozzles from end pieces.
Unroll all Teflon tape from the threads of barbed nozzles ( part a ) and the male adapter ( part c ).
In a large, clean bin soak the cartridge pieces in 10% bleach , making sure the bleach solution covers all parts.
Autoclave a foil-wrapped bin that is large enough to hold all the cartridges on a dry cycle.
Autoclave several liters of deionized water in a carboy with a spigot attachment.
The next day, remove the VMMS cartridge pieces one at a time with gloved hands and thoroughly rinse each piece with sterile deionized water. Turn the carboy spigot so that the water flows slowly.
With fresh gloves , carefully shake each piece to remove excess water and then place them in the large, sterilized bin – replacing the foil after each transfer. The cartridges will still be slightly wet, so place the bin in a BSC to dry.
Rethread Teflon tape around the threads of the barbed nozzles ( part a ) and the male adapter ( part c ).
Screw the bottom end piece into the central connector.
With fresh gloves , insert one of the sterile MMS into a disinfected cartridge.
Screw top end piece tightly.
Place the assembled MMS cartridge back into the sterile bin and re-cover with foil.
Filtration Protocol
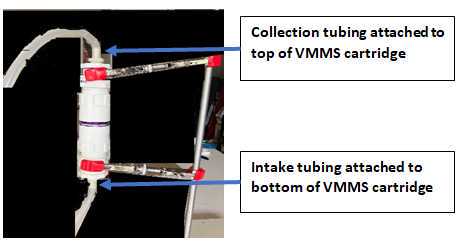
Secure one of the VMMS cartridges to a support stand and adjust the height. The Cartridge will be oriented vertically with tubing attached to the barbs at the top and bottom of the cartridge (Figure 1, a).

Using the Geotech pump and its accessories, place the sterilized intake tubing in the EZ Load pump head on the Geotech Pump. Then connect the outlet end of the intake sterilized hose to the bottom of the MMS cartridge over the barbed end.
If needed, add Control strain to 1L surface water sample by gently tipping vial over the opening. Close sample bottle tightly and thoroughly mix sample before proceeding.
Place the inlet end of the intake tubing into the 1 L bottle containing surface water.
Connect collection tubing to the top of the MMS cartridge and place the outlet end in a collection container. Use a collection container sufficient to hold up to 1 L of filtrate.
Turn the pump on and set the pump rate to 3/4 of maximum flow rate (use the dial). Once water is flowing into tube, then the pump speed can be slowed by 5 “clicks” (turn to the left) to maintain a constant flow.
After 1L has been pumped through the tubing, turn the pump off.
Position the waste container (containing a 10% bleach solution) underneath the MMS cartridge on the support stand and carefully disconnect the collection tubing from the top of MMS cartridge to retrieve the MMS. Allow water in collection tubing to drain to collection vessel.
Place the collection tubing into the waste container and let sit for at least 0h 30m 0s.
Remove (Unscrew) the top piece (male adapter with barb) of the MMS cartridge from the central connector and carefully place it in the waste container as well.
Using sterile forceps aseptically transfer the MMS filter into its pre-labelled 55 oz Whirl-Pak® bag and place the forceps in the waste container.
Carefully disconnect the intake tubing and place both the intake tubing and the cartridge in the waste container.
Using a sterile graduated cylinder, add 100mL 1 X UPB into each Whirl-Pak® sample bag containing a MMS.
Massage entire length of MMS in UPB for 0h 1m 0s and incubate at 37°C for 18-24 h.


