Protocol LSBA setup
Thomas Quiroz Monnens, Alice Boulanger
Abstract
This protocol details the large scale bacterial attraction assay.
Steps
LSBA setup
Estimated preparation time of a Large Scale Bacterial Attraction assay (LSBA) is around 0h 20m 0s. * Samples can be collected when desired and takes around 0h 5m 0s per experimental setup. To keep a strong chemoeffector gradient, even of small molecules, we do not recommend to continue the experiment for more than 2 days.
- Whilst setting up the LSBA the chance to spill
1millimolar (mM)MgCl2or LM medium onto the workspace is very high. We recommend to keep tissue paper nearby to clean up any spills.
Cut 2 circles from a sheet of parafilm with a diameter of 1cm. * Seal one of the outlet ports on the lower receiver of the Filter Unit by stacking the two parafilm circles and pressing them firmly against the outlet port.
- Tightly fold the edges of the circles over the outlet port to reinforce the seal. The seal can be strengthened by adding a thin strip of parafilm around the inlet port and the overlapping parafilm from the folded edges of the circle.
- Ensure their sealed is airtight and that there is not more parafilm than required for the seal. Too much Parafilm will cause problems when sealing the system in later staged of the experiment with the rubber port cap.
- Seal the other outlet port with the rubber port cap from the filtration kit.
- Ensure the quality of the rubber of port cap is good. Old port caps can be dry and this increases the chances of the setup leaking. When in doubt, this seal can also be reinforced using Parafilm.
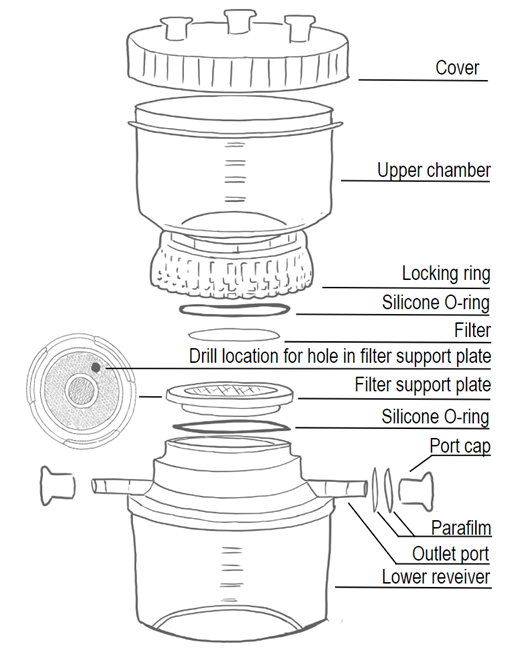
Fill the lower receiver with your non-chemo attractive buffer of choice. Ensure to fill the lower receiver completely to the edge, till it overflows.
Place the filter support plate into the lower receiver and add buffer to the top of the support plate till it overflows.
Place the 1.2 micron mixed cellulose ester filter on the filter support plate. Ensure the buffer in the lower receiver is in direct contact with the filter.
- This means that the filter should completely saturate with buffer once placed on the filter support plate. Be careful whilst handling the filter as it is delicate.
Place the upper chamber of the filtration system on top of the lower receiver and filter support plate with the filter.
- Carefully, yet firmly tighten the locking ring of the upper chamber onto the lower receiver whilst pressing down firmly on the upper chamber.
- Pressing down on the system ensures that there is no friction between the red support silicone O-ring on the upper chamber, the filter support plate and the filter, which could damage the filter.
A) The structure of the filter support plate allows it to hold some air. This air could possibly interrupt the buffer column between the lower receiver and upper chamber if not handled carefully.
- To reduce this risk, one can drill a >3mm hole into the filter support plate, which ensures it cannot capture any air. This does not affect the use of the Filter Unit for filtration applications.
B) If modification of the filter support plate is not desirable, one can remove the air following instructions below.
- After step 6, first add
10mLof buffer into the upper chamber of the compartment. - Tilt the complete system 45 degrees so the air bubble trapped in the filter holder will move towards the outlet port with the rubber port cap. Remove the port cap and quickly add buffer to the system through the outlet port using a pipette to reduce the size of the air bubbles.
- After addition, quickly seal the outlet port again using the rubber port cap. This will reduce the size of the air bubble, reducing the chance the air might disrupt the buffer column between the lower receiver and the upper chamber.
- We prefer to drill a hole in the support plate as reducing the air bubble size can be tedious and might not always work as desired if one is not fast enough. With the hole there is virtually no risk of an air bubble.
Visually ensure the buffer in the lower receiver and upper chamber of the filtration system are in direct contact, meaning that there are no air bubbles in the buffer column between lower receiver, filter and upper chamber. If not, loosen the locking ring and repeat from step 4.
Add your bacteria of interest to a syringe with a 25G needle. Fill the syringe with a high density of bacterial suspension to avoid adding too much liquid to the lower receiver (1mL of bacterial suspension at a concentration of 4 x 10¹⁰ cells/ml).
- Ensure the bacteria are washed multiple times to avoid adding external chemoeffectors from growth media into the lower receiver.
Pierce the parafilm seal at the outlet port with the needle and slowly add your bacteria to the lower receiver of the system.
Once finished, pull the needle from the Parafilm seal and place a rubber port cap on the parafilm seal.
- During this step, a few drops of non-chemotactic buffer with bacteria will drop out of the hole in the parafilm seal. Anticipate this by having some paper tissue nearby. One can additionally reinforce the seal of the port cap over the outlet port with additional Parafilm.
Place the cover on the system to avoid external contamination of the upper chamber.
After 30 minutes of adding the bacteria, take samples from the upper chamber to count bacteria at time 0 and plate 100µL of direct suspension on rich media. This is a control, which helps to ensure the system was set up properly.
- Relatively high numbers of bacteria in the upper chamber at this time point might indicate the filter was damaged during preparation of the assay or that the upper chamber was contaminated prior to the start of the experiment.
Add the attractant to the upper chamber and mix by pipet and fill the upper chamber till it contains 100 ml. Be careful not to touch the filter as it is delicate.
Cover the complete system with the receiver cover to minimise the chance of external contamination of the upper chamber.
Take samples from the upper chamber for viability counting over a period of time.
