Mechanical Dissociation using COVARIS cyroPREP
aurelia_reynolds
Abstract
Prior to nuclei isolation from frozen tissue it is necessary to pulverize the sample. The Covaris cryoPREP Dry Pulverizer allows for dry, non-contact cryopulverization of tissue samples in a closed system. The manufacturer’s published protocol was applied to frozen melanoma and liver metastases for the Human Tumor Atlas Network (HTAN) single-nuclei RNA-seq Trans-Network Project (snRNAseq TNP).
Before start
Purpose: To better replicate the environment when performing mechanical dissociation, the COVARIS cyroPREP is used alongside the any Nuclei Isolation Protocol. Ultimately, the COVARIS cyroPREP machine pulverizes frozen tissue samples in order to prep for isolation of nuclei for single nucleus RNAseq. Using cyroPREP eliminates the need to mechanically dissociate tissue samples by hand with fine scissors, as well as variability of technicians.
Steps
Preparation
Clean off bench space with RNAse away then 70% EtOH.
Prepare for nuclei isolation (see Nuclei Isolation Protocol).
Gather dry ice bucket, wet ice bucket, and empty bucket for LN2.
USING SAFETY GOGGLES AT ALL TIMES , gather LN2. Use specific LN2 container found in the lab. Make sure to use cryo-gloves when handing LN2 tank to avoid burning skin on hands. Grab enough LN2 with excess due to evaporation.
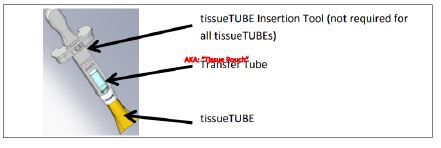
Gather tissueTUBE/Tissue Pouch, Transfer Tube, and if needed tissueTUBE Insertion Tool.
TISSUE PULVERIZATION
Put on Safety Goggles
Place Transfer Tube on wet ice.
Note: Transfer Tube is not used to hold any sample. It is kept cold so that there are not extreme temperature changes that could cause the glass to break. Be careful handling Transfer Tube with LN2.
Place Tissue Pouch on dry ice. Make sure Tissue Pouch is fully covered by dry ice. This is to cool down the Tissue Pouch before putting in the sample.
Gather sample on dry ice. Check project-specific 10x tracker to make sure the correct sample is being processed.
Place cold plate on dry ice. On top of the cold plate, place two rulers on top at a right angle to properly measure sample. Place new petri dish on top of rulers with markers in good view to ensure proper measurement references for the sample. Once petri dish is cold, use forceps to place sample on petri dish and take a photo for processing notes.
Using forceps, place sample into Tissue Pouch. Using fingers, pinch the bottom of the Tissue Pouch and place the tissue in about 1/3 from the bottom of the Tissue Pouch. If tissue cannot be held in that place, it is okay. Try to center tissue as much as possible in the Tissue Pouch. Keep on dry ice.
Note: It is very important to keep tissue as cold as possible during this process. Cover Tissue Pouch with dry ice if necessary.
Attach Tissue Pouch to Transfer Tube. Once attached and fully screwed into the Tissue Pouch, turn the Transfer Tube ¼ of a turn out to allow venting during cryofracture. If needed, attach Tissue Pouch Insertion Tool to whole apparatus.
MAKE SURE TO WEAR SAFETY GOGGLES . Using container with LN2, pour LN2 into empty bucket. Make sure not to splash LN2.
Holding the Transfer Tube, dip the Tissue Pouch into liquid nitrogen ensuring the tissue is submerged. Make sure the Transfer Tube does not touch the LN2. Hold Tissue Pouch in LN2 for ~30 seconds. Flip the Tissue Pouch so that each side evenly is covered in LN2.
Place the whole apparatus (either Tissue Pouch connected to Transfer Tube or the tissueTUBE Insertion Tool) into the cryoPREP.
Turn on the cyroPREP using the bright red button.
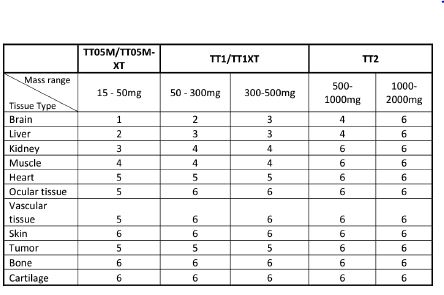
Set the cyroPREP to the appropriate impact setting using the table below:
Place the Tissue Pouch/Transfer Tube apparatus or the tissuTUBE Insertion Tool into the cyroPREP. Make sure the Tissue Pouch is sitting at the appropriate location.
Close the lid to the cyroPREP. Once lit, hit the large green button for impact.
After impact, hit the large red button to turn off the cyroPREP.
Open the lid and take out the Tissue Pouch/Transfer Tube apparatus.
Check Tissue Pouch for any breaks in the plastic. If there are any breaks in the plastic, do not continue with any further impacts.
Check tissue to see if pulverized enough. This can be done by gently flicking the pouch. Make sure not to touch pulverized sample to prevent heat transfer to the frozen pulverized sample within Tissue Pouch.
If ready for isolation, remove Transfer Tube from Tissue Pouch by unscrewing.
Note: Remember the Transfer Tube is not actually used for transfer of sample. The Transfer Tube is just so that the Tissue Pouch can properly sit inside the cryoPREP. There should be no sample inside the Transfer Tube.
Add 500 μL - 1000 μL of TST buffer (from Nuclei Isolation Protocol) to Tissue Pouch depending on sample size.
Very slightly resuspend pulverized tissue in TST. Resuspend just enough to transfer all pulverized sample before being dissociation by pipette mixing.
Transfer resuspended sample mix to 1.5 mL tube on wet ice.
Transfer wet ice bucket to tissue culture hood
Proceed with nuclei isolation protocol with pipette mixing of TST and pulverized sample on wet ice for 3 minutes.
