Evaluation of the Efficacy and Safety of Antiplatelet Therapeutics in Rabbits
Dawn S. Kuszynski, Dawn S. Kuszynski, Barbara D. Christian, Barbara D. Christian, Matthew P. Bernard, Matthew P. Bernard, D. Adam Lauver, D. Adam Lauver
Abstract
Hemostasis is a multifactorial process that involves vasoconstriction of blood vessels, activation of the coagulation cascade, and platelet aggregation. Inappropriate activation of hemostatic processes can result in thrombosis and tissue ischemia. In patients at risk for thrombotic events, antiplatelet therapeutic agents inhibit platelet activation, thereby reducing the incidence of pathologic clot formation. Platelets are activated by several endogenous chemical mediators, including adenosine diphosphate, thrombin, and thromboxane. These activation pathways serve as attractive drug targets. The protocols described in this article are designed to evaluate the preclinical efficacy and safety of novel antiplatelet therapeutics in rabbits. Here, we provide two protocols for blood collection, two for determining platelet activation, and one for assessing bleeding safety. Together, these protocols can be used to characterize the efficacy and safety of antiplatelet agents for hemostasis. © 2023 The Authors. Current Protocols published by Wiley Periodicals LLC.
Basic Protocol 1 : Blood collection via the central ear artery
Alternative Protocol 1 : Blood collection via the jugular vein
Basic Protocol 2 : Platelet aggregation assessment via light transmission aggregometry
Alternative Protocol 2 : Platelet activation assessment via flow cytometry
Basic Protocol 3 : Determination of tongue bleeding time
INTRODUCTION
Rabbits (Oryctolagus cuniculus) are an excellent animal model for studying platelet biology because of the similarity between this species and humans. Compared to rodents, rabbits are phylogenetically closer to humans and have more similar platelet morphology and cell counts. Additionally, due to their size, larger blood volumes can be collected compared to rodents, which is essential for pharmacodynamic and pharmacokinetic studies requiring serial blood collections. Furthermore, due to a wealth of historical data, rabbit platelet agonist responses have been well characterized, making this an ideal species for antiplatelet drug research. Despite their usefulness for characterizing the actions of antiplatelet drugs, rabbits remain less frequently used than rodent species and therefore lack well-established protocols for assessing platelet function. Here, we outline the best practices for evaluating the efficacy and safety of antiplatelet therapeutics. This article provides protocols for blood collection, platelet function assessment, and determining bleeding safety in rabbits.
Platelets are activated by several endogenous chemical mediators, including adenosine diphosphate (ADP), thrombin, and thromboxane. One therapeutic strategy to inhibit the pathological action of platelets in thrombotic diseases is selective inhibition of one specific receptor pathway, for example, ADP-induced activation of the purinergic receptor 2Y12 (P2Y12). P2Y12 is a G-protein-coupled receptor (GPCR) that drives platelet activation. Activation of P2Y12 indirectly increases cytoplasmic calcium to cause platelet shape change and aggregation. Additionally, activation of platelets by agonists such as collagen and arachidonic acid causes the secretion of ADP from dense granules, resulting in subsequent activation of P2Y12 and thereby potentiating aggregation (Burnstock, 2017; Stalker, Newman, Ma, Wannemacher, & Brass, 2012). The secondary release of ADP serves as the rationale for developing P2Y12 antagonists (Estevez & Du, 2017). Moreover, combining therapeutic agents to inhibit multiple platelet activation pathways is common. Dual antiplatelet therapy is often used to treat thrombotic diseases and involves the combined administration of low-dose aspirin, which inhibits the cyclooxygenase-dependent activation pathway, and a P2Y12 antagonist. The experiments described in this article are crucial for investigating novel antiplatelet agents to determine both efficacy and safety.
The collection of whole blood in Basic Protocol 1 and Alternate Protocol 1 must be done carefully to avoid hemolysis and ensure that platelets are not prematurely activated, which would preclude their use in ex vivo studies. Therefore, blood is collected in a sodium citrate anticoagulant, which prevents premature activation while allowing for subsequent platelet activation upon the addition of an activator. Sodium citrate chelates extracellular divalent cations including calcium but does not affect intracellular calcium like other anticoagulants do (e.g., ethylenediaminetetraacetic acid, like EDTA). For that reason, platelets in sodium citrate will activate upon ex vivo addition of platelet agonists (Mann, Whelihan, Butenas, & Orfeo, 2007). Additionally, some anticoagulants, like EDTA, induce changes in platelet morphology, which may have functional consequences (do Amaral et al., 2016). For these reasons, sodium citrate is the preferred anticoagulant for platelet function assays.
The choice of a blood collection protocol will depend on the length of the study and the volume of blood necessary. Basic Protocol 1 describes a technique for minimally invasive blood collection from the central ear artery, and Alternate Protocol 1 details blood collection from the jugular vein during a terminal surgical procedure.
Basic Protocol 2 details the gold-standard platelet function assay: light transmission aggregometry. This assay allows for the rapid assessment of ex vivo platelet aggregation and is ideal for testing the effects of antiplatelet drugs. However, one limitation of light transmission aggregometry is that the volume of blood necessary to perform the assay is relatively large compared to other assays. Depending on the number of time points to be evaluated, the total volume of blood required for Basic Protocol 2 may be unfeasible. Instead, if numerous time points need to be assessed (or if the total volume of blood to be collected exceeds daily limitations), Alternate Protocol 2 may be a better option. This alternate protocol measures the efficacy of antiplatelet drug treatment in decreasing α-granule secretion and the formation of integrin αIIbβ3 in rabbit platelets by flow cytometry using small volumes of blood. Upon the activation of platelets, calcium increases within the platelet, which in turn activates the integrin αIIbβ3 receptor. The relative binding of fibrinogen-FITC can then be used to measure integrin αIIbβ3 expression. Additionally, exocytosis of the α-granules within the platelets via fusion results in the expression of P-selectin on the platelet's surface. This α-granule secretion can be determined by measuring P-selectin (CD62P) expression on the platelet surface.
A consequence of platelet inhibition is excessive bleeding. To assess the safety of antiplatelet agents, we describe the rabbit tongue bleeding assay in Basic Protocol 3. This assay determines the time required for bleeding cessation after an incision is made in the tongue's upper surface and helps evaluate the drug's effects on normal hemostasis. In rodent species, most bleeding assays are performed via tail amputation. However, due to anatomical differences, this cannot be replicated in a rabbit.
Given that rabbits are completely covered in fur, the available choice of locations to conduct a bleeding test is limited. Previous studies utilized an ear bleeding time assay (Blajchman, Senyi, Hirsh, Genton, & George, 1981; Klement, Liao, Hirsh, Johnston, & Weitz, 1998; Marret et al., 2004). Although this assay provides valuable information, it lacks robust reproducibility between investigators and laboratories. A rabbit's ear is highly vascularized, and its perfusion may be affected by various subject-dependent and environmental factors. Without adequate control of these external elements, bleeding times may differ widely, even within the same animal. The rabbit tongue bleeding assay has also been described, but to a lesser extent. Although the tongue is also highly vascularized, its perfusion is much more consistent and less likely to be affected by external influences (Klokkevold, Lew, Ellis, & Bertolami, 1991; Lauver et al., 2019). The tongue bleeding time assay protocol described here provides a uniform, reproducible evaluation of adverse bleeding in rabbits.
As detailed above, this article describes blood collection via the central ear artery and jugular vein (Basic Protocol 1 and Alternate Protocol 1), platelet aggregation assessment (Basic Protocol 2), flow cytometric evaluation of platelet activation (Alternate Protocol 2), and a tongue bleeding assay (Basic Protocol 3). Use of these protocols will aid in the evaluation of the efficacy and safety of antiplatelet therapeutics.
NOTE : All protocols using live animals must first be reviewed and approved by an Institutional Animal Care and Use Committee (IACUC) and must follow officially approved procedures for the care and use of laboratory animals.
Basic Protocol 1: BLOOD COLLECTION VIA THE CENTRAL EAR ARTERY
Both minimally invasive (this protocol) and surgical preparations (Alternate Protocol 1) allow for the collection of large blood volumes from rabbits. For minimally invasive procedures, the maximum blood volume collected within 2 weeks should not exceed 1% of the animal's body weight. For example, adult New Zealand white rabbits in the experiments detailed herein weigh approximately 2 to 6 kg. Therefore, 20 to 60 ml blood can be collected, respectively. If the maximum blood volume is collected at one sample point, an equal volume of warm isotonic fluids must be administered. The loss of large volumes of blood without replacement can lead to hypovolemic shock and anemia. It is good practice to administer isotonic fluids after each blood draw. In rabbits, blood samples can be collected from the marginal ear vein, central ear artery, lateral saphenous vein, cephalic vein, or jugular vein. The most accessible location for minimally invasive blood collection is the marginal ear vein (for relatively small volumes, or ∼1 ml) or central ear artery (for relatively large volumes, or several milliliters). Blood collection from the marginal ear vein, central ear artery, lateral saphenous vein, or cephalic vein can be conducted without anesthesia by trained individuals. However, blood sampling from animals under general anesthesia provides higher-quality samples with less stress on the animals.
Materials
-
0.9% (w/v) sodium chloride (Cytiva, #Z1376)
-
3.2% (w/v) sodium citrate (JT Baker, #3649-01; dissolved in phosphate-buffered saline, or PBS, Sigma-Aldrich, #D8537; store ≤1 year at room temperature)
-
Ketamine (40 mg/ml; Henry Schein, #056344)
-
Xylazine (5 mg/ml; Covetrus, #061035)
-
New Zealand white rabbit (2.0 to 3.5 kg; Charles River Laboratories)
-
Isoflurane (1% to 3%; Covetrus, #029405)
-
10-ml syringes (BD, #302995)
-
1-ml syringes (BD, #309659)
-
25-gauge hypodermic needles (BD, #305122)
-
Recirculating heating pad (e.g., Gaymar Stryker T/Pump with recirculating heating pad)
-
Anesthesia vaporizer, with nose cone
-
Cotton gauze pads (Fisher Scientific, #22-246069)
-
Fine animal clippers (optional)
-
Disinfecting alcohol wipes
-
Angiocath PTFE IV catheter (Exel, #26746)
-
Surgical tape
-
Three-way stopcock (SAI Infusion Technologies, #SC3LL)
-
5-ml polyethylene tubes (VWR, #16465-262)
-
Additional reagents and equipment for monitoring vital signs
1.Add 10 ml of 0.9% sodium chloride solution to a 10-ml syringe. Add 1 ml of 3.2% sodium citrate solution to a separate 10-ml syringe.
2.Based on the rabbit's weight, prepare the required volumes to administer the appropriate doses of ketamine (40 mg/kg) and xylazine (5 mg/kg) in separate 1-ml syringes with a 25-gauge hypodermic needle.
3.Loosely restrain the New Zealand white rabbit on a table so its head is tucked under an arm. Grasp the rabbit's back leg with a hand. Inject the ketamine into the rabbit's thigh with the other hand. Then, inject the xylazine into the same thigh. Wait 15 min, until the rabbit is fully sedated and unresponsive to toe pinch.
4.Position the rabbit on a recirculating heating pad and place the nose cone connected to an anesthesia vaporizer over the rabbit's nose and mouth. Adjust the isoflurane concentration (1% to 3%) as necessary during the procedure to maintain adequate depth of anesthesia. Monitor vital signs (heart rate, respiratory rate, and body temperature) every 15 min.
5.Lay one of the ears flat on cotton gauze pads and remove the hair around the central ear artery by plucking the hair manually or with fine animal clippers. Wipe the ear with a disinfecting alcohol wipe.
6.Insert an angiocath PTFE IV catheter into the central ear artery and pull back on the internal needle to visualize blood. If blood is present, remove the inner needle. Keep the cannula in place with surgical tape.
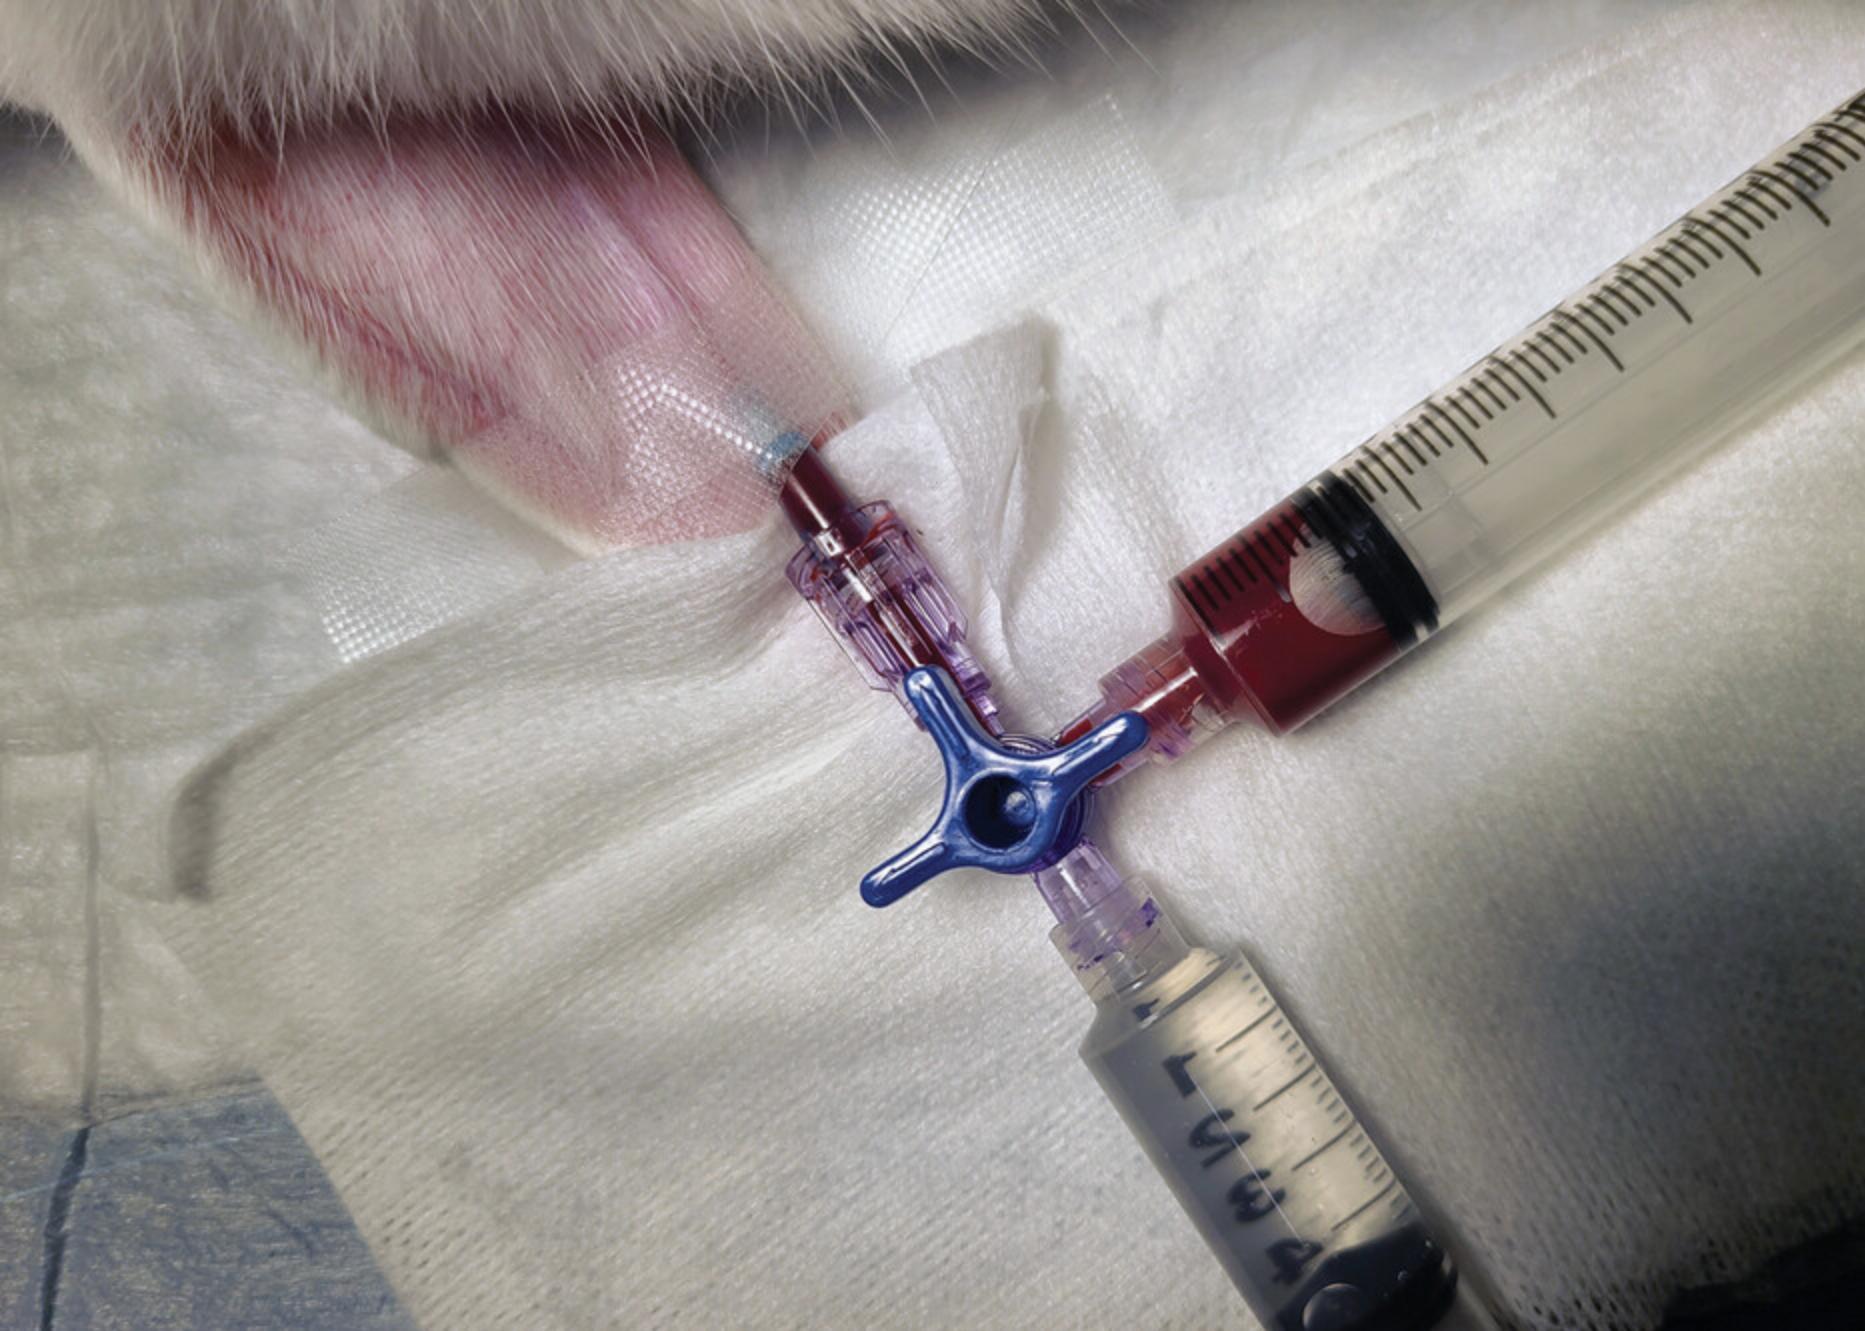
7.Attach a three-way stopcock to the catheter luer adapter. To the stopcock, attach the 10-ml syringe filled with 0.9% sodium chloride solution (see step 1). Pull back on the plunger of this syringe to visualize the blood. Then, attach the 10-ml syringe containing 3.2% sodium citrate solution (see step 1) to the other port of the stopcock. Close the sodium chloride syringe port and collect 9 ml blood in the sodium citrate syringe (Fig. 1).
8.Close the catheter port of the stopcock. Remove the blood-filled syringe. Flush the stopcock with 1 ml of 0.9% sodium chloride solution. Then, close off the port where the citrated blood syringe was and administer 10 ml of 0.9% sodium chloride through the IV catheter.
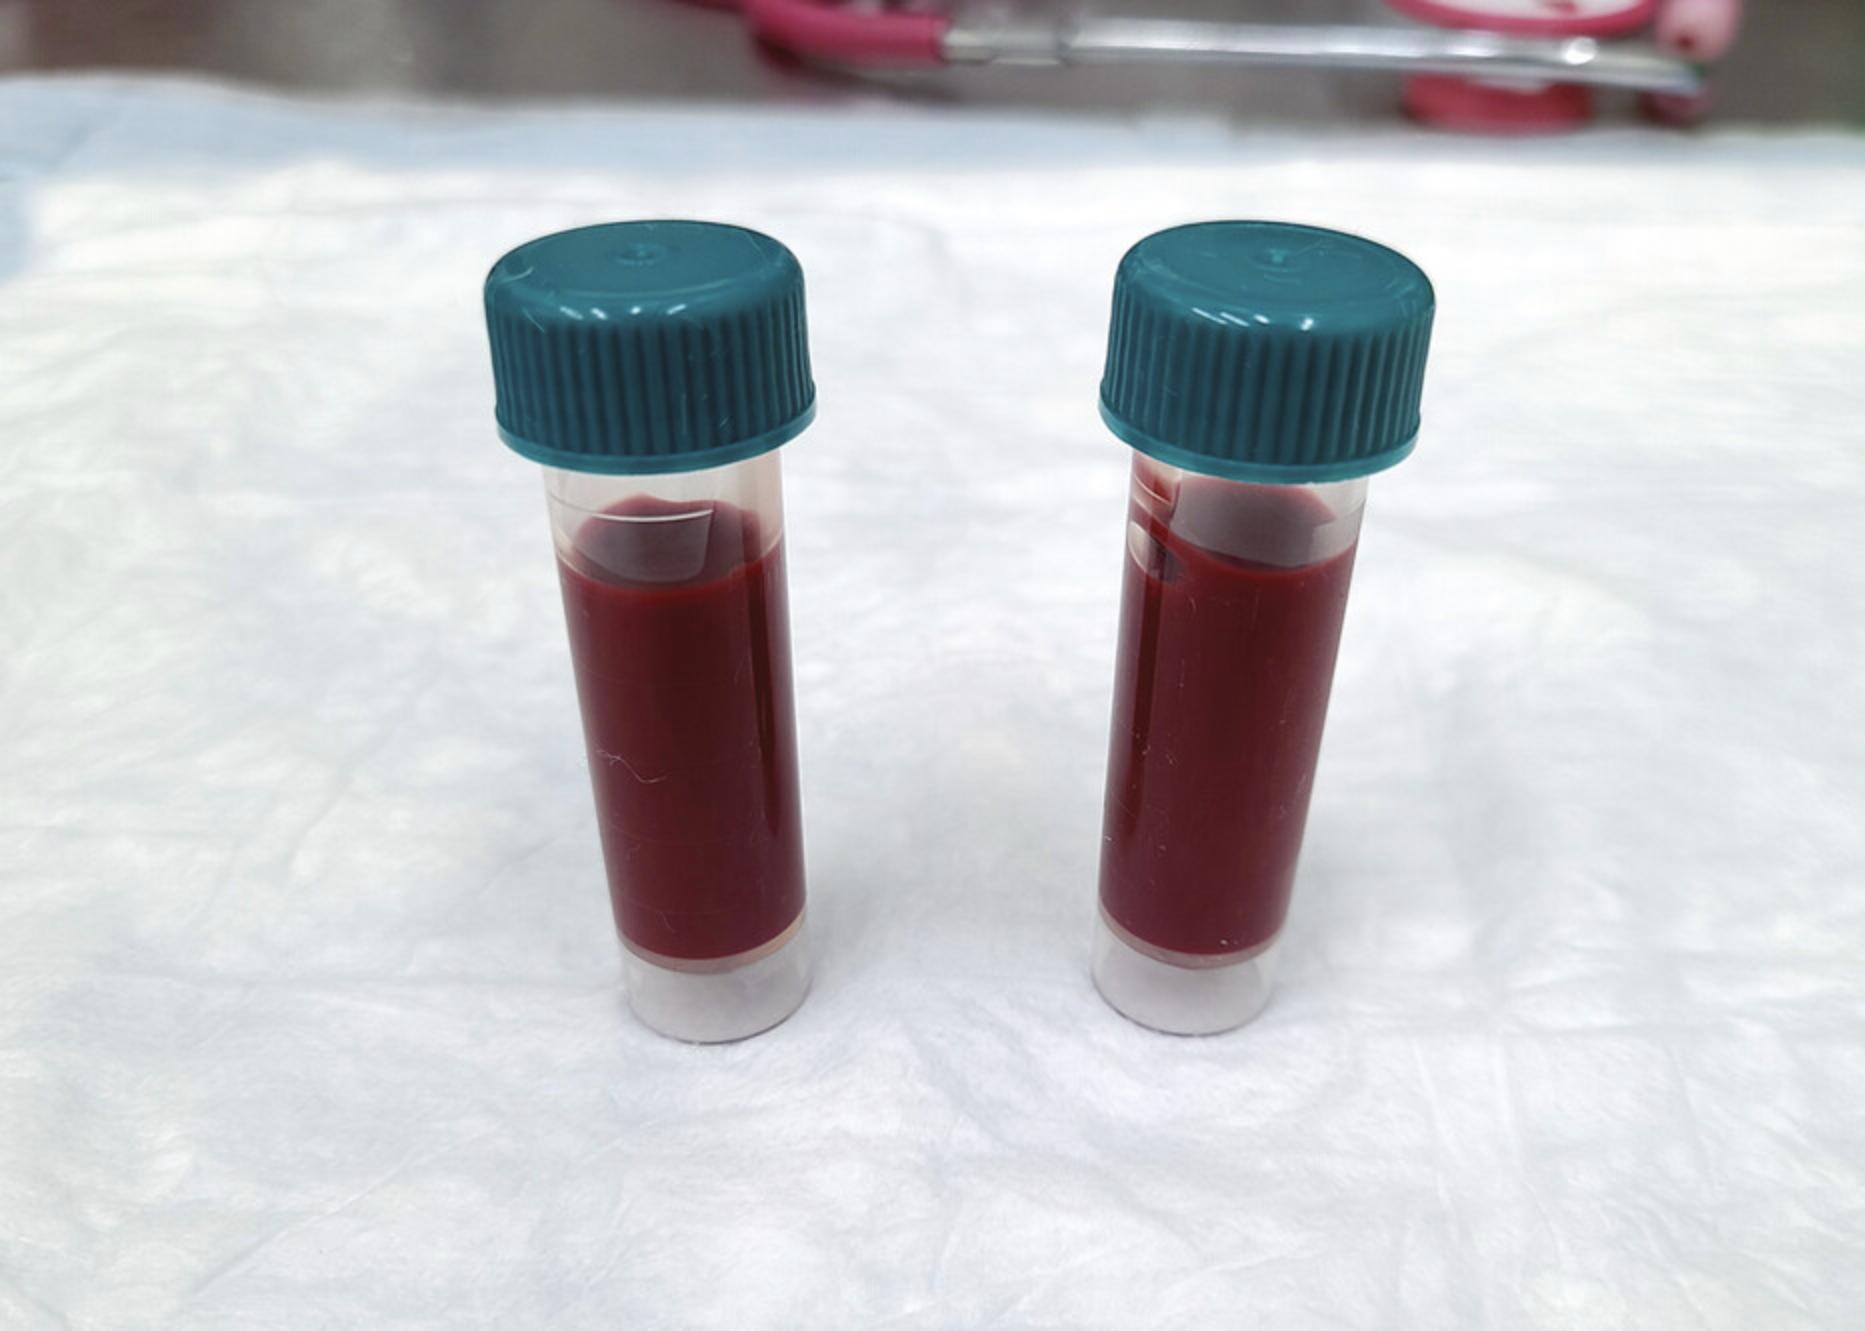
9.Pull back on the plunger of the 10-ml syringe filled with blood and sodium citrate to create an air pocket. Then, invert the syringe to mix the collected blood with the sodium citrate. Add 5 ml blood to a 5-ml polyethylene tube and 5 ml blood to another (Fig. 2).
10.Store the tubes containing blood at room temperature until needed for Basic Protocol 2 or Alternate Protocol 2.
Alternate Protocol 1: BLOOD COLLECTION VIA THE JUGULAR VEIN
If the rabbit is to be euthanized at the end of the study, large volumes of blood can be collected under anesthesia. For these terminal procedures, blood can be collected via the method above (Basic Protocol 1) or via the vena cava or a cardiac puncture. However, it is recommended to cannulate the jugular vein in terminal procedures if samples are to be collected at various time points under anesthesia.
Additional Materials (also see Basic Protocol 1)
- Polyethylene tubing (PE 90, Intramedic, #427426)
- 21-gauge blunt stub adapter (BD, #427564)
- Veterinary hair clippers
- #10 scalpel blade and handle (Fine Science Tools; blade, #10010-00, and handle, #10003-12)
- Halsted-Mosquito hemostats (Fine Science Tools, #13008-12)
- 3-0 braided silk sutures (Surgical Specialties, #SP118)
- Vannas scissors (Fine Science Tools, #15018-10)
1.Prepare the required amounts of ketamine (40 mg/kg) and xylazine (5 mg/kg), based on the rabbit's weight, in separate 1-ml syringes with a 25-gauge needle.
2.Loosely restrain the rabbit on a table so its head is tucked under an arm. Grasp the rabbit's back leg with a hand. Inject the ketamine into the rabbit's thigh with the other hand. Then, inject the xylazine into the same thigh. Wait 15 min, until the rabbit is fully sedated and unresponsive to toe pinch.
3.Connect 6 in. of polyethylene tubing to the 21-gauge blunt stub adapter. Connect a three-way stopcock to the luer adapter of the blunt needle.
4.Fill 10-ml syringe(s) with 0.9% sodium chloride. Add 1 ml of 3.2% sodium citrate to the same number of separate 10-ml syringe(s).
5.Connect a 10-ml syringe filled with 0.9% sodium chloride to the stopcock. Push in the plunger to fill the stopcock, blunt needle, and tubing with the saline.
6.Using veterinary hair clippers, remove the fur from the neck of the rabbit from under the jaw to the top of the clavicle.
7.Position the rabbit on a recirculating heating pad and place the nose cone connected to an anesthesia vaporizer over the rabbit's nose and mouth. Adjust the isoflurane concentration (1% to 3%) as necessary during the procedure to maintain adequate depth of anesthesia. Monitor vital signs (heart rate, respiratory rate, and body temperature) every 15 min.
8.Make a 2-in. midline incision in the neck with a scalpel (i.e., a #10 scalpel blade and handle). Use Halsted-Mosquito hemostats to dissect the internal jugular vein from the muscle and surrounding connective tissue.
9.Tie two 3-0 braided silk sutures loosely around the jugular vein. Place one suture in a cephalic position and one in a caudal position. Tie the top cephalic suture tight. Leave the caudal suture loose.
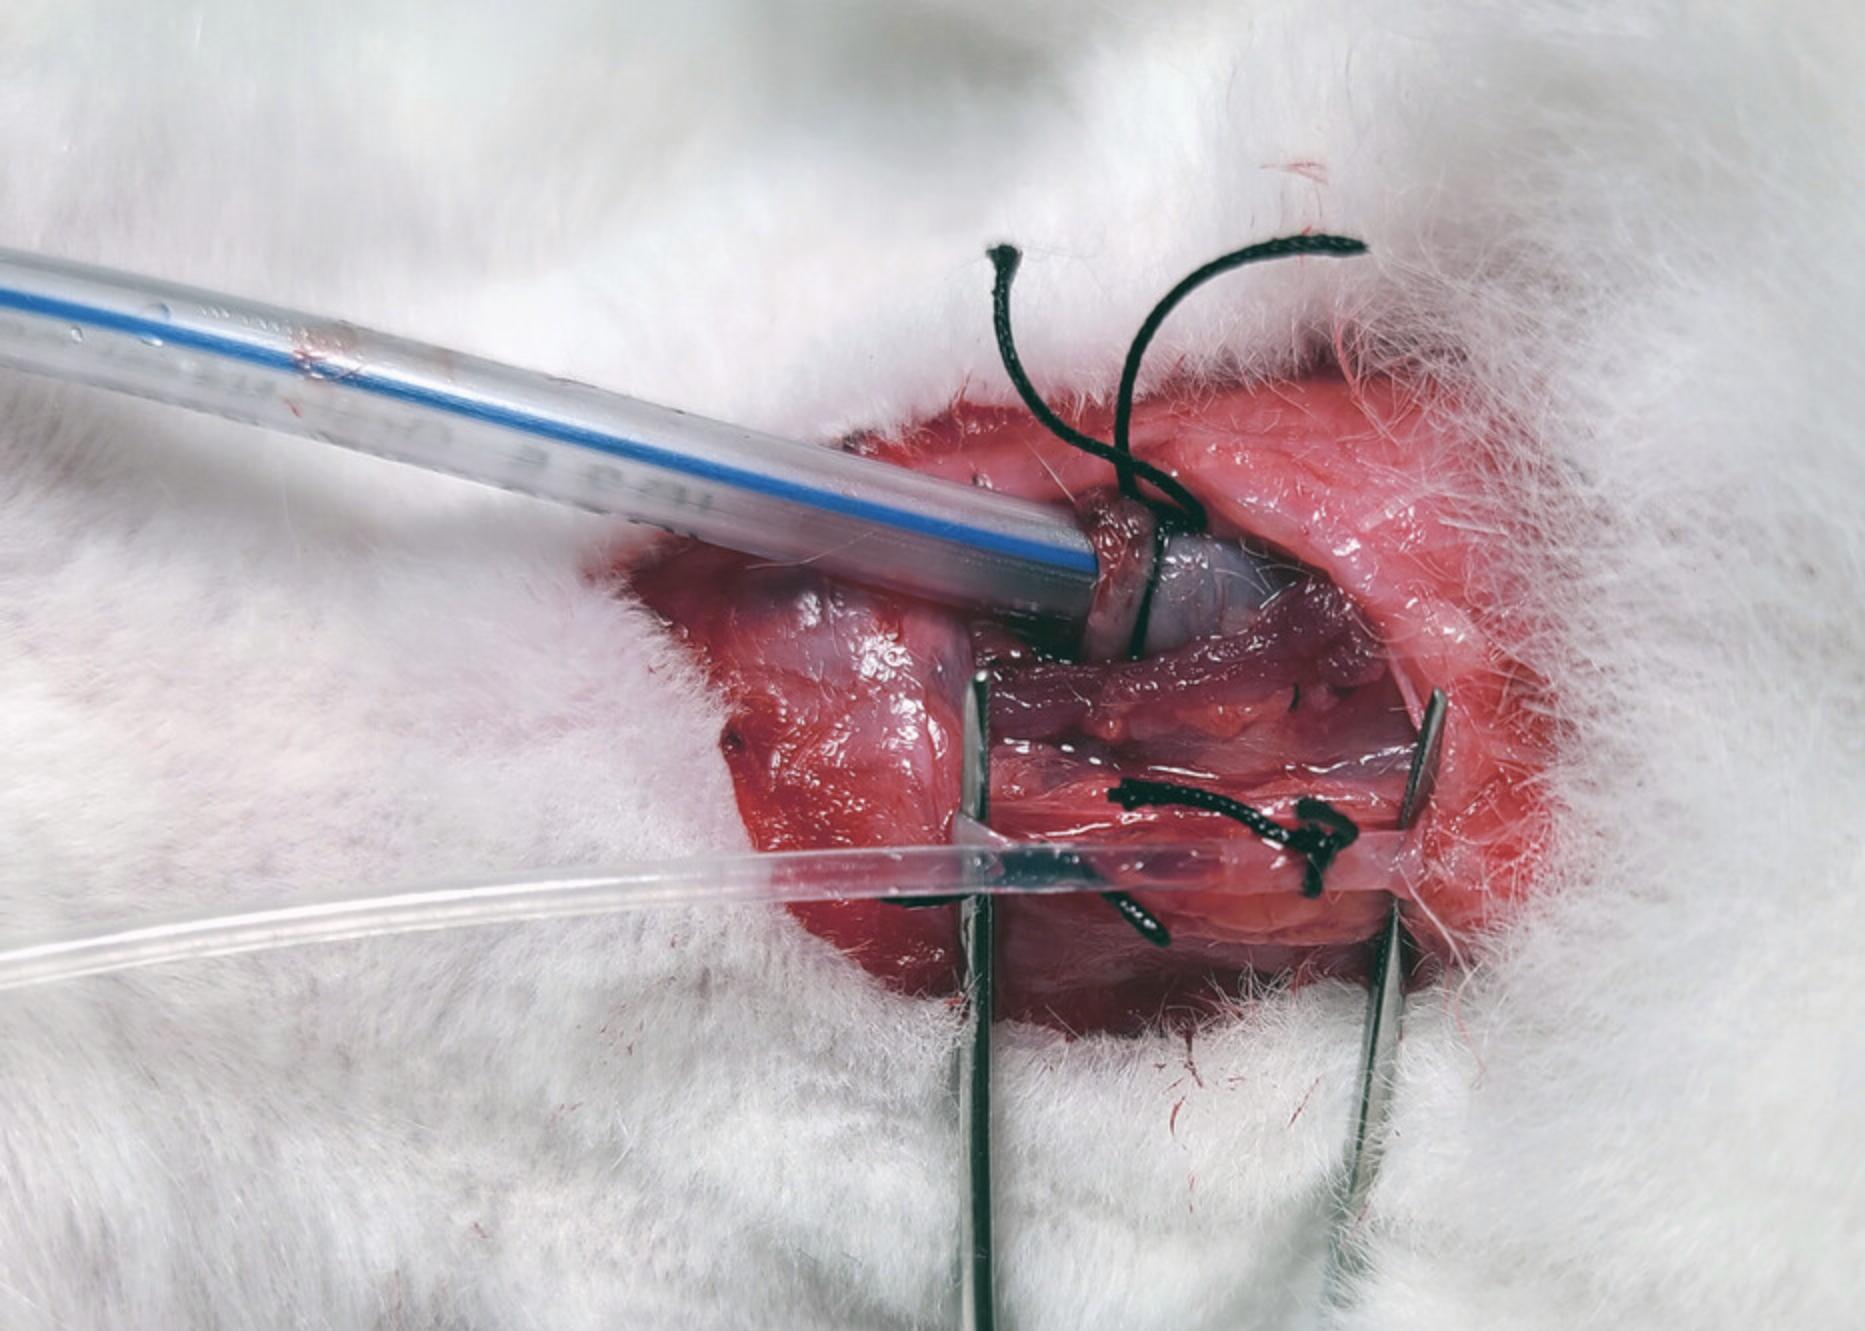
10.Using Vannas scissors, make a small incision in the jugular vein that is large enough to insert the tubing but small enough not to cut through the vessel completely. Slide the cannula inside the vein toward the heart, ∼1 in. Secure the suture around the vein with the cannula inside (Fig. 3).
11.Pull back on the syringe plunger to visualize blood. Then, fill the stopcock with blood and attach a 10-ml syringe filled with 1 ml of 3.2% sodium citrate (see step 4). Adjust the valve on the stopcock to the collection syringe and collect 9 ml blood.
12.Close the catheter port of the stopcock. Remove the blood-filled syringe. Flush the stopcock with 1 ml of 0.9% sodium chloride solution (see step 4). Then, close off the port where the citrated blood syringe was previously located and administer 10 ml of 0.9% sodium chloride through the venous catheter.
13.Aspirate the 10-ml syringe filled with blood and sodium citrate to create an air pocket. Invert the syringe to mix the collected blood with the sodium citrate. Add 5 ml blood to one 5-ml polyethylene tube and 5 ml to another (Fig. 2).
14.Store the tubes containing blood at room temperature until needed for Basic Protocol 2 or Alternate Protocol 2.
Basic Protocol 2: PLATELET AGGREGATION ASSESSMENT VIA LIGHT TRANSMISSION AGGREGOMETRY
Platelet reactivity can be determined in platelet-rich plasma (PRP) obtained from whole blood samples (Basic Protocol 1 and Alternate Protocol 1) using light transmission aggregometry. This protocol is specific for assessing ex vivo platelet aggregation via a four-channel aggregometer (Chrono-log Corporation Model 700). About 10 ml whole blood is required for this experiment. The agonists used in this protocol depend greatly on the molecular target of the therapeutic agent of interest. For P2Y12 antagonists, ADP-induced platelet aggregation is inhibited, and therefore, the platelet response to ADP needs to be determined. Additionally, platelets’ response to agonists that are not inhibited should be examined to verify that platelets respond normally to other activators. For P2Y12 antagonists, the response to arachidonic acid and/or collagen should be used as a positive control because these activate platelets through P2Y12-independent mechanisms for platelet aggregation. The following protocol assesses platelet reactivity in blood from animals treated with a P2Y12 antagonist. Therefore, ADP, arachidonic acid, and collagen are used.
Materials
-
Anticoagulated whole blood (e.g., 10 ml from Basic Protocol 1 or Alternate Protocol 1)
-
Agonists:
- ADP (Chrono-log, #P/N 384)
- Arachidonic acid (Chrono-log, #P/N 390)
- Collagen (Chrono-log, #P/N 385)
-
Benchtop centrifuge (Thermo Fisher Sorvall Legend X1R, #75004261, or similar)
-
Transfer pipets (Fisherbrand, #13-711-9A)
-
5-ml polyethylene tubes (VWR, #16465-262)
-
Aggregometer (Chrono-log® Model 700 four-channel aggregometer)
-
Cuvettes (Chrono-log, #P/N 312)
-
Stir bar (Chrono-log, #P/N 311)
-
Kimwipes
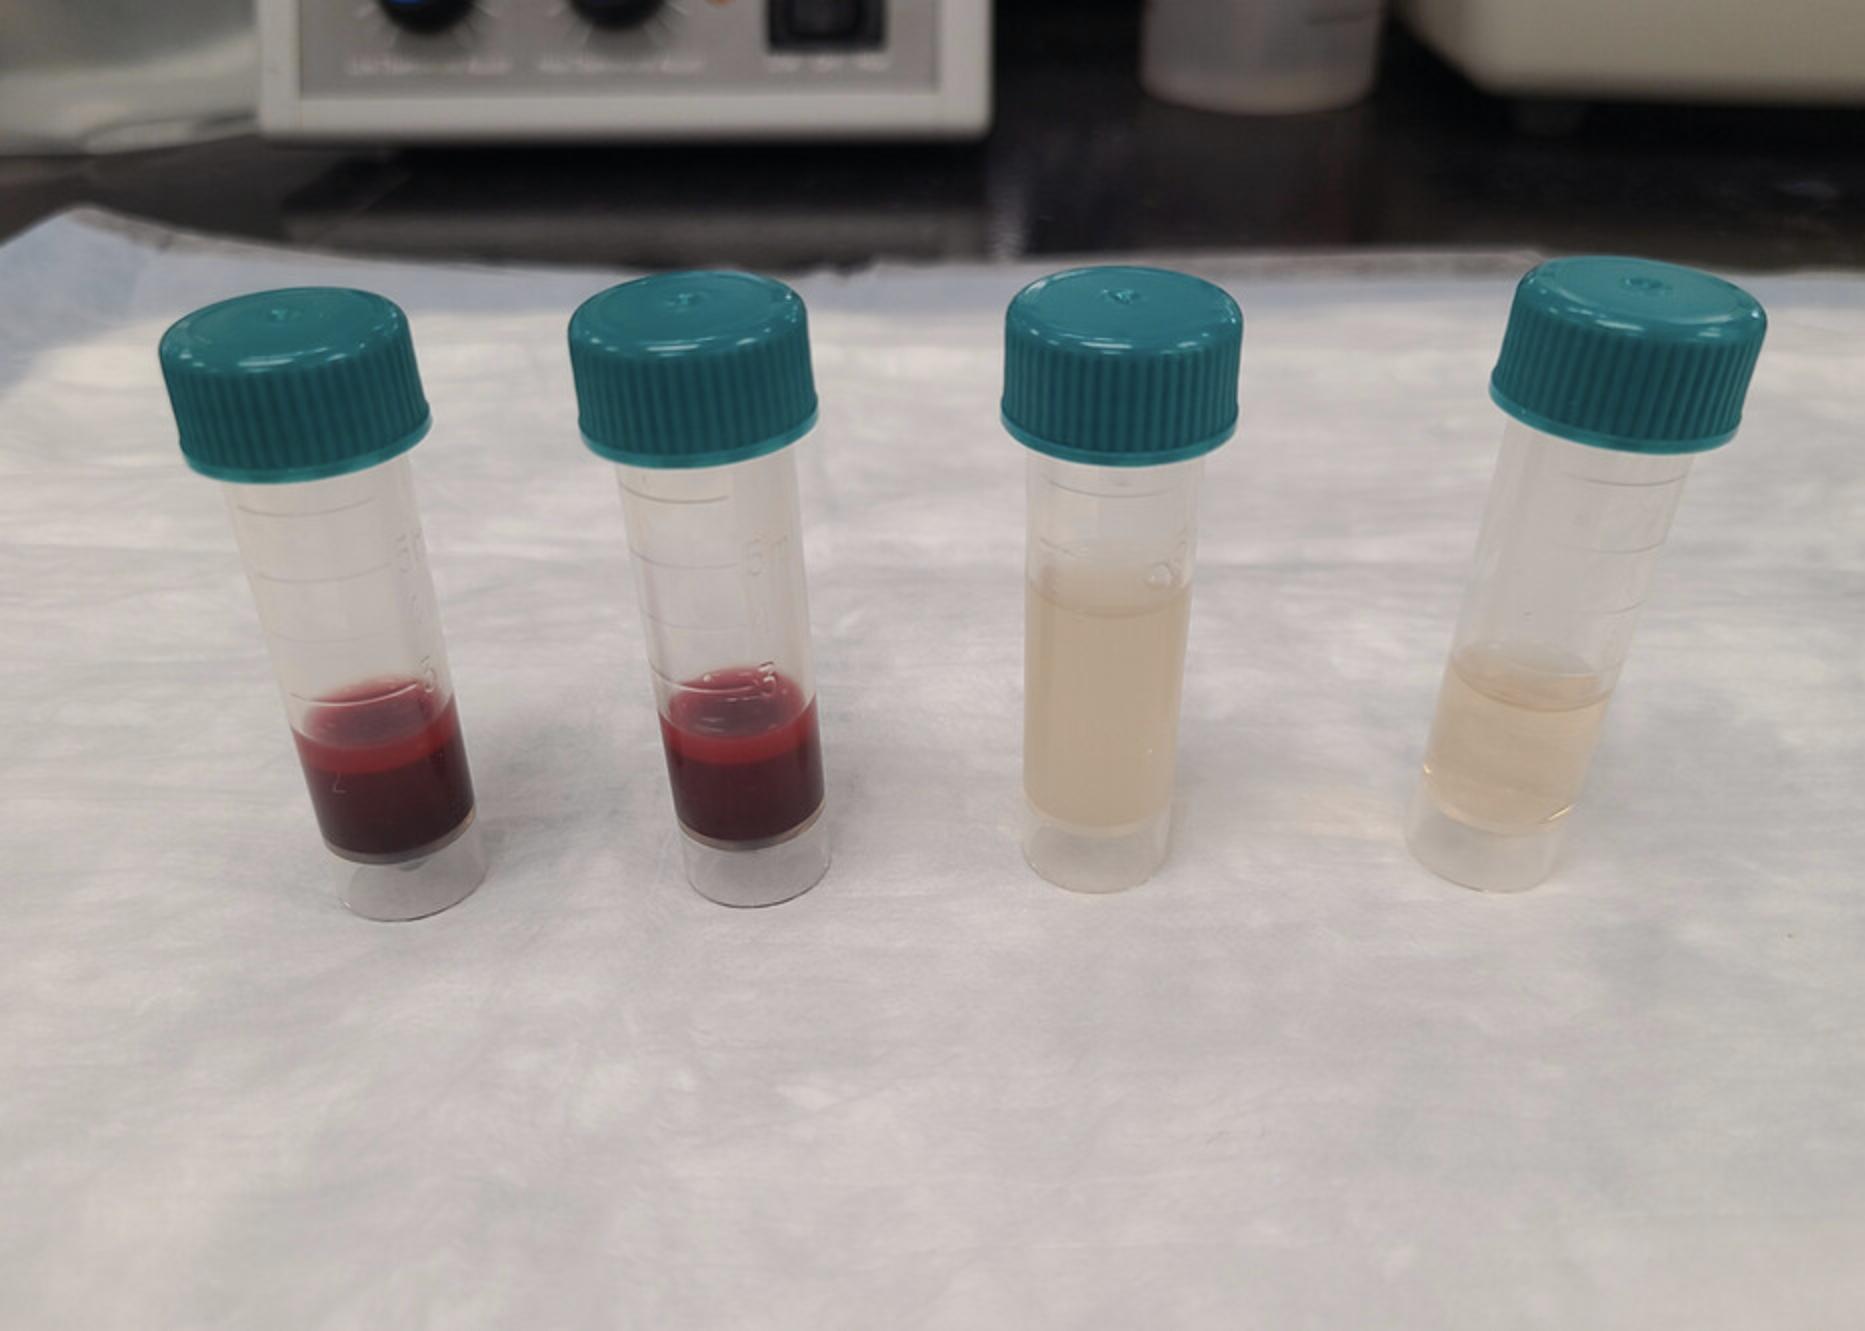
1.Centrifuge anticoagulated whole blood for 10 min at 150 × g at room temperature. Aspirate the entire PRP layer with a transfer pipet and place it into a separate 5-ml polyethylene tube (Fig. 4).
2.Centrifuge the remaining non-PRP pellet for 10 min at 1500 × g at room temperature. Aspirate the platelet-poor plasma (PPP) layer with a new transfer pipet and place it into a separate 5-ml polyethylene tube.
3.Turn on the aggregometer and allow it to warm up for 10 min. Place cuvette(s) in the incubation wells. Add stir bar(s) to the cuvette(s) being used for PRP agonist-induced aggregation. Wait ∼3 min for the PRP cuvette(s) to warm.
4.Mix the PRP by end-over-end inversion. Add 500 μl PRP to a pre-warmed cuvette (with a stir bar) for each channel. Place in the incubation well for 3 min.
5.Add 500 μl PPP to another cuvette. Wipe the outside with a Kimwipe. Place the PPP cuvette in the channel 1 PPP position (without a stir bar).
6.Similarly, wipe the pre-warmed 500 μl PRP cuvette(s) from step 4 with a Kimwipe and place in the channels of interest.
7.Follow software instructions for zeroing each aggregation channel.
8.Open a new assay window and click on the START button for Trace 1.Add an agonist (ADP, arachidonic acid, or collagen) and close the test door. Repeat this step for all channels. Wait 8 min and then click STOP.
9.Save the test and discard the cuvettes.
Alternate Protocol 2: PLATELET ACTIVATION ASSESSMENT VIA FLOW CYTOMETRY
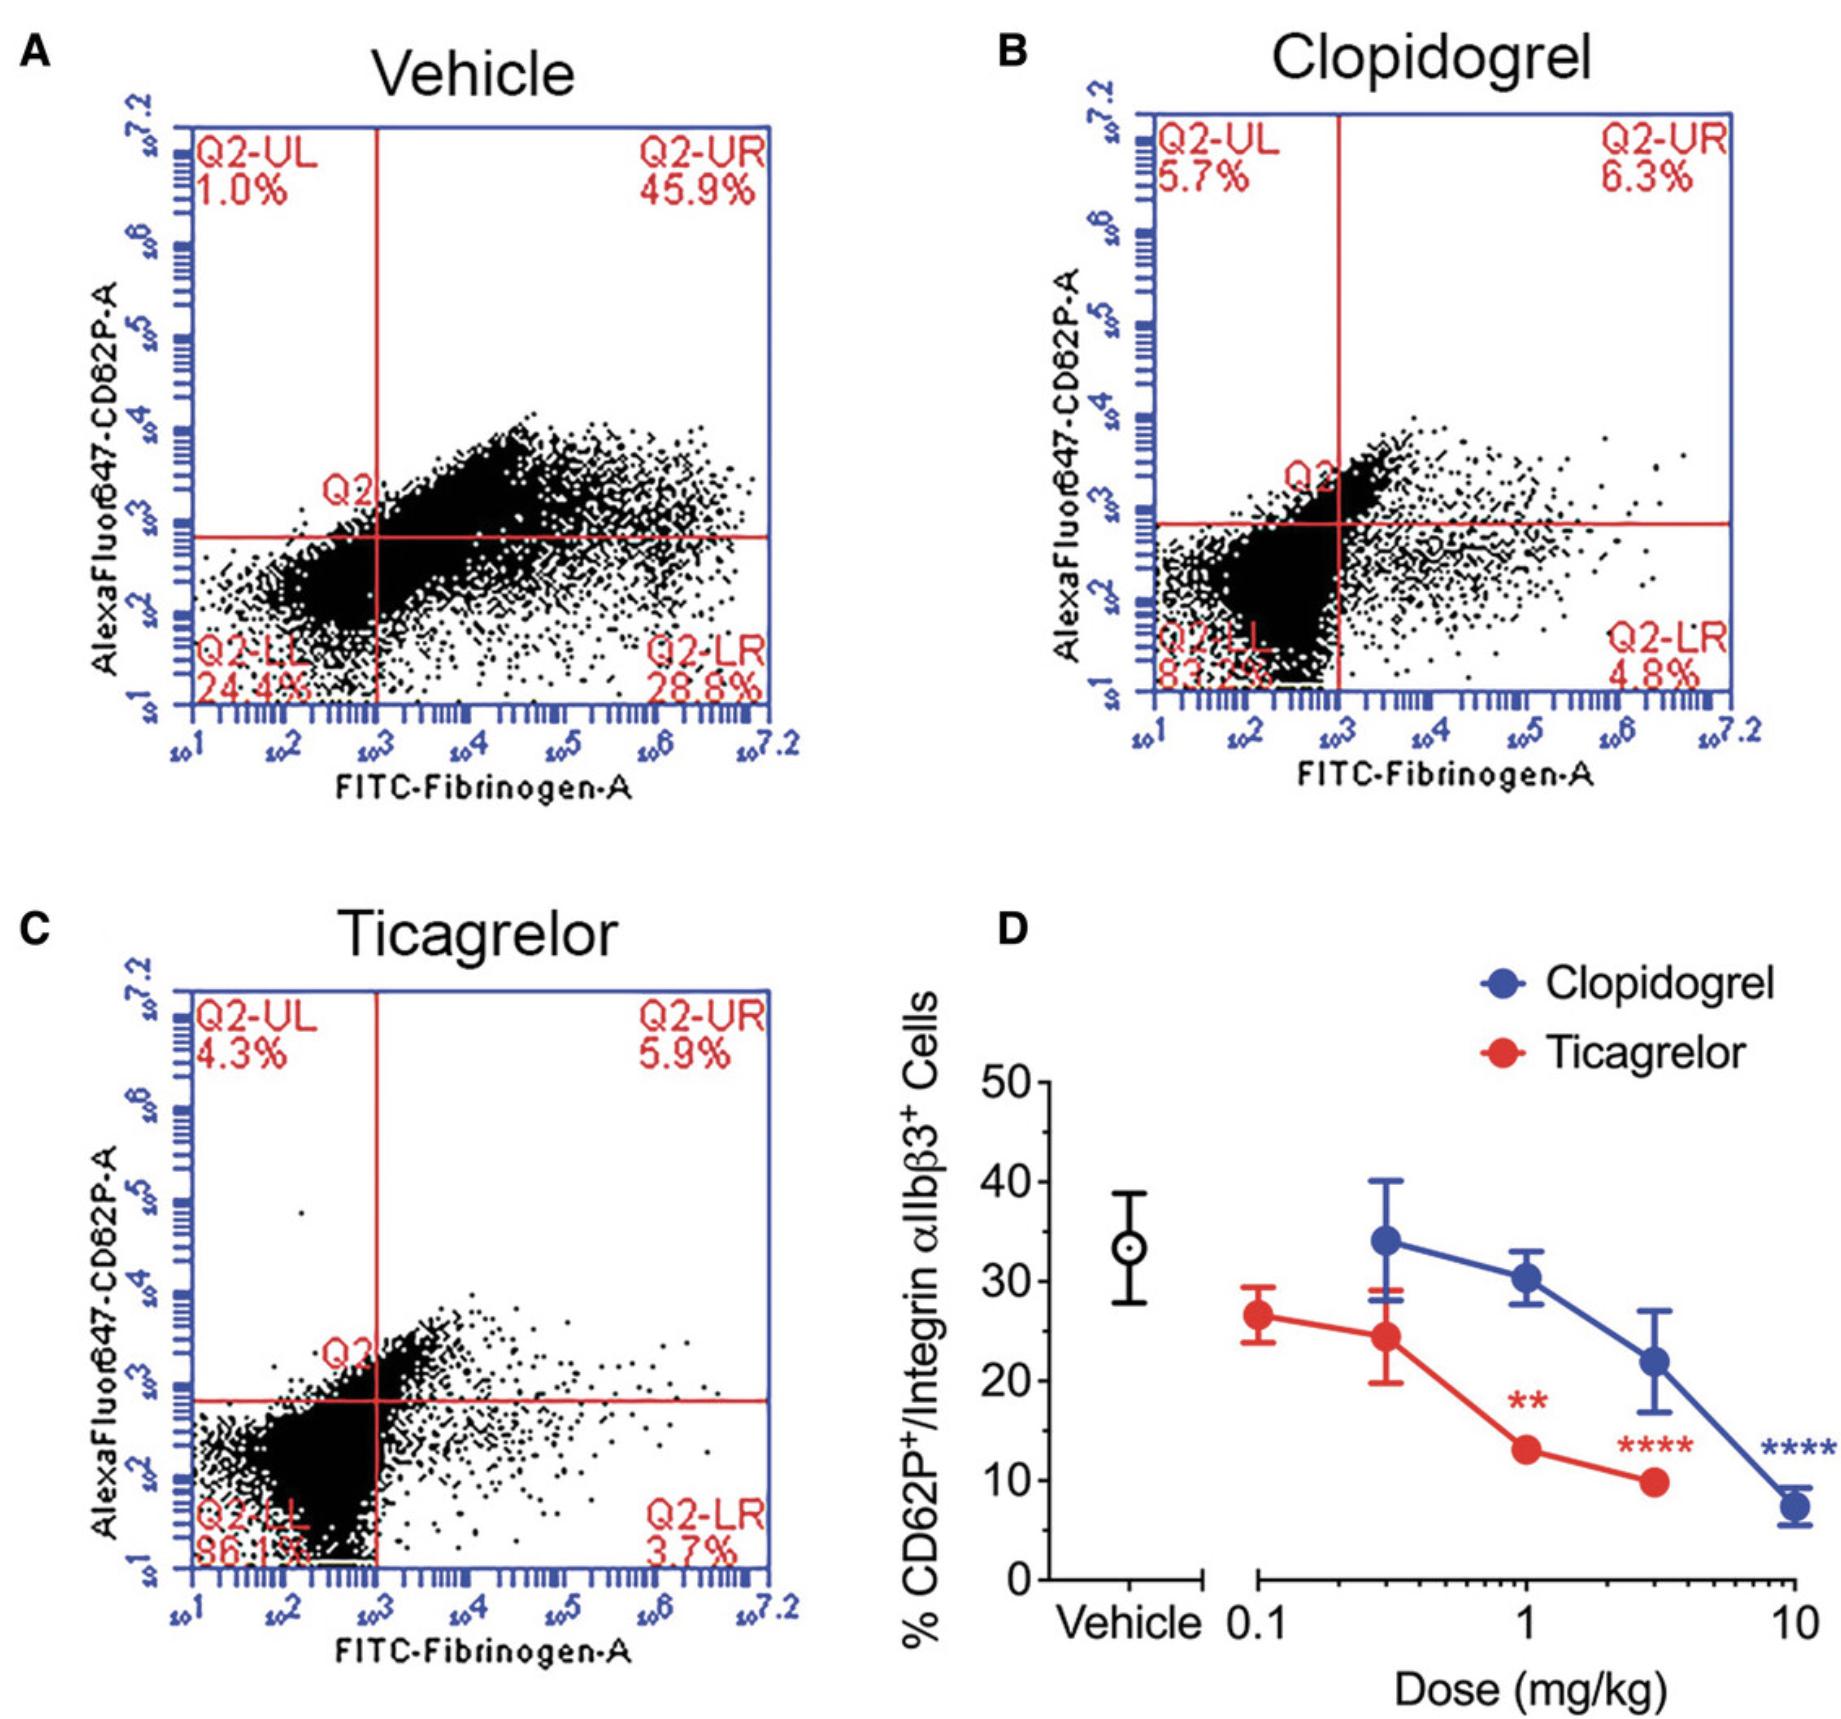
Assessing platelet activation via flow cytometry is useful when small volumes of blood need to be analyzed. Flow cytometry can evaluate platelet function in as little as 1 ml whole blood. This method is useful when assessing several time points to remain under the maximum blood collection volume limitations. Unlike assessment of platelet aggregation via light transmission aggregometry (Basic Protocol 2), assessment of platelet activation by flow cytometry detects P-selectin and integrin αIIbβ3 surface expression. Platelets positive for both P-selectin (detected by anti-CD62P antibody binding) and integrin αIIbβ3 (detected by FITC-labeled fibrinogen binding) are quantified as a measure of platelet activation.
Additional Materials (also see Basic Protocol 1)
-
Anticoagulated (citrated) whole blood (e.g., 1 ml from Basic Protocol 1 or Alternate Protocol 1)
-
20 μM ADP (Sigma-Aldrich, #A2754-500 mg)
-
HEPES-buffered saline (HBS; Sigma-Aldrich, #H3375-100G)
-
Fibrinogen-FITC (10 mg/ml; FITC-labeled Native Rabbit Fibrinogen protein, Abcam, #ab92788)
-
1% (w/v) paraformaldehyde (PFA; e.g., Electron Microscopy Sciences, #15712-S; make fresh and store on ice)
-
Dulbecco's PBS (DPBS; Sigma-Aldrich, #D8537)
-
Anti-CD62P-AF647 (Alexa Fluor 647 (AF647)-labeled anti-CD62P antibody, MBL, #D280-A64)
-
12 × 75–mm polypropylene tubes (Dot Scientific, #PPT1275)
-
Vortex
-
Benchtop centrifuge (Thermo Fisher Sorvall Legend X1R, #75004261, or similar), 4°C
-
Flow cytometer and associated software (Accuri C6 flow cytometer and CFlow Plus v1.0.227.04, BD Biosciences)
CAUTION : The 1% PFA solution should be prepared in a chemical hood and disposed of properly.
1.Prepare eight 12 × 75–mm polypropylene tubes per rabbit or time point. Label them as follows:
- Unstained/Unactivated.
Negative control.
- Unstained/ADP.
Positive unstained control (activated unstained platelets).
- Fibrinogen-FITC/Unactivated.
Single-stained unactivated control for fibrinogen FITC.
- Fibrinogen-FITC/ADP.
CD62P-AF647 fluorescence minus one (FMO) control (single-stained fibrinogen-labeled activated platelets).
- Anti-CD62P-AF647/Unactivated.
Single-stained unactivated control for anti-CD62P-AF647.
- Anti-CD62P-AF647/ADP.
Fibrinogen-FITC FMO control (single-stained anti-CD62P-AF647-labeled activated platelets).
- Fibrinogen-FITC + anti-CD62P-AF647/Unactivated.
Double-stained fibrinogen-FITC + anti-CD62P-AF647 unactivated control.
- Fibrinogen-FITC + anti-CD62P-AF647/ADP.
Double-stained fibrinogen-FITC + anti-CD62P-AF647-labeled activated platelets.
The different conditions are necessary to verify that the fibrinogen-FITC and the anti-CD62P-AF647 are binding normally and to determine the background fluorescence level.
2.Add 50 µl of 20 µM ADP to a separate polypropylene tube. Then, add 50 µl HBS to another polypropylene tube.
3.Add 450 µl whole blood to the ADP tube and 450 µl to the HBS tube. Swirl gently to mix. Incubate for 2 min at room temperature.
4.Add 5 µl of the blood-ADP mixture to the four tubes labeled with ADP (see steps 1b, 1d, 1f, and 1h). Then, add 5 µl of the blood-HBS mixture to the unactivated sample tubes (see steps 1a, 1c, 1e, and 1g). Swirl gently to mix.
5.Add 1 µl fibrinogen-FITC (0.17 mg/ml) to the appropriate sample tubes (see steps 1c, 1d, 1g, and 1h). Swirl gently to mix. Incubate for 15 min at room temperature.
6.Add 1 ml of 1% PFA to each tube from step 1.Swirl gently to mix. Incubate for 15 min on ice.
7.Add 1 ml DPBS to each tube. Vortex the tubes to mix. Then, centrifuge all tubes for 10 min at 1000 × g , 4°C.
8.Discard the supernatant.
9.Resuspend the pellet in the tubes from steps 1a to 1d with 50 µl HBS. Resuspend the pellet for the tubes from steps 1e to 1h with 46 µl HBS.
10.Add 4 µl (0.5 µg/ml final concentration) anti-CD62P-AF647 to the appropriate tubes (from steps 1e to 1h). Incubate for 15 min at room temperature.
11.Add 1 ml DPBS to each tube from step 1. Vortex the tubes to mix. Then, centrifuge all tubes for 10 min at 1000 × g , 4°C.
12.Discard the supernatant.
13.Resuspend the pellet in 500 µl DPBS. Vortex to mix.
14.Analyze samples using a flow cytometer and associated software (e.g., an Accuri C6 flow cytometer and CFlow Plus v1.0.227.04.
Basic Protocol 3: DETERMINATION OF TONGUE BLEEDING TIME
Rabbits are entirely covered in fur, which makes it challenging to determine the bleeding time on the skin. A simple tail amputation in mice does not translate well in rabbits due to anatomical differences. One location on the rabbit that is not covered in fur is the tongue. Therefore, an incision in the tongue is used to evaluate the bleeding risk of antiplatelet therapeutics. Surgicutt® devices are used to create a uniform, 5-mm-long by 1-mm-deep incision on the upper surface of the tongue of a rabbit. The edge of this incision can then be carefully blotted with filter paper every 10 s until the bleeding has stopped. The elapsed time from the creation of the tongue incision to the cessation of bleeding is considered the tongue bleeding time. We have found that bleeding time can be assessed at up to three different time points/locations on the tongue while the rabbit is under anesthesia. Due to injury to the tongue, this is a terminal procedure.
Additional Materials (also see Basic Protocol 1)
- Endotracheal tube (2.5-mm ID; Jorvet, #J149T)
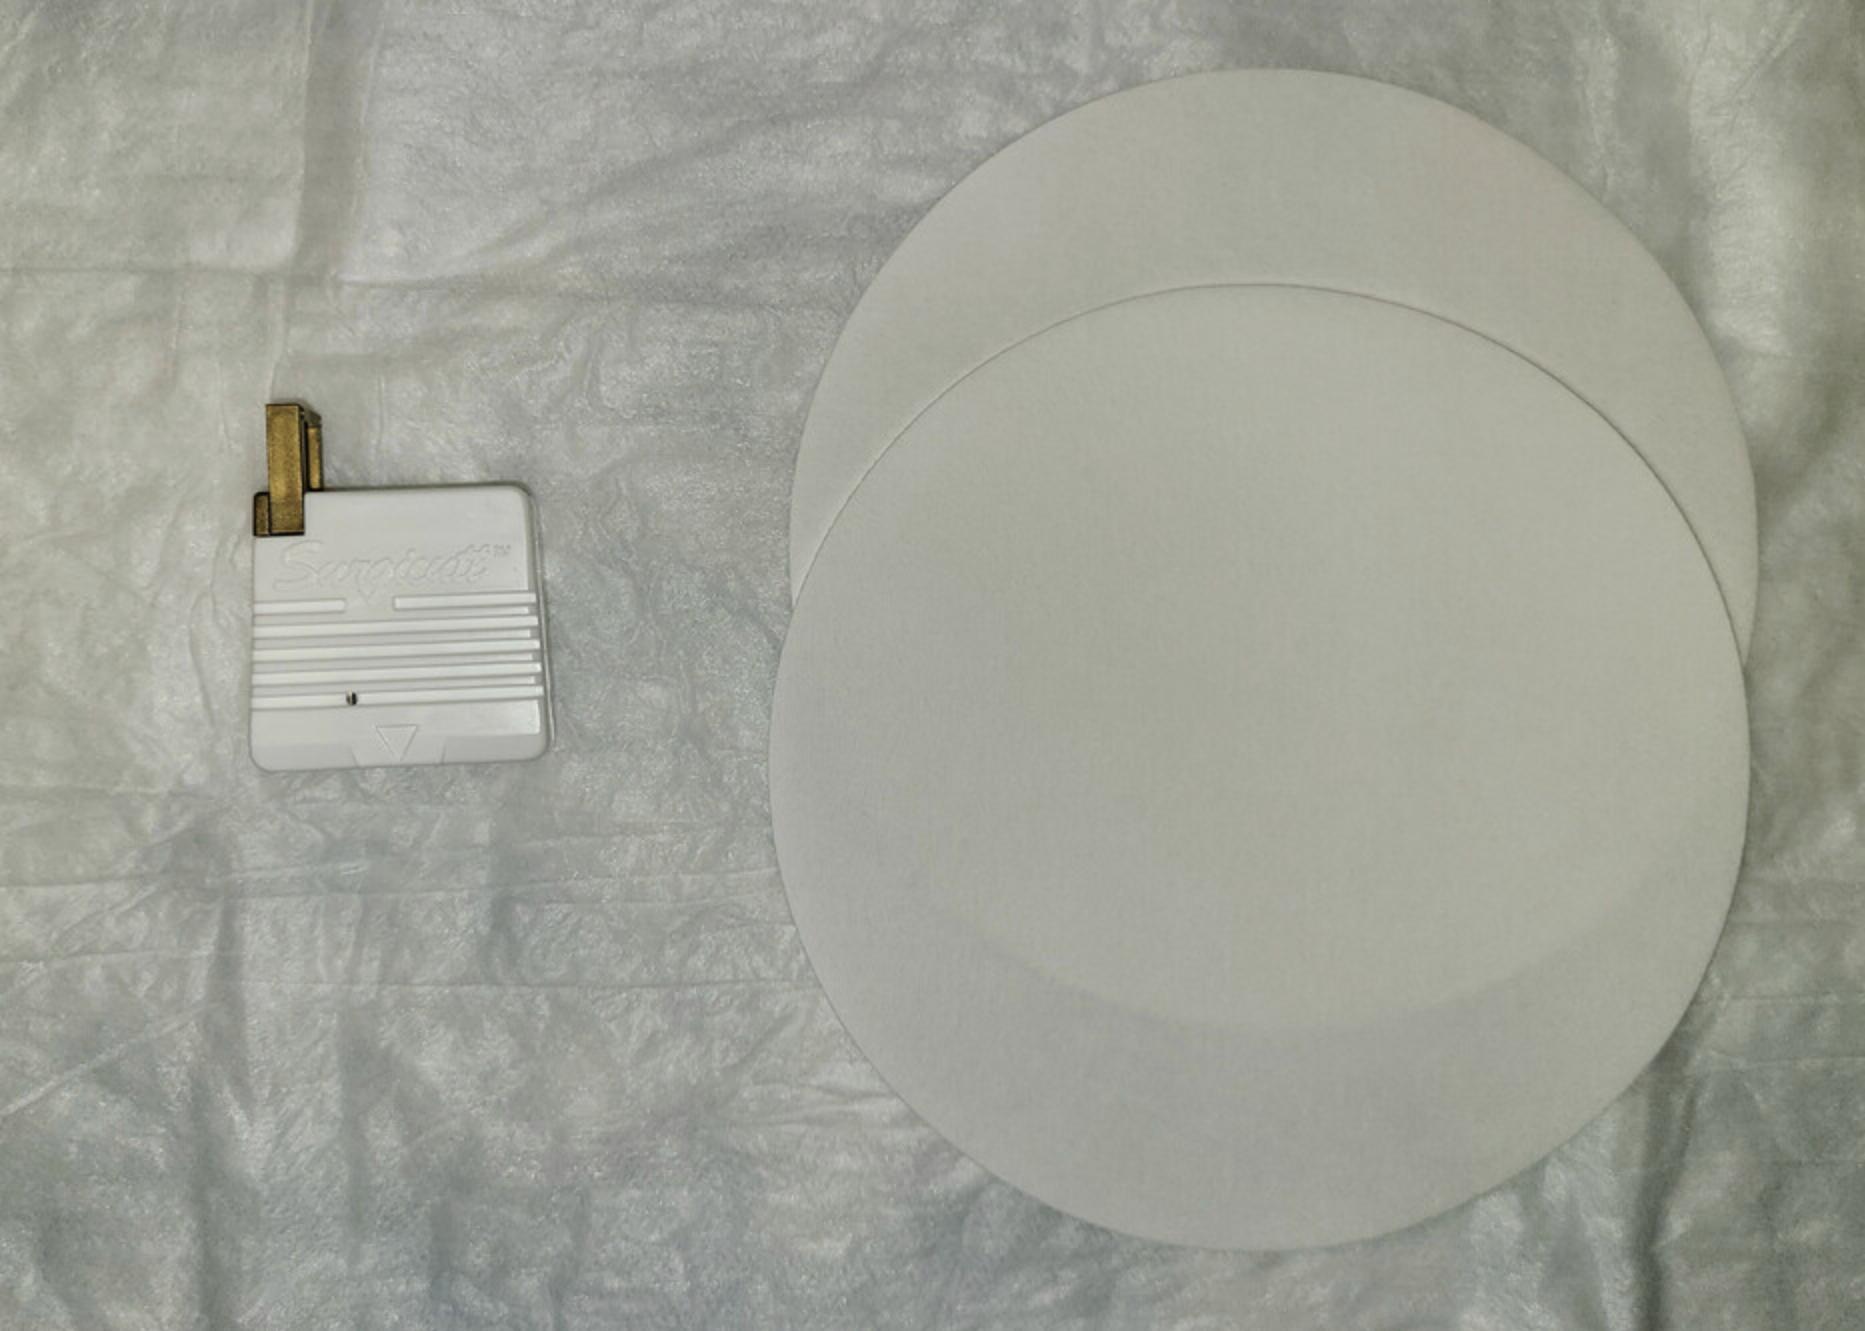
- Surgicutt® Bleeding Time Device (Fig. 7; Jorvet, #J0522S)
- Stopwatch
- Whatman cellulose filter paper (25-mm circle; Fig. 7; Whatman, #1004-125)
1.Based on the rabbit's weight, draw up the required amounts of ketamine (40 mg/kg) and xylazine (5 mg/kg) in separate 1-ml syringes with a 25-gauge hypodermic needle.
2.Loosely restrain the rabbit on a table so its head is tucked under an arm. Grasp the rabbit's back leg with a hand. Inject the ketamine into the rabbit's thigh with the other hand. Then inject the xylazine into the same thigh. Wait 15 min until the rabbit is fully sedated and unresponsive to toe pinch.
3.Position the rabbit on a recirculating heating pad and use a scalpel to make a 2-in. midline incision on top of the trachea. Use blunt hemostats to dissect the trachea.
4.Loosely tie a single suture around the trachea in a caudal position. Using the scalpel, make a small lateral incision between two tracheal cartilage rings. Insert the endotracheal tube and secure it with the suture (Fig. 3). Connect the other end of the endotracheal tube to the anesthesia vaporizer. Adjust the isoflurane concentration (1% to 3%) as necessary during the procedure to maintain adequate depth of anesthesia.
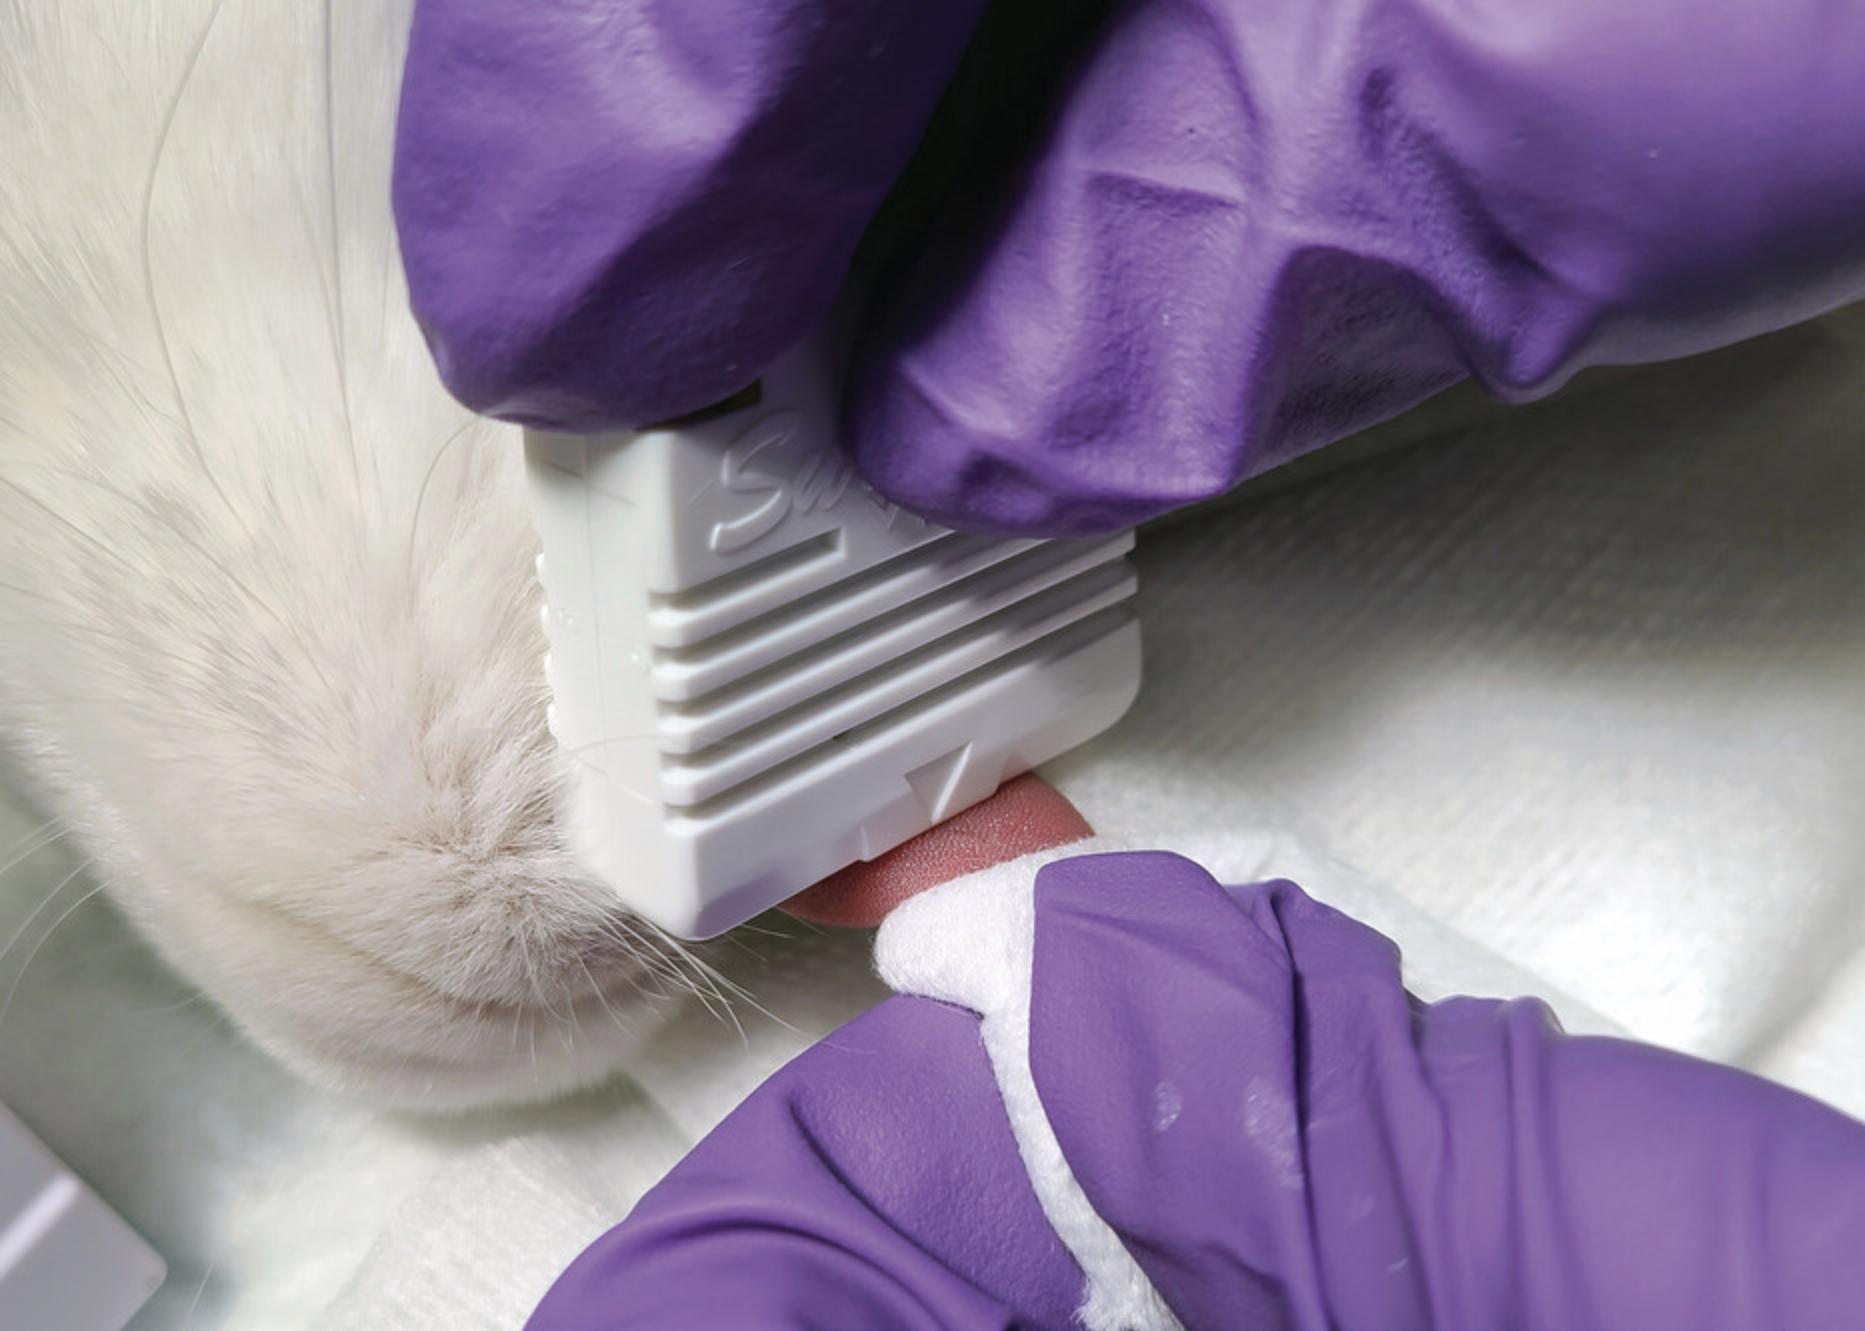
5.Place the Surgicutt® Bleeding Time Device on top of the tongue, as close as possible to the tip, while gently grasping with gauze (Fig. 8). Release the blade by pushing the activator.
6.Start a stopwatch. Carefully blot the edges of the incision with Whatman cellulose filter paper every 10 s without disturbing the incision (Fig. 9).
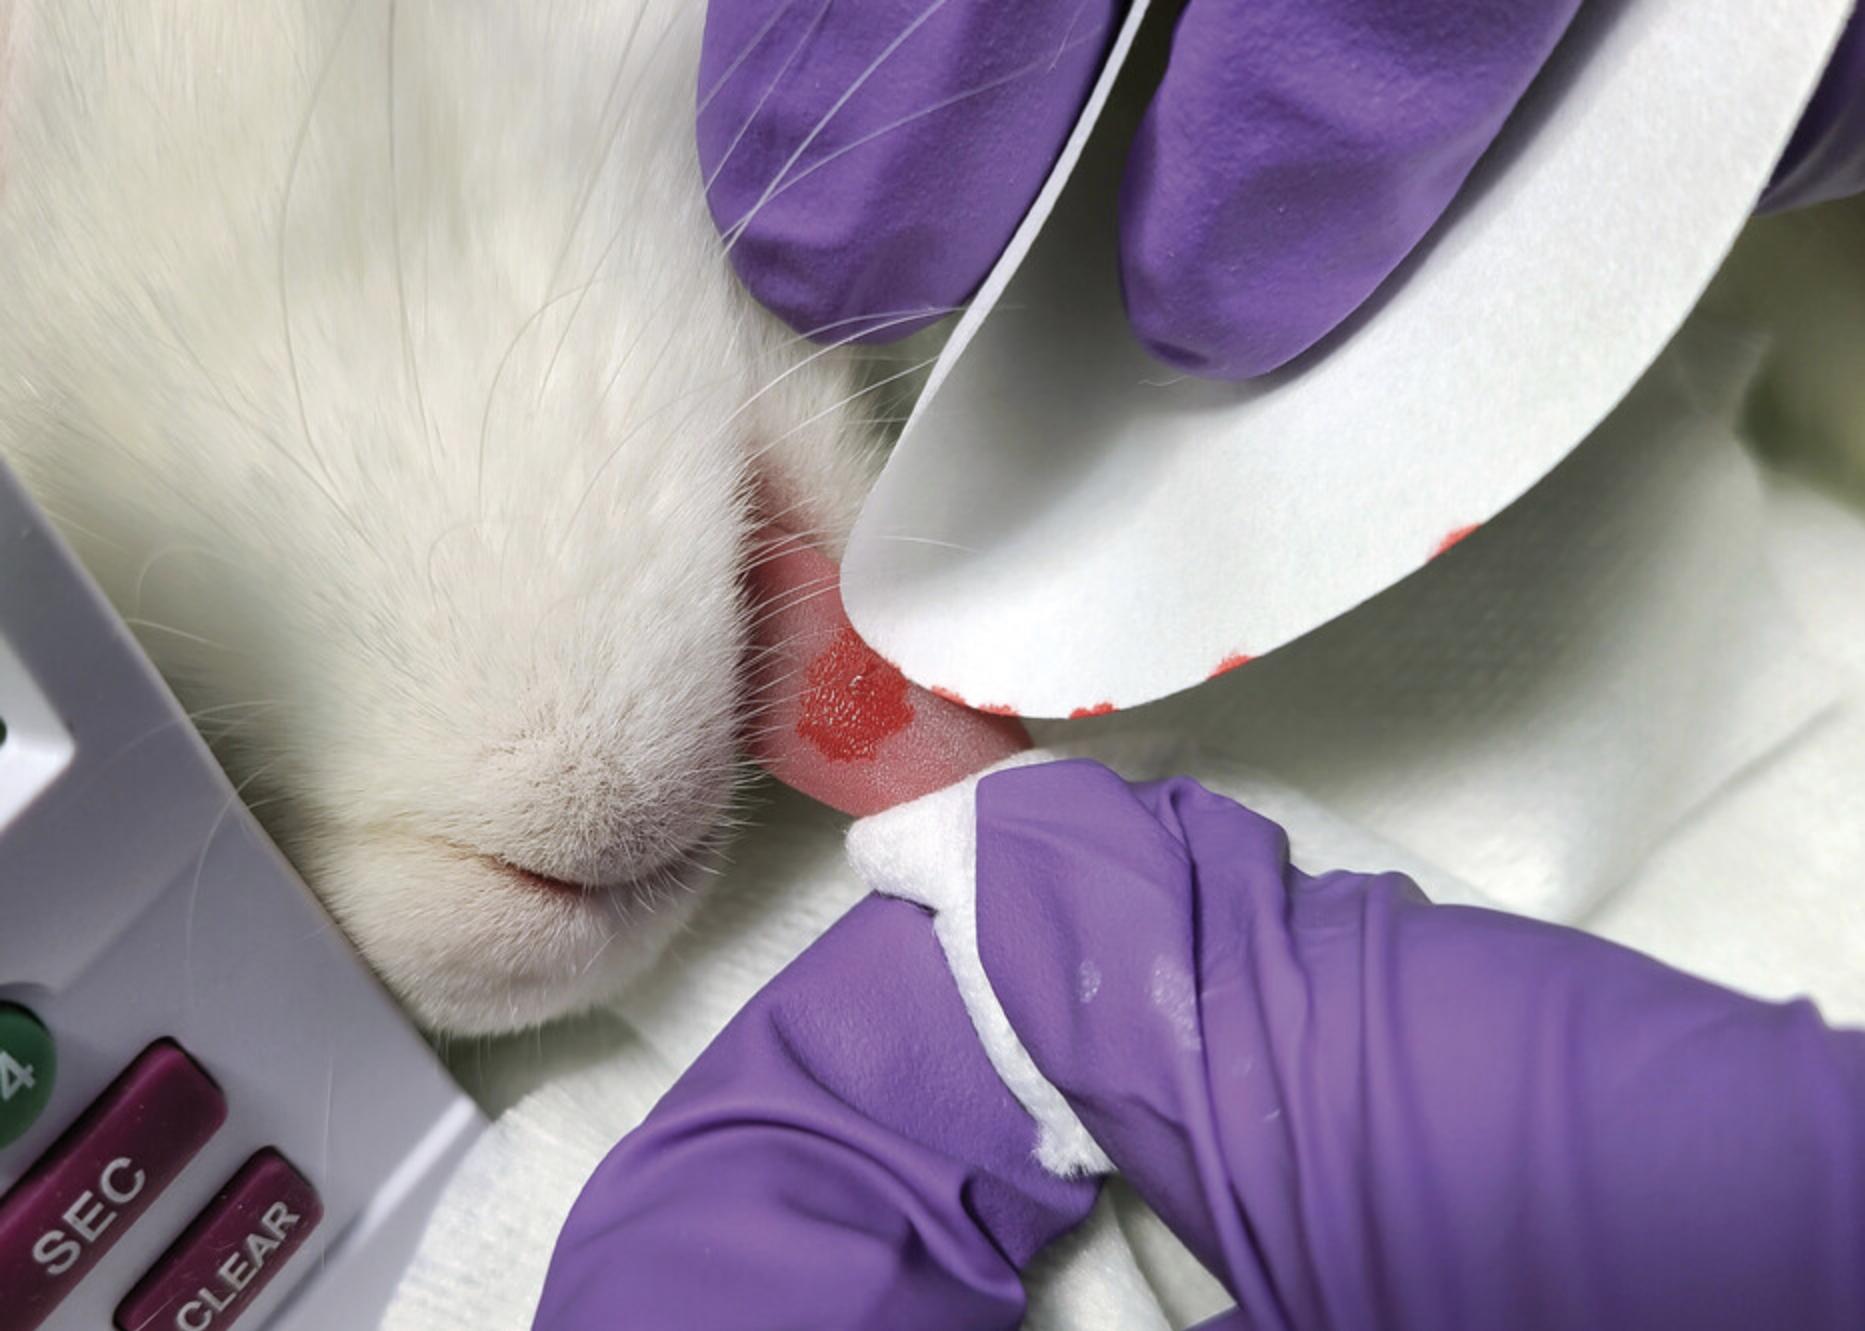
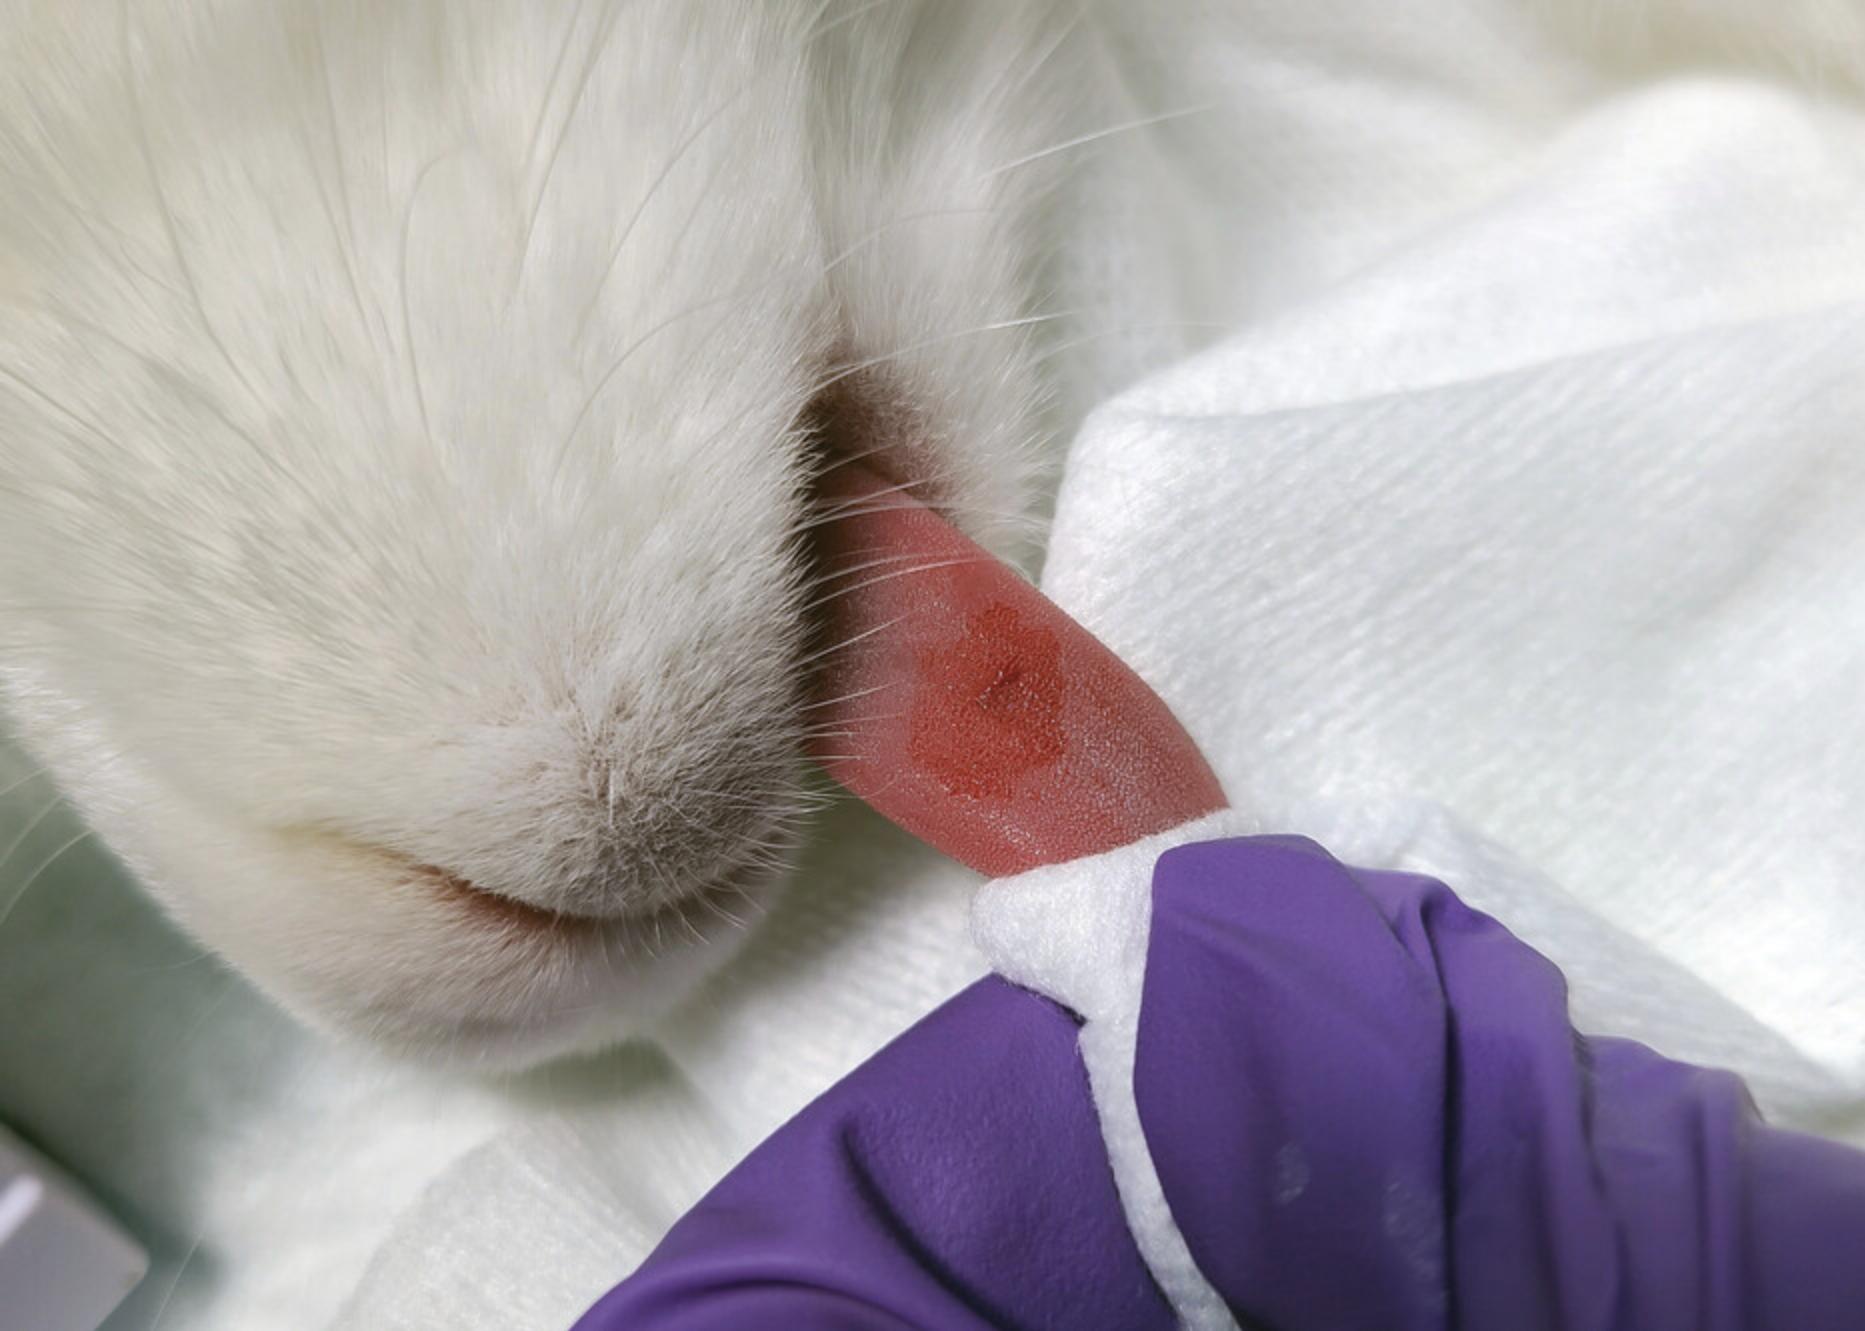
7.Stop the stopwatch when blood is no longer present on the filter paper (Fig. 10). Record the time.
COMMENTARY
Background Information
Tongue template bleeding assay
Antiplatelet therapy is a frequently prescribed preventative treatment for arterial thrombosis. All antiplatelet therapeutics have bleeding risks. Most threatening is the increased risk of cerebral microbleeds and intracerebral hemorrhages (Lovelock et al., 2010; Qiu et al., 2018). Annually, more than 7000 patients in the United States suffer from intracerebral hemorrhages resulting from antiplatelet therapies (Cordina, Hassan, & Ezzeddine, 2009). That is, preventing death via arterial thrombosis with antiplatelet therapies increases the risk of death via intracerebral hemorrhage. Therefore, it is crucial to evaluate the bleeding effects of novel antiplatelet agents to reduce this risk.
The availability of standardized animal models limits the preclinical assessment of bleeding risk. Most commonly, the murine tail cut assay is used to assess the bleeding tendency of antiplatelet therapeutics. However, this method does not accurately replicate what is seen clinically, as the severity of tail amputations differs significantly from the clinical situation. Because there is no standard protocol for the murine tail cut assay, bleeding times vary among laboratories, making direct comparisons of adverse bleeding effects difficult (Greene et al., 2010; Liu, Jennings, Dart, & Du, 2012). Human template bleeding tests involve making a small incision in the skin and recording the time required for blood flow to cease. Therefore, similar tests must be performed to replicate clinical bleeding tests in animals. Unfortunately, most laboratory animals are entirely covered by fur. Therefore, one of the few locations where fur is not present, the tongue's upper surface, is used. A common device used to determine bleeding time in humans is the Surgicutt®. Surgicutt® bleeding devices create automatic incisions with reproducible length and depth, allowing for reliable comparisons between laboratories (Buchanan & Holtkamp, 1989; Lauver, Driscoll, & Lucchesi, 2008; Lauver et al., 2019; Sato, Anderson, & Parry, 2000; Zhang et al., 2016).
Antiplatelet drug study design
The design of preclinical studies to evaluate antiplatelet drug efficacy and safety depends on specific pharmacological characteristics. For instance, irreversible/covalent platelet activation inhibitors (clopidogrel) are not susceptible to ex vivo “wash out” of drug effect during centrifugation and sample preparation. In contrast, care should be taken with reversible inhibitors of platelet activation (ticagrelor) to ensure that the drug's inhibitory effects are not lost due to sample wash procedures. Similarly, pharmacokinetic characteristics should also be accounted for in designing blood sampling time points with reversible platelet activation inhibitors. In these situations, choosing a blood sample time point near the time of maximum plasma drug concentration is prudent, as the antiplatelet effects will decline with decreasing plasma concentration.
Critical Parameters
Blood draw
When collecting blood from the central ear vein (Basic Protocol 1) or through the jugular vein (Alternate Protocol 1), critical parameters must be considered. In both methods, blood must be collected slowly to prevent premature clotting and hemolysis. Shear forces will lyse red blood cells and activate platelets (Nobili, Sheriff, Morbiducci, Redaelli, & Bluestein, 2008); therefore, care must be taken to obtain acceptable blood draws for further analysis. Any premature activation will impact the data obtained from the platelet aggregation (Basic Protocol 2) and platelet activation (Alternate Protocol 2) studies. Furthermore, blood should not be collected faster than it flows (i.e., under vacuum). This will cause the vessel to collapse. On the other hand, slow collection of blood samples will result in poor mixing with the anticoagulant. This can lead to clotted blood and therefore unusable samples. There is a balance between collecting blood too quickly and not collecting blood quickly enough. It is essential to practice blood collection techniques before a study begins so that the experimental results are consistent.
Isolating PRP
Isolating the PRP (Basic Protocol 2) can be a simple step in the protocol; however, the technique must first be mastered. Transfer of red blood cells in the sample may alter the aggregation results. The best method to collect all the PRP is to place a transfer pipet at the side of the tube and top of the supernatant. As the PRP is collected, move the pipet down with the top of the supernatant layer. This will prevent any disruption in the bottom layer. The collection should be slow so that the red blood cells do not get aspirated by the pipet. Furthermore, do not eject any PRP out of the pipet, which will cause unwanted mixing of the separated layers. To measure the concentration of platelets in the PRP, the samples should also be analyzed via an automated cell counter. Low counts would suggest pre-activation of platelets in the sample. To compare results between studies and animals, it is best practice to normalize the platelet concentration. PRP can be diluted with PPP to achieve the desired concentration.
Use of PRP
PRP should be used within 4 hr of collection. Performing these studies after 4 hr will lead to reduced platelet activity and produce inconsistent results. It is best to leave platelets at room temperature until use. Drastic changes in temperature by placing the PRP on ice will negatively affect aggregation results (Ho & Chan, 1995). Platelets are incredibly sensitive, so care should be taken to limit any disruption, as this may cause premature activation.
Bleeding time measurements
The experimental outcomes of the tongue template bleeding assay (Basic Protocol 3) are dependent on several factors, including the type of anesthesia, temperature, age of the rabbit, weight of the rabbit, and position of the incision on the tongue. These factors must remain consistent between experimental groups to limit variability. Rabbits should be placed on a heating pad and body temperature should be monitored, as anesthesia can cause hypothermia and therefore decreased peripheral blood flow. If the incision location is different between rabbits, the bleeding time will likely also differ. Therefore, incision placement must be determined prior to the start of the study.
Troubleshooting
Please see Tables 1–3 for troubleshooting guides for blood collection (Basic Protocol 1 and Alternate Protocol 1), assessment of platelet aggregation and activation (Basic Protocol 2 and Alternate Protocol 2), and determination of tongue bleeding time (Basic Protocol 3).
| Problem | Possible cause | Solution |
|---|---|---|
| No blood flow through the cannula | A clot formed at the end of the tubing | Flush the cannula with saline |
| Cannula is positioned against the vessel wall | Adjust the cannula within the vessel | |
| Unable to advance cannula tubing into the jugular vein | Cannula tubing is inserted at a steep angle with respect to the vessel | Reposition the tubing so that it is parallel to the vein |
| Natural bend in the vessel inhibits smooth passage of the cannula | Reposition the cannula at a different angle |
| Problem | Possible cause | Solution |
|---|---|---|
| No platelet aggregation with any agonist | Blood was clotted/pre-activated during collection or preparation | Collect a new blood sample |
| Agonists are expired | Order fresh agonists | |
| No positive platelets in flow cytometry | Insufficient binding of antibodies or activation markers | Replace reagents |
| Problem | Possible cause | Solution |
|---|---|---|
| Excessive bleeding from the tongue | Too much downward pressure applied to the Surgicutt® | Discard the time point and repeat with a new Surgicutt® |
| No bleeding from the tongue | Insufficient downward pressure applied to the Surgicutt® | Discard the time point and repeat with a new Surgicutt® |
Understanding Results
Platelet activation assays
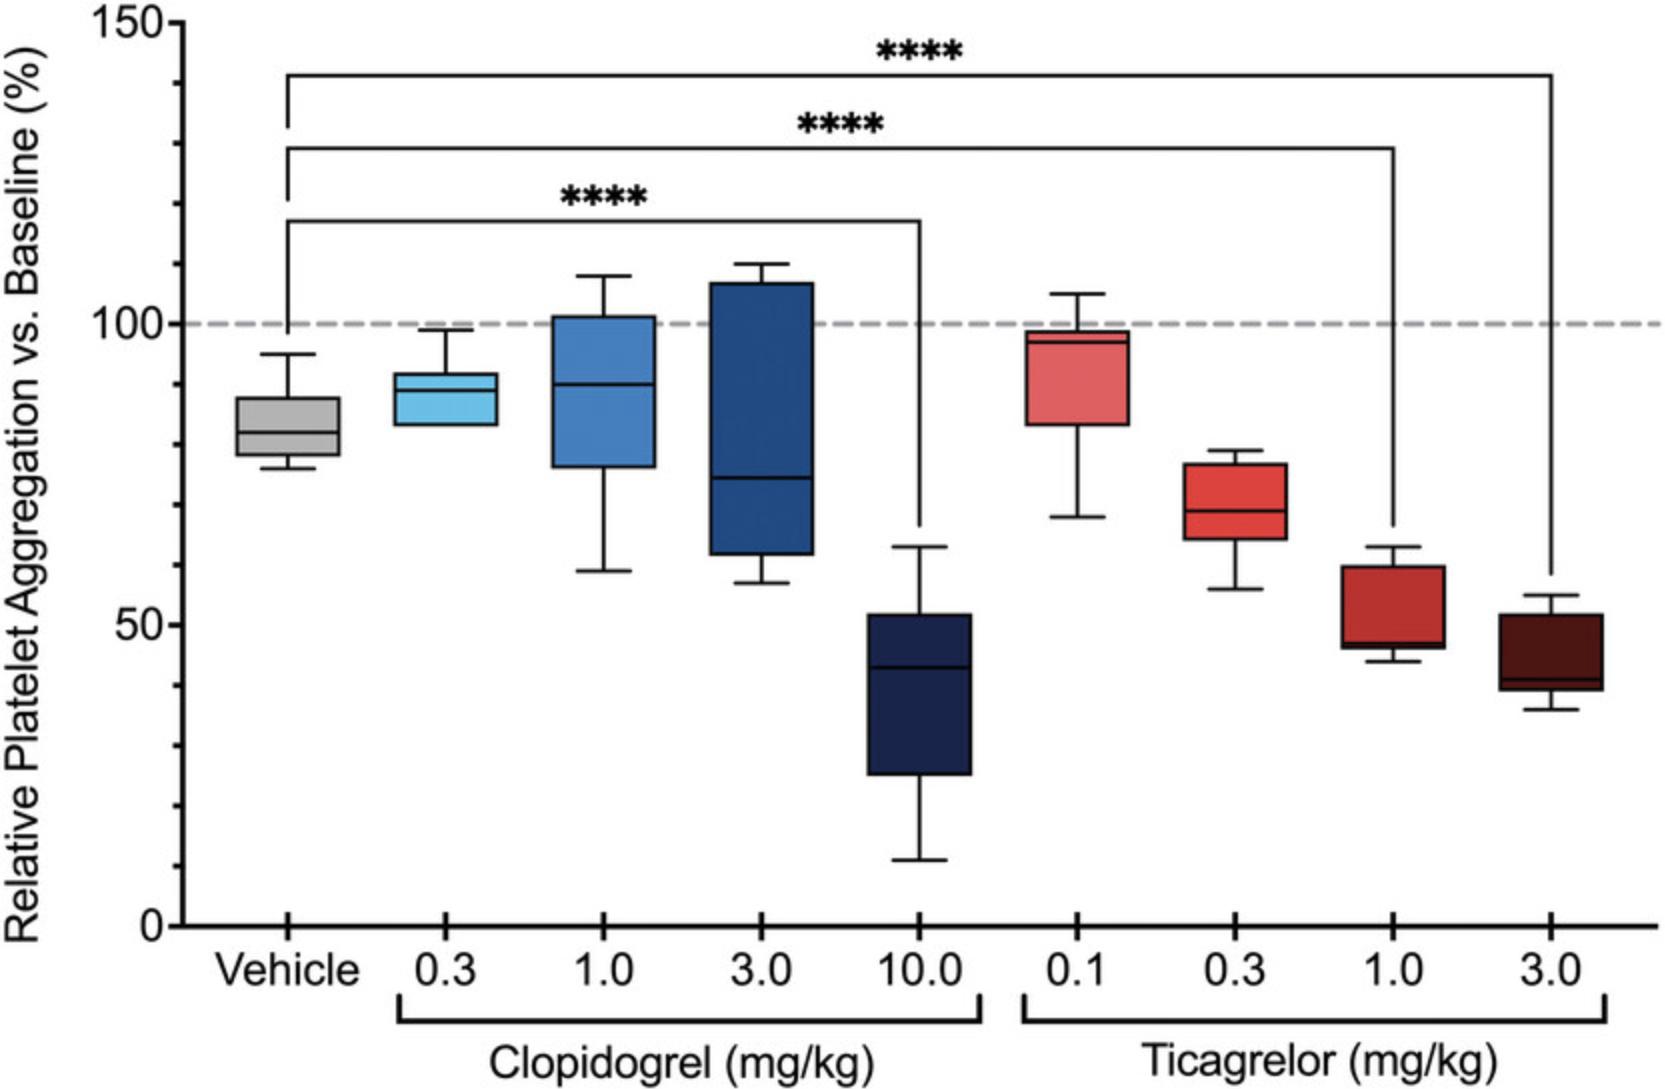
Significant differences in platelet aggregation (Basic Protocol 2) between control and treatment groups suggest that the antiplatelet agent is effective. Inhibition of platelet aggregation by a specific agonist (e.g., ADP) suggests pharmacological modulation of that signaling pathway by the drug of interest (Fig. 5). Similarly, attenuated platelet activation as determined by flow cytometry (Alternate Protocol 2) suggests that the antiplatelet agent is also an effective inhibitor of platelet activation and degranulation (Fig. 6). These results can determine dose-dependent inhibition as well as allowing comparisons between different antiplatelet agents.
Tongue bleeding time
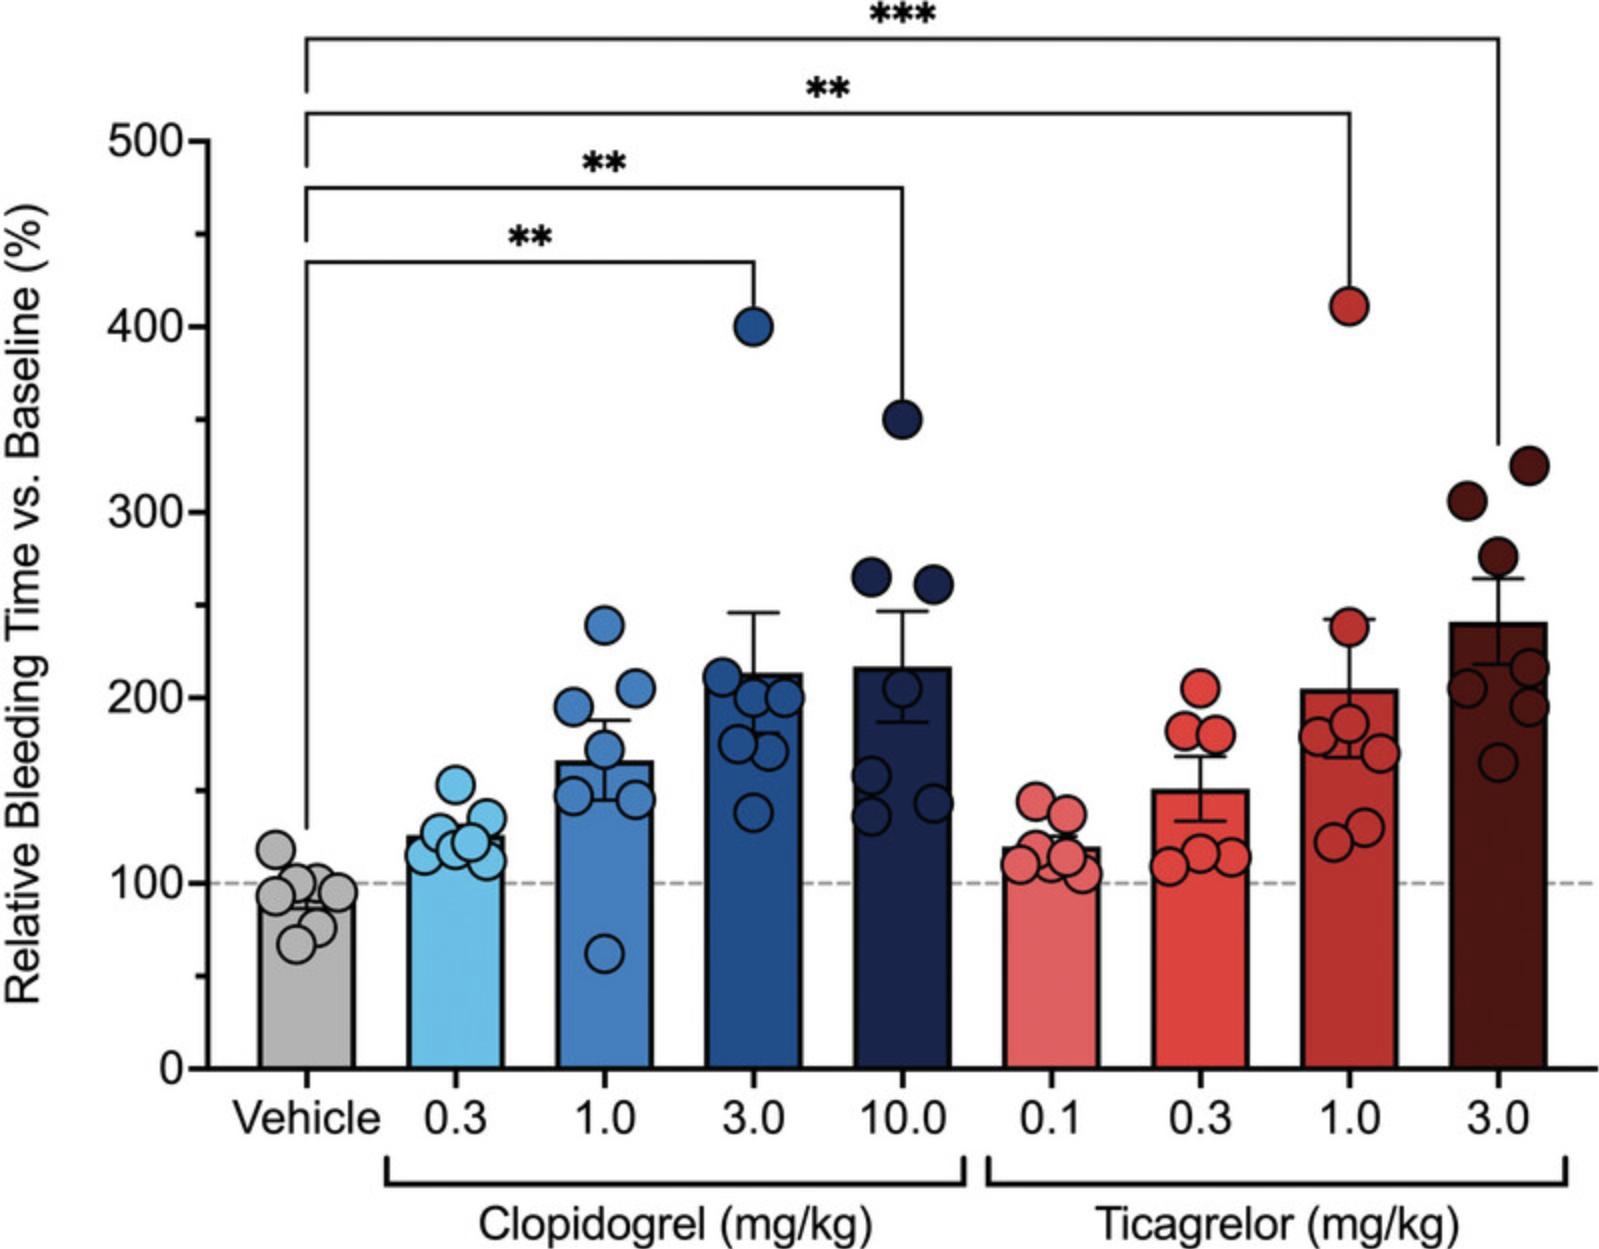
A significant increase in the bleeding time (Basic Protocol 3) in the drug treatment group versus control indicates that the agent potentiates bleeding (Fig. 11). These results can be used to evaluate dose-dependent bleeding and subsequently the therapeutic index. The therapeutic index can be calculated by determining the ratio of platelet inhibition to the prolongation of bleeding time. It is possible to determine doses of antiplatelet agents that maximize platelet inhibition without a corresponding increase in bleeding time (Lauver et al., 2019).
Time Considerations
Blood collections
Once the techniques have been mastered, blood collection via the central ear artery (Basic Protocol 1) can be completed within 5 min after the rabbit is anesthetized. The surgical preparation for blood collection from the jugular vein (Alternate Protocol 1) can be completed within 10 min, and the blood draw itself will take <1 min.
Isolating PRP and PPP
Once the blood has been collected, it must first be centrifuged for 10 min to isolate the PRP (Basic Protocol 2). Then, the PRP can be collected within 5 min, or even faster as the technique is mastered. Next, the remaining blood components are centrifuged for another 10 min to isolate the PPP. The PPP can also be collected within 5 min. Therefore, this part of the protocol will take a total of 30 min to complete.
Platelet aggregation
Measuring platelet aggregation (Basic Protocol 2) requires ∼10 min to set up the platelet aggregometer, 3 min to pre-warm the PRP, 2 min to add the agonists, and 8 min to measure the maximum aggregation. Therefore, one run using four different agonists takes <25 min. With practice, successive runs can be started and pre-warmed while the previous run is completed, which will minimize the overall time, resulting in 10 min per run thereafter.
Flow cytometry platelet activation
The setup for flow cytometry (Alternate Protocol 2) takes 35 min, which includes incubating the fibrinogen for 30 min. Preparing the samples for running on the flow cytometer takes ∼1.5 hr. This includes reagent addition, incubation times, and centrifugation times. Analyzing the samples takes an additional 1 hr, which includes instrument startup, running the samples, and shutting down the instrument. Therefore, this protocol will take 3 to 3.5 hr.
Tongue bleeding time
Once the rabbit is anesthetized, the tongue bleeding time assay (Basic Protocol 3) usually takes <15 min per rabbit. However, depending on the drug given, this time may be prolonged. In untreated rabbits, the tongue bleeding time is typically 2 to 3 min.
Acknowledgments
The data and methods in this article were supported by a grant from the National Heart, Lung, and Blood Institute (1R43HL139380-01).
Author Contributions
Dawn S. Kuszynski : Investigation, methodology, writing – original draft; Barbara D. Christian : Investigation, methodology, writing – review and editing; Matthew P. Bernard : Investigation, methodology, writing – review and editing; D. Adam Lauver : Conceptualization, funding acquisition, investigation, methodology, project administration, writing – review and editing.
Conflict of Interest
There are no conflicts of interest.
Open Research
Data Availability Statement
The data that support these protocols are openly available at https://doi.org/10.1002/prp2.509.
Literature Cited
- Blajchman, M. A., Senyi, A. F., Hirsh, J., Genton, E., & George, J. N. (1981). Hemostatic function, survival, and membrane glycoprotein changes in young versus old rabbit platelets. Journal of Clinical Investigation , 68(5), 1289–1294. doi: 10.1172/jci110375
- Buchanan, G. R., & Holtkamp, C. A. (1989). A comparative study of variables affecting the bleeding time using two disposable devices. American Journal of Clinical Pathology , 91(1), 45–51. doi: 10.1093/ajcp/91.1.45
- Burnstock, G. (2017). Purinergic signaling in the cardiovascular system. Circulation Research , 120(1), 207–228. doi: 10.1161/CIRCRESAHA.116.309726
- Cordina, S. M., Hassan, A. E., & Ezzeddine, M. A. (2009). Prevalence and clinical characteristics of intracerebral hemorrhages associated with clopidogrel. Journal of Vascular and Interventional Neurology , 2(1), 136–138.
- do Amaral, R. J., da Silva, N. P., Haddad, N. F., Lopes, L. S., Ferreira, F. D., Filho, R. B., … Balduino, A. (2016). Platelet-rich plasma obtained with different anticoagulants and their effect on platelet numbers and mesenchymal stromal cells behavior in vitro. Stem Cells International , 2016, 7414036. doi: 10.1155/2016/7414036
- Estevez, B., & Du, X. (2017). New concepts and mechanisms of platelet activation signaling. Physiology (Bethesda, Md.) , 32(2), 162–177. doi: 10.1152/physiol.00020.2016
- Feuston, B. P., Culberson, J. C., & Hartman, G. D. (2003). Molecular model of the alpha(IIb)beta(3) integrin. Journal of Medicinal Chemistry , 46(25), 5316–5325. doi: 10.1021/jm030146j
- Greene, T. K., Schiviz, A., Hoellriegl, W., Poncz, M., & Muchitsch, E. M. (2010). Towards a standardization of the murine tail bleeding model. Journal of Thrombosis and Haemostasis , 8(12), 2820–2822. doi: 10.1111/j.1538-7836.2010.04084.x
- Ho, C. H., & Chan, I. H. (1995). The influence of time of storage, temperature of storage, platelet number in platelet-rich plasma, packed cell, mean platelet volume, hemoglobin concentration, age, and sex on platelet aggregation test. Annal of Hematology , 71(3), 129–133. doi: 10.1007/BF01702648
- Jurk, K., & Kehrel, B. E. (2005). Platelets: Physiology and biochemistry. Seminars in Thrombosis and Hemostasis , 31(4), 381–392. doi: 10.1055/s-2005-916671
- Klement, P., Liao, P., Hirsh, J., Johnston, M., & Weitz, J. I. (1998). Hirudin causes more bleeding than heparin in a rabbit ear bleeding model. Journal of Laboratory and Clinical Medicine , 132(3), 181–185. doi: 10.1016/s0022-2143(98)90166-4
- Klokkevold, P. R., Lew, D. S., Ellis, D. G., & Bertolami, C. N. (1991). Effect of chitosan on lingual hemostasis in rabbits. Journal of Oral and Maxillofacial Surgery , 49(8), 858–863. doi: 10.1016/0278-2391(91)90017-g
- Lauver, D. A., Driscoll, E. M., & Lucchesi, B. R. (2008). Disodium disuccinate astaxanthin prevents carotid artery rethrombosis and ex vivo platelet activation. Pharmacology , 82(1), 67–73. doi: 10.1159/000132085
- Lauver, D. A., Kuszynski, D. S., Christian, B. D., Bernard, M. P., Teuber, J. P., Markham, B. E., … Zhang, H. (2019). DT-678 inhibits platelet activation with lower tendency for bleeding compared to existing P2Y12 antagonists. Pharmacology Research & Perspectives, 7(4), e00509. doi: 10.1002/prp2.509
- Liu, Y., Jennings, N. L., Dart, A. M., & Du, X. J. (2012). Standardizing a simpler, more sensitive and accurate tail bleeding assay in mice. World Journal of Experimental Medicine , 2(2), 30–36. doi: 10.5493/wjem.v2.i2.30
- Lovelock, C. E., Cordonnier, C., Naka, H., Al-Shahi Salman, R., Sudlow, C. L., Edinburgh Stroke Study Group, … Rothwell, P. M. (2010). Antithrombotic drug use, cerebral microbleeds, and intracerebral hemorrhage: A systematic review of published and unpublished studies. Stroke; A Journal of Cerebral Circulation , 41(6), 1222–1228. doi: 10.1161/STROKEAHA.109.572594
- Mann, K. G., Whelihan, M. F., Butenas, S., & Orfeo, T. (2007). Citrate anticoagulation and the dynamics of thrombin generation. Journal of Thrombosis and Haemostasis , 5(10), 2055–2061. doi: 10.1111/j.1538-7836.2007.02710.x
- Marret, E., Bonnin, P., Mazoyer, E., Riou, B., Jacobs, T., Coriat, P., & Samama, C. M. (2004). The effects of a polymerized bovine-derived hemoglobin solution in a rabbit model of arterial thrombosis and bleeding. Anesthesia and Analgesia , 98(3), 604–610. doi: 10.1213/01.ane.0000099366.73625.dd
- Nobili, M., Sheriff, J., Morbiducci, U., Redaelli, A., & Bluestein, D. (2008). Platelet activation due to hemodynamic shear stresses: Damage accumulation model and comparison to in vitro measurements. Asaio Journal , 54(1), 64–72. doi: 10.1097/MAT.0b013e31815d6898
- Qiu, J., Ye, H., Wang, J., Yan, J., Wang, J., & Wang, Y. (2018). Antiplatelet therapy, cerebral microbleeds, and intracerebral hemorrhage: A meta-analysis. Stroke; A Journal of Cerebral Circulation , 49(7), 1751–1754. doi: 10.1161/STROKEAHA.118.021789
- Sato, I., Anderson, G. A., & Parry, B. W. (2000). An interobserver and intraobserver study of buccal mucosal bleeding time in Greyhounds. Research in Veterinary Science , 68(1), 41–45. doi: 10.1053/rvsc.1999.0334
- Stalker, T. J., Newman, D. K., Ma, P., Wannemacher, K. M., & Brass, L. F. (2012). Platelet signaling. In P. Gresele, G.V.R. Born, C. Patrono, & C. P. Page (Eds.), Antiplatelet agents (pp. 59–85). Springer. doi: 10.1007/978-3-642-29423-5_3
- Zhang, H., Lauver, D. A., Wang, H., Sun, D., Hollenberg, P. F., Chen, Y. E., … Eitzman, D. T. (2016). Significant improvement of antithrombotic responses to clopidogrel by use of a novel conjugate as revealed in an arterial model of thrombosis. Journal of Pharmacology and Experimental Therapeutics , 359(1), 11–17. doi: 10.1124/jpet.116.236034

