Colony PCR
An.Huang
Disclaimer
DISCLAIMER – FOR INFORMATIONAL PURPOSES ONLY; USE AT YOUR OWN RISK
The protocol content here is for informational purposes only and does not constitute legal, medical, clinical, or safety advice, or otherwise; content added to protocols.io is not peer reviewed and may not have undergone a formal approval of any kind. Information presented in this protocol should not substitute for independent professional judgment, advice, diagnosis, or treatment. Any action you take or refrain from taking using or relying upon the information presented here is strictly at your own risk. You agree that neither the Company nor any of the authors, contributors, administrators, or anyone else associated with protocols.io, can be held responsible for your use of the information contained in or linked to this protocol or any of our Sites/Apps and Services.
Abstract
Colony PCR using the whole organism of bacteria instead of purified DNA template. This simplifies PCR procedure. This protocol helps conduct a simple colony PCR procedure.
Steps
Preparation for experiment
Pick several colonies of bacteria from the plate using pipette tips.
Put the selected colonies into different 15mL centrifuge tubes, each with 5mLLB broth.
Incubate in an orbital shaker at 171rpm overnight.
Pipette 30µL culture from each tube to different agar plates. Spread the culture evenly on the plate.
Incubate the plates in a biochemical incubator at 37°C overnight.
Prepare several sterilized 1.5ml microcentrifuge tubes.
Colony PCR
Add 30µL TE buffer to X+2 1.5ml microcentrifuge tubes each. Label the tubes as "1, 2, 3, ..., X, +, -".
Pick one colony from each plate using a sterilized pipette tip and put the colonies into different 1.5ml microcentrifuge tubes numbered "1, 2, 3, ..., X"
Place the tubes in a heating block, heating at 100°C for 0h 5m 0s.
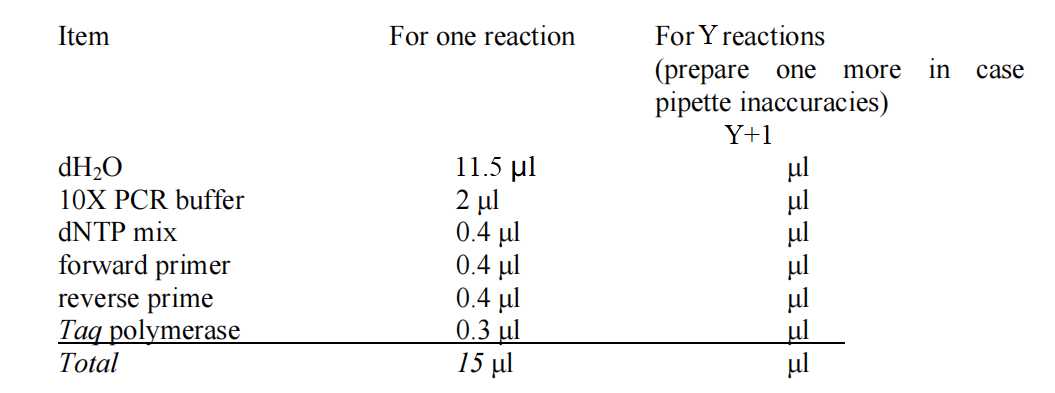
Prepare Master Mix for colony PCR. The recipe for the Master Mix is as follows:
Label X+2 0.2mL PCR tubes as "1, 2, 3, ..., X, +, -"
Pipette 15µL from the Master Mix into all X+2 0.2 mL PCR tubes.
Pipette 5µL from the colony lysate from tube "1, 2, 3, ..., X" into corresponding 0.2 mL PCR tubes.
Add 5µL plasmid into "+" PCR tube. Add 5µL ddH2O into "-" PCR tube.
Place the X+2 PCR tubes in Thermocycler. PCR procedure will be set as the following programme:
1 cycle of 95°C
30 cycles of 94°C
                   `50°C`


                   `72°C`
Final extension 72°C
When the programme is finished, store the tubes at 4°C
