Canadian Airborne Biodiversity Observatory's Forest Inventory Field Survey Protocol
Anna L Crofts, Sabine St-Jean, Mark Vellend
Abstract
Here, we describe the standardized protocol used by the Canadian Airborne Biodiversity Observatory (CABO) to conduct the field-based surveys of canopy trees at the forested study sites, Parc national du Mont Mégantic and Parc national du Mont Saint Bruno, located in southern Québec, Canada. These field-based surveys were conducted to relate field-based tree biodiversity data with aerial hyperspectral imagery data. Forest inventory plots (~706 m2) were systematically distributed to span the range of conditions present within the imaged areas. Plot dimensions were corrected to account for slope in the field and therefore, plots were circular (15 m radii) when viewed-from-above. Within each plot, we quantified the tree community defined as all individuals whose crowns extended into the general level of the canopy and those whose crowns were below the canopy but had a diameter at breast height (DBH) greater than 9 cm. Individuals were identified to species, positioned in relation to the plot center, and a suite of dendrometric properties (e.g., DBH, height) were quantified. To relate the field surveys with the hyperspectral imaging data, we took high-precision positions of plot centers. All data were collected using Fulcrum , a data collection application.
Before start
- Field work within Parc national du Mont Mégantic and Parc national du Mont Saint Bruno require valid research permits. Prior to field work obtain research permit and ensure permit is being carried when conducting field surveys. Additionally, Parc national du Mont Saint Bruno requires that the staff be informed of dates and times when surveys are being conducted.
- If working at a site other than Parc national du Mont Mégantic ( MtMeg-1 ) or Parc national du Mont Saint Bruno ( MSB-Forest-Crew ), create the site in Fulcrum prior to field work.
- If working in a project other than 2019-Crofts-PHD-UDES or 2019-MONTSAINTBRUNO , create the project in Fulcrum prior to field work.
-
Ensure that the batteries of the cellphone, LaserGeo, Postex System (DP II handheld device and SmartScale Calipers), and Trimble Catalyst are fully charged . Additionally, pack extra alkaline AA batteries for the Postex System transponders.
-
Verify that the Magnetic Declination in LaserGeo is calibrated for the correct site and is up to date.
Attachments
Steps
Plot Establishment in the Field and in Fulcrum
Systematically establish plots to span the range of conditions across the imaged area. Specifically, we aim to:
- Maximize the number of unique tree species assemblages
- Cover the range of topographic conditions (e.g., elevation, slope, and aspect)
In the field,
-
Permanently mark plot centers with rebar1 topped with orange safety cap (Fig. 1) and label cap2 as follows: CABO - Plot ID - Initials of Surveyors - Date Established
-
There is no need to physically delineate the perimeters of the plots - the Postex System that is used to position trees in relation to the plot center is used to determine the plot boundaries. When an individual tree is beyond the slope corrected radius of a plot the system will beep and return a warning message that the Tree is outside the plot . The visible strings (~16 m in length) used to create sampling sections will provide a rough indication of the plot's boundary (detailed in Step 6) and surveyors should sample all individual trees until the Postex System returns the warning message (detailed in Step 7).

In Fulcrum ,
- Create a plot record in Fulcrum by selecting + Record within the Plots app (Fig. 2a,b).
- TAP TO SELECT PROJECT 1, select the appropriate Site 2, assign a Field Plot ID 3, and list the names of the surveyors who the plot was First Established By (Fig. 2c) .
- UPDATE LOCATION WITH GPS 4- Latitude (degrees), Longitude (degrees), Horizontal Accuracy (m), and Altitude (m) fields will automatically be filled in when Update Location with GPS is selected (Fig. 2d).
- Assign the Plot Shape as circular and Plot Diameter (m) as 30 5 (Fig. 2e).
- Optional - Add details about species assemblage to Plot Remarks 6 and photos to Plot Photos (Fig. 2e) .
![Figure 2. Screenshots from Fulcrum mobile application CABO account. To create a new record of a plot select the Plots app from the home page (panel a) and then within the Plots app select + Record (panel b). Tap to select project that you are working with, select the appropriate study site, assign a Plot Field ID, and record the surveyors by whom the plot was First Established By (panel c). Then, UPDATE LOCATION [of the plot] WITH GPS (panel d). Assign the Plot Shape to circular and Plot Diameter to 30 m (panel e). Optional information can be added within Plot Remarks and photos can be added to Plot Photos (panel e). Red boxes have been added to screenshots to illustrate selections. Note that Fulcrum can be used via a mobile app or desktop website and that the two are organized differently. Figure 2. Screenshots from Fulcrum mobile application CABO account. To create a new record of a plot select the Plots app from the home page (panel a) and then within the Plots app select + Record (panel b). Tap to select project that you are working with, select the appropriate study site, assign a Plot Field ID, and record the surveyors by whom the plot was First Established By (panel c). Then, UPDATE LOCATION [of the plot] WITH GPS (panel d). Assign the Plot Shape to circular and Plot Diameter to 30 m (panel e). Optional information can be added within Plot Remarks and photos can be added to Plot Photos (panel e). Red boxes have been added to screenshots to illustrate selections. Note that Fulcrum can be used via a mobile app or desktop website and that the two are organized differently.](https://static.yanyin.tech/literature_test/protocol_io_true/protocols.io.q26g7rn23vwz/Fulcrum1.png)
For each plot, quantify the slope and orientation in the field1.
-
Measure the slope angle and compass bearing with the LaserGeo's ANGLE and COMPASS 2 functions, respectively, along two 7.5 m vectors in the direction from high to low elevation, where: i) the first vector is parallel to the steepest slope and
ii) the second vector is oriented in any direction as long as it is not parallel to the first (Fig. 3a). -
Enter the slope angle and compass bearing measurements to Slope 1 (°) , Bearing 1 (°) , Slope 2 (°) , and Bearing 2 (°) fields within the plot's record in Fulcrum (Fig. 3b) .
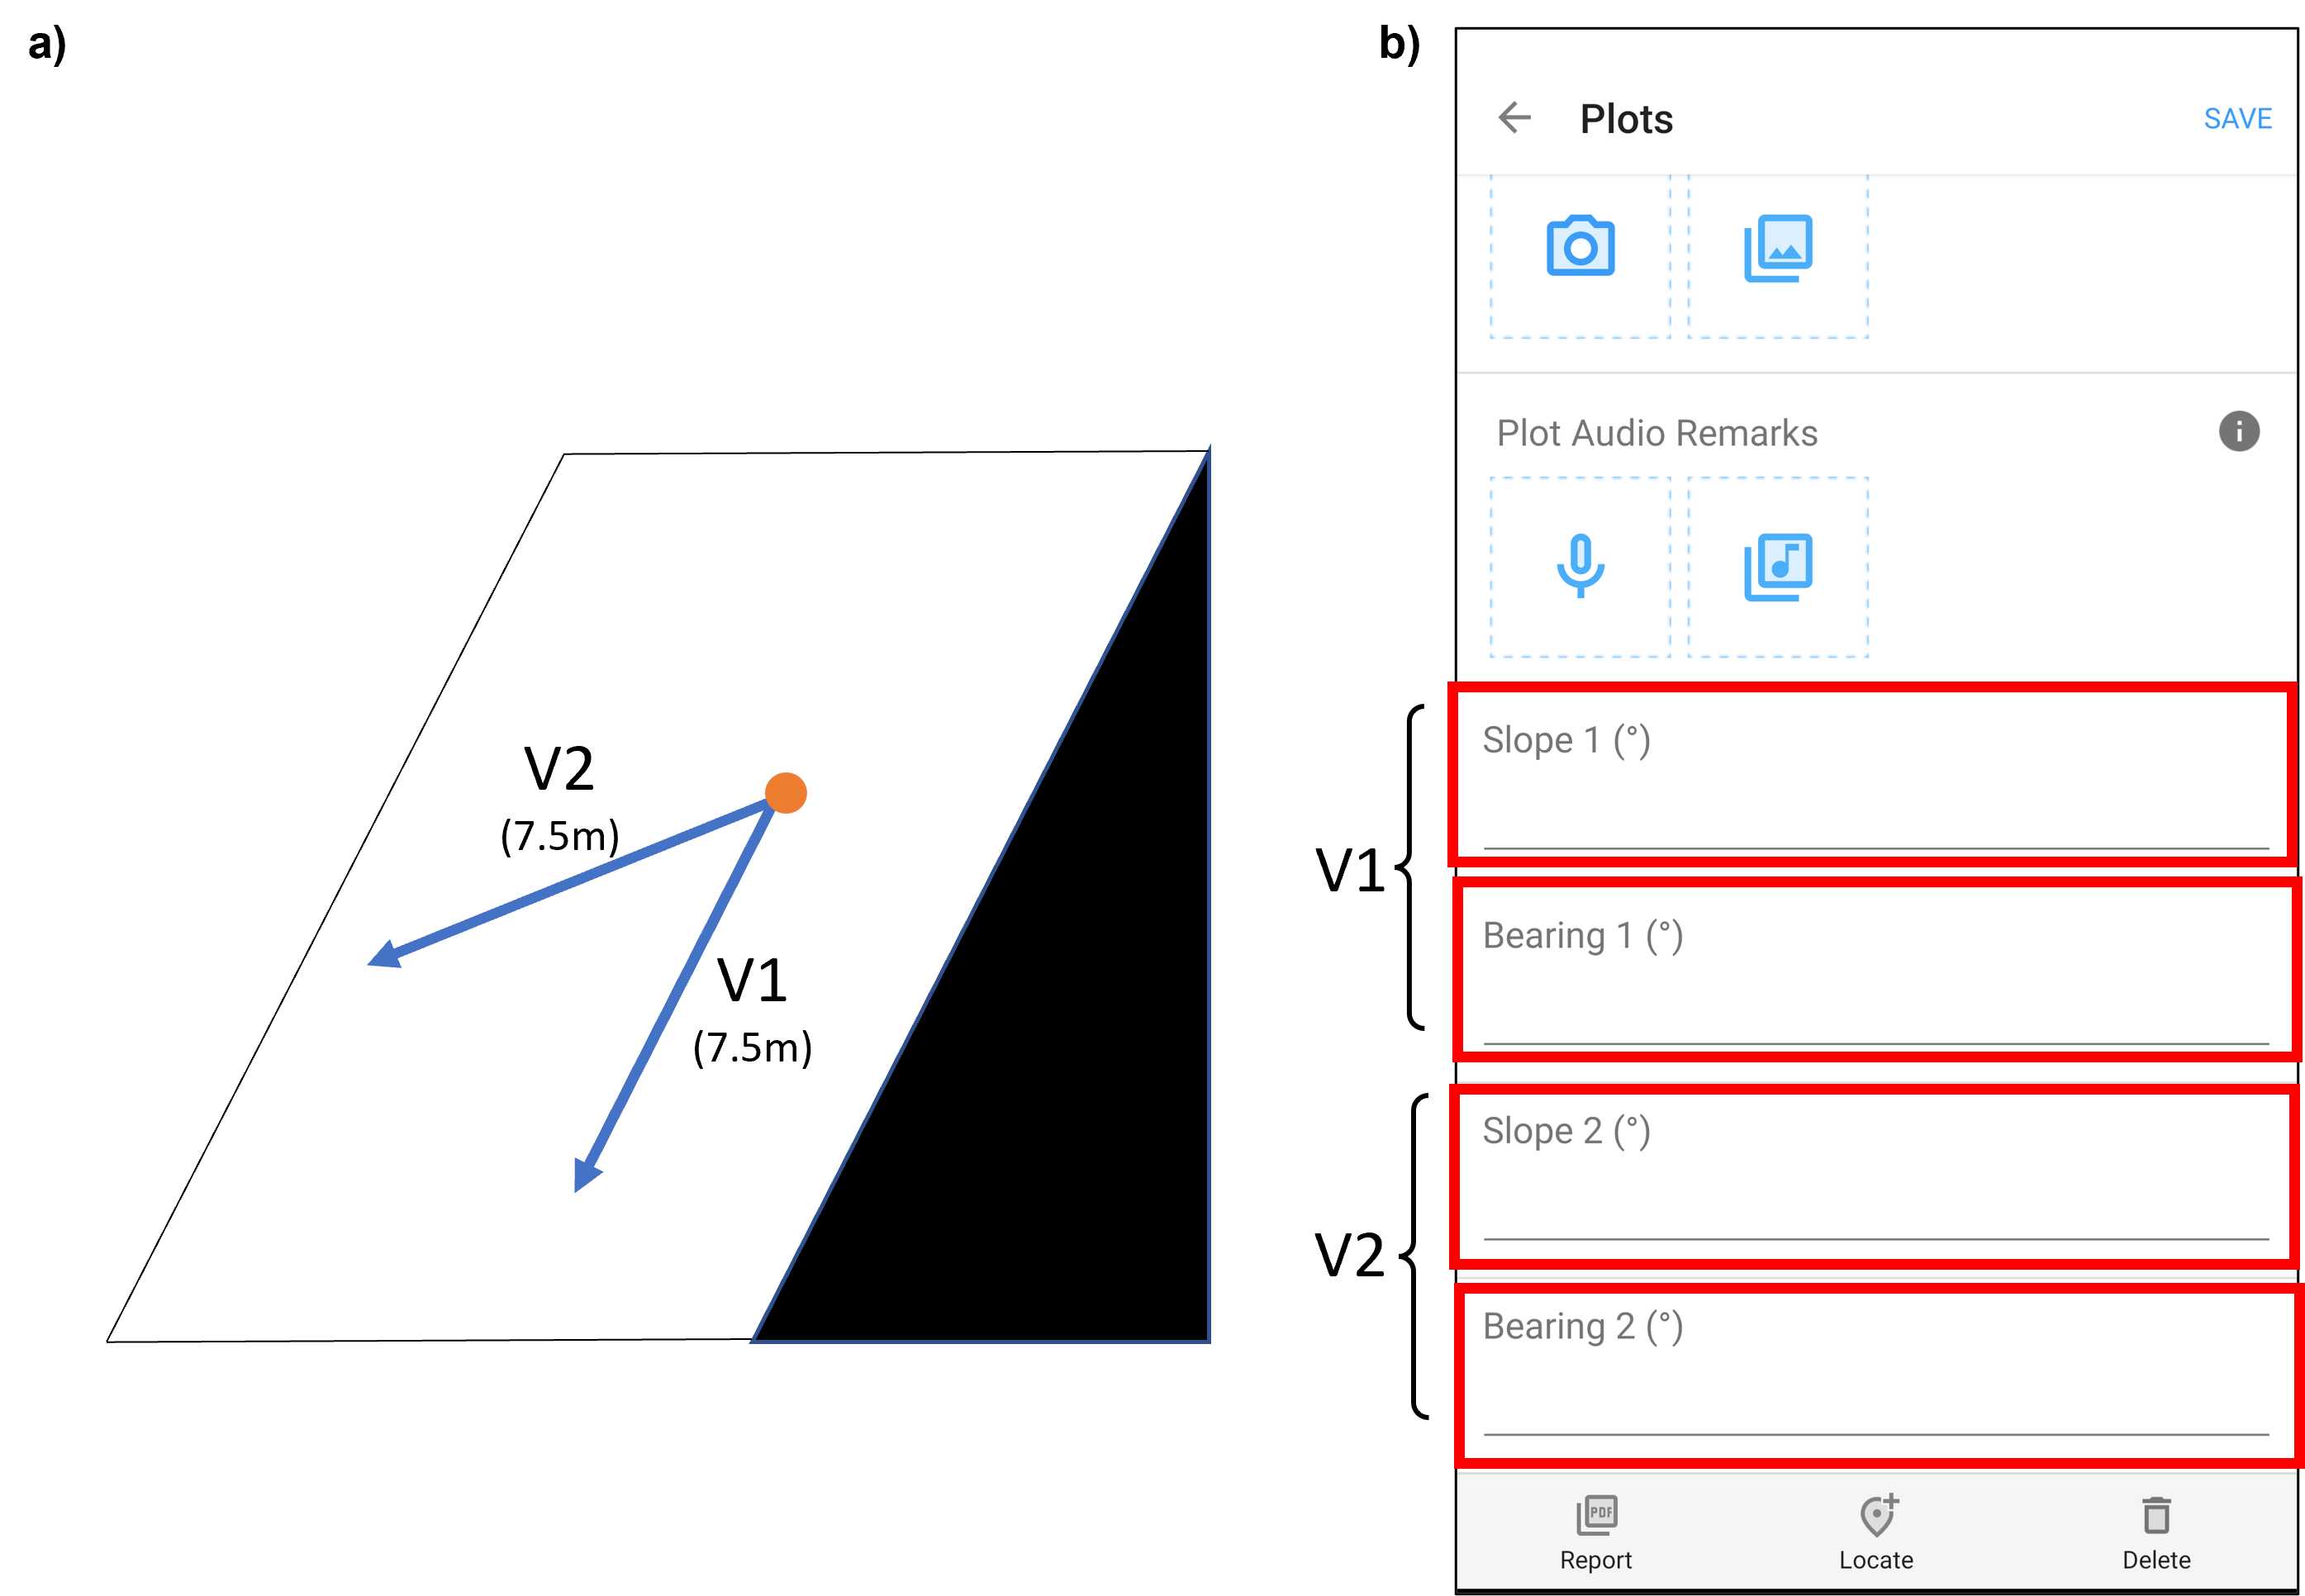
Figure 3. a) A schematic of potential orientation of two vectors along which the slope and compass bearing are measured, where one vector is parallel to the steepest slope (V1) and the other is oriented in any other direction (V2). The orange circle denotes the plot center. b) A screenshot from Fulcrum mobile application CABO account, where the slope and compass bearing measurements are entered to the plot's record Slope 1 (°), Bearing 1 (°), Slope 2 (°), Bearing 2 (°) fields under the Optional Plot Info heading (panel b). Red boxes have been added to screenshots to illustrate selections. Note that Fulcrum can be used via a mobile app or desktop website and that the two are organized differently.
In Fulcrum :
-
SAVE 1 the plot record in Fulcrum (Fig. 4a). This will return you to the Plots app.
-
Sync2 Fulcrum to upload new plot record online by selecting the icon of two circular arrows. This icon will spin when synchronizing is in progress (Fig. 4b).
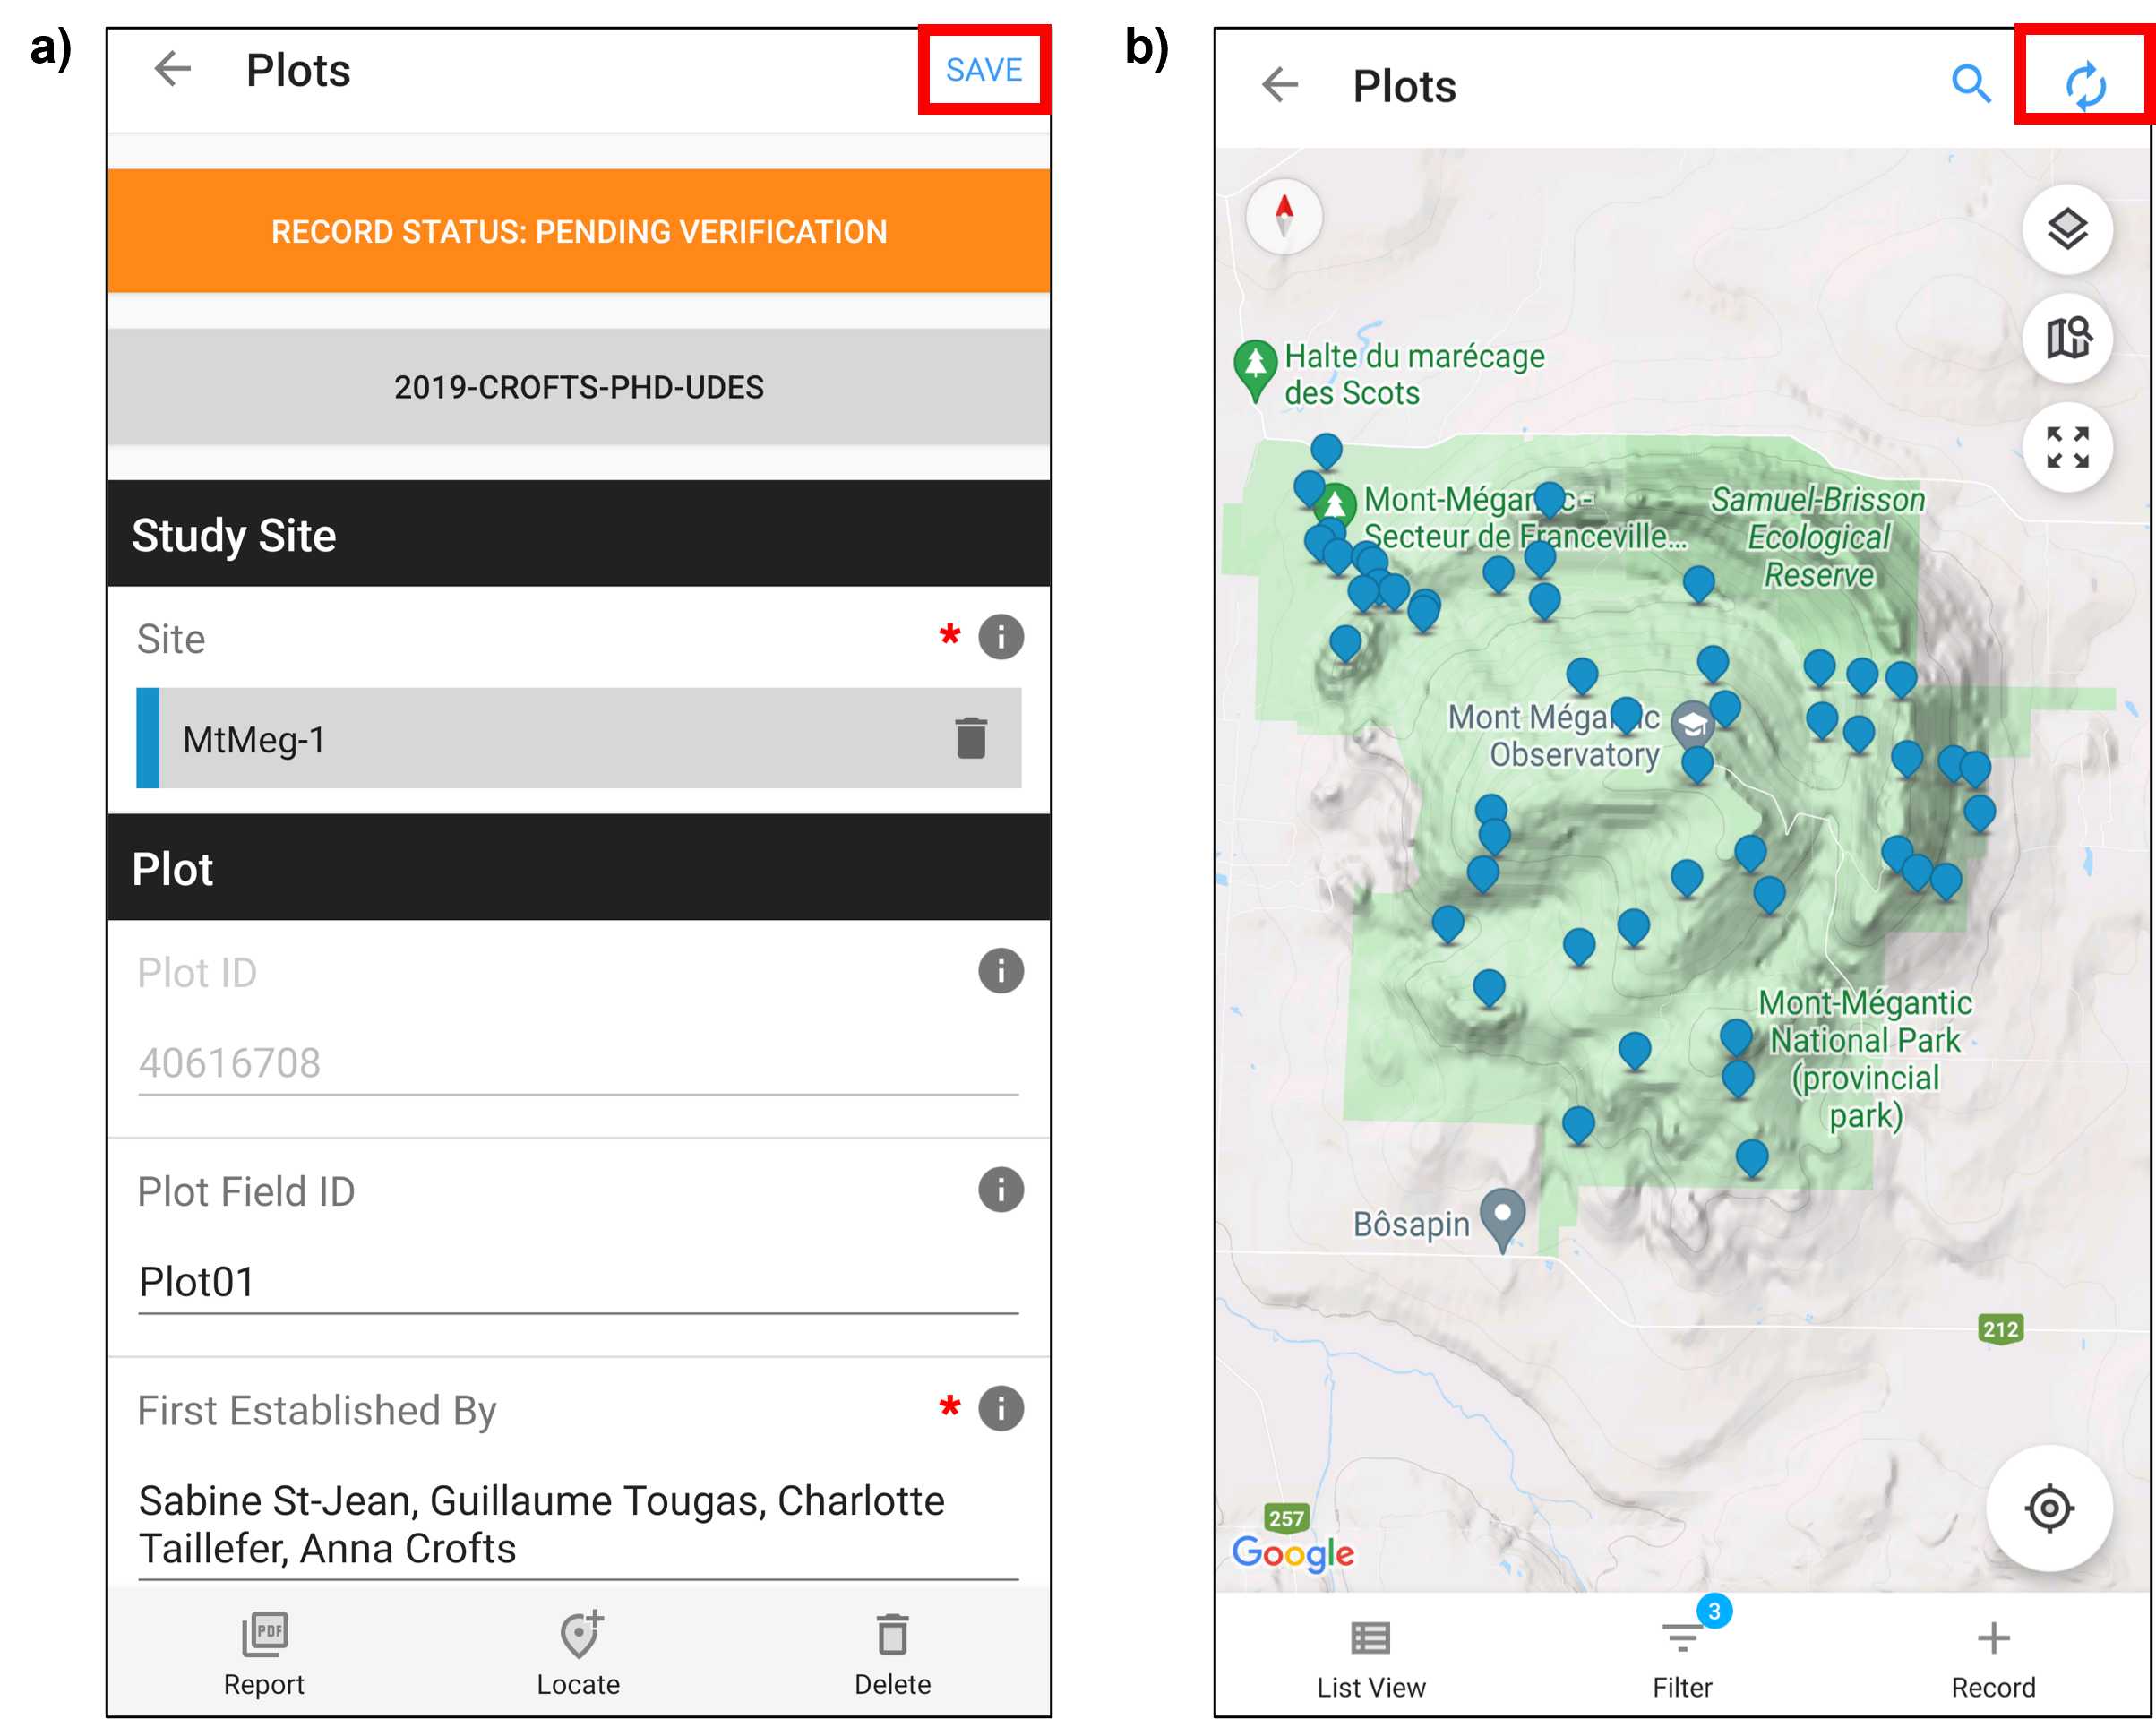
Figure 4. Screenshots from Fulcrum mobile application CABO account, once plot has been established in the field, in Fulcrum, and the plot's slope and orientation measured SAVE the plot's record (panel a). Sync Fulcrum to upload new plot record online by selecting the two circular arrows (panel b). Red boxes have been added to screenshots to illustrate selections. Note that Fulcrum can be used via a mobile app or desktop website and that the two are organized differently.
Create Vegetation Survey Record in Fulcrum
Prior surveying a plot, create the plot's vegetation survey record in Fulcrum.
- Create a record for the plot's vegetation survey in Fulcrum by selecting + Record in the Vegetation Survey: Large Trees app (Fig. 5a,b).
- TAP TO SELECT PROJECT , select the appropriate Site and the corresponding Field Plot ID , answer No to Trees Measured in a Subplot? 1, and list the names of who the plot will be Surveyed By (Fig. 5c) .
- For Tree Positioning Method select X-Y POSITION FROM PLOT CENTER and for Tree Size Measurements select DBH, Height, Crown class, and Crown diameter (Fig. 5d).
- Select Tree Taxa Present followed by + Record (Fig. 5d,e).
- If needed, you can apply filters but regardless, select VASCAN Taxon 2 and choose a species present in the plot from the drop-down list (Fig. 5f).
- Once species is selected, select SAVE (Fig. 5g). The species you just entered should now appear on the Tree Taxa Present page (Fig. 5h).
- Select + Record if additional species are present and repeat the previous two steps (Fig. 5h,f,g).
- Repeat this process until all species present in the plot are listed under Tree Taxa Present , then return to the plot's Vegetation Survey record by selecting the arrow (←)(Fig. 5i)
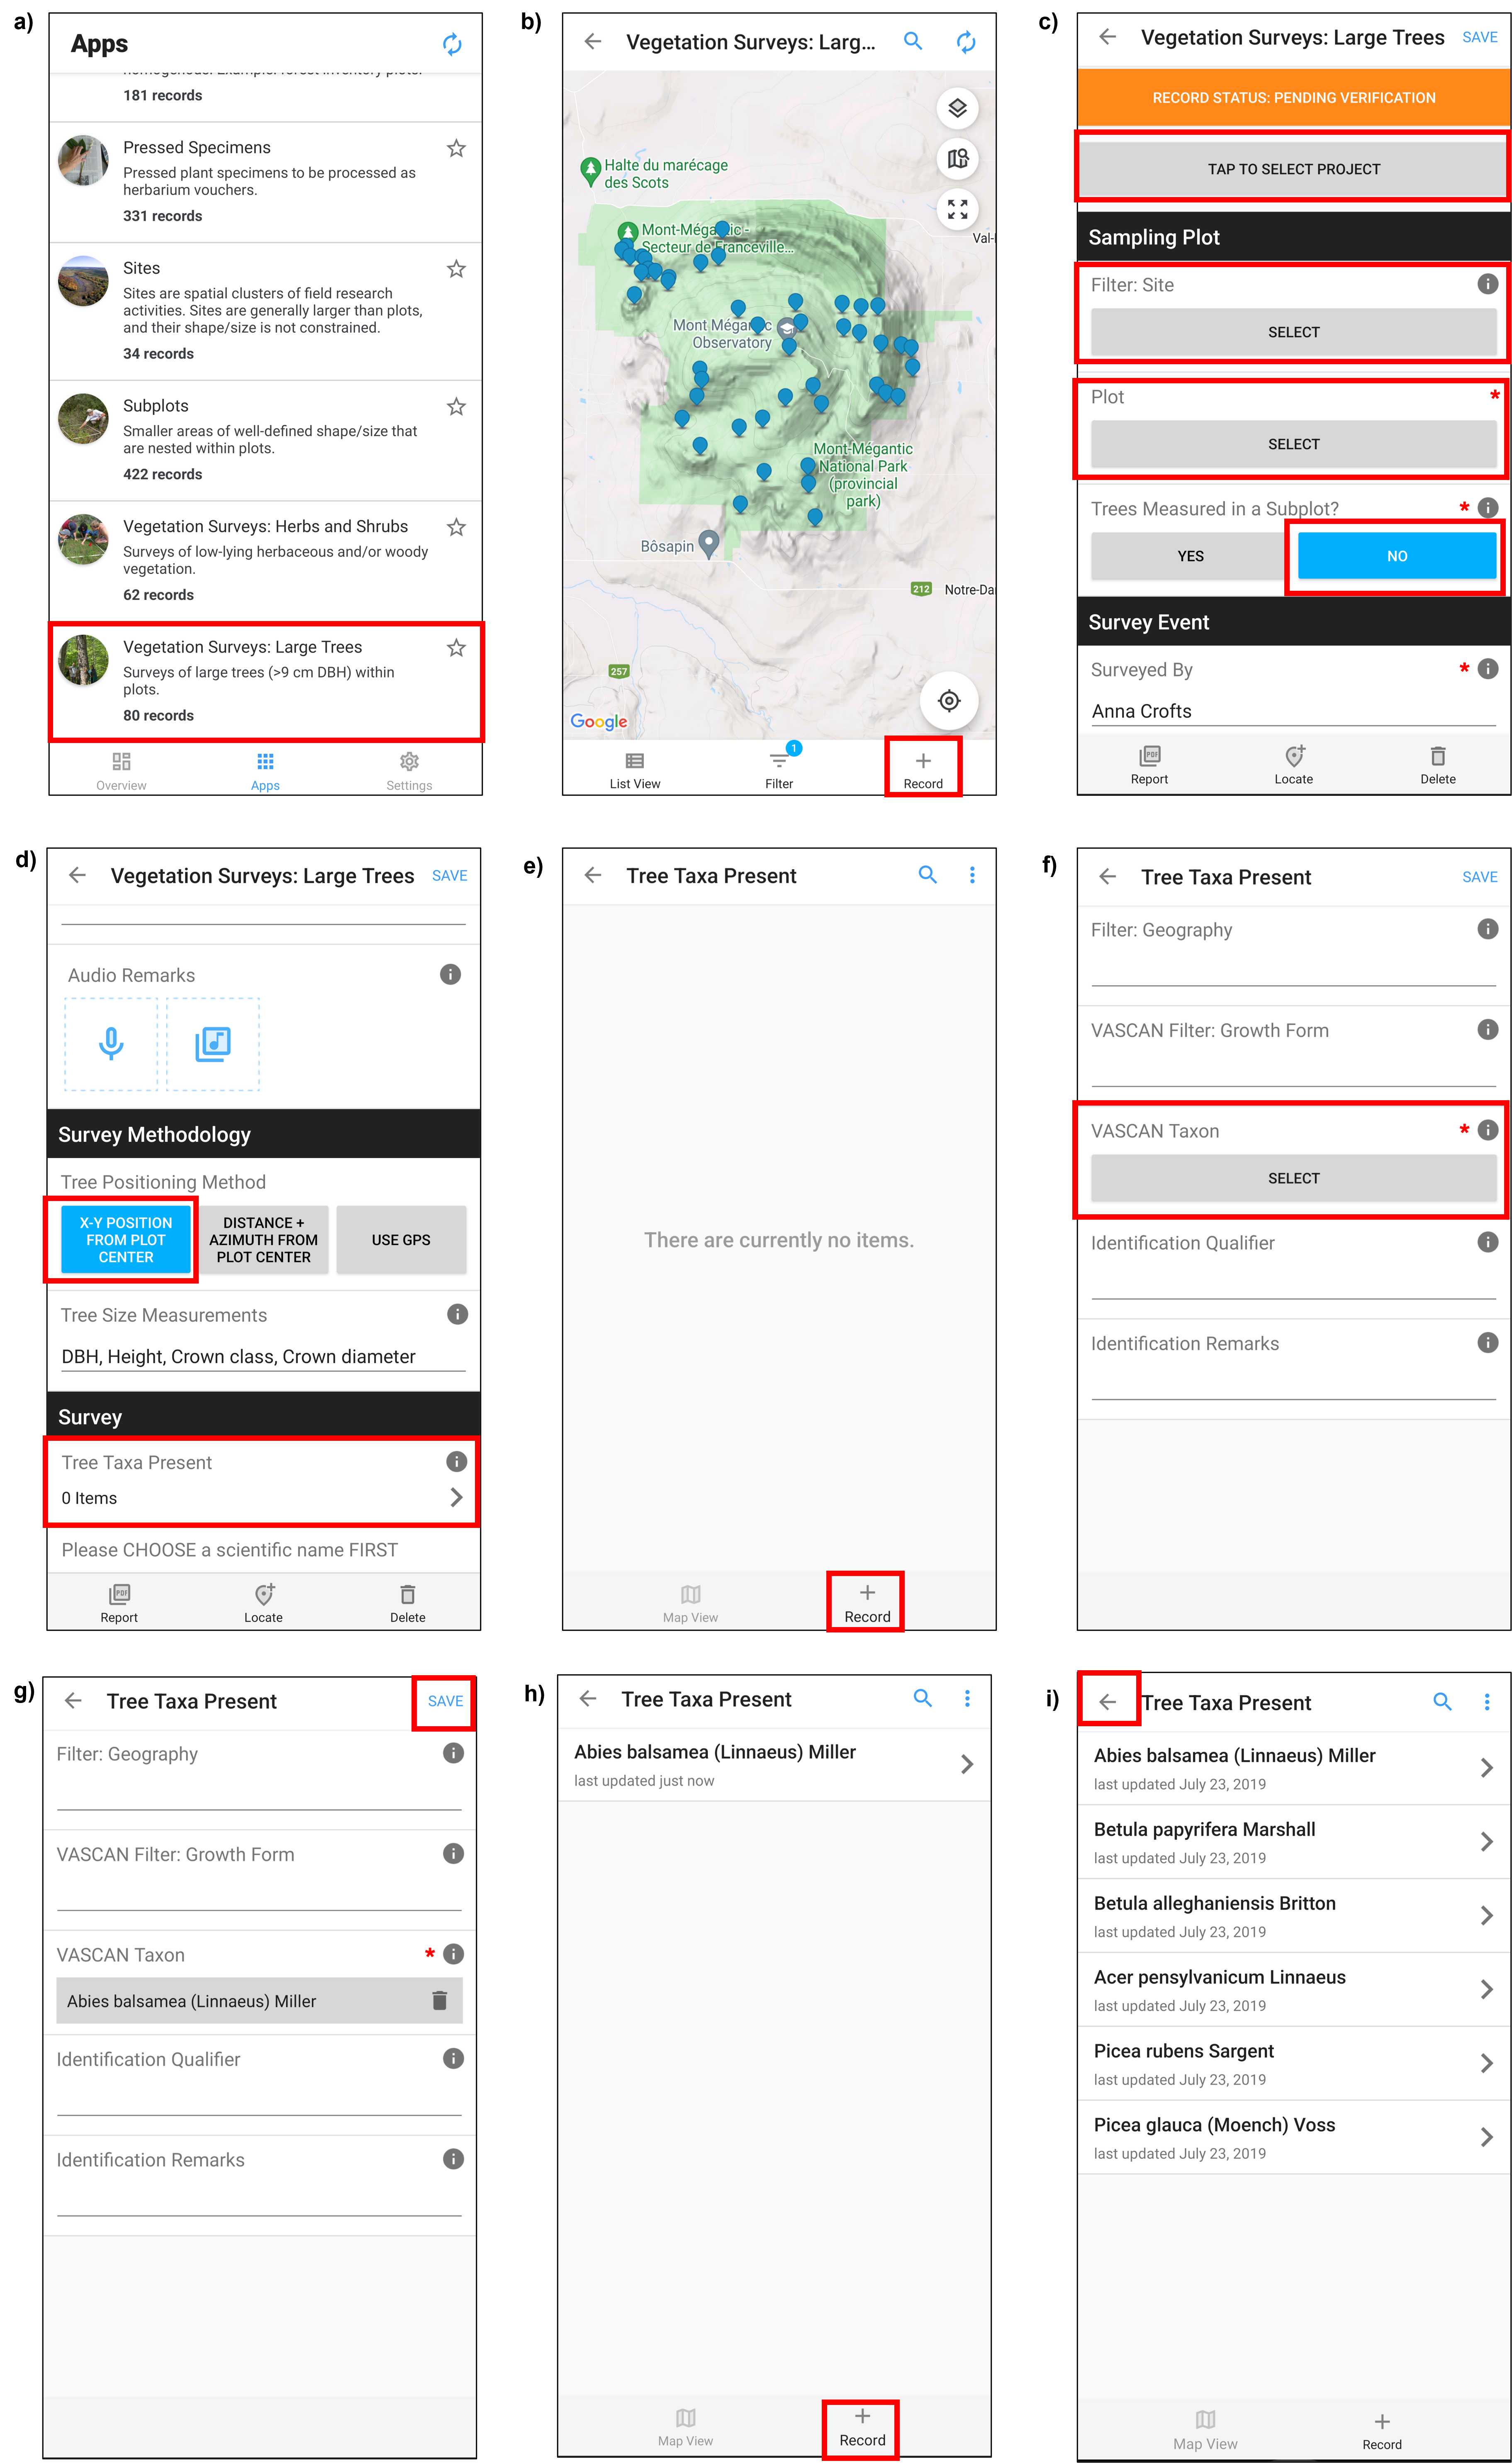
Figure 5. Screenshots from Fulcrum mobile application CABO account. To create a new record of a vegetation survey select the Vegetation Survey: Large Trees app from the home page (panel a) and then within the Vegetation Survey: Large Trees app select + Record (panel b). TAP TO SELECT PROJECT that you are working with, select the appropriate site within Filter: Site, select the Plot where you are conducting the vegetation survey, answer No to Trees measured in a subplot?, and record the names of who the plot will be Surveyed by (panel c). For Tree Positioning Method select X-Y POSITION FROM PLOT CENTER and for Tree Size Measurements select DBH, Height, Crown class, and Crown diameter (panel d). To list tree taxa present within the plot, select Tree Taxa Present (panel d) and then + Record (panel e). Then select VASCAN Taxon (panel f) and choose a species present within the plot from the drop-down list. Once a species is selected, select SAVE (panel g). If additional species are present in the plot, select + Record (panel h) and repeat previous steps pictured in panel f and g. Once all species present in the plot are listed in the Tree Taxa Present page return to the vegetation survey record by selecting the arrow (←)(panel h). Red boxes have been added to screenshots to illustrate selections. Note that Fulcrum can be used via a mobile app or desktop website and that the two are organized differently.
Set-up Postex System
Prior to surveying a plot, set-up the Postex system.
- Set-up the Postex system, center the tripod over the plot center, and create a new plot in the DP II handheld device (Fig. 6). Please see the Postex System User Guide for instructions detailing how to set-up and use the system.

Figure 6. Photo of the Postex System set-up and centered over plot center at a low elevation plot at Parc national du Mont Mégantic.
Divide the Plot into Sampling Sections
Prior to surveying a plot, divide the plot into sampling sections.
-
Given the large size of sampling plots (~706 m2), use visible strings ~16 m in length attached to ground spikes (Fig. 7a) to divide the plot into sampling sections - attach strings to plot center and extending to the plot edge.
-
The number of sampling sections is dependent on tree density and is up to the surveyors discretion1 (i.e., more dense stands, more sampling sections to ensure all individuals are sampled and only sampled once).
-
A minimum of three strings are needed - start by delineating two sampling sections and move the center string to delineate the next sampling section once the first two sections are surveyed and repeat until entire plot is surveyed (Fig. 7b).

Figure 7. a) Photo of visible string attached to ground spikes used to delineate sampling sections. b) A Schematic depicting sampling sections. Pink lines represent visible strings used to delineate sampling sections, the orange dot is the plot center, and the black arrow shows the movement of the center string when surveyors are ready to delineate next sampling section.
Conduct Vegetation Survey
Survey all individual trees within each plot1 that meet the following selection criteria:
- All individuals with crowns in the general canopy-level (i.e., all individuals with a crown class of Dominant, Co-dominant, or Intermediate; see Step 7.5 for crown class definitions)
- Individuals with crowns below the general canopy-level (i.e., individuals with a crown class of Suppressed) that have a DBH ≥ 9 cm.
- Standing dead trees that extend into the upper canopy-level (i.e., same height as the dominant crown class).
For every individual that meets the selection criteria, identify it to species (see Step 7.2), measure DBH and position it (see Step 7.3), measure height (see Step 7.4), assign a crown class (see Step 7.5), and measure crown area and orientation (see Step 7.6).
For each individual, create a record in Fulcrum.
- Create a record for an individual by selecting Surveyed Trees within the plot's Vegetation Survey record and then + Record (Fig. 8a,b) .
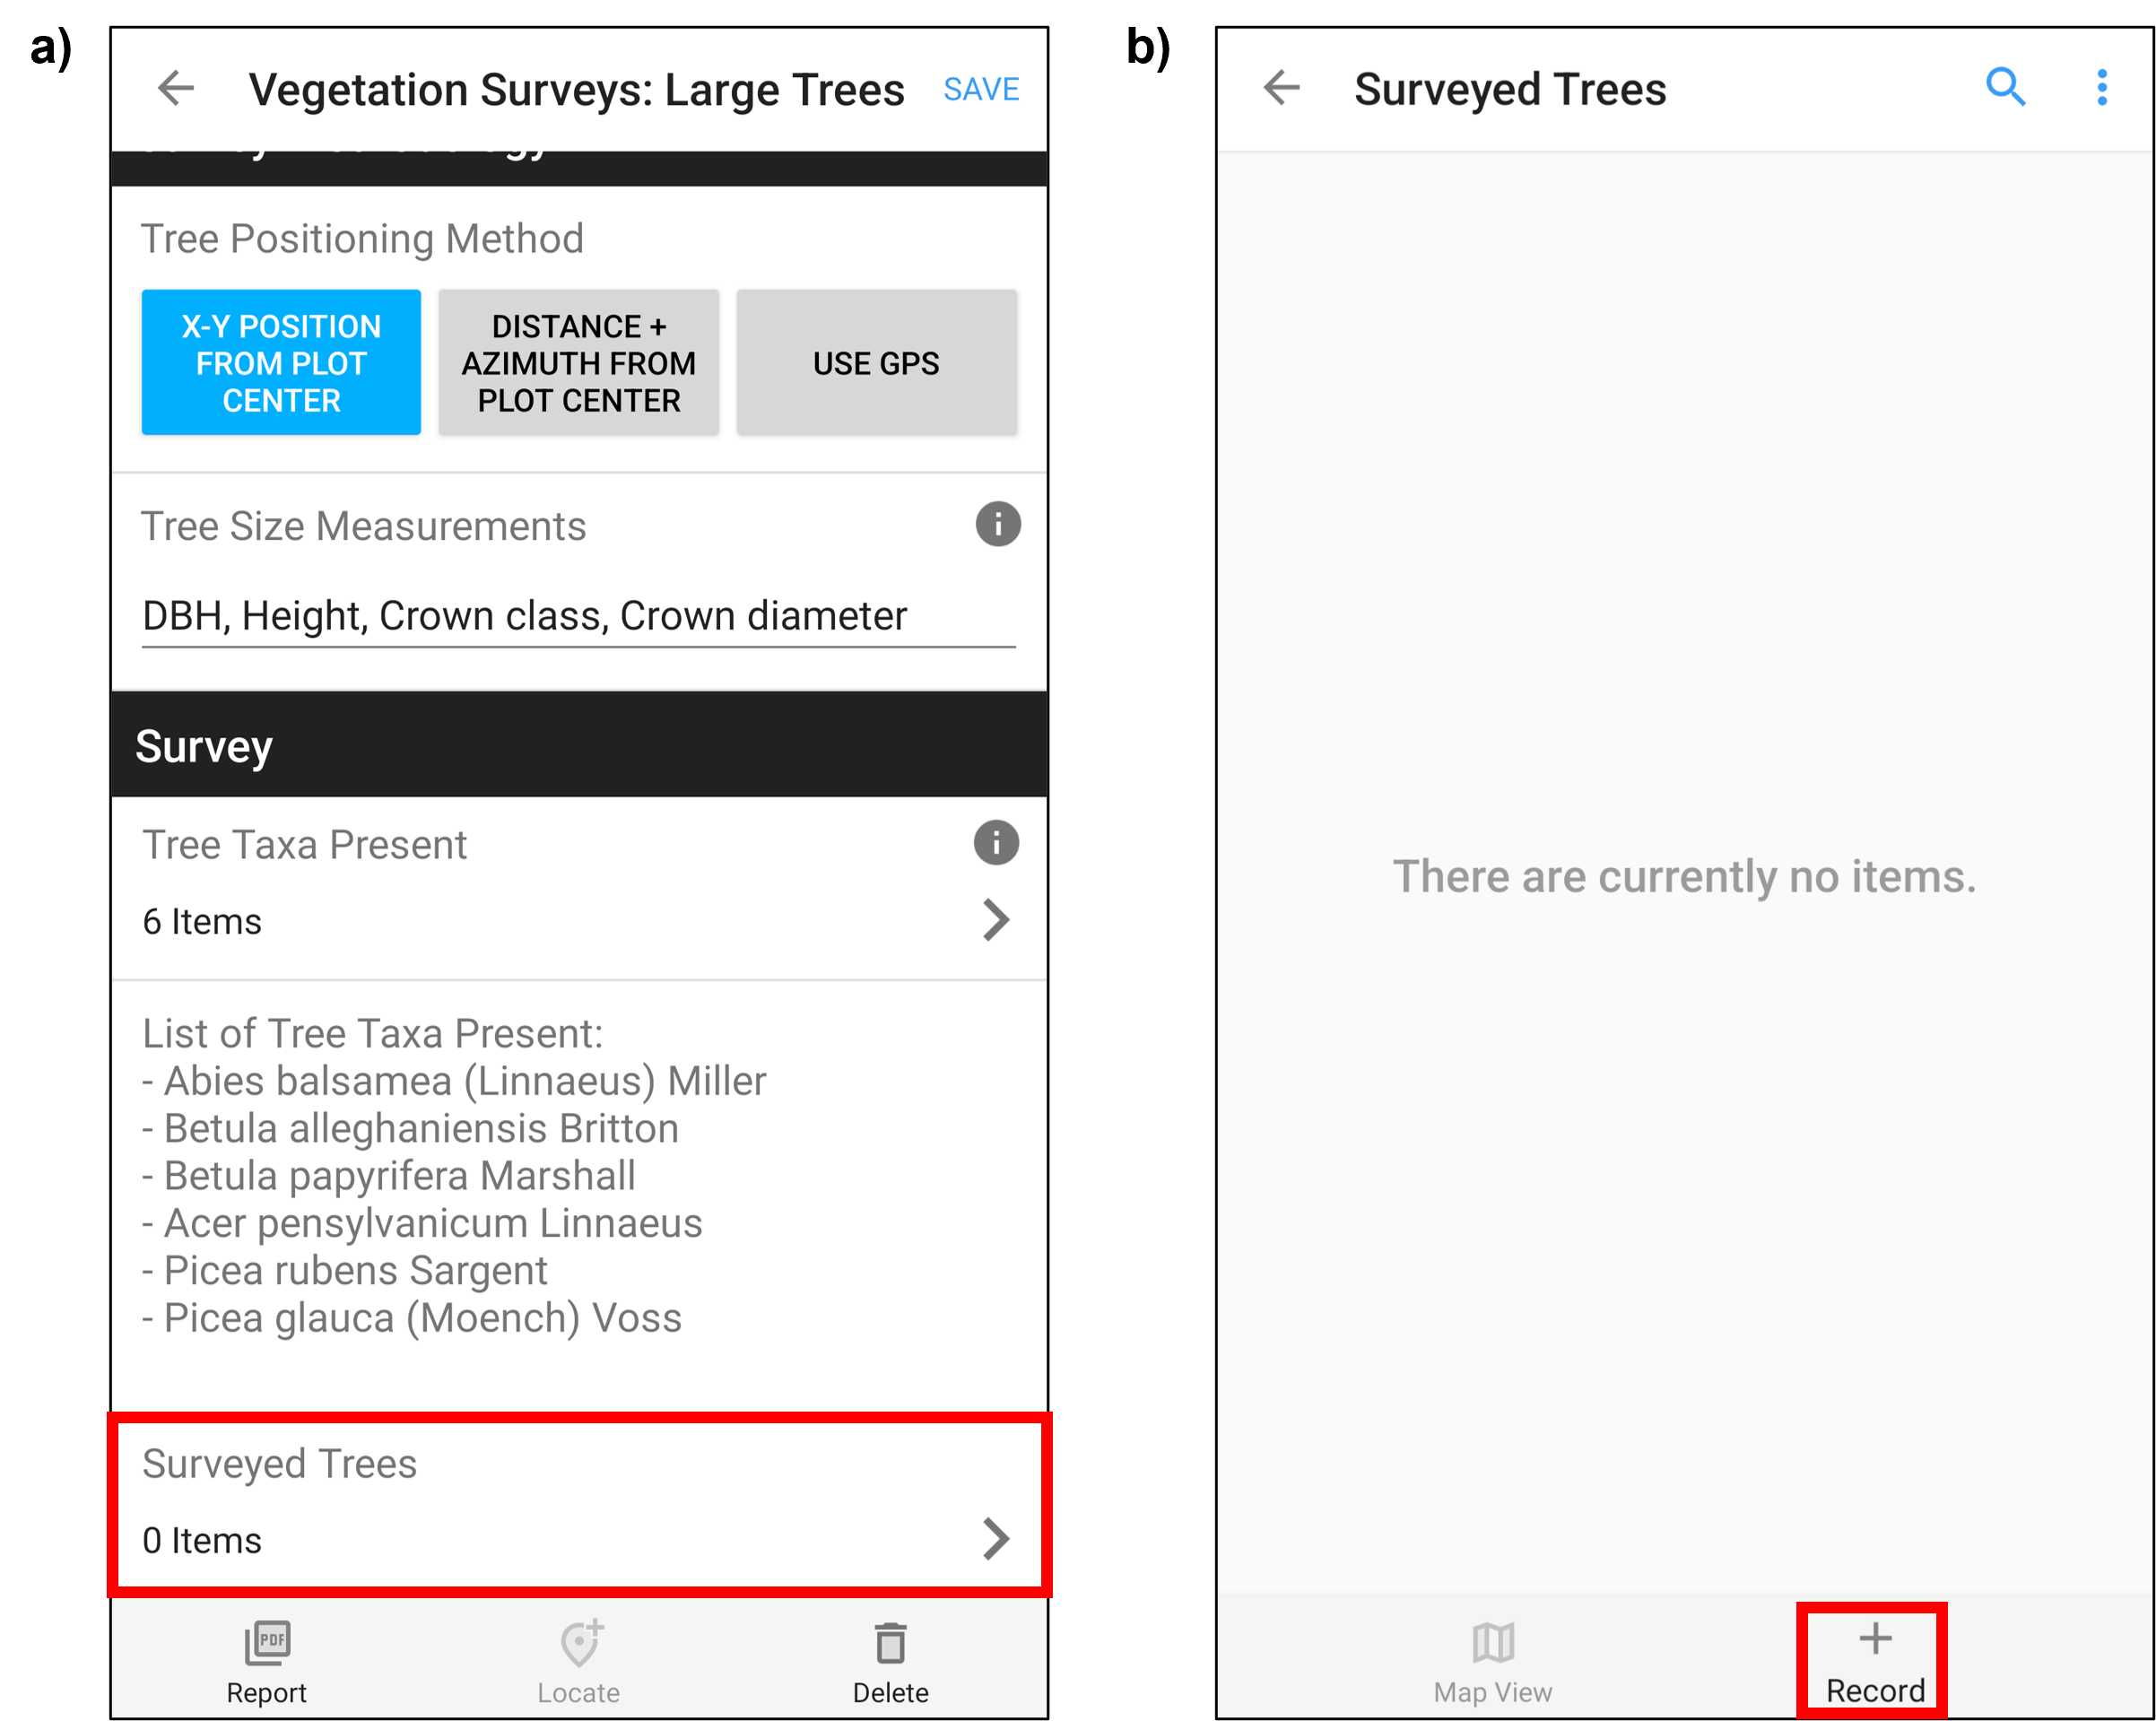
Figure 8. Screenshots from Fulcrum mobile application CABO account. Within the plot's Vegetation Survey record, select Surveyed Trees to create a record for an individual tree (panel a) and then + Record (panel b). Red boxes have been added to screenshots to illustrate selections. Note that Fulcrum can be used via a mobile app or desktop website and that the two are organized differently.
Identify the individual to species.
- Identify individuals to species and enter taxonomic identity within Tree Taxon 1 field in the individual's Surveyed Trees record in Fulcrum (Fig. 9) .
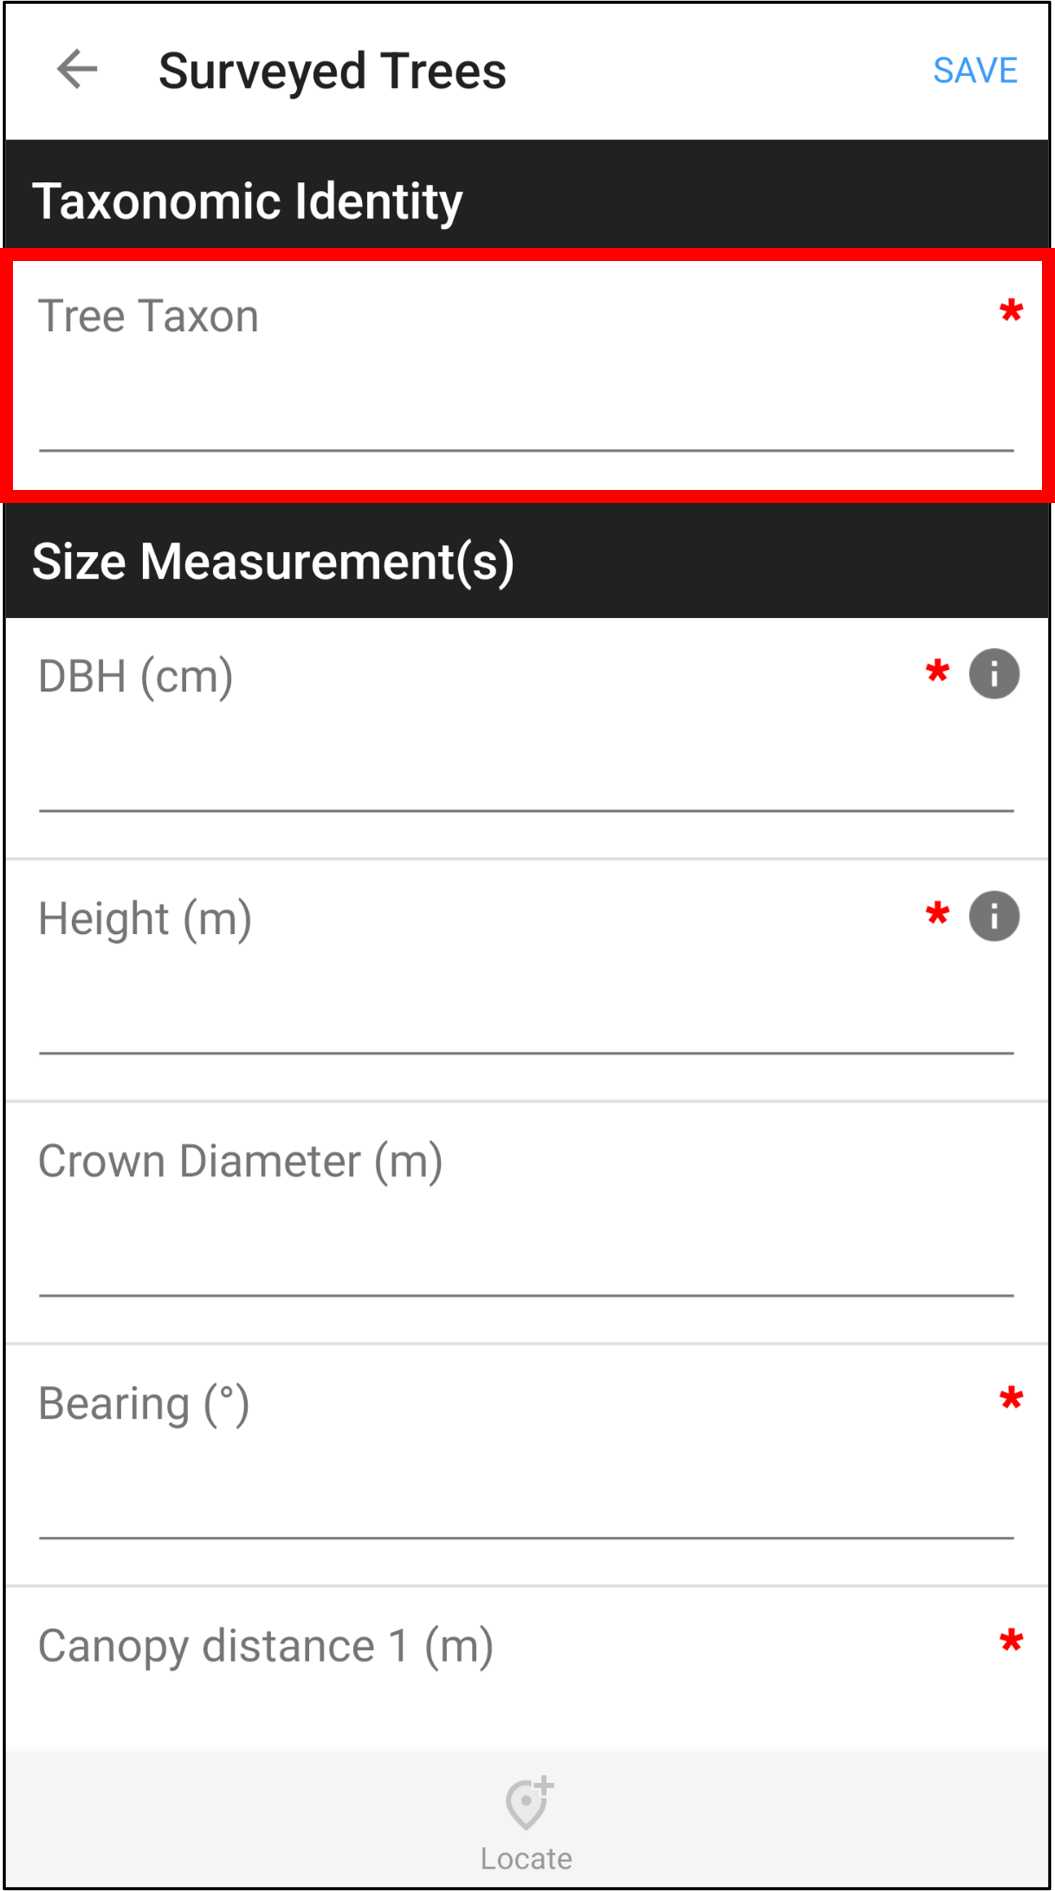
Figure 9. A Screenshot from Fulcrum mobile application CABO account. Within the individual's Surveyed Trees record, select Tree Taxon to enter individual's taxonomic identity. The red box has been added to screenshot to illustrate selection. Note that Fulcrum can be used via a mobile app or desktop website and that the two are organized differently.
Use Postex system to measure DBH and position individual (see Step 6 in Postex Sysem User Guide),
- Use the LaserGeo's ANGLE function to measure the angle between the individual at breast height (~1.3 m) and the center of the Postex tripod.
- Select Measure in the DP II handheld device and enter the ANGLE between the individual and the Postex tripod as measured with the LaserGeo.
- Spec will be highlighted in the DP II handheld device, enter a numeric species code (optional) and/or press Enter.
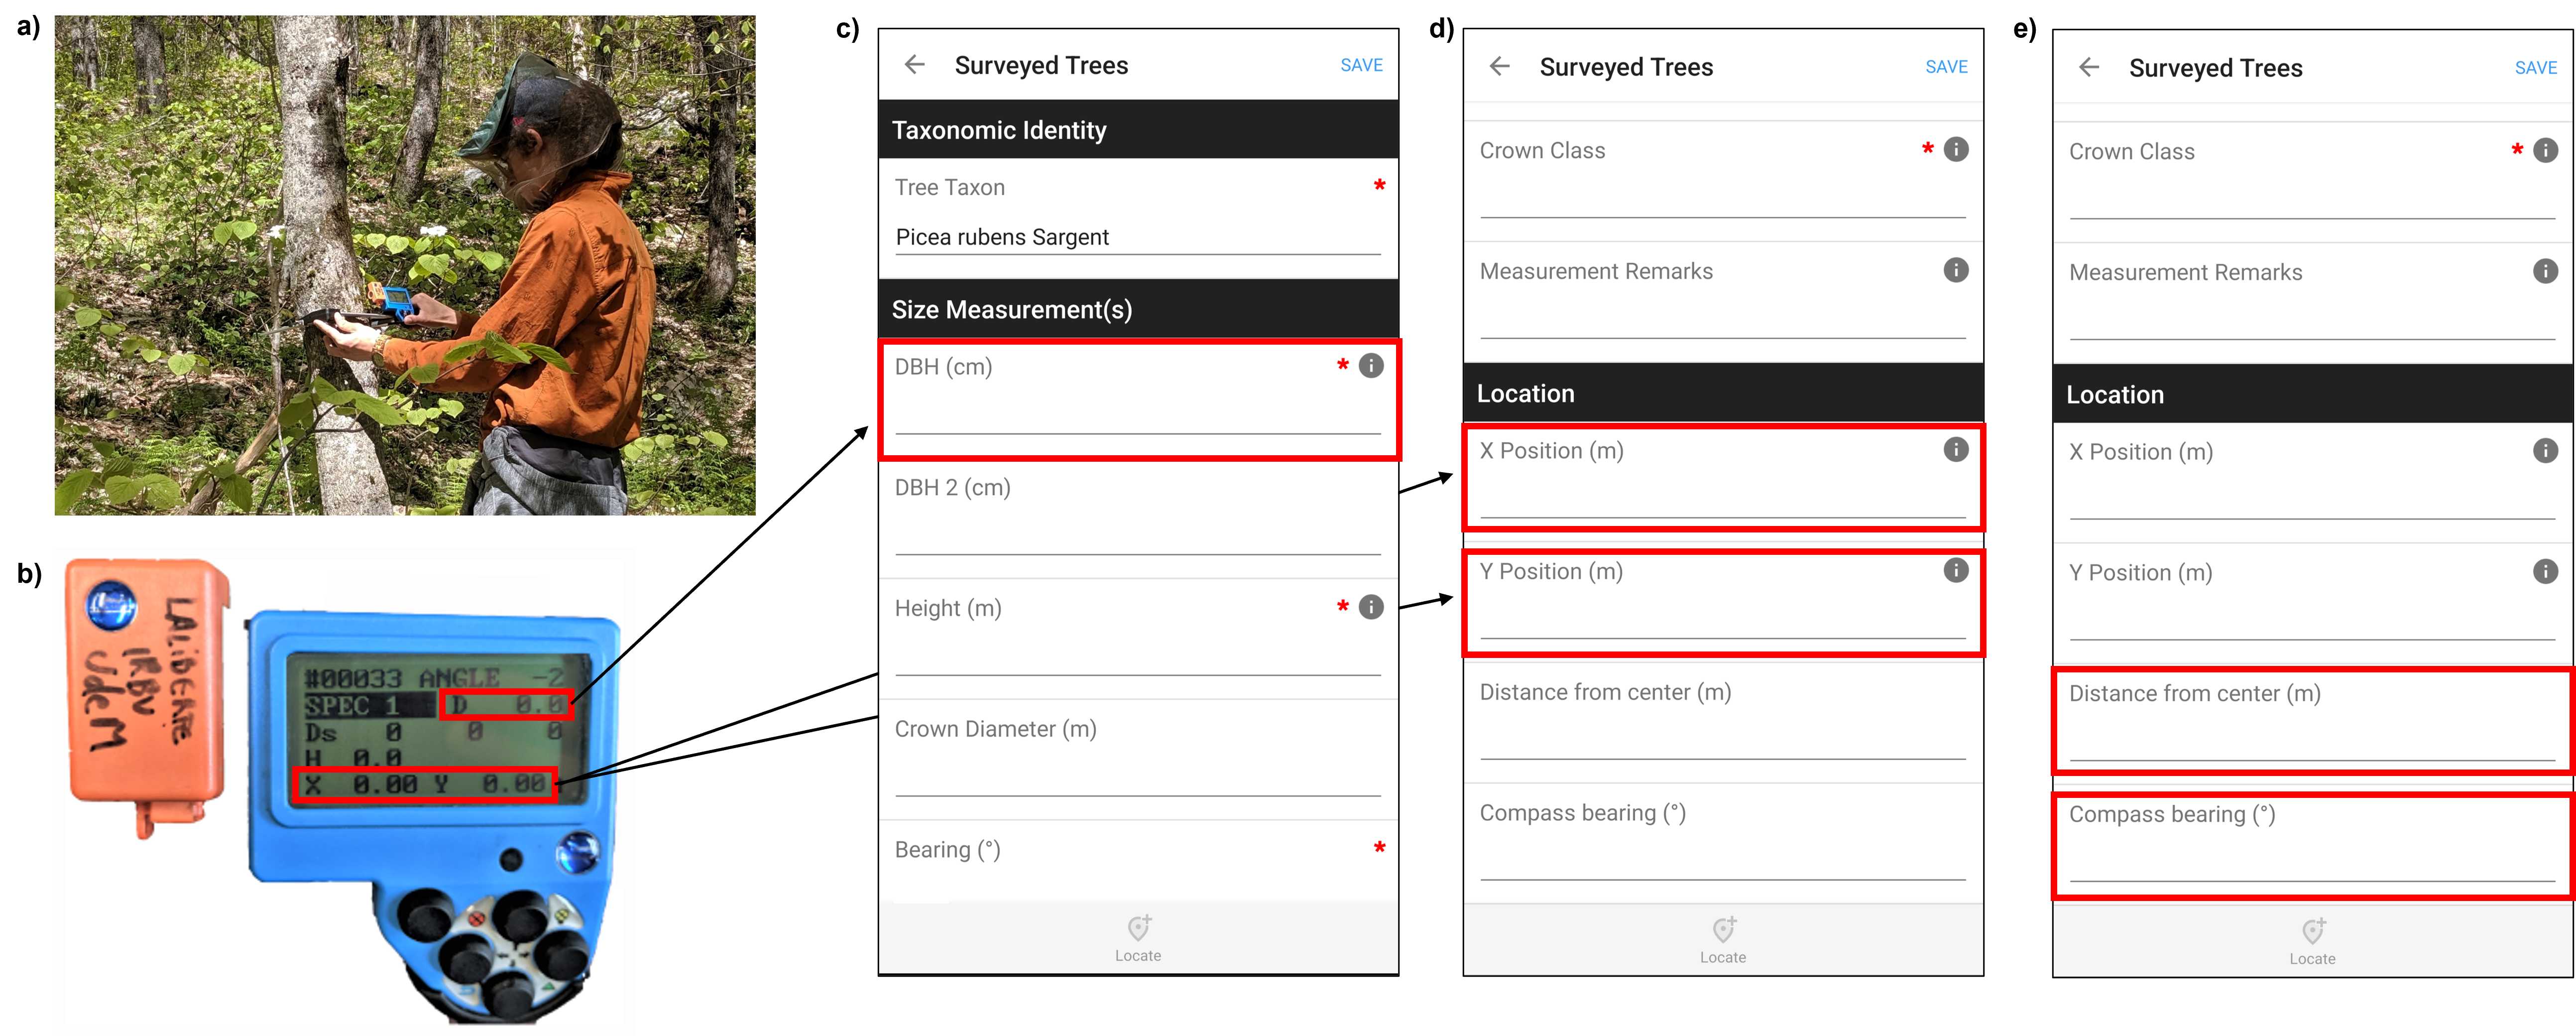
- D will be highlighted in the DP II handheld device, position the SmartScale caliper at breast height1,2,3 with the mounted DP DME oriented toward the plot center, and press Enter (Fig. 10a). The DBH will be measured and displayed (Fig. 10b); enter the value to DBH (cm) field in the individual's Surveyed Trees record in Fulcrum (Fig. 10c).
- Press enter in the DP II handheld device to position the individual and display the X-Y coordinates (Fig. 10b). Record the X-Y positions in the X Position (m) and the Y Position (m) fields in the individual's Surveyed Trees record in Fulcrum (Fig. 10d) .
- If you are unable to obtain a position using the Postex system4, use the LaserGeo's DME and COMPASS functions to measure the distance between the individual's trunk at breast height to the plot center and the compass bearing, respectively. Take distance and compass bearing measurements directly against individual's trunk at breast height (i.e., from the same position that the Postex DP DME would). Enter the distance and compass bearing to Distance from center (m) and Compass bearing (°) fields in the individual's Surveyed Trees record in Fulcrum (Fig. 10e) .
Use LaserGeo to measure individual's height.
-
To account for uneven ground, use the LaserGeo's HEIGHT 3P function that quantifies the height by measuring: 1) Distance to the individual's trunk at eye-level,
2) Angle to the base of the trunk, and 3) Angle to the tip of the individual's crown<sup>1,2,3</sup>(Fig 11a), -
Enter the height to Height (m) field in the individual's Surveyed Trees record in Fulcrum (Fig 11b).
-
Optional - Enter height into DP II handheld device ( H will be highlighted after measuring the individual's position) and/or press Enter. The device will beep and advance to the next individual, bringing you back to the ANGLE step.
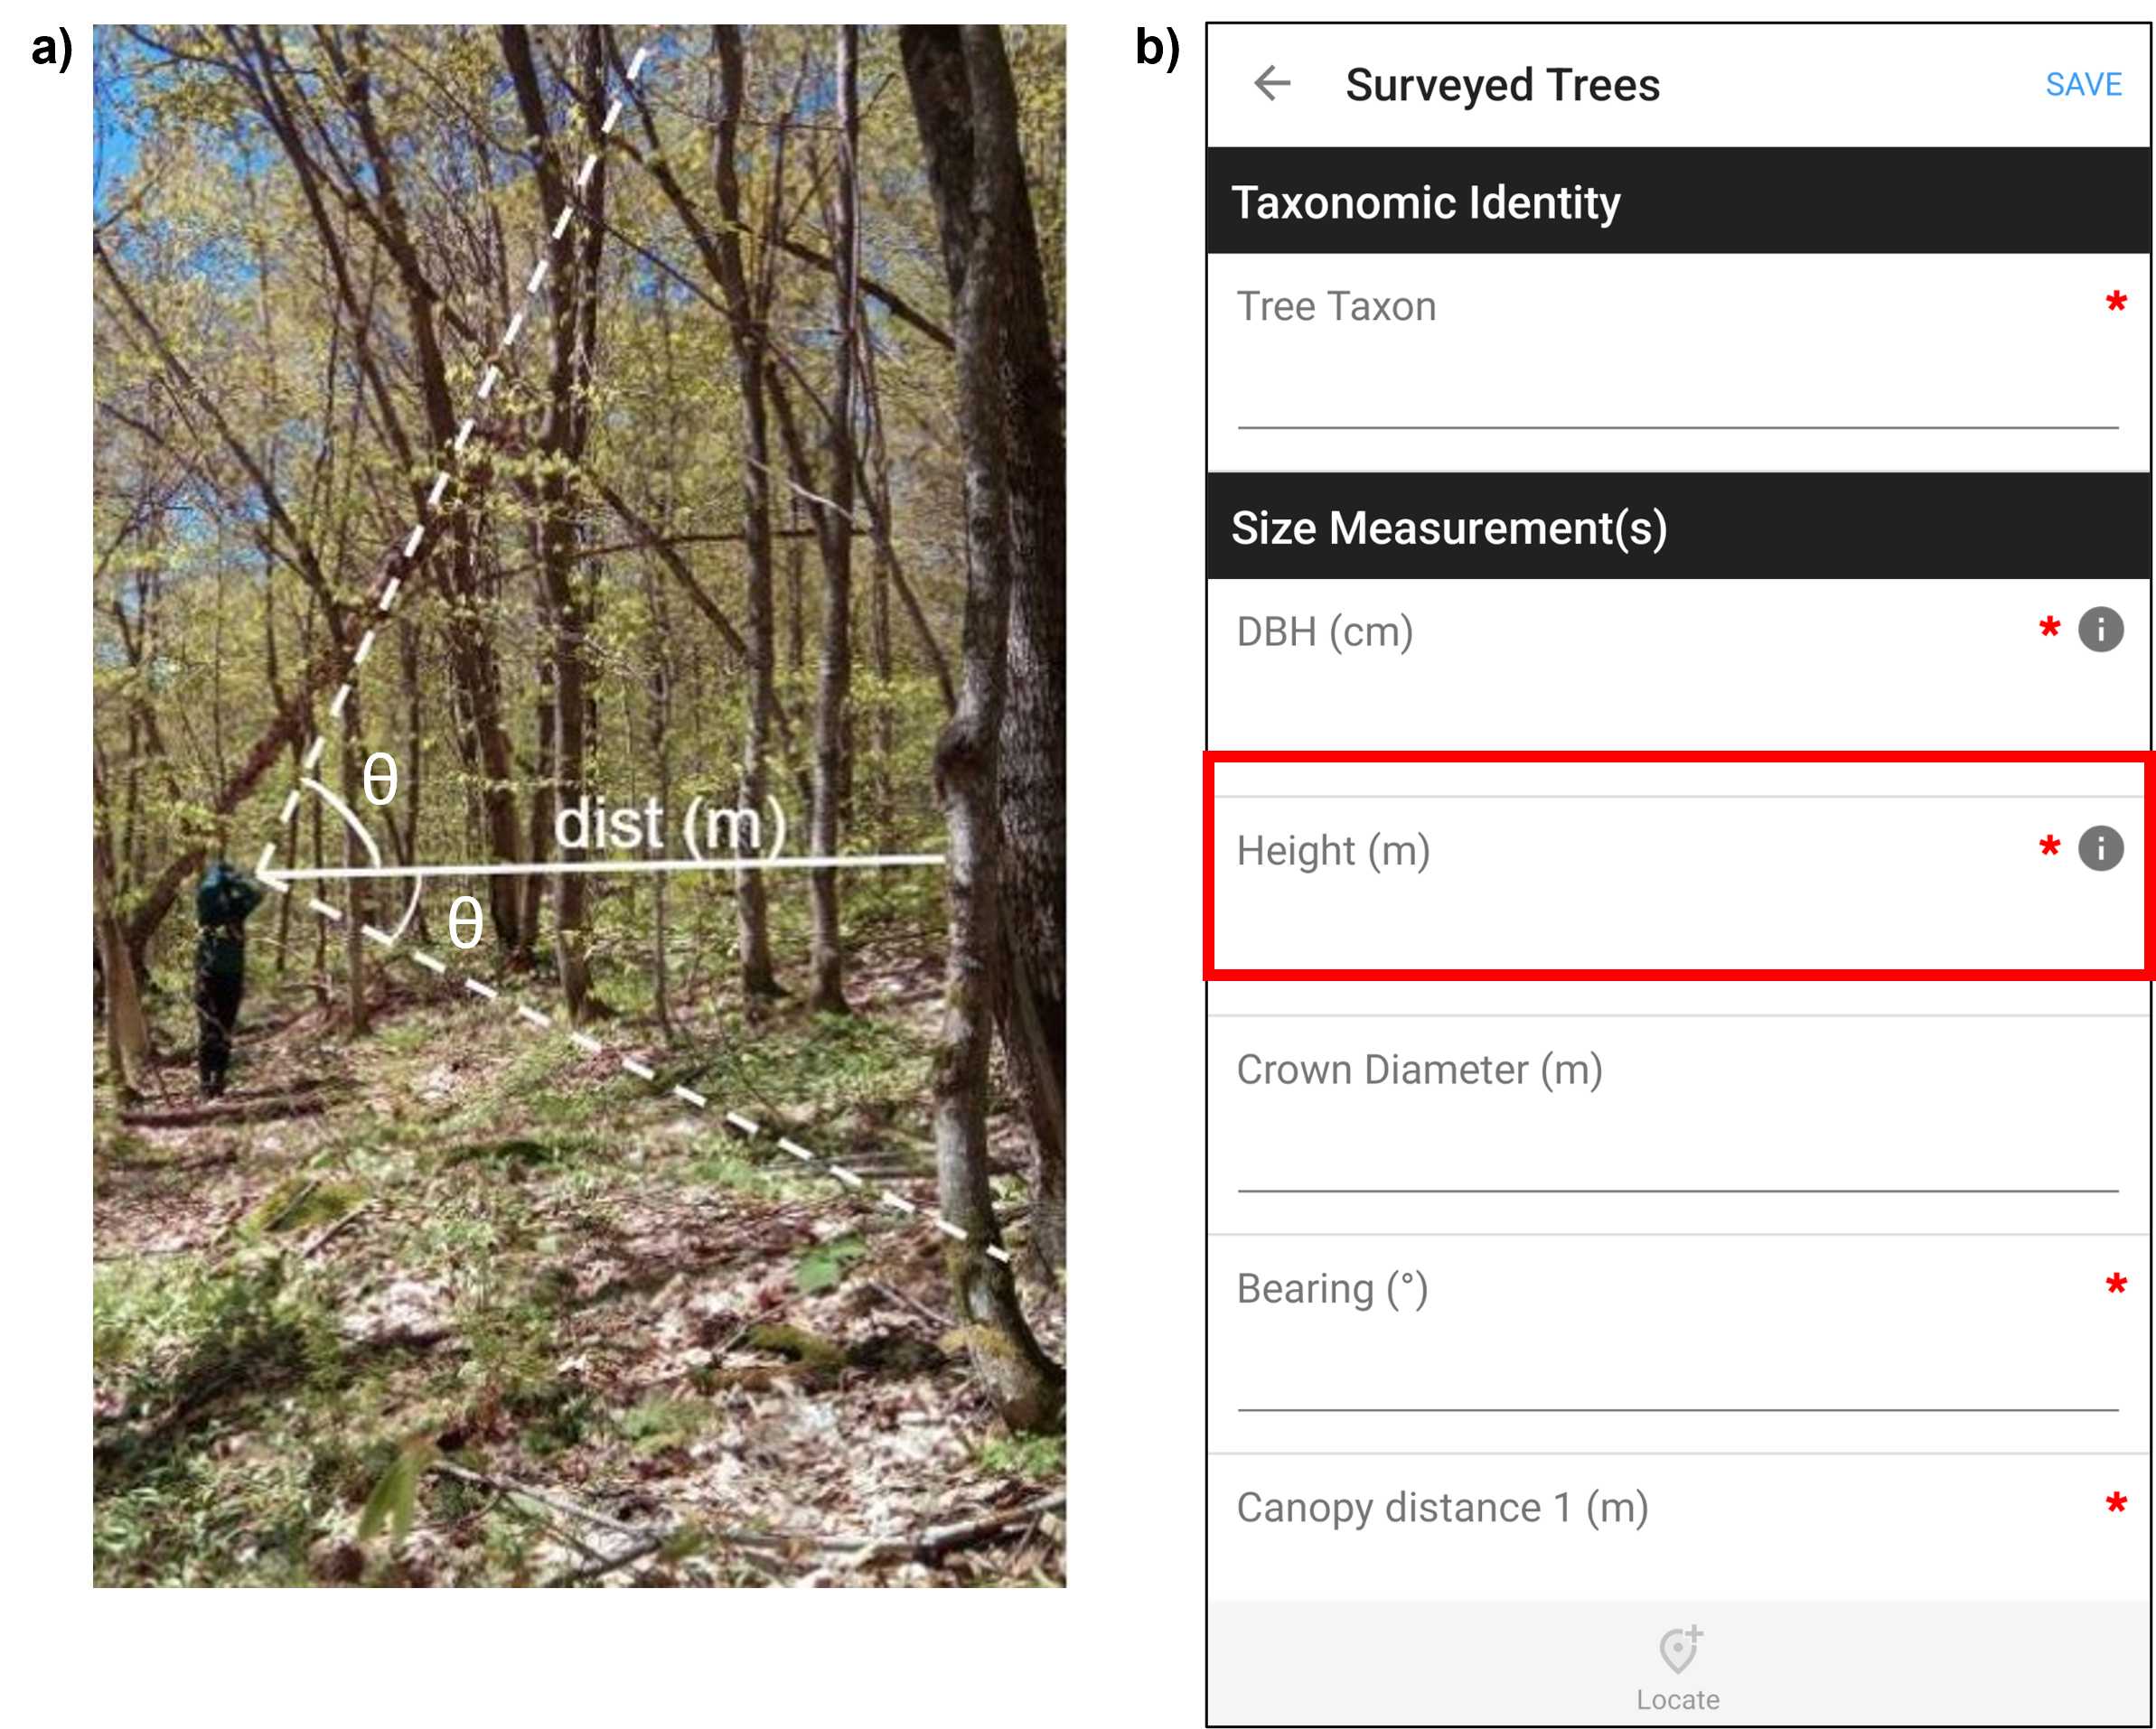
Figure 11. a) An anotated photo of a surveyor using the LaserGeo to measure the heigh of individual trees, by quantifying the distance to the individual at eye-level, the angle to the base of the trunk, and the angle to the top of the individual. b) A screenshot from Fulcrum mobile application CABO account. Enter the height into the Height (m) field in the individual's Surveyed Trees record in Fulcrum (panel b). The red box has been added to screenshot to illustrate selections. Note that Fulcrum can be used via a mobile app or desktop website and that the two are organized differently.
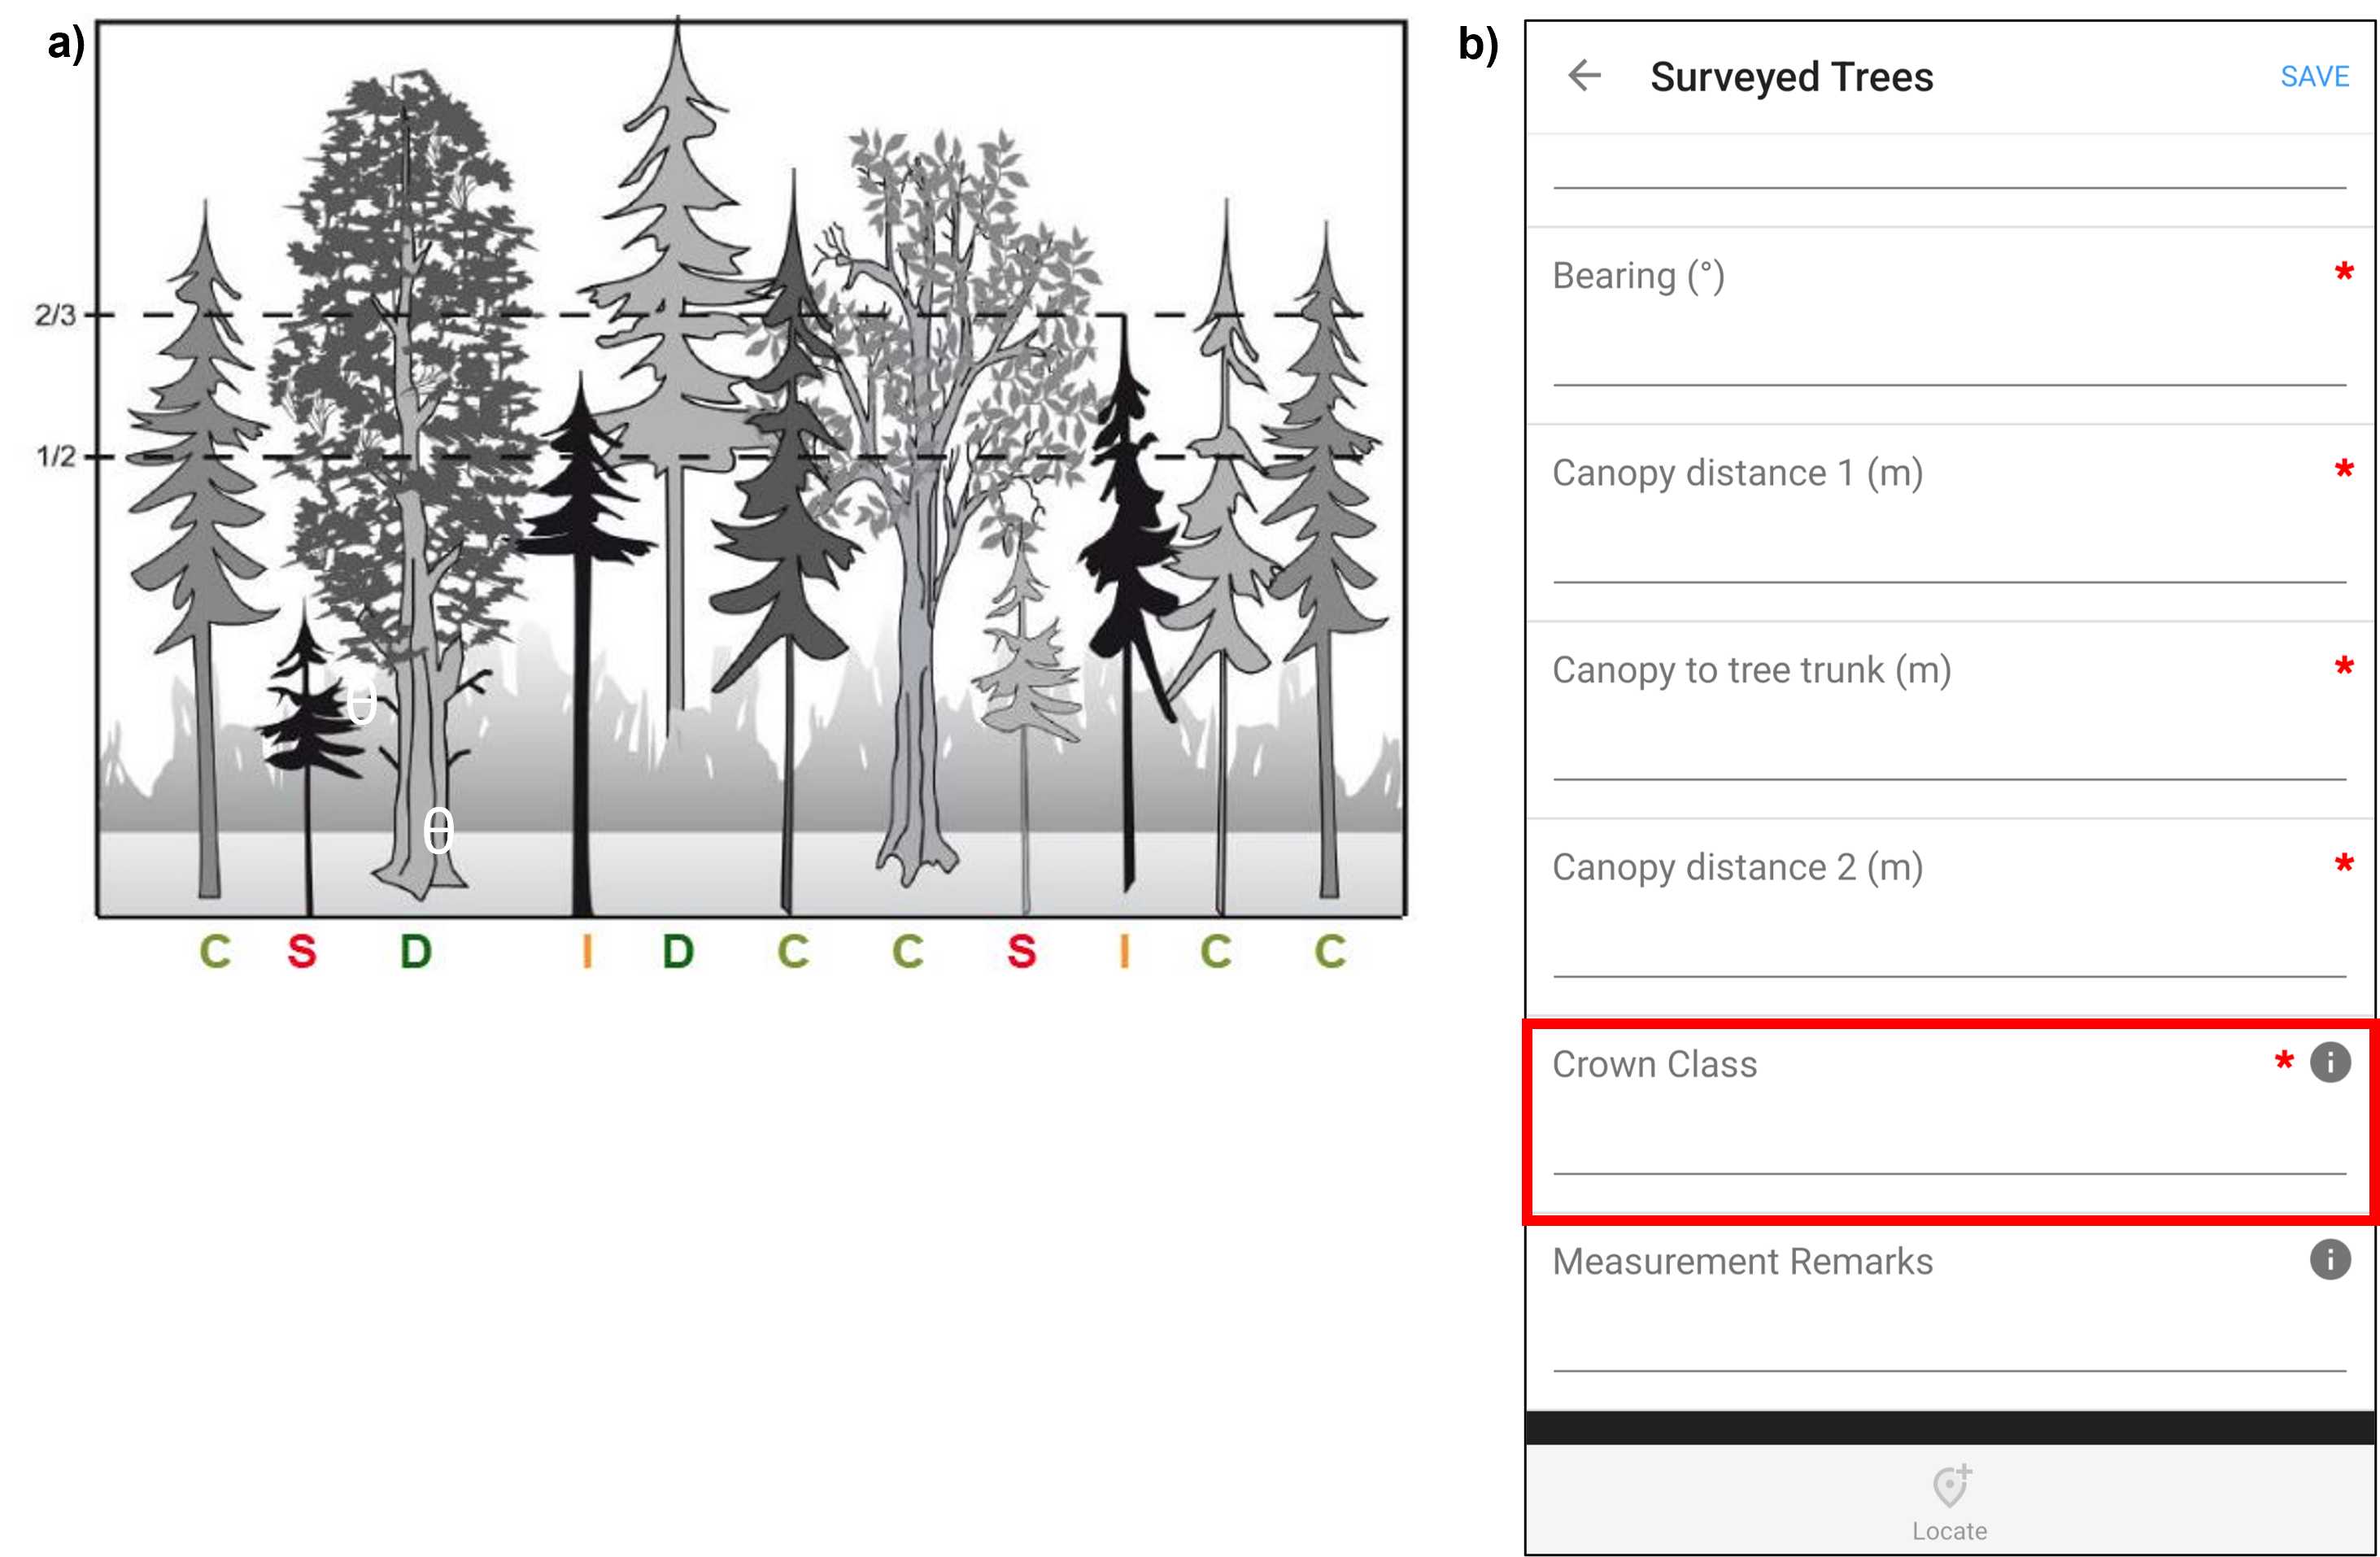
Assign individual to a crown class, a categorical variable that describes the vertical position and dominance of individual crowns
- Determine crown class of an individual, by comparing it to trees in its immediate proximity1(Table 1, Fig. 12a).
- Enter the crown class to Crown Class field in the individual's Surveyed Trees record in Fulcrum (Fig 12b).
| A | B |
|---|---|
| Dominant | Individuals with crowns extending above those of surrounding trees. Crowns are well developed and experience full sun from above and partially from the sides. |
| Co-dominant | Individuals with crowns at the general level of surrounding trees. Crowns are not distinct from surrounding trees, receiving full sun from above but not the sides. |
| Intermediate | Individuals with crowns below those of surrounding trees, where individuals are approx. 2/3 the height of surrounding trees. Crowns are not well-developed and receive little-to-no direct light. |
| Suppressed | Individuals with crowns below those of surrounding trees, where indivduals are less than 1/2 the height of surrounding trees. Canopies are not well developed and receive little-to-no direct light. |
Table 1. Crown class definitions as modified from Canada's national forest inventory ground sampling guidelines (NRCan, 2008).
Use LaserGeo to measure crown dimensions and orientation.
-
Take the compass bearing and measure the length of the longest crown dimensions using the LaserGeo's DME and COMPASS functions (Fig. 13a) and enter the measurements in Bearing (°) and Canopy distance 1 (m) fields, respectively, in the individual's Surveyed Trees Fulcrum record (Fig. 13c).
-
Measure the distance from crown's edge to the individual's trunk using the LaserGeo's DME function, from the crown edge in which the compass bearing was quantified (Fig. 13a) and enter the distance in the Canopy to tree trunk (m) field in the individual's Surveyed Trees Fulcrum record (Fig. 13c).
-
If the individual is angled to the extent that the trunk at the DBH is not under the crown (Fig. 13b), then measurements are taken as described above but enter the distance from the crown's edge to the individual's trunk as a negative number in the Canopy to tree trunk (m) field in the individual's Surveyed Trees Fulcrum record (Fig. 13c).
-
Measure the length of the crown perpendicular to the longest canopy dimension1 using the LaserGeo's DME function (Fig. 13a) and enter the length in Canopy distance 2 (m) field in the individual's Surveyed Trees Fulcrum record (Fig. 13b).
-
If the individual is a standing dead tree that extends into the upper canopy (i.e., similar height of dominant crown class), there will be no canopy to measure but write Dead in the Measurement Remarks field in the individual's Surveyed Trees Fulcrum record (Fig. 13b).
-
Once all measurements are complete, select SAVE 2 (Fig. 13b). This will return you to the plot's Vegetation Survey Fulcrum record.
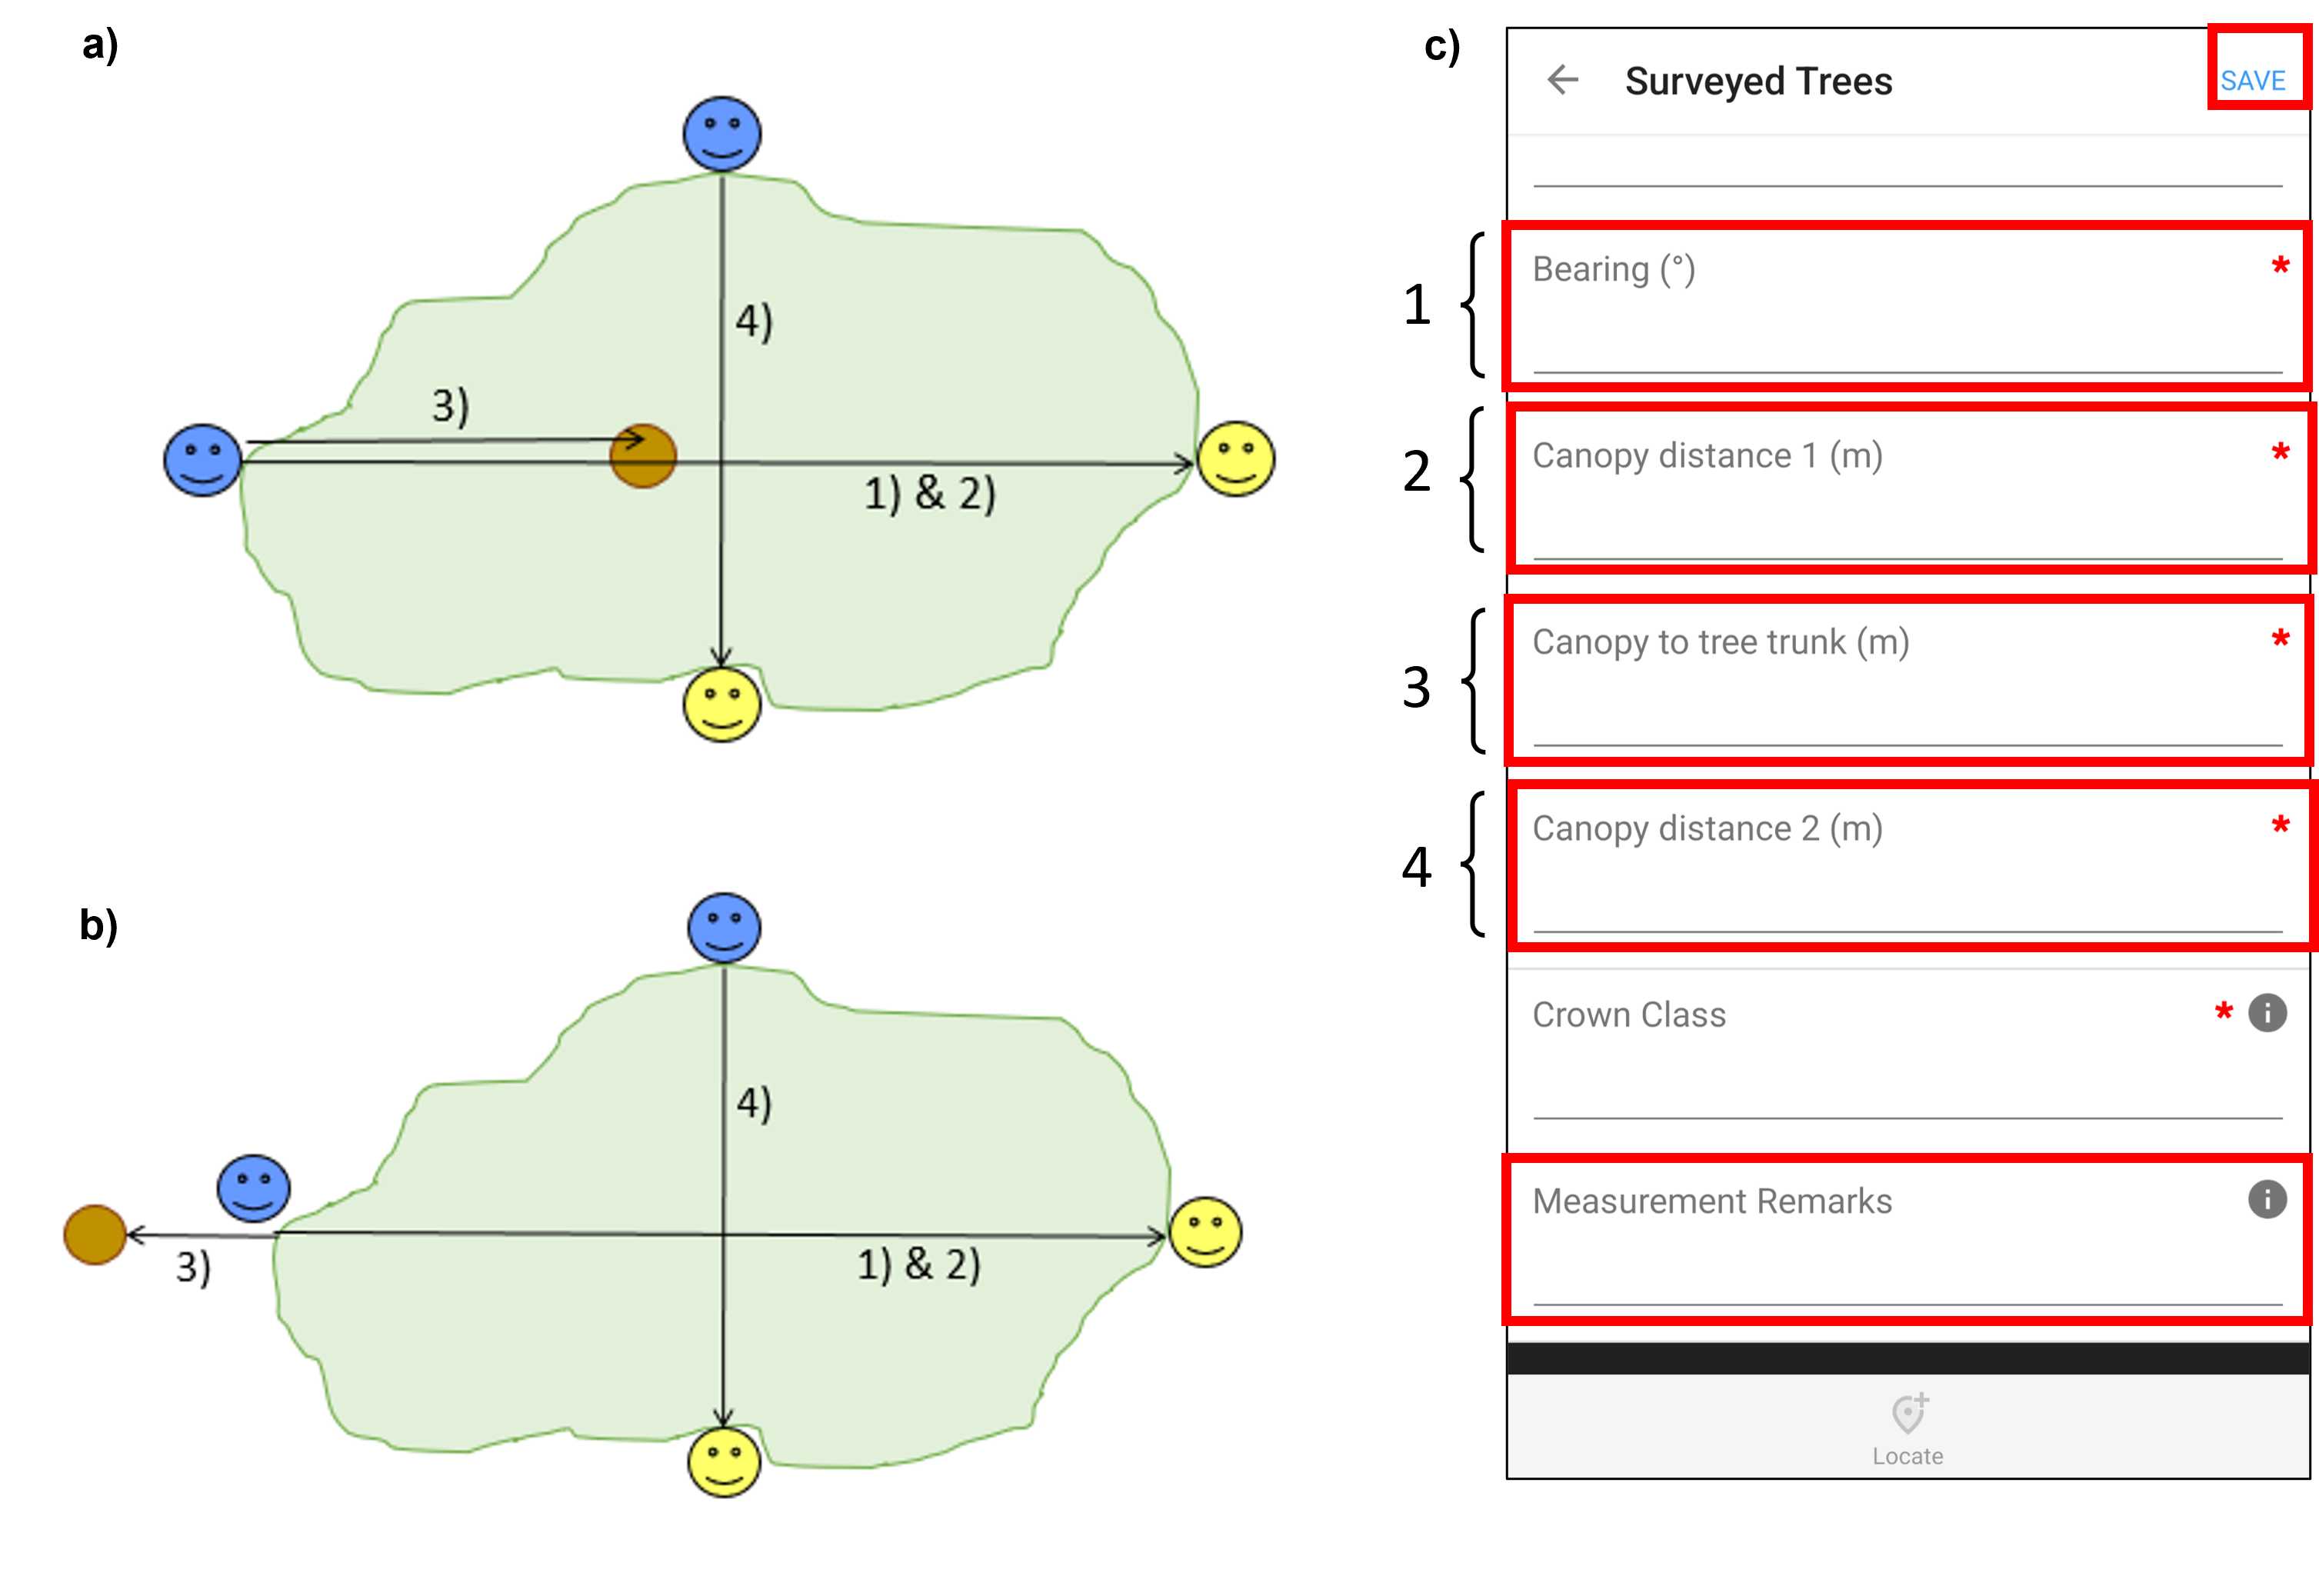
Figure 13. a) A schematic illustrating crown dimension and orientation measurements, where the brown circle is the individual's trunk, the green ellipse is the individual's crown, the smiley emojis are the surveyors, and the numbered arrows are the measurements required. b) A schematic illustrating crown dimension and orientation measurements when an individual is angled to the extent that the crown is no longer about the trunk at DBH, where the brown circle is the individual's trunk, the green ellipse is the individual's crown, the smiley emojis are the surveyors, and the numbered arrows are the measurements required. c) A screenshot from Fulcrum mobile application CABO account. Enter the Bearing (°), Canopy distance 1 (m), and Canopy to tree trunk (m) fields from measurements oriented along the longest crown dimension and the Canopy distance 2 (m) from measurement oriented perpendicular to the longest crown dimension fields in the individual's Surveyed Trees record in Fulcrum. Note that if the individual is angled as in panel b, enter the Canopy to tree trunk (m) as a negative number. If the individual is standing dead, leave the crown dimension and orientation measurement fields blank and write Dead in the Measurement Remarks field. Once all measurements are complete SAVE the individual's Surveyed Trees record in Fulcrum. The red box has been added to screenshot to illustrate selections. Note that Fulcrum can be used via a mobile app or desktop website and that the two are organized differently.
Repeat Steps 7.1 to 7.6 until every individual in the plot that meets the sampling criteria has been sampled, surveying individuals sampling section by sampling section (see Step 6). Then save the plot's Fulcrum Vegetation Survey record.
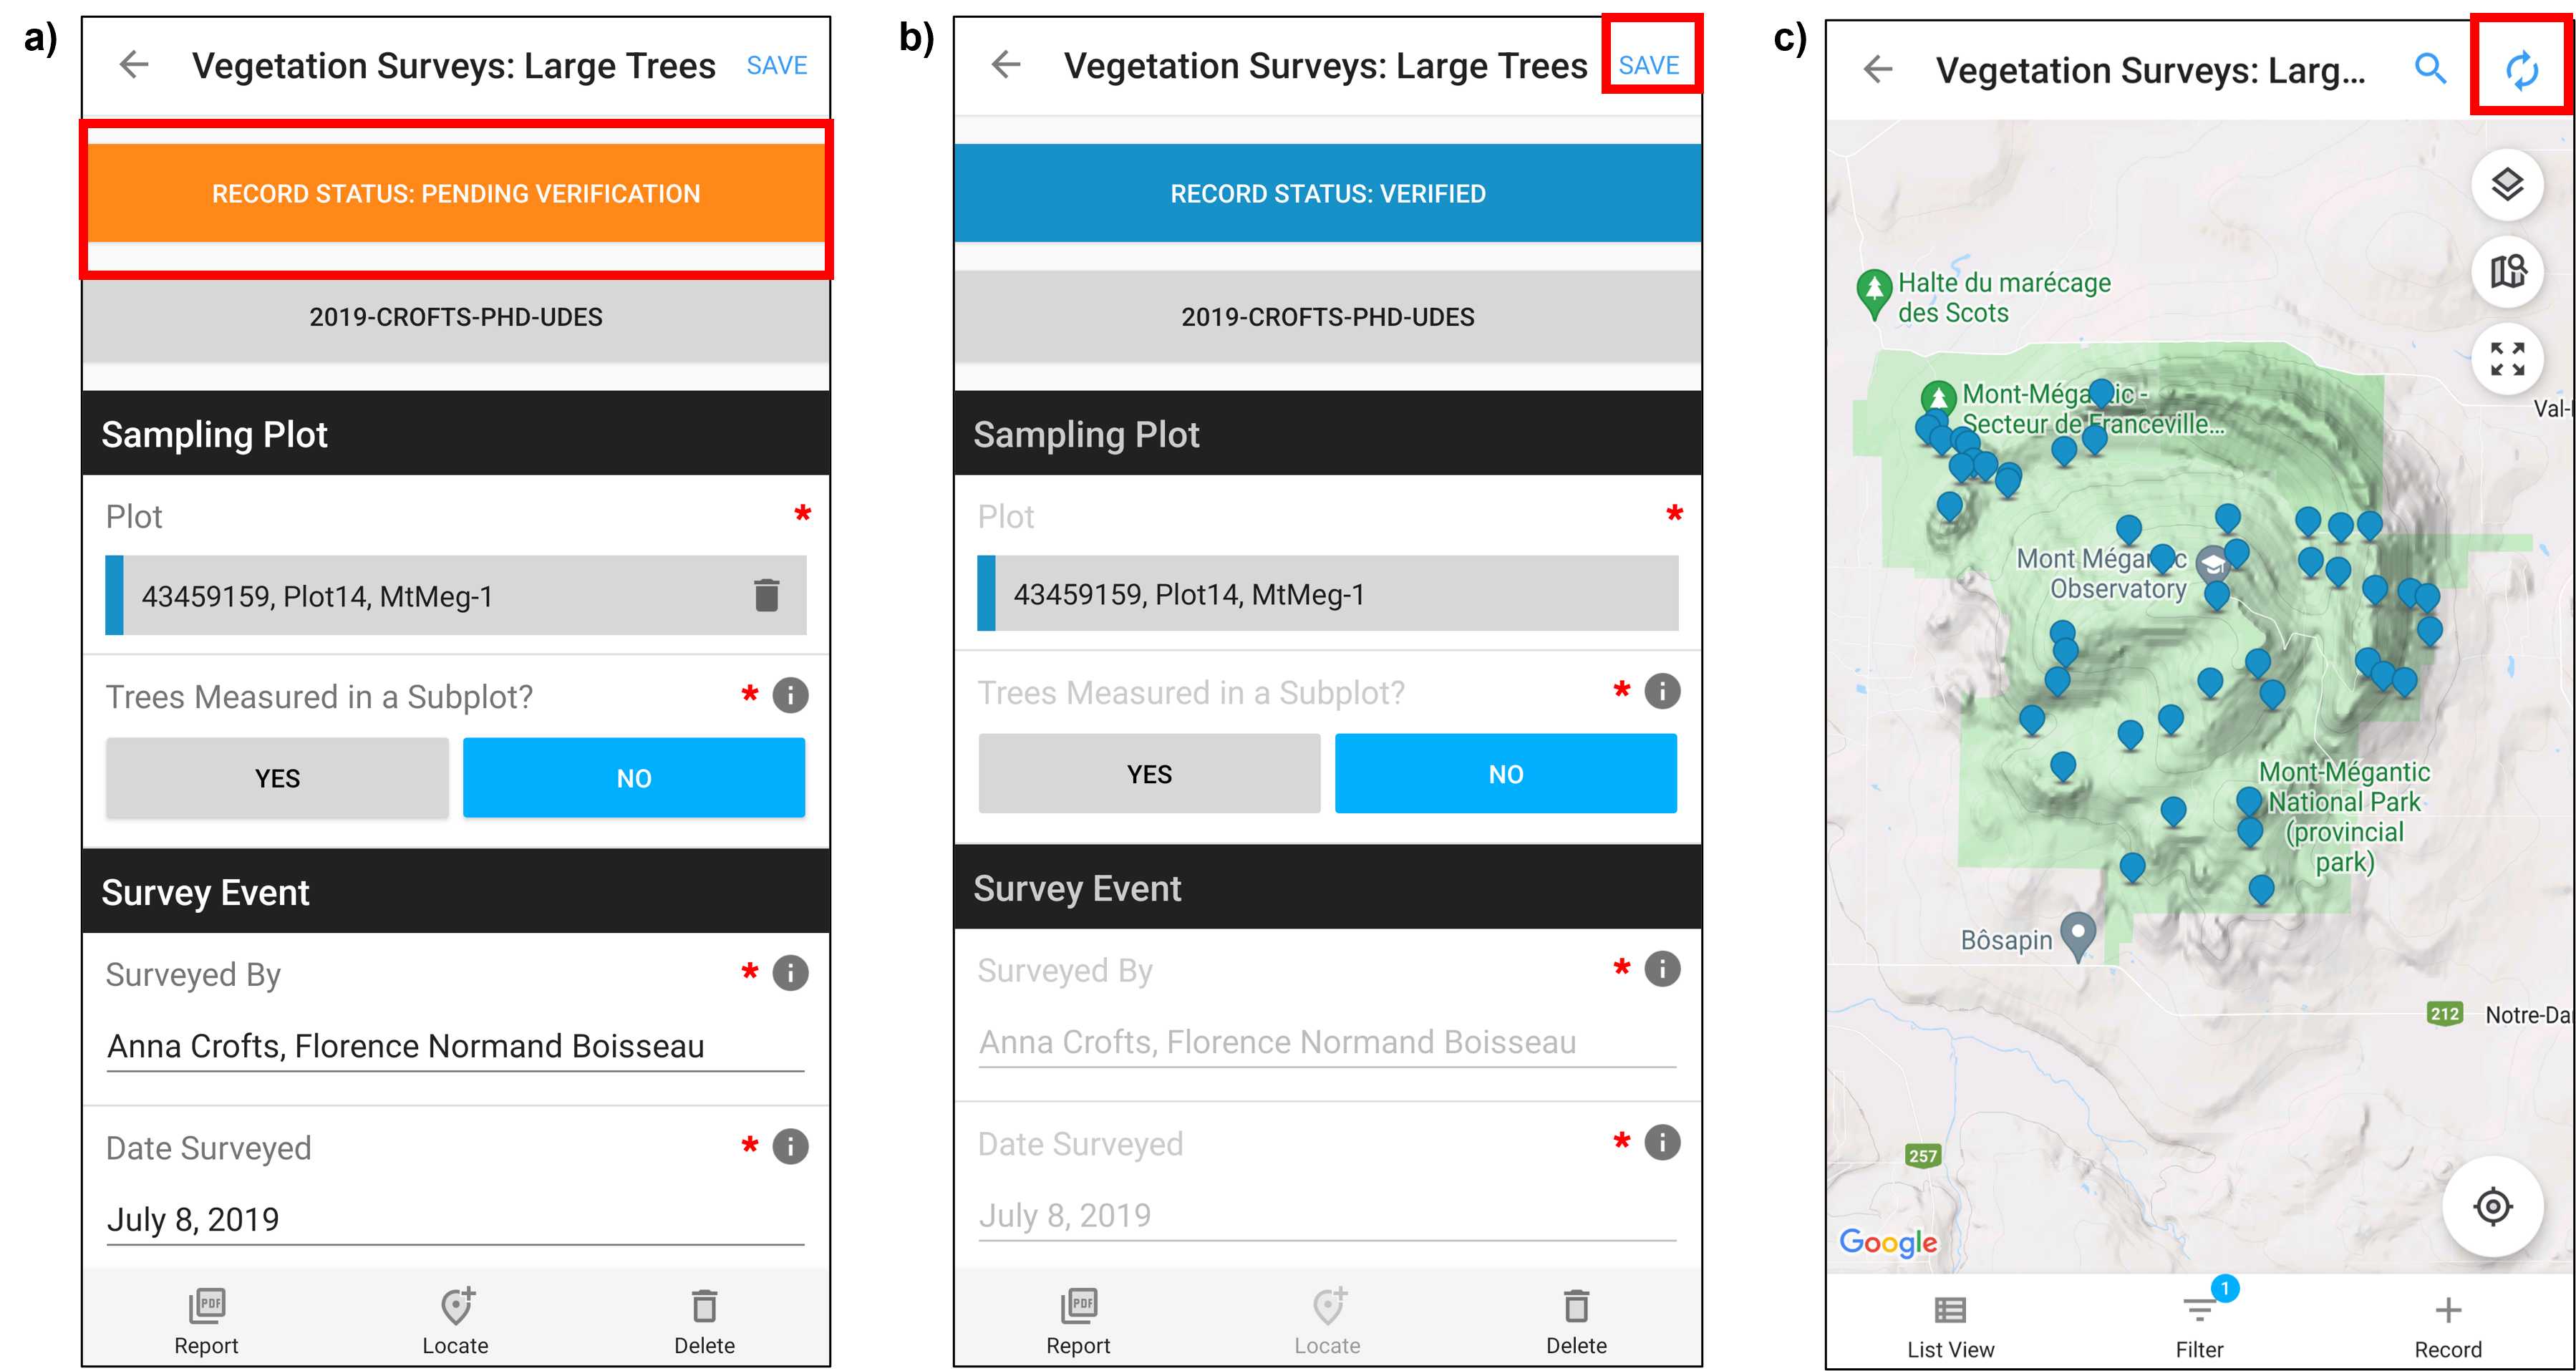
- Select the RECORD STATUS: PENDING VERIFICATION in the plot's Vegetation Survey Fulcrum record and change the status to VERIFIED . The colour of the Record Status bar should change from orange to blue (Fig. 14a).
- SAVE 1 the plot's Vegetation Survey record in Fulcrum. This will return you to the Vegetation Survey: Large Trees app (Fig. 14b).
- Sync2 Fulcrum to upload the plot's vegetation survey record online by selecting the icon of two circular arrows. This icon will spin when synchronizing is in progress (Fig. 14c).
Optional - export data from Postex system to your computer to backup individuals' X-Y positions (see Step 8 in Postex System User Guide).
Obtain High Precision Plot Coordinates
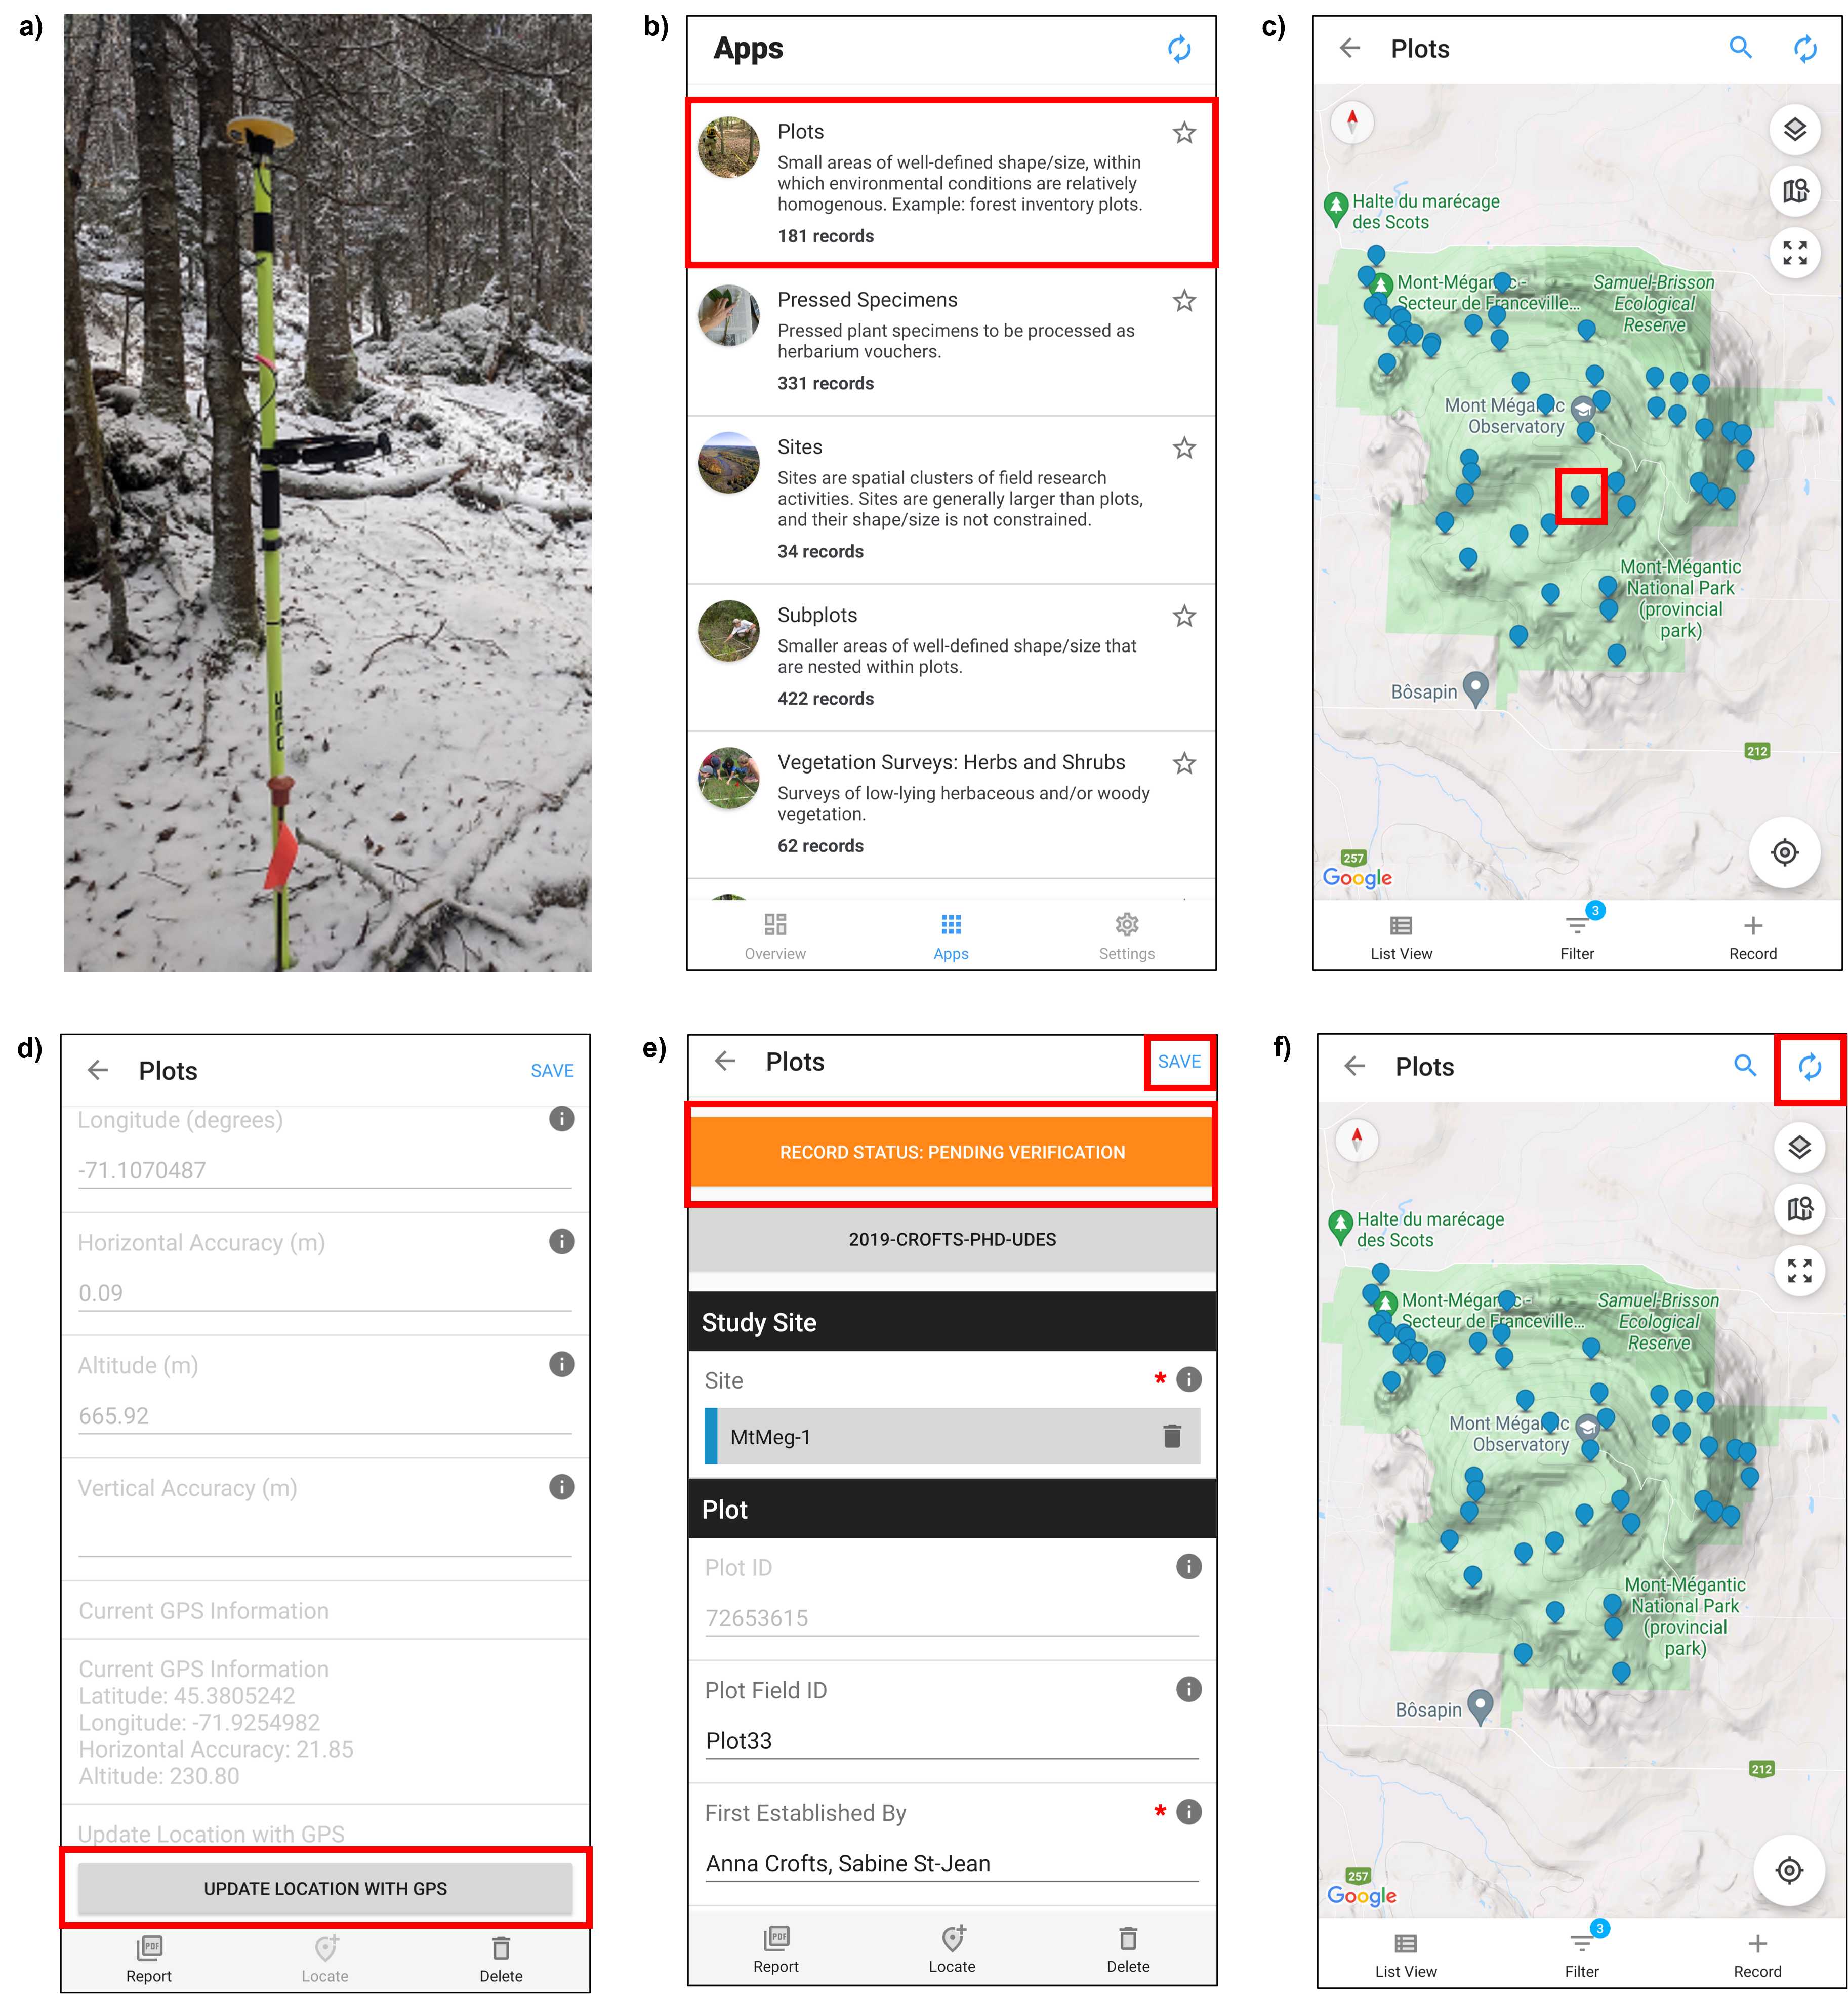
Return in the Autumn once the deciduous leaves have fallen with Trimble Catalyst (Trimble Catalyst DA1 antenna with Trimble RTX correction service, Trimble Inc.) or alternative high-precision GPS to obtain high-precision coordinates of plot centers (Fig. 15a). See Trimble GPS Protocol for step-wise details regarding how to use Trimble Catalyst.
-
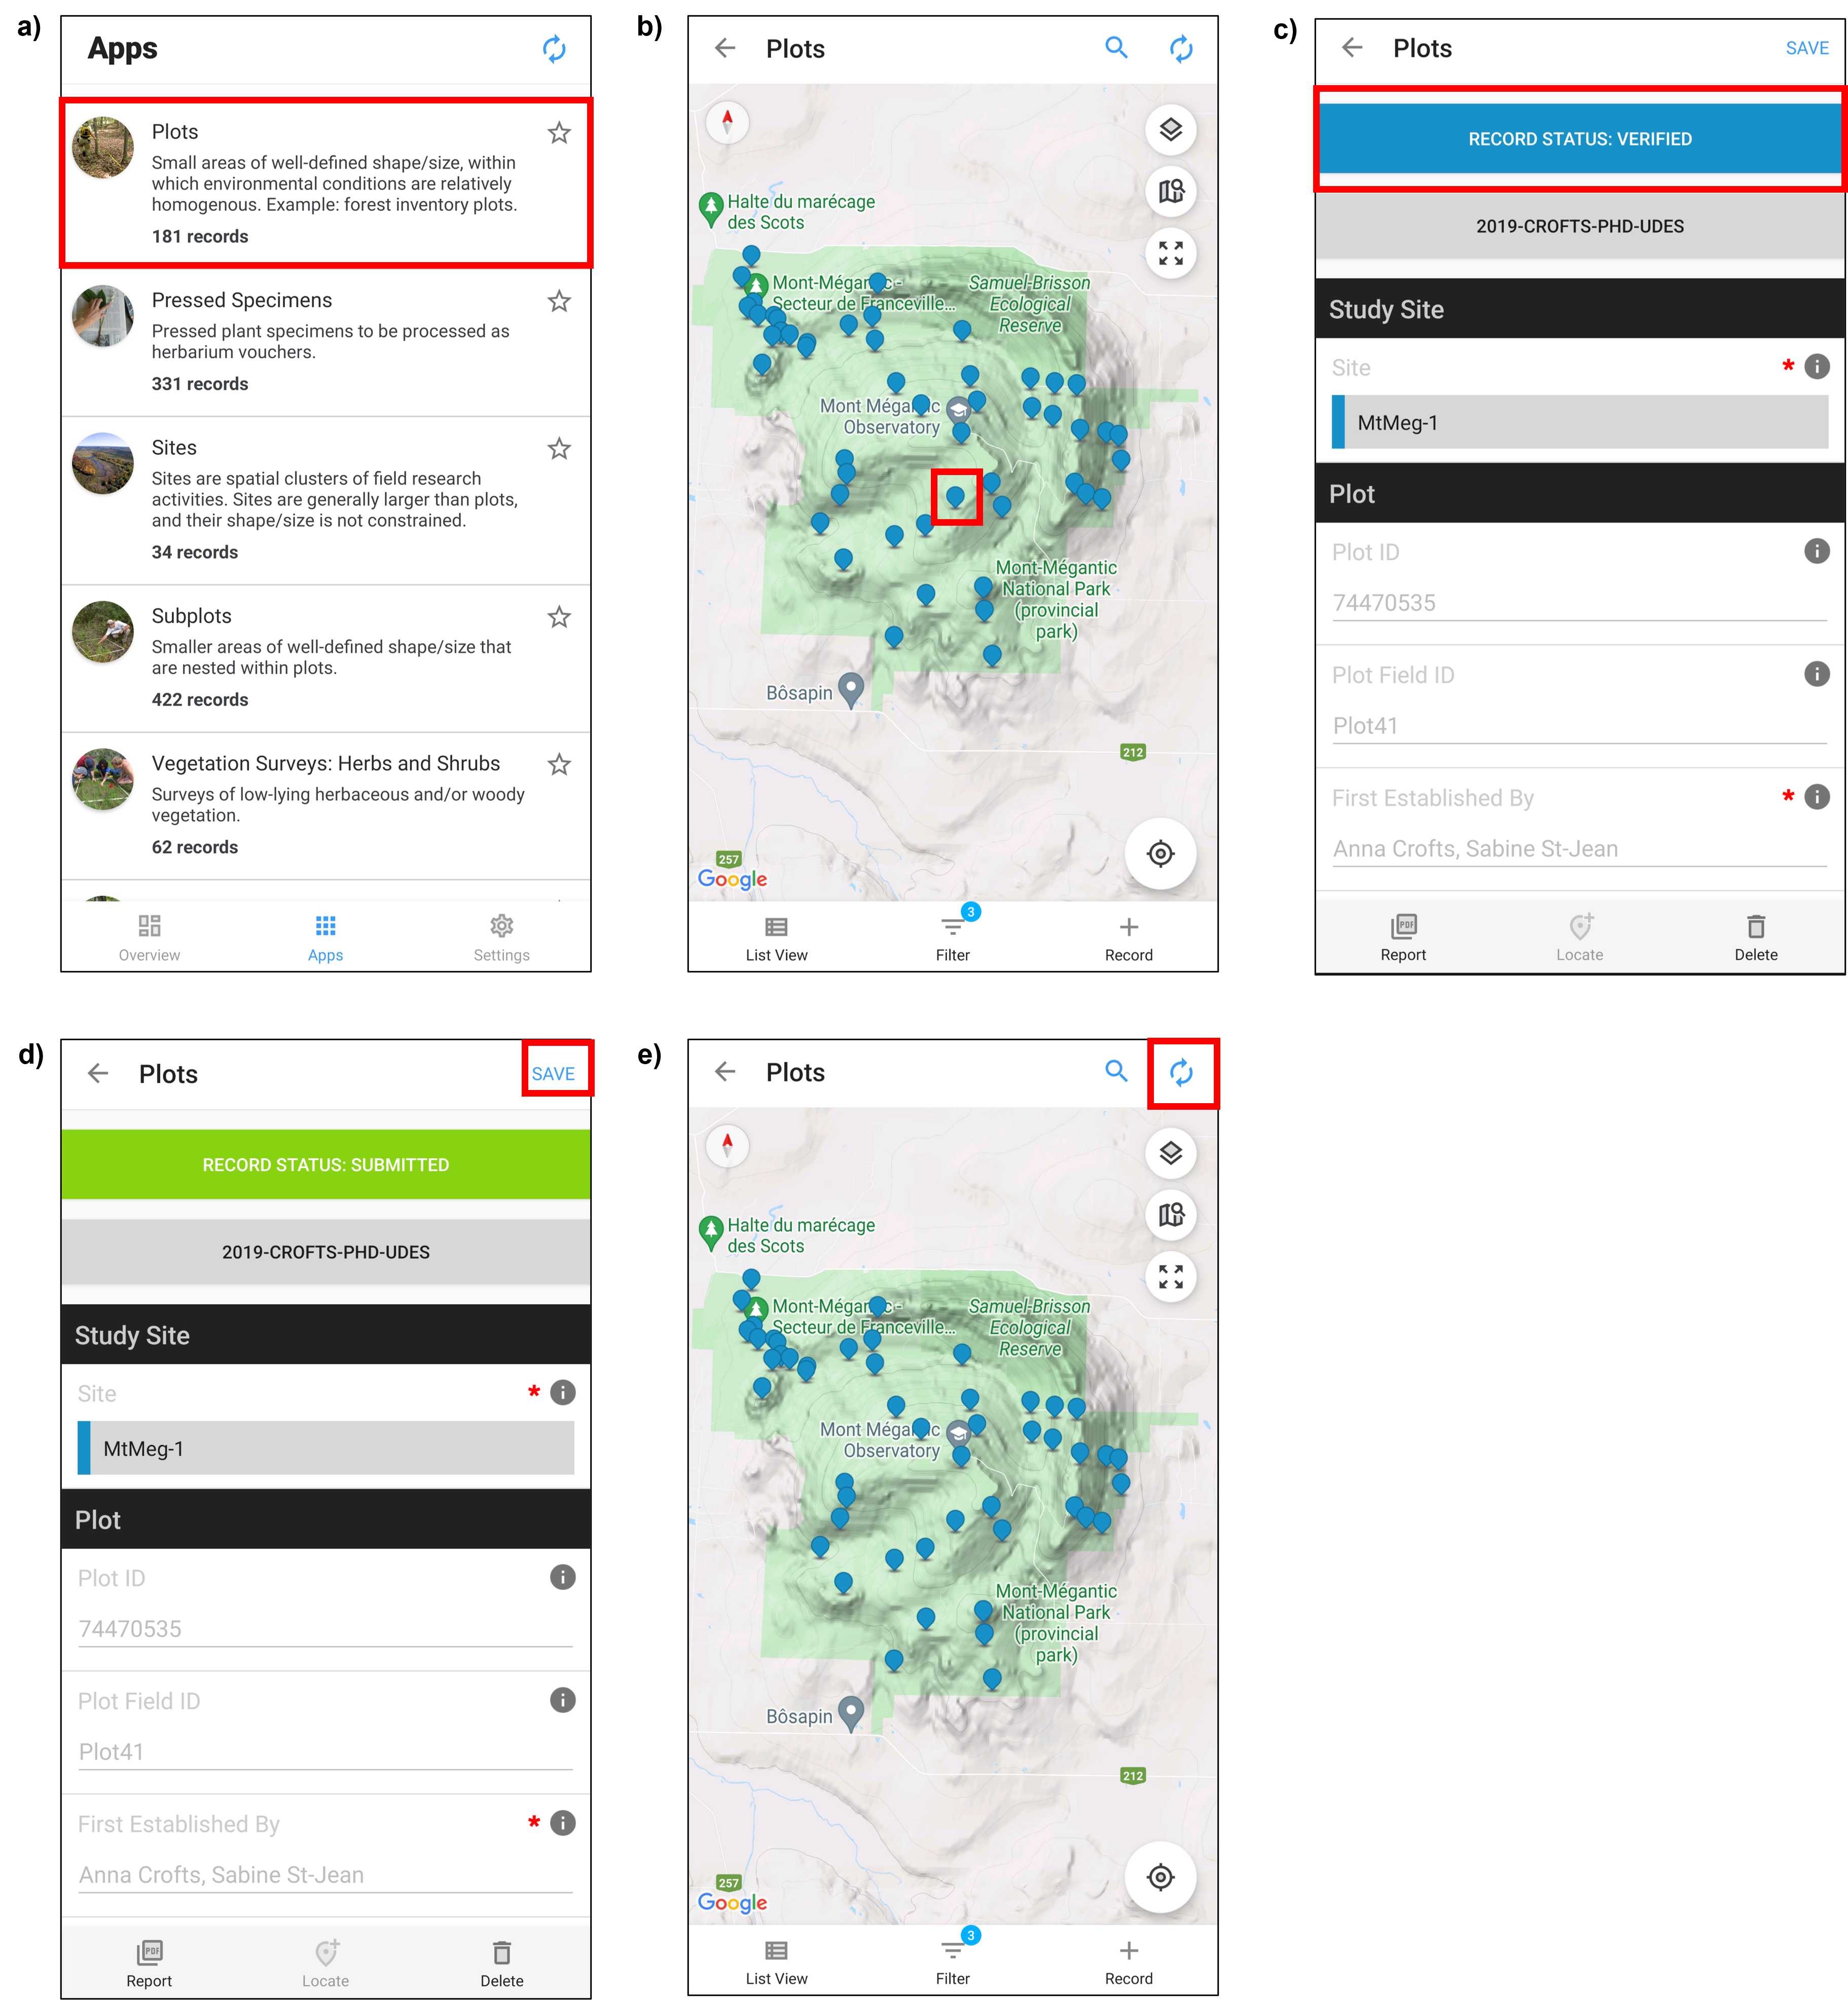
Within the Plots app in Fulcrum select the appropriate plot record (Fig. 15b,c).
-
The Trimble Catalyst integrates with Fulcrum , select UPDATE LOCATION WITH GPS - Latitude (degrees), Longitude (degrees), Horizontal Accuracy (m), and Altitude (m) fields will automatically be filled in when Update Location with GPS is selected - once GPS connection is established and, ideally, horizontal accuracy is ≤ 0.30 m1 (Fig. 15d).
-
Select the RECORD STATUS: PENDING VERIFICATION in the plot's Fulcrum record and change the status to VERIFIED . The colour of the Record Status bar should change from orange to blue (Fig. 15e).
-
SAVE the plot's record in Fulcrum. This will return you to the the Plots app (Fig. 15e).
-
Sync2 Fulcrum to upload the changes online by selecting the icon of two circular arrows. This icon will spin when synchronizing is in progress (Fig. 15f).
Download Forest Inventory Field Survey Data
Using the Fulcrum desktop website,
-
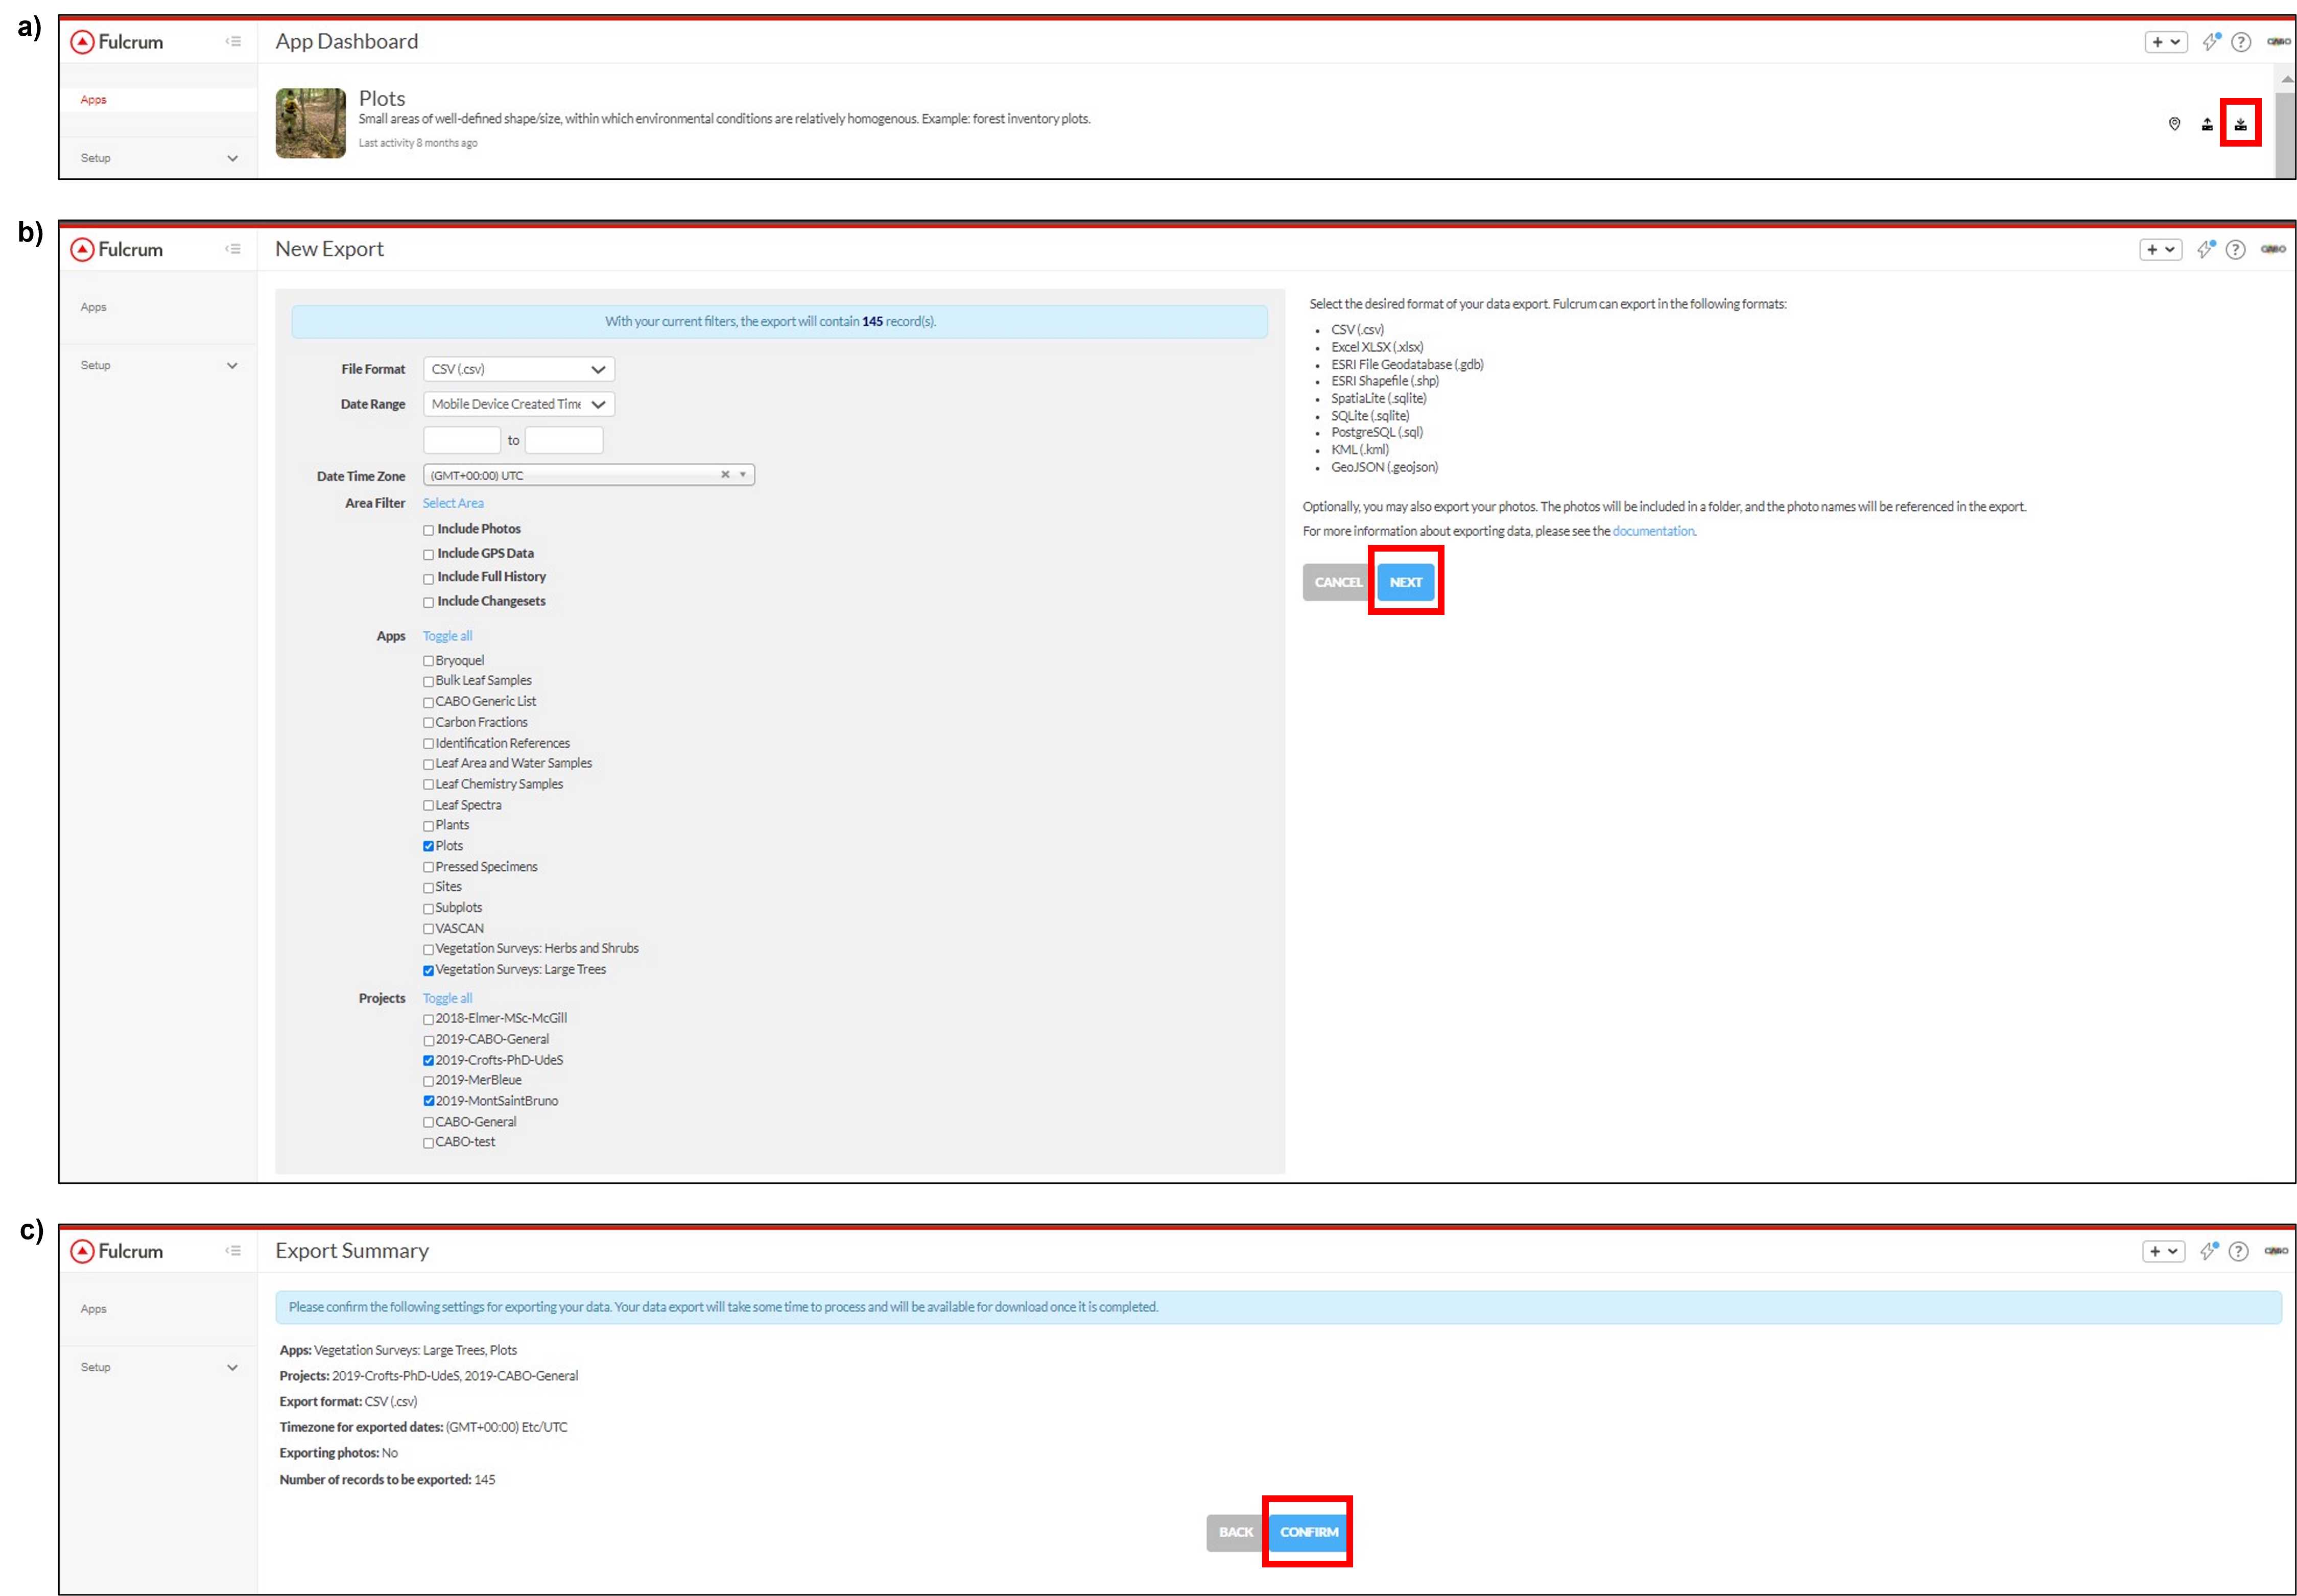
In CABO's Fulcrum account, select Export Data as indicated by a downward facing arrow (Fig. 16a)
-
Select the File Format , in Apps select Plots and Vegetation Survey: Large Trees , in Projects select 2019-MontSaintBruno and 2019-Crofts-PhD-UdeS or alternative, and then select NEXT (Fig. 16b).
-
Review Export summary and select CONFIRM to download (Fig. 16c).
Submit Forest Inventory Field Survey Fulcrum Records
Once the forest inventory field survey is complete and data has been checked, change the status of all plots and their associated vegetation survey records to 'Submitted' in Fulcrum.
- Within the Plots app and Vegetation Survey: Large Trees app in Fulcrum select completed and checked plot and their associated vegetation survey records (Fig. 17a,b).
- For each plot and vegetation survey record, select the RECORD STATUS: VERIFIED in the plot's Fulcrum record and change the status to SUBMITTED . The colour of the Record Status bar should change from blue to green (Fig. 17c). Then SAVE the changes in Fulcrum. This will return you to the Plots or Vegetation Survey: Large Trees app (Fig. 17d).
- Once the status of all appropriate plots and their vegetation survey records have been changed, Sync Fulcrum to upload the changes online by selecting the icon of two circular arrows. This icon will spin when synchronizing is in progress (Fig. 17e).
