CODEX® Multiplexed Imaging | Microscope Setup and Tissue Imaging
Diane Saunders, Marcela Brissova, Alvin C. Powers, Conrad Reihsmann
Disclaimer
This protocol is adapted from the CODEX User Manual, revision C (Akoya Biosciences, Dec. 2020). See also: CODEX Run and Keyence 800 setup.
Abstract
This protocol describes the imaging workflow currently in use by the Vanderbilt Diabetes Research Center Islet & Pancreas Analysis (IPA) Core and Powers/Brissova Research Group for CO-Detection by indEXing (CODEX®, now PhenoCycler™; Akoya Biosciences). See also CODEX® Multiplexed Imaging | Modality overview .
Steps
Experiment Preparation
Check and power up equipment: CODEX® Instrument and Keyence BZ-X810 microscope.

Equilibrate the following to Room temperature :
- Coverslip in storage buffer
- Prepared reporter plate
Gather additional supplies:
Prepare 1L of 1X CODEX Buffer (100mL 10X CODEX Buffer in 900mL MilliQ/ddH2O).
Fill bottles for the CODEX Instrument accordingly:
- Bottle 1 - 1X CODEX Buffer
- Bottle 2 - DMSO
⚠ Make sure the Waste Bottle is empty.
Load the prepared reporter plate, noting the coordinates of the first well containing solution.
Launch the CODEX Instrument Manger (CIM) software. Load or create an experiment template and input appropriate labels under Project , Experiment , and Operator fields.
Specify the number of cycles in Total #Cycles and enter the Start Cycle Well (the first well in the reporter plate for the experiment).
Double check template contents, including marker names, classes, and exposure times. Set Z-Stack Planes to 5.
Press Start Experiment button and follow the guided Experiment Start Wizard prompts as outlined below.
Experiment Start Wizard
Prime the instrument:
Briefly soak a gasket in 1X CODEX Buffer. Load a blank coverslip onto the stage plate and place gasket on top. Fit the stage insert, tighten, and place the assembly on a horizontal surface (in a plastic collection container or on the benchtop). Click Prime on the Experiment Start Wizard.
Load sample:
Once the machine is finished priming, remove the stage insert and gasket and discard the blank coverslip. Carefully load the sample coverslip into the stage plate, place gasket on top, and tighten the stage insert. Remove any buffers or salts from bottom of the coverslip using a Kimwipe dipped in water. Next, situate the stage plate/stage insert into the holder of the Keyence BZ-X810 microscope, making sure fluidics lines can exit through the front of the microscope.
 and after being fitted into the Keyence BZ-X810 microscope (right).")
Add DAPI:
Pipette 700µL of Nuclear Stain Solution (0.067% (v/v) Nuclear Stain in 1X CODEX Buffer) onto the sample coverslip. Click Immediately Wash Tissue on the Experiment Start Wizard.
Configure microscope settings:
Minimize the CIM window and Experiment Start Wizard and launch the BZ-X Viewer software. Choose Capture Still Images , and select Versatile as the Sample Holder.
Verify the following settings:
- Set to Multi-Color
- Enable all four fluorescent channels (DAPI, GFP, TRITC, Cy5)
- Set all channel pseudocolors to white
- Set Excitation Light to 100 % and enable Low Photobleach
- Set camera to Mono
- Set Resolution Sensitivity to High Resolution
In Options tab:
- Select Z-Stack -> Multi-Color
- Enable Gain and Transmitted Light Power
- Enable Excitation Light Filter
- Choose 14bit under TIFF Image Setting
- Enable Automatically Save Image and set Format to TIFF
Under Capture Area Settings:
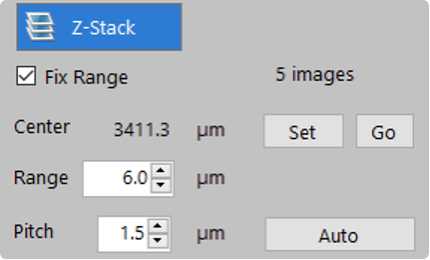
- Enable Z-Stack
- Enter 1.5 μm for Pitch
- Enable Stitching
- Choose Set Center and Number of Images
Set Z-stack parameters:
Ensure that the tissue is situated over the objective, moving the stage using the BZ-X Viewer as needed. Switch to the DAPI channel and perform autofocus to locate the tissue. At multiple points across the tissue, find and note the optimal focus (Z position). If values are within ~5 μm of each other, scroll to the center Z position and under Capture Area Settings, select Fix Range and click Set. Range should correspond to 5 images (Z-stacks), approximately ~6 μm.
Set imaging region:
Bring up the Navigation window, adding regions as needed to locate the edges of the tissue. Use these macro stitched images to approximate the center of the tissue and click Add . Define region size by setting the number of X and Y images (tiles) under Capture Area Settings. Without changing positions, scroll back through stored regions and ensure that the green box (denoting the captured area) includes the tissue edges. Adjust center and/or X and Y numbers as needed.
 across a series of tiles (magenta). These parameters represent the x and y dimensions, while the Z-Stack range corresponds to the z dimension.")
Once you are satisfied with the imaging region, delete all other regions stored in the Navigation window so that only the central region remains. Select Start Capture and specify the file path for images to be saved (folder should match Experiment name). Press Stop after a few images.
Microscope Pre-Check:
Back in CIM Experiment Start Wizard, select Microscope Pre-Check. If pre-check fails, double-check microscope parameters outlined above and in the Quick Reference Guide.
Press Start Run . Stay several minutes to ensure sample well is not leaking before walking away.
Post-Run
Once run is complete, carefully remove coverslip and place back into Storage Buffer for preservation at 4°C if future imaging or staining is to be performed. Otherwise, coverslip can be discarded.
Load a blank coverslip and perform a Clean Instrument Wash by navigating to the Maintenance tab. If another run will not be performed immediately, place Bottle 1 and Bottle 2 lines in a beaker of MilliQ water and perform a Maintenance Wash .
Empty the vacuum waste container and small solution containers under the hood. Rinse, and leave to dry on paper towels. Remove reporter plate.
Shut down BZ-X Viewer and CIM software.
