Basic Operant Behavioral Training
Alexandra Nelson, Xiaowen Zhuang
Abstract
This protocol includes information about the operant chamber, mouse preparation, initial shaping (training), and instrumental learning. This can be followed by other behavioral tasks, such as probabilistic reversal learning or delay discounting, which are described in other protocols. To promote consistent results, each mouse should be trained in the same operant chamber at the same time of day, five days per week, throughout the study. Male and female mice should be trained in separate operant chambers.
Attachments
Steps
Operant Box Setup
Ensure the correct SD cards are inserted into the logging shield of each chamber.
Connect the USB cable of each Arduino to the computer.
Turn on the 12-volt power supply.
Pour 10mL diluted milk into each falcon tube for each behavioral box.
Connect each solenoid to its behavioral chamber: one end goes into the milk solution, and the other end goes to the chamber.
Ensure that milk is pumped into the chamber.
Upload the Arduino code to the operant chambers, depending on the training phase of each mouse.
In each Arduino window, go to “Tools”, and the select “Port” to choose the correct board number, and then click “Upload”.
In each Arduino window, go to “Tools” again, and then select “Serial monitor” to open serial monitor windows.
Insert the waste pan and floor into the behavioral chamber.
Starting an Operant Session
Place each mouse into their designated box and close acrylic door to the operant box.
Allow to acclimate for 1-2 minutes.
Turn on 5-volt breadboard power switch and press “Reset” button on the Arduino board.
Securely close the door of the sound attenuating box.
Cleanup
Replace the falcon tube with clean tap water.
Upload the “cleaning” protocol onto each chamber.
Allow the water to run through the entire system for at least 0h 15m 0s.
Clean the walls of operant chamber, nosepoke ports, and reward port with 75% alcohol.
Rinse the waste pan and floor with water, and allow them to air dry 0h 50m 0s.
Turn off the 5-volt breadboard power switch.
Turn off the 12-volt power supply.
Training procedure - Preparing the mice with food restriction
Three days before the start of Phase 1 (Magazine Training), the free-feeding (ad libitum) weight is recorded by hand in a logbook.
Food is removed on the same day, and the food restriction protocol is initiated. This starts with
2.5-3 g of standard food pellets per animal per day for the first few days.
Subsequent adjustments may be necessary based on the animals’ weights, which must be monitored daily and maintained at approximately 85%-90% of their free-feeding weights.
Training procedure - Operant Training Phase 1/Magazine Training
Three days after starting food restriction, animals can be started on Phase 1. This phase introduces mice to the reward delivery port (1 session).
A liquid reward (10µL of milk) is delivered on a random interval schedule of 40-80 seconds for a total of 40 rewards.
Each trial begins with the delivery of milk into the center port, accompanied by a 10-second illumination of the center port light.
Training procedure - Operant Training Phase 2/Blocked Instrumental Learning
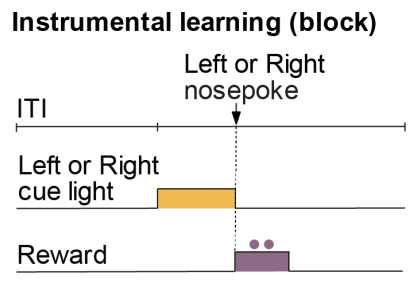
In this phase, the side (choice) nosepoke triggers reward delivery (6-10 sessions).
Mice are trained to nosepoke at the side ports to obtain a reward on a fixed-ratio 1 (FR1) schedule.
Each training session is separated into blocks, separated by a two-minute break period when the house light is turned off.
Each block lasts 0h 50m 0s.
Only one nosepoke (either the left or the right side) is trained in each block, and the active nosepoke switches during the break period.
The initial nosepoke (left or right) is counterbalanced across sessions.
Each trial begins with a stimulus cue light above the left or right nosepoke.
If the mouse nosepokes that port within 0h 0m 20s, the cue light is extinguished, and a reward (10µL of milk) is delivered to the center port, which is illuminated for 0h 0m 10s, followed by a random 30-50 second intertrial interval.

If the mouse does not perform a nosepoke on the correct side, then the cue lights are extinguished and a timeout period (a random 30-50 second interval) begins.
To advance to Phase 3, a mouse must perform a correct response on more than 80% of trials in the last session.
Training procedure - Operant Training Phase 3/Self-initiated Instrumental Learning with Randomized Trials
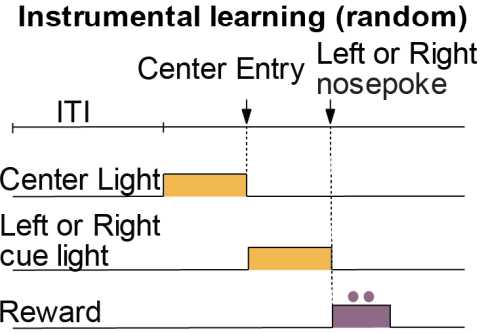
This phase shares some features with Phase 2, but in this phase, the mouse must center nosepoke to trigger trial start (5-8 sessions), and choice trials are presented in a randomized (rather than blocked) fashion.
Trials begin with the center port being illuminated for 0h 0m 10s.

During this period, a trial can be initiated by a center port nosepoke.
Failure to make a center nosepoke within this period is considered a center omission and is followed by a timeout period (random 30-50 second interval).
Following an initiation nosepoke, the stimulus cue lights at either the left or right port are activated for 0h 0m 10s.
If the mouse nosepokes that port within 0h 0m 10s, the cue light is extinguished, and a reward (10µL of milk) is delivered to the center port, which is illuminated for 0h 0m 10s, followed by a random 30-50 second intertrial interval.
Failure to poke the correct side port within 0h 0m 10s is considered a side omission, and cue lights are extinguished until the next trial.
Poking the opposite, uncued side is recorded as an incorrect response and does not trigger punishment. Each session lasts 1h 30m 0s.

