One step RT-ddPCR for probes to target eRNA samples : from sample preparation to droplet reading
Marine Vautier, Isabelle Domaizon, Cecile Chardon, Cyrielle GALIEGUE
quantification
PCR
ddPCR
absolute quantification
probes
digital droplet
multiplexing
droplet
dPCR
RNA
eRNA
rare RNA
Abstract
The aim of this protocol is the digital droplet PCR (ddPCR) quantification of RNA target(s) using primer and probe sets. Reverse transcription and amplification are carried out in a single step , using the One Step RT-ddPCR Advanced kit for probes (Bio-Rad).
This protocol is optimised for the analysis of environmental RNA (eRNA) samples (water, sediment, biofilm and soil matrices) and then rare DNA targets.
The ddPCR can be performed using a QX600 or a QX200 droplet reader system (Bio-Rad), and this protocol begins after the RNA extraction step and ends with the droplet reading.
Multiple eRNA targets can be specifically targeted using multiple primer and probe sets that are compatible.
The advantages of using the ddPCR are: the absolute quantification , the sensitivity, the efficiency and the specificity of the method for RNA target quantification .
Before start
Amount of RNA to be used
The suggested input quantities of total RNA are 100 fg - 100 ng per reaction.
To minimize freezing and thawing, prepare aliquots of the extracted RNA samples in 0.5 mL tubes after the RNA extraction step. Prepare the RNA sample before setting up the transcription reaction mix and keep both of them on ice.
- Multiplexing
Multiple sets of primers and probes can be used simultaneously to target multiple targets. In this case, add them to the reaction mix at the same concentrations as indicated in the protocol, reducing the amount of water to be added proportionally. For multiplexing, use probes with different fluorescent dyes and ensure that the primers/probe sets are compatible.
- The following precautions must be applied:
-
Wear gloves throughout the extraction process
-
Clean the bench with RNA-removing solution (e.g. RNA-off, RNA away).
-
Use tips with filters to avoid contaminations
-
All steps have to be performed into a specific DNA/RNA-work station (sterile area equipped with air filtration and UV systems)
For any manipulation in a rare DNA room, provide complete equipment (disposable coat, cap, mask, shoe covers & gloves).
Steps
Material preparation
Equipment decontamination: - Specific DNA-workstation: UV decontamination.
- Turn on the following equipments: - the QX200 droplet generator
- the PX1 PCR plate sealer at 180 °C
- the thermal cycler for PCR
- the QX600 or QX200 droplet reader for ddPCR
- Tubes annotation - One 0.5 mL / 1.5 mL / 2 mL or 5 mL tube for the reaction mix according to the number of samples to be analysed.
- PCR strips: 8 samples per PCR strip.
Reaction mix & PCR strips preparation
Before starting, calculate the reagent requirements according to the number of samples to be analysed (Table 2).
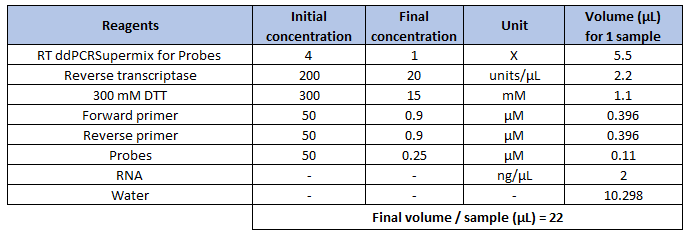
Note: The suggested input quantities of total RNA are 100 fg - 100 ng per reaction.
Note: Primers can be multiplexed by using probes with different fluorescent labels and ensuring that they are compatible. With the addition of one or more primer and probe sets, the amount of water in the reaction mix needs to be adjusted.
Note: Before manipulation, all reagents should be thawed on ice for 30min. Prepare the RNA sample before setting up the transcription reaction mix and keep both of them on ice.
During these steps, manipulate under specific DNA/RNA-workstation and cover the tubes and PCR strips containing the photosensitive reaction mix, the probe tube and the supermix tube with aluminium foil to prevent any damage to the fluorescence reaction.
The reactions should be done on ice before droplet generation to prevent a nonspecific reverse transcription reaction from occuring.
- Reaction mix preparation
-
Collect the reagents and defrost them
On icefor0h 30m 0s. -
Vortex each tube thoroughly to ensure homogeneity for
0h 0m 30s, as a concentration gradient may form during -20°C storage. And benchtop centrifuge briefly all the reagents. -
Prepare the reaction mix by adding all the reagents in the tube one by one.
-
Vortex and benchtop centrifuge briefly the reaction mix.
-
Cover the reaction mix tube with aluminium foil and store at
Room temperaturefor immediate use andOn icefor later use.
- Distribution of Reaction mix, RNA samples and controls into the PCR strips
-
Collect the negative and positive controls from the freezer and defrost them
0h 10m 0sat4On ice, and take DNase and RNase free water for the NTC. -
Collect the RNA samples and defrost them
0h 10m 0s4On ice

- Pipet the reaction mix into each well of the PCR strip. The volume of reaction mix to be added depends on the volume of RNA selected. In our example, there is 2 µL of RNA, so 20 µL of reaction mix must be added into each PCR strip well.
Note : As RNA degrades quickly, gradually thaw the tubes corresponding to the filling of the current strip and after use, store them quickly again at . Repeat this operation for each PCR strip. -80°C. Repeat this operation for each PCR strip.
-
Vortex and benchtop centrifuge briefly each RNA and control samples.
-
According to the plate layout, insert the quantity of each RNA sample and controls into the corresponding PCR strip well.
-
Once each PCR strip is complete, close it and annotate it.
-
Cover the samples strips with aluminium foil
-Mix thoroughly by vortexing the PCR strips at maximum speed for 0h 0m 10s , and centrifuge briefly. Allow the PCR strips to equilibrate to Room temperature for no more than 10 minutes before droplet generation. If a longer waiting time is estimated, place them oOn ice.
Droplets generation
Steps 4 and 5 must follow each other quickly (less than one hour between these two steps).
-
Place a DG8 cartridge into the cartridge holder.
-
Vortex and benchtop centrifuge all the PCR strips.
-
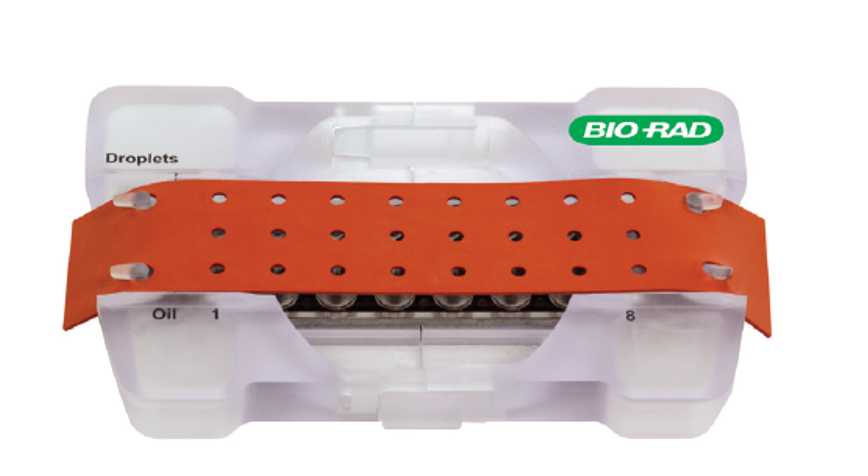
Dispense the following volumes into the corresponding cartridge compartments (Figure 1):
-
Middle line
`20µL` of the **RNA sample + reaction mix** previously prepared into the PCR strips. -
Bottom line
`70µL` of **droplet generation oil.**
-
Note: One cartridge corresponds to one sample strip and the 8 samples must be filled ( no empty well) .
Note: Avoid the formation of bubbles in the cartridge well containing the samples by tilting the pipette at 15° and gently dispense the sample without pushing the pipet plunger after the first stop.

- Place a DG8 gasket for ddPCR on the DG8 cartridge (Figure 2)
-
Open the droplet generator by pressing the green button on the front of the machine and insert the cartridge. Press the button again to close the machine and start the droplet generation. When the reaction is complete, the 3 indicator lights will turn green.
-
Take out the cartridge from the droplet generator and remove the gasket from it.
-
With the multi-channel pipet, transfer slowly
40µLof droplets generated from the top line of the cartridge (Figure 1) into the ddPCR 96-well plate.
- Intake : place the tips at the bottom of the well, hold the pipet with a 30-45° angle and slowly draw 40µL of droplets into the pipet tip (it should take around 0h 0m 5s).
-Dispense : position the pipet tip along the side of the well, near, but not at, the bottom of the well, and slowly dispense the droplets (it should take around 0h 0m 5s).
-
Cover and reserve the plate
On iceuntil all the samples have been loaded into the ddPCR 96-well plate. -
Once the ddPCR 96-well plate is filled, place one sheet of pierceable foil seal (with the coloured line on top) onto the plate, and seal the plate at
180°Cfor0h 0m 5susing the PCR plate sealer. Check that all wells in the plate are sealed. Once sealed, the plate is ready for thermal cycling.
Note: Begin the thermal cycling within 30 min after the sealing of the plate, or store at 4°C for up to 4 hours prior to thermal cycling.
PCR reaction
Place the sealed ddPCR 96-well plate into the PCR thermal cycler – see instrument manual
- Program the following cycling conditions (Table 3) :
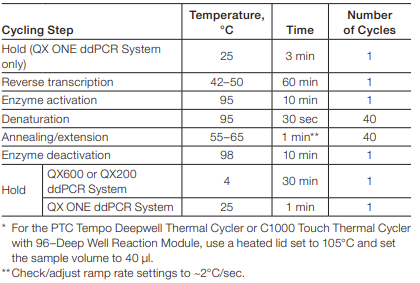
Note: The temperature and duration of annealing/extension step, as well as the number of cycles can be adjusted if necessary.
- Start the PCR run.
Note: Once the PCR is complete, the plate containing the droplets can be stored for up to 24 hours before the reading of the ddPCR plate.
Reading of the ddPCR plate
Switch on the droplet reader (QX200 or QX600).
-
Place the ddPCR 96-well plate into the droplet reader support - see instrument manual
-
Open the droplet reader by pressing the green button on the front of the machine and insert the droplet reader support. Press the button again to close the machine.
-
Open the ddPCR software associated with the droplet reader in use (QX200 or QX600) and check the oil and waste bin levels (an error message will appear if one of the bottles needs to be changed).
Note: If necessary, place a new oil bottle and use the old bottle as a waste container. If a new oil bottle has been installed , you must press “prime” . If the machine has not been used for 1 month or more, press “flush system” to clean the system.
- Define the experiment:
Note: The information given below applies to the QX600 reader. For the QX200, please refer to the user manual.
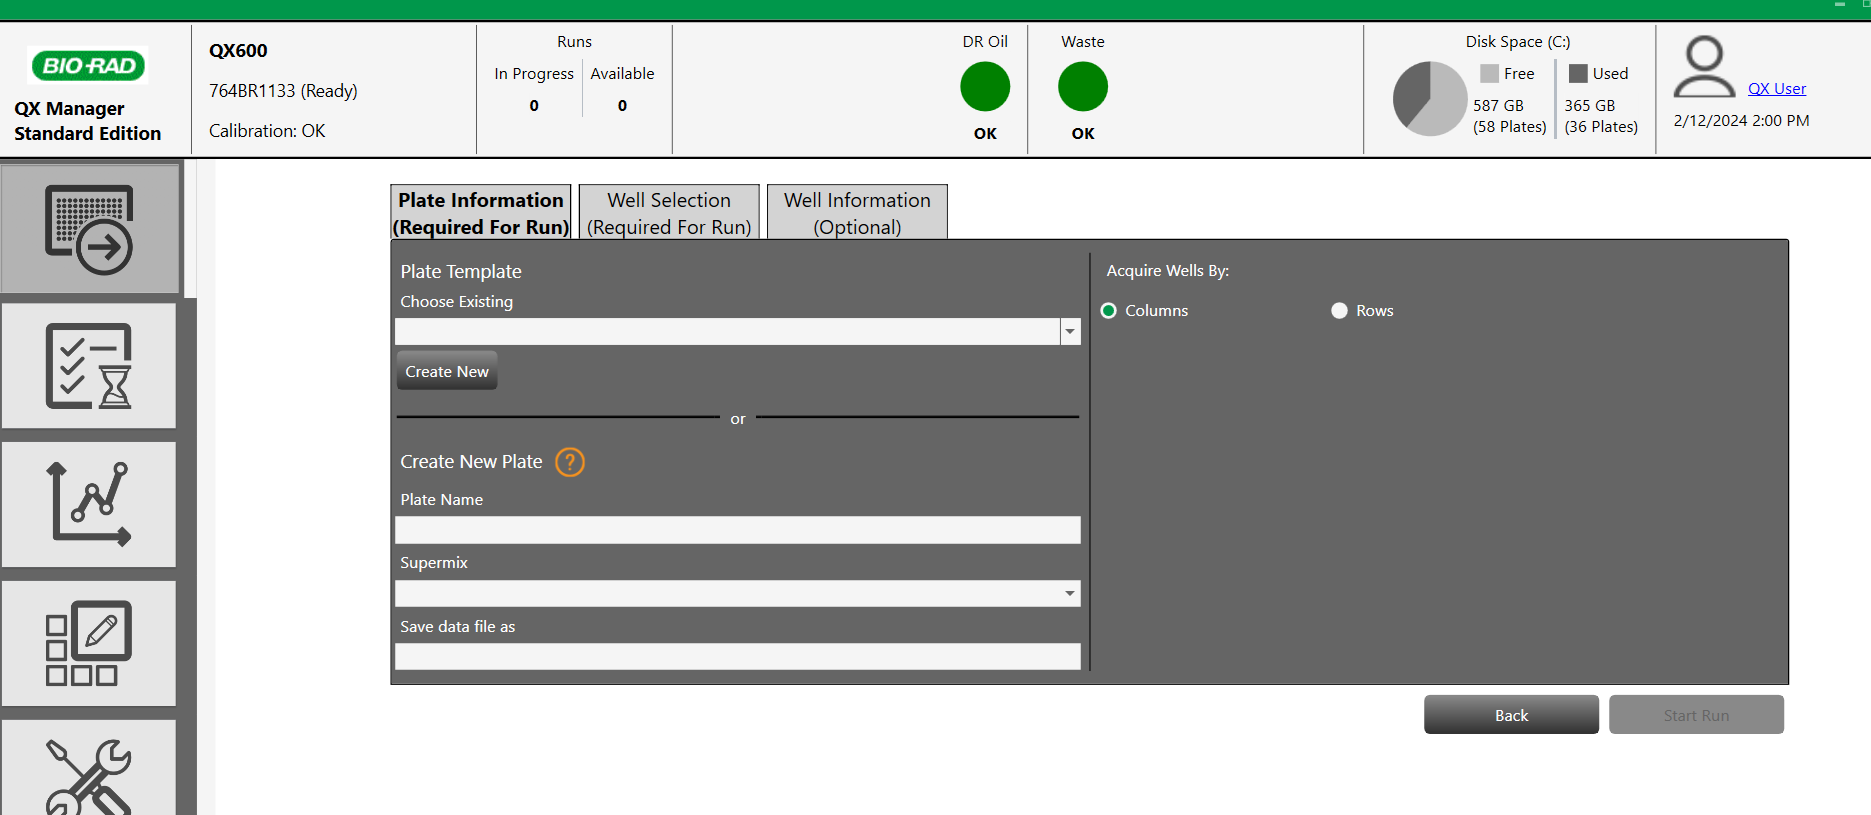
1) Plate information (required for run) required for run )
-
Click on "Add plate & Configurate plate "
-
Load a plate template or create a new plate > Name the plate and select the appropriate Supermix
2) Well selection (required for run) required for run )
- Select the wells be analysed on the plate layout and click "Include selected wells".
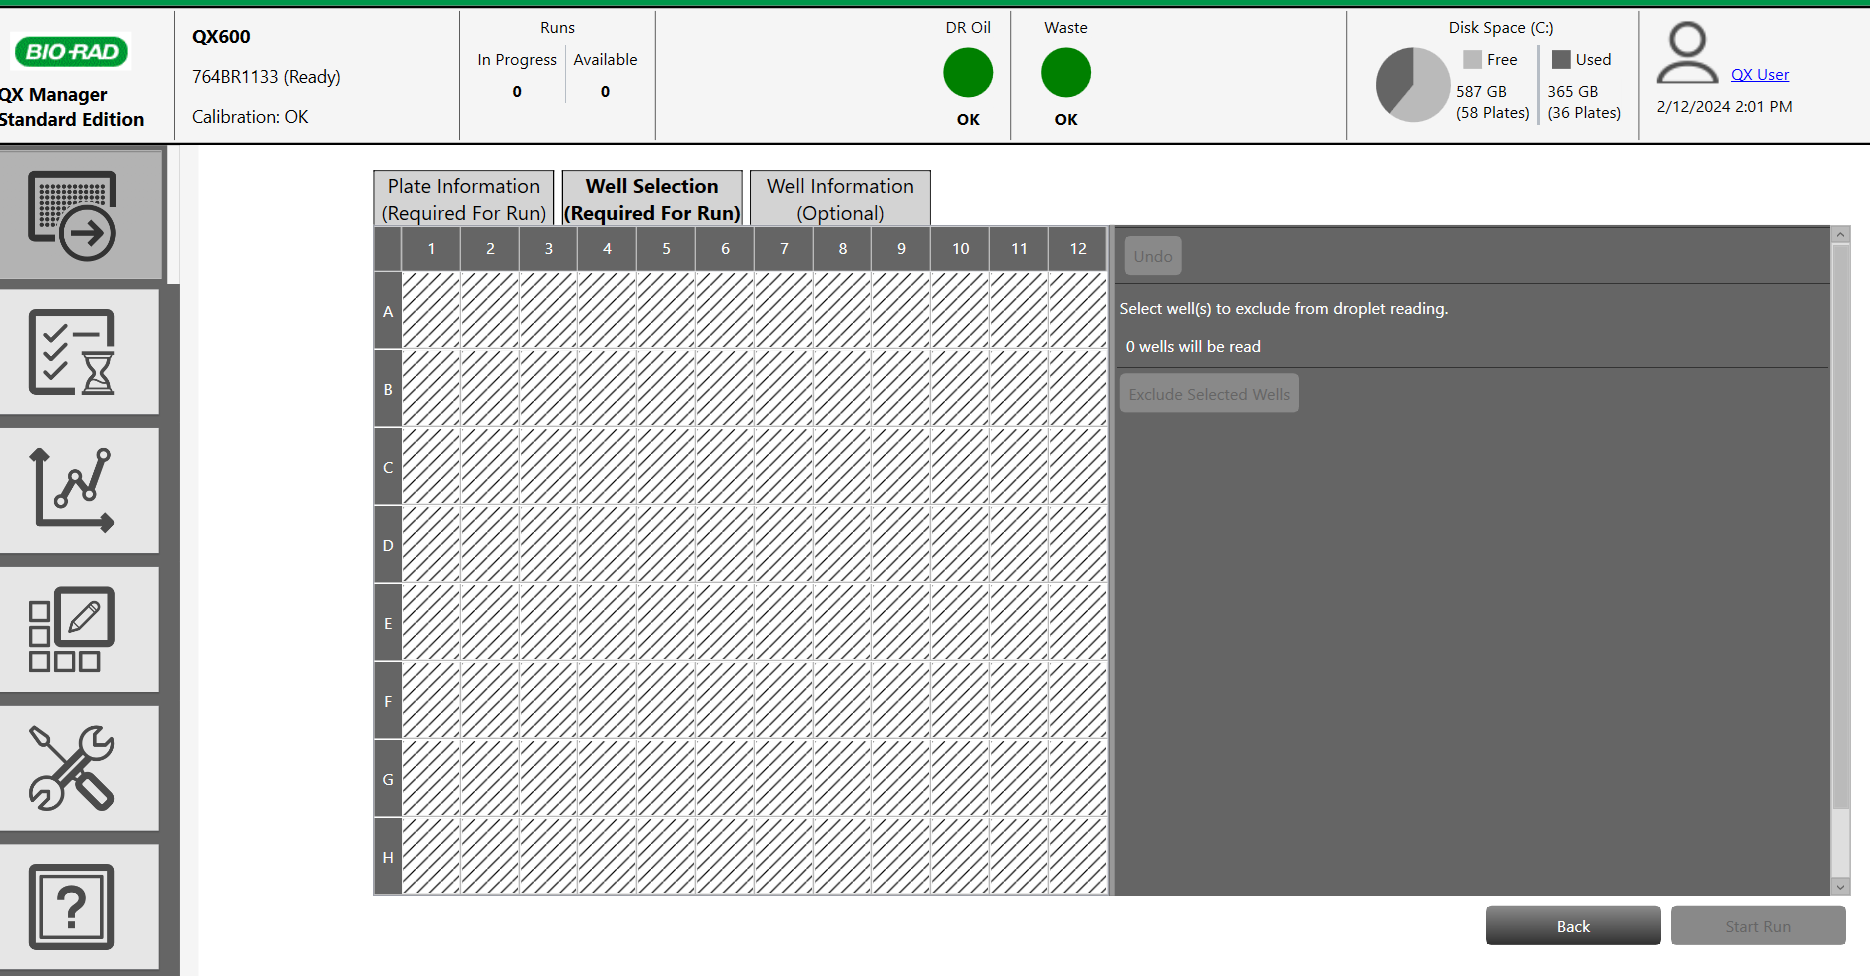
3) Well information (optional) optional )
-
If necessary, fill in the different information (name of the target, the channel used and the sample type (by default select "Unknown")).
-
Then click 'Apply'. The information entered will now appear in the plate layout.
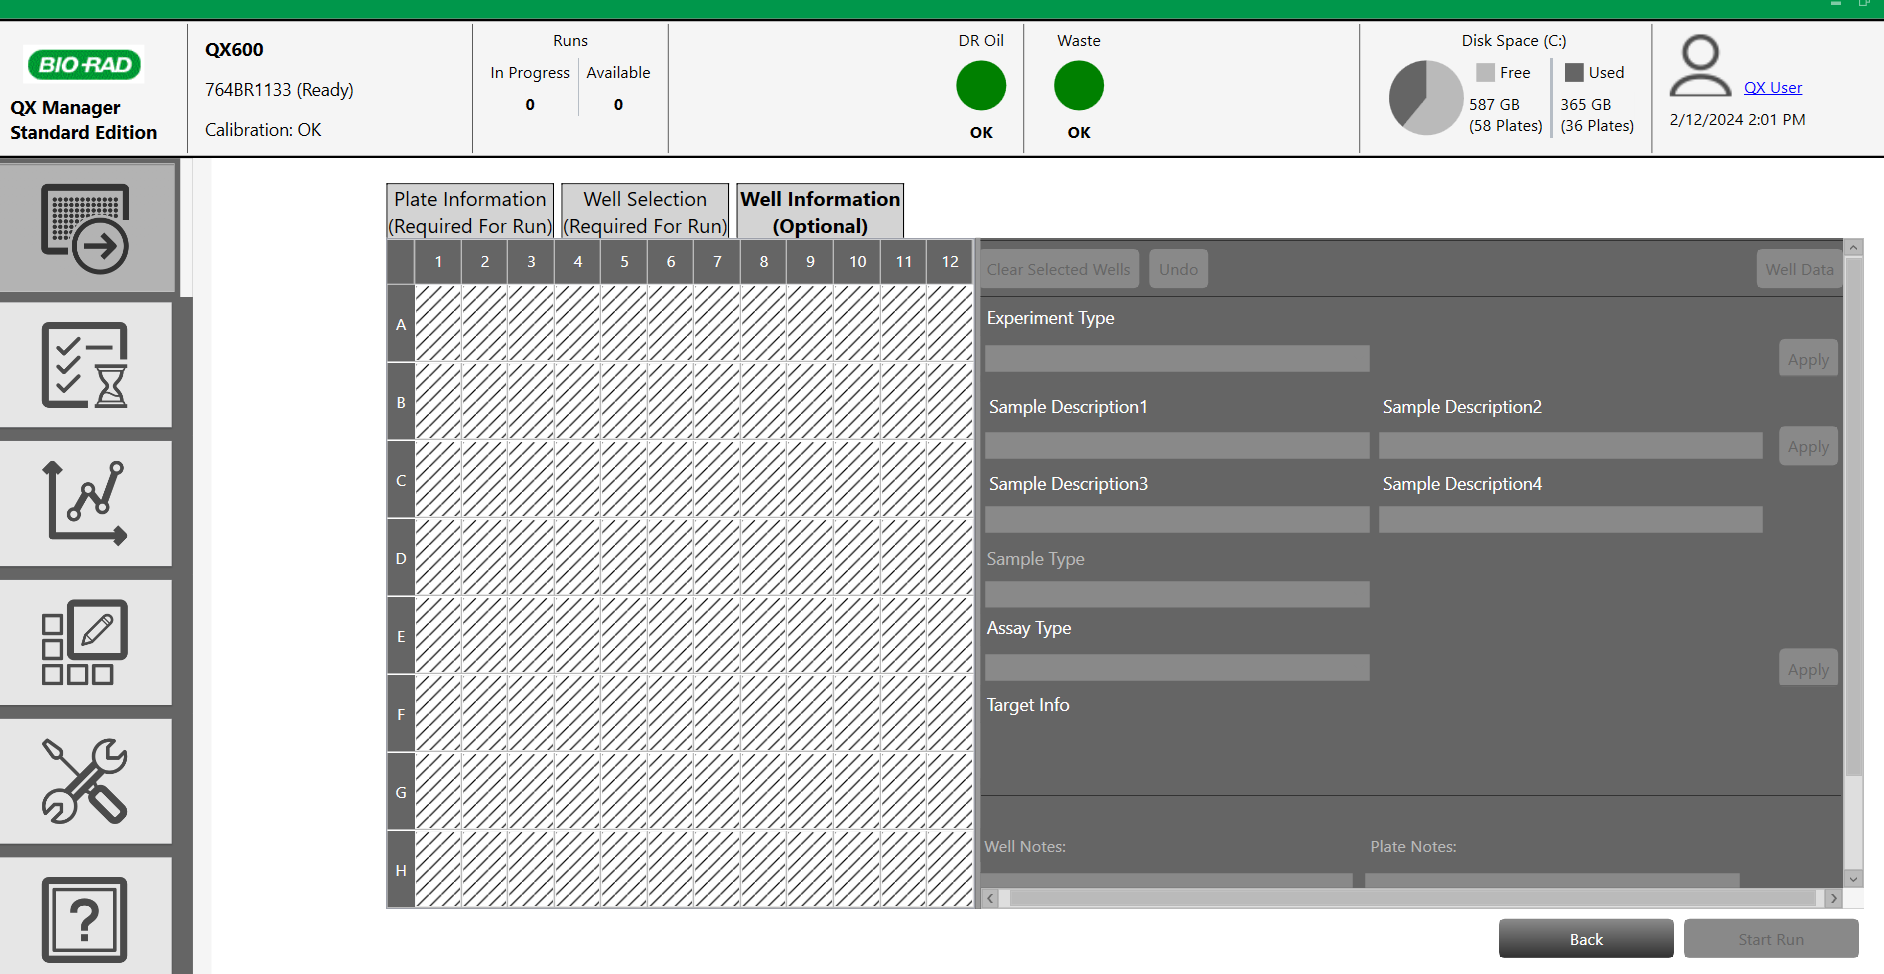
- Click "Start Run" at the bottom right of the screen. After start confirmation, the run starts and the analysis time is displayed (depending on the number of samples). The results can be viewed live as the wells are read. At the end of the run, the results are automatically stored in the dedicated folder and the analyses can be performed (see the software manual of the droplet reader used).

