Infrared PAR-CLIP
svetlana lebedeva
Disclaimer
This protocol is based on multiple contributions from PAR-CLIP, iCLIP and easyCLIP. I acknowledge Harm Wessels, Antje Hirsekorn and Nico Kastelic for ideas, contributions and discussions on this protocol.
Abstract
Crosslinking and immunoprecipitation (CLIP) protocol based on 4-thiouridine incorporation and sequencing to determine binding sites of RNA-binding proteins (RBPs).
This protocol has been used for the manuscript "Control of immediate early gene expression by CPEB4 repressor complex-mediated mRNA degradation" by Poetz, Lebedeva et al. , Genome Biology 2022.
Based on the following protocols.
- easy CLIP
Porter DF, Miao W, Yang X, Goda GA, Ji AL, Donohue LKH, Aleman MM, Dominguez D, Khavari PA. easyCLIP analysis of RNA-protein interactions incorporating absolute quantification. Nat Commun. 2021 Mar 10;12(1):1569. doi: 10.1038/s41467-021-21623-4. PMID: 33692367; PMCID: PMC7946914.
- PAR-CLIP
Hafner M, Landthaler M, Burger L, Khorshid M, Hausser J, Berninger P, Rothballer A, Ascano M Jr, Jungkamp AC, Munschauer M, Ulrich A, Wardle GS, Dewell S, Zavolan M, Tuschl T. Transcriptome-wide identification of RNA-binding protein and microRNA target sites by PAR-CLIP. Cell. 2010 Apr 2;141(1):129-41. doi: 10.1016/j.cell.2010.03.009. PMID: 20371350; PMCID: PMC2861495.
- iCLIP
Huppertz I, Attig J, D'Ambrogio A, Easton LE, Sibley CR, Sugimoto Y, Tajnik M, König J, Ule J. iCLIP: protein-RNA interactions at nucleotide resolution. Methods. 2014 Feb;65(3):274-87. doi: 10.1016/j.ymeth.2013.10.011. Epub 2013 Oct 25. PMID: 24184352; PMCID: PMC3988997.
How to analyze the data:
-
For the general pipeline to map CLIP-seq reads, see https://github.com/ohlerlab/clip_pipeline or https://github.com/slebedeva/CLIP_mapping. For specific pipeline to map the data from this protocol, look into - https://github.com/slebedeva/CPEB4_public.
-
For the Ohler lab tool to call CLIP peaks, see https://github.com/ohlerlab/omniCLIP or https://github.com/slebedeva/omniCLIP.
-
For the Ohler lab deep learning tool to predict RBP binding sites based on CLIP peaks see https://github.com/ohlerlab/DeepRiPe.
Steps
Infrared dye labeling of the adapter oligos
Order the following oligos from IDT:
3’ adapter:
/5rApp/NN NNT GGA ATT CTC GGG TGC CAA GGA AAA AAA AAA AA/iAzideN/ AAA AAA AAA AAA /3Bio/
5’ adapter:
/5AzideN/GTTCAGAGTTCTACAGTCCGACGATC [CTGATC] rNrNrNrNrNrNrN
Choose the smallest possible scale, and add RNAse free HPLC purification. The amount of oligo and dye will be enough for several hundred CLIP reactions.
The bold sequence in the 5' adapter is an optional barcode.
There are 2 possibilities of multiplexing:
-
Pool several IPs before gel purification, and proceed with the library prep. In this case, order as many 5' adapters with different barcodes as the number of samples you plan to pool. There is no need to label them all with the dye, it is enough to have one adapter labeled and the rest unlabeled.
-
Standard Illumina multiplexing at the level of library PCR. In this case, order the 5' adapter without the barcode . If you have only one adapter with the barcode, make sure to run at least 20% PhiX on the flowcells with the CLIP sequencing, if you do not have other samples on the same run. Otherwise the clustering will fail due to the same sequence in the beginning of the read!
Resuspend the oligos in X µl PBS (to final concentration of 100 µM).
Resuspend the dye in the dark tube in 42.9µl PBS.
Be careful!!! The lyophilized pellet electrostatically sticks to the plastic tip and flies away super easily! - I did it under the cell culture hood and transferred ~2 x 20 µl to dark tubes.
Perform the labeling reaction:
| A | B |
|---|---|
| Dye in PBS | 20 µl |
| 100µM oligo | 86 µl |
| PBS | to 200 µl (94 µl) |
Incubate 37°C 2h 0m 0s
Either freeze the other half of the oligo and dye at -20°C and use within one week or use all the reagents on the single day to label all available oligos.
I label 3'adapter with 800nm dye and 5’adapter with 680nm dye. But you can also reverse it :-)
Purify the product:
Follow Zymo RNA Clean and Concentration Kit protocol. Use 2 high capacity columns per 100nmoles oligo. Wash with 85% EtOH.
I got around 100 µl ~ 50 µM oligo.
Aliquot and store working aliquot at -20°C . I store main stocks at -80°C
Growing, labeling and crosslinking cells
Starting material varies depending on the expression of your RBP of interest, the quality of your antibody and labeling time and efficiency. For the case of our test RBP, ELAVL1 (HuR) with the 3A2 antibody (sc-5261) in HeLa or HEK293 cells, 5x 15cm plates (~ 100M cells) should be enough to see a good signal after 2h labeling with 200 µM 4-thiouridine (4SU).
Important: longer labeling with higher 4SU concentrations could lead to cell toxicity.
Add 4SU diluted in DMSO to 1M or 0.5M concentration directly to the cell growth medium of the ~80% confluent cells.
Example:
1 plate = 20 ml medium = 8 µl of 0.5M 4SU
For multiple plates, I collect some medium from all plates, dilute the 4SU and distribute the medium again. We use conditioned medium.
During the labeling time, prepare crosslinking bench. You will need:
-
the 365nm UV crosslinker
-
an ice tray that can be put inside the crosslinker
-
larger ice trays to put the plates on
-
an ice box with a large bottle of cooled PBS (does not have to be sterile) and pre-labeled, cooled 50ml falcon tubes
-
cell scrapers
-
liquid waste bottle
-
a centrifuge for Falcon tubes cooled down to 4°C
-
a bucket of liquid nitrogen
Note: it is also possible to proceed with the lysis directly, if you only have a small sample and a long day. Usually I freeze the cell pellets to proceed later because crosslinking can take several hours depending on the number of plates.
After labeling, take the cells out of the incubator. Pour off the medium, replace with ice cold PBS and stack the plates onto the ice tray. Proceed in pairs (crosslinker fits 2 plates):
-
take the lid off, pour off the PBS
-
place onto the ice tray inside the crosslinker without lid
-
crosslink (I use 150 mJ/cm2) (takes a minute or two)
-
pour 5-10 ml of PBS onto each plate and scrape the cells off quickly into the falcons
-
keep falcons on ice until all plates are processed
4000rpm,4°C Centrifuge the cells at 4000 rpm (top speed) for 10 min. Pour off the PBS and flash freeze the pellets in the liquid nitrogen. Store pellets at -80°C until use.
Immunoprecipitation
Couple 100 µl ProteinG beads with 10 µg of your antibody per large scale IP reaction.
Wash the beads once with PBST (PBS-Tween).
Rotate the beads with antibody in 2x volume PBS-Tween for 0h 30m 0s at Room temperature
Cool down the Falcon centrifuge to 4°C
Preheat water bath at 37°C
Meanwhile, lyse the cells (it will take time).
Prepare lysis buffer on ice: count with ~ 10-15 volumes per cell pellet. (I usually need ~50 ml buffer for 4 samples.)
Add protease and RNase inhibitor (see buffer recipes).
Get the pellets from the -80°C onto ice. First, pour ~10V of lysis buffer on top of all pellets. Then start pipeting gently one by one until the pellet has been dissolved. Avoid making too many bubbles. Then let them sit on ice for another 0h 10m 0s
If there are many pellets, I sometimes let them rotate overhead in the cold room to dissolve. It can take up to 0h 30m 0s .
Additionally, you can pass the lysate through a syringe several times to make sure that everything is lysed.
4000rpm,4°C
Transfer the cleared lysate into a new Falcon tube.
If the volume is more than 10ml, I would split it into several 14ml tubes to be able to quickly heat up the whole volume.
Add RNase I (1:1000) on ice. Ideally, you would need to adjust the RNAse concentration and digestion time for your BP by using radioactivaly labeled RNA and running it on a 15% TBE-Urea gel to estimate the size. Alternatively, you could either run the RNA gel after 3'adapter ligation and substract the adapter length, or visualize the RNA size on a Tapestation or Bioanalyzer. However, I have not tried it and cannot tell how sensitive those methods are for the very small amounts of the IP RNA.
Bring the ice bucket and timer to the water bath. Put all the tubes at once into the water and digest exactly 0h 3m 0s . I quickly turn the tubes over about every 45 sec. Immediately place the tubes back on ice (even better: ice water) and leave to cool for at least 3 min.
If desired, collect some of the input sample for protein extraction to control IP efficiency.
A note on the RNA input sample : I have found that RNA extraction from the digested lysate does not result in good libraries. I would rather recommend a separate, full RNA-seq library preparation from the same cells.
Wash once the beads coupled with the antibody and add the beads to the lysates. Rotate overhead at 4°C for 2h 0m 0s .
Washing and adapter ligation
Collect the beads onto the magnet.
If desired, save some of the supernatant for protein extraction to control the IP efficiency.
Wash the beads 3 times with the high salt wash buffer, followed by 2 times of PNK-Tween washes.
Resuspend the beads in 40 µl 1x LDS NuPAGE sample buffer.
70°C 0h 5m 0s 1100rpm
Dephosphorylate the RNA.
This step is from the iCLIP protocol and is needed to open circular 2',3' cyclic phosphate bond which is left behind by RNaseI to make the 3'-OH end available for ligation.
| A | B |
|---|---|
| Water, RNase-free | 15 |
| 5x pH6.5 buffer | 4 |
| SuperasIn | 0.5 |
| T4 PNK | 0.5 |
| fresh DTT | to 5 mM |
Incubate in Thermomixer : 37°C 0h 20m 0s 1100rpm
Wash the beads 2x with PNK-Tween buffer.
Ligate the 3’ adapter.
We connect the 3'OH end of the IP-RNA to the 5'-App end of the adapter with the help of truncated, mutated RNA ligase 2.
| A | B |
|---|---|
| Rnase-free water | 11 |
| 3' adapter, labeled, from step 4 (diluted to 1 pmol/µl) | 1 |
| PEG8000 50% | 4 |
| 10x T4 RNA ligase buffer | 2 |
| Rnl2TrK227Q | 1 |
| SuperaseIn | 1 |
| fresh DTT | to 5 mM |
16°C 1100rpm
Wash the beads 2x with PNK-Tween buffer.
5'end phosphorylation
Converts 5'-OH end left by RNAseI to 5'-phosphate.
| A | B |
|---|---|
| T4 PNK | 2 |
| SuperasIn | 1 |
| Rnase-free water | 13 |
| 10x PNK buffer | 2 |
| 10mM ATP | 2 |
| fresh DTT | to 5 mM |
37°C 0h 20m 0s 1100rpm
Wash the beads 2x with PNK-Tween buffer.
Ligate the 5' adapter
| A | B |
|---|---|
| T4 Rnl1 buffer 10x | 2 |
| PEG8000, 50% | 10 |
| 10mM ATP | 2 |
| 5' adapter from step 4 (diluted to 1 pmol/µl) | 1 |
| SuperaseIn | 0.5 |
| T4 RNA ligase 1 (normal or high concentration) | 1 |
| Rnase-free water | 4 |
| fresh DTT | to 5 mM |
25°C 2h 0m 0s 1100rpm
Wash the beads 2x with PNK-Tween buffer.
Running the gel, transfer and imaging
Run the gel
Prepare NuPAGE chamber with 1x MOPS running buffer and 4-12% Bis-Tris gel.
Using 1mm 10well combs, I run each sample on 2 adjacent lanes alongside with 5 µl / lane of the NIR (near infrared) prestained protein ladder.
If you have time, reduce the voltage to avoid distortion of bands (I use 120V for 1h 30m 0s ).
While the gel is running, prepare transfer.
Transfer
Notes:
I prefer wet overnight transfer, because it is more complete. Proteins crosslinked to RNA transfer poorly with fast transfer such as iBlot. However, if your RBP is very abundant, like ELAVL1, also incomplete transfer can give enough material to prepare a good library.
For the same reason I use transfer buffer without methanol (to prevent gel shrinkage, which leads to even poorer recovery of crosslinked complexes). I add small amount of SDS to facilitate transfer.
Always use nitrocellulose membrane.
Wet transfer:
- Prepare ~ 2L of 1x NuPAGE transfer buffer with 0% methanol and 0.0375% SDS.
- Cut 2 thick or 6 thin filter papers per each gel to be transferred.
- Cut a membrane of the size of the gel.
- Soak all papers, transfer pads and membrane in the transfer buffer.
- Take out the gel, open up the cassette and remove only one side of the cassette (I use this trick to stabilize the gel and avoid tearing it).
- Soak the gel lying on the half-cassette in the transfer buffer.
- Fill up the chamber with transfer buffer.
- Assemble the sandwich starting from the bottom: mnemonic rule is "gel to black"
- Red half-sandwich
- Transfer pad (sponge)
- Thick filter paper (or 3 thin papers)
- Membrane
- Take the gel still lying on plastic half-cassette, turn it over, I usually try to have the half with the slit, then I can use the cassette opening tool to push the gel through the slit off the cassette, while holding it over the sandwich.
- You can use a roll like the one that comes with iBlot to remove air bubbles between gel and membrane
- Thick filter paper (or 3 thin papers)
- Transfer pad (sponge)
- Black half-sandwich
Place sandwich(es) into the chamber minding again the black-to-black rule.
Transfer at constant voltage of 30V in the cold room 4°C
Imaging
Next morning disassemble the cassette. I keep the membrane on the filter papers to avoid drying and image it wet. If the membrane is partially dry, the scan will have bright dry-wet boundaries and difficult to assess.
Scan both IR channels (short, 680nm and long, 800nm). NIR ladder will be short.
Use Fiji software to merge the channels with false colors. (Image -> Color -> Merge channels...)
Two colors have to give a distinct color when combined. Locate the merged band (for green and red, it will be yellow) which will indicate the complex ligated to both adapters.
Software
| Value | Label |
|---|---|
| FIJI (Image J) | NAME |
| NIH | DEVELOPER |
| https://fiji.sc/ | LINK |
As an example, I used blue color for short and red for long channel, so we need to look for a purple band.
We look around the size of our protein plus the size of the >=20nt RNA (~6kDa) plus the 2 adapters (~12kDa+~15kDa).
Example: 100kDa RBP => look for ~135-140 kDa band.
I imaged the gel before transfer, where one can see different by-products: unligated adapters, adapter dimers, RBP-RNA complexes ligated to only one of the two adapters, and sometimes higher molecular weight complexes. Also NuPAGE loading dye lights up in the short channel.

After transfer the adapters pass through the membrane, so we mostly see single and double ligated complexes with sometimes higher molecular weight ones:

Print out the channel where the double ligated band is seen best in original size and high contrast black and white.
RNA isolation and library preparation
Use printed out black and white papers to cut out the double-ligated band. I use a white light table (or a tablet under a big square plate lid), put the printout on top, then a transparent film treated with RNase away, and the membrane.
Cut the band out with the scalpel and place it into an RNase-free Eppendorf tube.
Proteinase K digestion
This step will remove the RBP crosslinked to the RNA, leaving behind only one or few amino acids crosslinked to a 4SU nucleotide.
- Add 375 µl ProtK-SDS buffer to the membrane in the tube.
- Add 25 µl Proteinase K
55°C 0h 45m 0s 1100rpm
Library validation and sequencing
-
Determine library concentration with Qubit (it will be low, 1-10ng/µl)
-
Run the samples on Bioanalyzer or Tapestation to confirm that you cut out correct size.
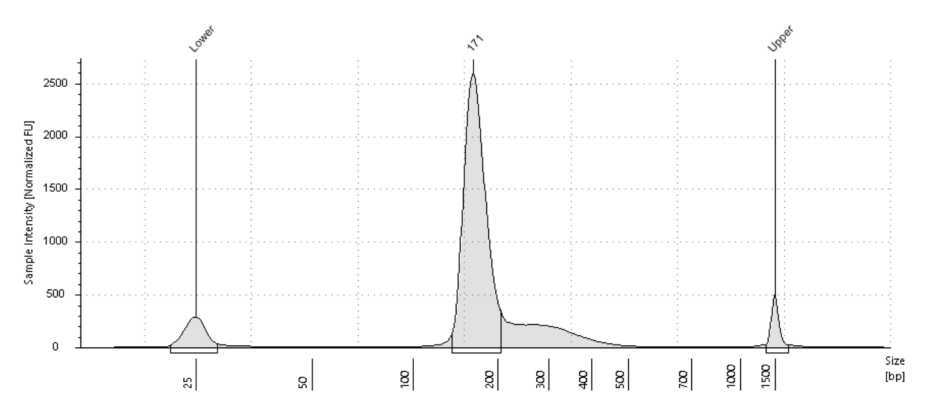
Here is an example trace of a successful library run on a D1000 Tapestation:
There is a peak of 160bp or more, and no adapter dimer or 140bp.
-
Sequence the samples on Illumina NEXTSeq500 or comparable machine. Include PhiX if running CLIP samples alone.
-
See the description on suggested pipelines to analyze the data.
Purification of the RNA on oligo-dT beads
Follows easyCLIP protocol.
- Use 20 µl oligo-dT beads per sample in a DNA LoBind tube
- Wash the beads with BIB buffer and leave in 600 µl BIB
- Transfer the Proteinase K extract to the beads
- Overhead rotation in the cold room
4°C0h 20m 0s - Wash 1x BIB, 2x NT2 buffer and 3x with ice cold PBS with added RNase inhibitor
Reverse transcription
Use standard Illumina small RNA RT primer: GCCTTGGCACCCGAGAATTCCA
I use a magnet for PCR tubes for this step, but one could also use normal 1.5ml tubes and heat in the thermocycler.
- Prepare double number of PCR tubes as your number of samples
- Heat up the PCR block to 95°C
- Prepare the Superscript kit on ice
- After the last wash, resuspend oligo-dT beads in a mix of 12.4 µl RNase-free water + 3µl RT primer
- Heat
95°C0h 3m 0s, immediately transfer to the magnet and quickly collect the supernatant into a fresh PCR tube - Place the tubes on ice for
0h 5m 0s - Add 6.7 µl of the master mix:
| A | B |
|---|---|
| 5x Superscript buffer | 4 |
| 10 mM dNTPs | 1 |
| 0.1M DTT | 1 |
| SuperaseIn | 0.5 |
| Superscript III | 0.5 |
| Rnase-free water | 1 |
50°C 1h 0m 0s
Library PCR
Use Illumina small RNA barcoded primers (1 sample = 1 barcode).
You can also order them yourself (see materials).
Use the same forward primer and different barcode index reverse primer for each sample to be multiplexed.
Use NEBNext High Fidelity 2x PCR Master Mix.
Pilot PCR
Perform small scale PCR to determine the number of cycles.
Depending on the scarcity of the sample, I perform 3-5 pilot reactions.
The mix for 5 reactions:
| A | B |
|---|---|
| cDNA | 5 |
| small RNA forward primer | 1 |
| small RNA reverse barcode (index) primer | 1 |
| NEBNext PCR MM | 25 |
| water | 18 |
Pipet the mix onto 5 PCR tubes 10 µl each.
Perform the following PCR program:
(place samples in cycler when T > 80°C)
0h 2m 0s 95°C
N cycles of:
0h 0m 20s 95°C
0h 0m 30s 60°C
0h 0m 15s 72°C
Final extension:
0h 2m 0s 72°C
for different amount of cycles (depending on your starting material and RBP expect different results).
For example, I use 17, 20, 23, 26, 29 if I expect less material. Or use 14, 16, 18, 20, 22 if expecting a lot.
Take out the tubes one by one after respective number of cycles and keep on ice.
Add 2 µl 6x DNA loading dye to each tube.
Run 6% TBE PAGE gel with a 100bp or another low molecular weight DNA ladder.
Stain the gel for 0h 3m 0s in 1x SYBR Gold (stock is 10,000x) in 1x TBE.
Determine the optimal number of cycles.
The desired productive library size is between 157 bp (expecting 20nt long RNA insert) and 187bp (50 nt insert). Because we rely on RT readthrough, unlike iCLIP, we try to sequence ideally reads of length around 30nt, which are long enough for mapping but short enough to give us single nucleotide resolution.
The adapter dimer is 137bp.
The full PCR product sequence (sense) will be:
AATGATACGGCGACCACCGAGATCTACAC GTTCAGAGTTCTACAGTCCGACGATC CTGATC NNNNNNN [CLIP_RNA 20-50nt] NNNNTGGAATTCTCGGGTGCCAAGGAACTCCAGTCAC [XXXXXX] ATCTCGTATGCCGTCTTCTGCTTG
N's denote unique molecular identifiers (UMIs): random bases which purpose is:
-
Reduce RNA ligase biases
-
Identify unique ligation events and separate them from PCR duplicates.
X's denote Illumina index used for multiplexing samples on the same sequencing lane.
Be aware that depending on the RNaseI digestion efficiency, you may not get a very sharp band.

For this library, I would use 21 or 22 cycles.
Usually it is not recommended to go higher than 22-23 cycles, because low amount of starting material and high duplication rates will waste a lot of sequencing depth, and it will be difficult to analyze the scarce data. If your library comes up very late, try to increase the amount of starting material, overexpress the RBP, if possible, or use a more efficient antibody (in case your RBP is not tagged, make a FLAG-tagged cell line).
Assemble final library amplification:
| A | B |
|---|---|
| rest cDNA | 15-17 |
| NEBNext 2x PCR MM | 25 |
| small RNA forward primer | 1 |
| small RNA reverse barcode (index) primer | 1 |
| water | to 50 |
Run the same PCR program for the chosen number of cycles.
Gel clean up.
We use 2.5% high resolution agarose/TBE gel for final library cleanup.
It can be that your library will be almost invisible on this gel - do not panic and proceed, you do not need very much for a good sequencing run!
To guide purification, you can design genomic DNA primers which give a PCR product of ~160bp and ~140bp. Run them alongside your samples and cut out around 160bp, avoiding the 140bp.
- pour thick-welled 2.5% agarose gel
- leave enough wells for several loads of marker and ideally empty lanes in between samples
- add 6 µl of 6x DNA loading dye to PCR
- run on the gel alongside the size markers (check the separation of 140 and 160bp band to decide when to stop)
- excise the 160bp band (also when invisible) trying to avoid the 140bp band
- extract library using Zymo gel extraction kit (elute in 11 µl)
Troubleshooting
| A | B |
|---|---|
| No double ligated band is seen on the membrane after transfer | Troubleshoot possible steps at which material loss could have occurred (see below) |
| 1. Not enough material | Try to increase the amount of input lysate at least 10-fold. Try to overexpress the RBP. |
| 2. Immunoprecipitation is not working | Collect input, supernatant in IP samples in protein buffer for Western blot assessment of immunoprecipitation efficiency. Note that crosslniking rate of RBPs on average is only ~1%, so do not expect to see a Western blot signal where infrared ligated complexes are. If IP is not efficient, try a differnet antibody or tag the RBP of interest endogenously. FLAG tag usually works well. |
| 2a. RBP is not in the soluble fraction | If you cannot detect your RBP in the input, try checking by Western blot the insoluble pellet after lysate centrifugation at step 7.2. Possibly you may need to change lysis buffer or add sonication if your RBP is very chromatin-bound. |
| 3. Transfer is not working | Image the gel before and after transfer to the membrane. If the double-ligated band is still seen in the gel after transfer, try to increase transfer efficiency by reducing methanol, increasing SDS in transfer buffer and transferring for longer time. Try to increase RNase concentration to get shorter fragments. Alternatively, you can try the original PAR-CLIP protocol by cutting the band directly out of the gel and electroeluting the crosslinked complexes directly out of the gel piece. |
| 4. Only adapter dimer and 3' end ligation product is seen on the gel, but not 5' or double ligation product | DTT in ligation buffer deteriorated. This can happen even you aliquot fresh NEB buffer and use aliquots only once. Always add fresh DTT diluted from 1M stock to 5 mM. |
| No library amplification in pilot PCR | |
| 1. Not enough material | Extend pilot PCR up to 35-40 cycles. If the band of correct size is detected, try to increase the amount of input lysate at least 10-fold. |
| 2. Not efficient Proteinase K digestion | Do use SDS-containing Proteinase K buffer. I had problems with digestion step when using urea-containing buffer. |
| 3. Oligo-dT purification is not working | Check supernatants from the oligo-dT bead purification on an RNA urea-PAGE gel. |
| 4. Reverse transcription is not working | Check your RT enzyme by performing an independent RT reaction with a positive control. |
| 5. PCR is not working | Include a positive control to check the PCR master mix. Use the same primers for pilot PCR as for the main PCR. Check that your primers are from the correct kit (Illumina small RNA kit). (No joke: in case of NEXTflex kits, both small RNA and mRNA forward primers are called simply "Universal forward primer", and if it once gets into the wrong box, you will get no amplification). |
To troubleshoot phosphorylation, ligation, RT and PCR steps, you can use a positive control from the small RNA kit or order yourself a small RNA oligo of length ~20nt. PCR product from these reactions can subsequently be used as a size marker to purify the real library.
Also, Ule lab put together a very detailed forum about troubleshooting all possible steps of CLIP. They are very friendly and responsive, do not hesitate to ask!
