Cell Avidity analysis of murine CD8+ CAR T cells via z-Movi
Tamer B Shabaneh, Andrew R Stevens
Abstract
z-Movi is a cell based assay used to assess the avidity of specific immune cells against their targets. Perform this protocol at the end of generating CAR-T cells. For more information see "Retroviral transduction of primary murine CD8 T cells".
Target cell adhesion efficiency may vary between cell lines. Optimal chip-cell adhesion may be produced with adhesion media besides ConA, such as 0.01% Poly-L-Lysine. A cell-line specific protocol may be needed
This protocol was completed using a variant of B16-F10. "B16-F10 is a cell line exhibiting a morphology of spindle-shaped and epithelial-like cells that was isolated from skin tissue of a mouse with melanoma". We transduced B16-F10 with plasmid pTS194 (see attached ApE file) ( BF194 ) to ectopically express murine HER2 (mHER2) with puromycin resistance driven by a strong lentiviral promoter. Successfully transduced cells were selected for via screening for drug resistance, and confirmed via flow cytometry.
For information on publications that used zMovi, please visit the link below:
Before start
Prepare reagents listed below.
-
1 L cDMEM [1000 mL DMEM (1x), 100mL FBS (heat inactivated), 25 mL HEPES (1M), 10mL L-Glutamine (200 mM), 10 mL Pen/Strep. Filter the mix through 500 mL Bottle top Filter (0.2 μm aPES membrane)].
-
1 L mTCM [1000 mL RPMI1640 (w/ 20 mM HEPES) (1x), 100 mL FBS (heat inactivated), 10 mL Sodium Pyruvate (100 mM), 1 mL HEPES (1 M), 10 mL Pen/Strep, 100 uL 2-Mercaptoethanol (0.5 M). Filter the mix through 500 mL Bottle top Filter (0.2um aPES membrane)].
-
5 mL Concanavalin A type IV-S (ConA) [Reconstitute 5 mg vial of ConA lyophilized powder in 5 mL 1x D-PBS. Invert capped vial several times and incubate for several minutes at room temperature to ensure dissolution].
Attachments
Steps
Day -2: Culture target cells (BF194)
Using Trypsin-EDTA (0.05%), passage B16-F10 transduced with pTS194 (BF194) cell culture at a ratio of 1:4 to prepare for experiment day.
Immediately following passaging, place target cell culture in T-150 back into incubator (37 °C, 5% CO2, 95% humidity).
Day -1: Functionalization of clean, dry z-Movi chip
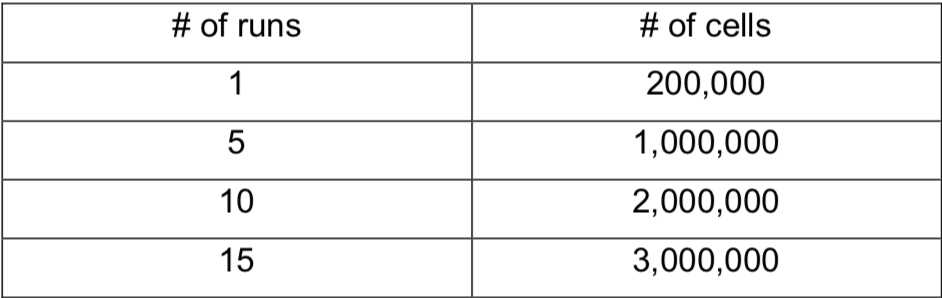
In order to obtain quality data, it's a good idea to run 5 replicates of each effector construct. Plan chip use accordingly.
Functionalize a clean, dry chip with 100 μL Concanavalin A (1 mg/mL) (ConA) for 16-18 hours.
Remove a clean, dry z-Movi chip from 37 °C dry incubator. Acquire z-Movi chip reservoir screw cap and set aside. Before screwing 5 mL luer-lock syringe on, pull back plunger to the 2.5 mL mark. Screw syringe onto z-Movi chip so that the measurement marks are facing upwards.
Using a P-200 micropipette, reverse-pipette 100 μL of pre-warmed 1x D-PBS (PBS) into the chip reservoir. Pipette up and down vigorously several times to dislodge any bubbles that have formed at the bottom of the reservoir during addition.
It is critical that no bubbles are present in the chip reservoir during the reagent addition steps.
While chip valve is still closed, pull back chip plunger to 3 mL mark to create negative pressure. Fully pen the chip valve and allow PBS to flow into chip (1/2). When volume in the reservoir has reduced to approximately 10 μL (~3 mm in column height), quickly close chip valve.
Pipette an additional 100 μL pre-warmed PBS into the chip reservoir, and open the valve while maintaining negative pressure in chip flow cell.
Using a P-200 micropipette, add 100 μL ConA solution to the chip reservoir. Pull back syringe plunger back to the 3 mL mark, open valve, and draw liquid into the flow cell. Close the valve when there is a small layer of liquid left in the chip reservoir.
Ensure there are no bubbles present in the flow cell and immediately proceed to next sub-step.
While the flow cell valve is closed, rinse chip reservoir with 200 μL PBS (1/3)
Rinse chip reservoir with 200 μL PBS (2/3)
Rinse chip reservoir with 200 μL PBS (3/3) and remove liquid, leaving a small layer in the reservoir.
Pipette 200 μL PBS into the reservoir. Securely fasten z-Movi chip reservoir cap to z-Movi chip. Un-screw the luer-lock syringe from the system and place the ConA-functionalized chip into 37 °C dry incubator overnight (14-18 hours).
Day 0: Target cell seeding and assessing monolayer
Preparation of functionalized z-Movi chip for BF194 cell seeding
Following overnight (14-18 hour) incubation, remove the chip reservoir cap and screw the 5 mL luer lock syringe (plunger set to 2.5 mL mark) onto z-Movi chip. Use a P-200 micropipette to discard the PBS left in the reservoir, leaving a small volume.
Replace discarded volume with 400 μL fresh, pre-warmed PBS. Pipette up and down in reservoir to dislodge any bubbles that may have formed.
Pull the syringe plunger back to the 3 mL mark, and open the valve to create negative pressure. Gently pull through 400 μL warm PBS (1/2). Close the valve. Pull through an additional 400 μL warm PBS (2/2) and close the valve.
Creating negative pressure with the syringe plunger, open chip valve and pull 100 μL warm serum-free DMEM through the chip flow cell (1/2). close valve.
Pull an additional 100 μL warm serum free DMEM through the flow cell (2/2), leaving a small amount of liquid in the chip reservoir, and close the chip valve.
Screw on the reservoir cap and place the cell-ready functionalized z-Movi chip into 37 °C dry incubator.
Dissociate and prepare target cells for seeding.
Dissociate target cells cultured in T-150 with 5 mL Tyrpsin-EDTA (0.05%). Pipet dissociated cells into a sterile 15 mL conical. Quench Trypsin-EDTA reaction by pipetting 6 mL cDMEM into cell culture flask to rinse, then pipet into the 15 mL conical containing cell suspension. Homogenize cell suspension by pipetting up and down several times.
Pipet the homogenous cell suspension through 40 μm cell strainer into a new sterile 15 mL conical.
Centrifuge cells 400rcf. With a pipet, resuspend cell pellet in 10 mL PBS.
Centrifuge cells 400rcf. With a pipet, resuspend cell pellet in 10 mL cDMEM. Count cells. Take note of viability. Spin down, re-suspend BF194 cells at 1x10⁸ cells/ml in cDMEM.
Because of the very high concentration of cells in suspension, move quickly to ensure cellular viability is not compromised.
Seed target cells onto z-Movi chip flow cell
Retrieve cell-ready functionalized z-Movi chip from 37 °C dry incubator and place onto z-Movi chip pedestal. Using a small flathead screwdriver, tightly screw in the four corner screws equally to stabilize the chip during use. Remove the reservoir cap and set aside.
While attached to pedestal, screw on the 5 mL luer lock syringe to chip (set to 4.4 mL mark). Pull syringe plunger back to the 4.6 mL mark to create negative pressure.
Before adding target cells, ensure cell suspension is homogeneous and there are no bubbles present in the suspension or chip reservoir.
Add 20 μL target cell suspension to the bottom of the chip reservoir. With your hand on the chip valve, close the z-Movi pedestal lid mostly. Closing the lid to shade the pedestal gives a better visualization of the cells moving through. While watching the camera view, open the valve and count two seconds. Close the chip valve and immediately proceed with next step
Once valve is closed, Use a pipette to rinse chip reservoir out with 100 μL cDMEM (1/3).
Rinse chip reservoir out with 100 μL cDMEM (2/3).
Rinse chip reservoir out with 100 μL cDMEM (3/3).
Leave 100 μL of cDMEM in chip reservoir. Follow prompts on Lumicks Oceon software to center. Once the monolayer begins to form; replace reservoir cap, unscrew z-Movi chip from pedestal, and unscrew luer lock syringe. Place target-cell-seeded z-Movi chip in 37 °C dry incubator. Incubate for 2-4 hours.
Following 2-4 hour incubation, inspect monolayer development on z-Movi pedestal again. Using a P200, pipette up and down several times to ensure there are no bubbles present in reservoir.
Replace the luer-lock syringe on z-Movi chip, and pull through fresh cDMEM in to the flow cell.
Day 0: Preparation of effector cells
Prepare 2x10⁵ effector cells per run. Enumerate and collect effector cells.
Pipette 20 μL of DMSO to a vial of CellTrace Far Red stain to prepare a 1000X solution.
In a sterile 15 mL conical, make a 1X dye solution by adding 1 μL reconstituted CellTrace Far Red to 1 mL of PBS.
Pipet cells to a sterile 15 mL conical for staining. Centrifuge cells 400rpm, discard supernatant. Using a P1000 micropipette, transfer 1 mL of 1X dye solution to the conical. Pipette up and down vigorously several times to dislodge and homogenize the cell pellet.
Incubate cells in 1X dye for 0h 15m 0s.
Following 15 minute incubation, quench the dye reaction by adding 5 mL mTCM to the 15 mL conical.
Centrifuge stained cells 400rpm. Re-suspend tracked cells at a concentration of 5x10⁶cells/mL.
Day 0: Avidity analysis
Follow prompts on Lumicks Oceon software to create an analysis protocol
If choosing to do avidity analysis replicate runs on several different chips, randomize the order of analysis to mitigate the influence of order and target antigen availability dependent results.
Proceed by placing functionalized z-Movi chip with prepared monolayer on the z-Movi pedestal. Securely screw chip down.
Once chip is securely fastened and protocol is open, confirm and center microscope camera on the glass flow chamber. Test monolayer adherence by following the on screen prompts. Continue only if you notice that most of the monolayer does not become dislodged. Some cells may peel off, this is okay. Be sure to flow fresh complete media into the flow chamber to clear dislodged cells.
Once monolayer adherence is validated, continue to tracked effector cell addition.
Move quickly once cells are added to reservoir. As elapsed time increases before flowing cells into flow chamber, the more cells will sediment in the chip reservoir.
For each cell avidity analysis run, add 20 μL of tracked effector cells (5 x 10⁶/mL) to the chip reservoir. Open chip valve, wait 2 seconds, close valve, and check tracked cells on screen. Effector cells within the tracked area of the flow chamber should total between 200-500 for an efficient run.
Immediately after flowing cells into flow chamber and validating efficient numbers of cells, click "Start incubation" prompt.
Analysis will start automatically within the time specified on your protocol. Be sure to rinse reservoir 3 times with complete media before the incubation timer reaches the 1:30 mark. Once the timer reaches the 1:30 mark, make sure the z-Movi pedestal lid is closed.
Once acquisition is complete, flush fresh cDMEM into flow cell. It is likely not all cells will become detached and flow out. Do not try to force them to detach as you will compromise the monolayer integrity. Continue with up to 6 runs per chip.
Day 0: Cleaning z-Movi chips
Immediately following completion of avidity analysis protocol, proceed to cleaning protocol which includes the steps outlined below. More information may be found in the Lumicks manual z-Movi chip cleaning protocol attached in description.
Insufficient cleaning may result in future adherence problems, and may impact the ability to run acoustic force ramps.
During chip cleaning, place syringe on used z-Movi chip with plunger between 1-2 mL mark to maintain high negative pressure and increase sheer force acting on spent monolayer .
Pull 400 μL DI water into the flow cell (1/2).
Pull 400 μL DI water into the flow cell (2/2).
Leave a small amount of water in the chip reservoir. Remove luer lock syringe, discard liquid volume in syringe into a sufficient biohazard container. Screw luer lock syringe back onto z-Movi chip.
Pull 400 μL 10% bleach solution into the flow cell (1/3). Pull completely through, then using the syringe plunger, push back and forth vigorously several times to create bubbles within the flow cell.
Pull 400 μL 10% bleach solution into the flow cell (3/3), making sure there are no bubbles present in the flow cell at this step . Discard flow through held in syringe. With chip valve closed, rinse chip reservoir with 400 μL DI water twice. Incubate 0h 30m 0s.
Immediately after 30 minutes has finished, completely pull through bleach solution.
Pull 400 μL 10% bleach solution into the flow cell and scrub vigorously once.
Pull 400 μL 10% bleach solution into the flow cell, making sure there are no bubbles present in the flow cell at this step . with the chip valve closed, rinse chip reservoir twice with 400 μL DI water. Incubate 0h 30m 0s.
Pull through 400 μL DI water (1/5)
Pull through 400 μL DI water (2/5)
Pull through 400 μL DI water (3/5)
Pull through 400 μL DI water (4/5)
Pull through 400 μL DI water (5/5)
Pull through 400 μL 1M NaOH (1/2), and scrub back and forth several times before pulling through completely.
Pull through 400 μL 1M NaOH (2/2). Incubate 1h 0m 0s. Rinse chip reservoir twice with 400 μL DI water, then screw cap over chip reservoir to prevent evaporation.
Incubations longer than 1 hour may be detrimental to the chip, do not extend NaOH incubation time.
Immediately following incubation, remove z-movi chip screw cap and pull through 400 μL DI water (1/3).
Pull through 400 μL DI water (2/3).
Pull through 400 μL DI water (3/3).
Pull through air multiple times until flow cell is completely dry before long term storage .
Store z-Movi chip in 37 °C dry incubator.
