Botanical Microfossil Extraction from Paleontological Sediments - 'Bot-MEPS' Protocol
Jacopo Niccolo Cerasoni, Megan C. O'Toole, Yoel E. Stuart
Abstract
Palaeobotanical microfossil analyses are often used to reconstruct palaeoecological histories and past environmental change. To do so, many researchers use lake sediment, for which chronological ordering of stratigraphical layers is possible. Lakes accumulate microfossils including pollen, starch grains, diatoms and phytoliths. Diatom and phytolith assemblages allow inference of vegetation, pH, salinity, water chemistry, and environmental temperature, among others. As an example, we employ this method to study the correlation between palaeobotanical microfossils and desert lake history from Nevada. The preliminary results hint at a complex climatic and environmental variance. Here we propose a protocol split into seven sections to isolate diatoms and phytoliths. By following the protocol, one can prepare samples for microfossil identification and interpretation. Researchers can develop an ecological history by analyzing microfossils from different locations and times. A case study is included from a Miocene diatomite deposit paleolake from Northern Nevada. The method resulted in the extraction and isolation of Miocene microfossils dated to approximately 10.3 Mya including phytoliths and diatoms. Another application of this method includes the development of environmental interpretations and hypotheses regarding the future of modern vegetation.
Before start
Create an organized sample inventory and a database of all samples. Include relevant information to identify samples (country, site, feature, level, etc.). Assign unique label codes to each sample (e.g. SITE CODE/YEAR/ID NUMBER). Digitally prepare and print a suitable form for recording observations during the laboratory preparation of samples.
Steps
Sediment Preparation
Using a chisel, outline a section to be used for the study. This should be done in a dust collector or a fumehood with a protective surface (e.g. aluminum foil) laid down to protect the researchers and sample.
Prepare sediment block by cleaning the exposed sections. Stratigraphical layers should be visible for best sampling strategy as per next steps.
Determine how thick the sampling region should be in relation to the thickness of the geological layers. If the source specimen is densely layered, then a thinner sampling region will result in a higher accuracy of placing microfossils within correct historical timelines.
E.g.: varve sediments (such as the examples included here) will include years of deposition in just a few centimeters. In contrast, metamorphic samples might include single-event deposition throughout meters of stratigraphy.
Use a flat tool to separate the sample from the rock. A flat chisel can separate portions until the whole sub-sample is isolated.
 removed. Removed layer is approximately 0.5cm in depth.")
Mass the sample.
Repeat steps 1.2-1.4 for each sample while cleaning the tools and using new aluminum foil to prevent cross-contamination.
Transfer each sample into a new plastic sealable bag, and then put that bag into a 2nd new plastic sealable bag.
Place the bag into a mortar and use a pestle to crush the samples (as finely as possible).

Pour the ground powder through a funnel into sealable falcon test tubes for storage.
Transfer sample to a centrifuge tube, filling to 1/3 of the height to allow volume for chemicals.
Carbonate Removal (HCl)
If the sample contains carbonates, they will have to be removed for quality viewing of the microfossils.
To remove carbonates, start by pouring 50mL of 30% concentration of Hydrochloric Acid (HCl) into a small beaker.
Carefully pipet a small amount of 30% Hydrochloric Acid (HCl) into each centrifuge tube, and stir with a clean pipet to further expose carbonates to acid.
Pipet more 30% Hydrochloric Acid (HCl) to fill the tube, leaving enough room to close the top.
Stir again with a clean pipet tip.
Wait until the bubbling stops and the reaction ceases.
If a reaction is present but slow (low rate of bubbling), heat the samples on a hotplate to a maximum temperature of 70°C until the bubbling ceases.
Allow the samples to cool and stir.
Centrifuge at 1700rpm,0h 0m 0s for 0h 10m 0s to pellet the sediment.
Carefully pipet the supernatant into a1000mL waste beaker half-filled with water.
Fill the centrifuge tube with distilled water (dH2O) 2O), and repeat steps 7 and 8 to rinse the sample. Be sure to remix the sample with a pipet tip to unpellet before centrifuging again.
Repeat until the supernatant is clear, approximately two times.
Dispose of waste Hydrochloric Acid by flushing down the sink while cold water pours from the tap. Leave the water running for 0h 5m 0s.
Dry the samples by repeating step 9 with Acetone . Pipet the supernatant into a 100mL waste beaker.
After decanting the waste Acetone , place samples and the 100mL beaker of decanted acetone in the fumehood to evaporate for 1-2 days. After 3 days, wash out now empty beaker.
Organics Removal (H2O2)
If the sample contains organics, they will have to be removed for quality viewing of the microfossils.
To remove organic material, start by filling the centrifuge tubes halfway with 30% concentration Hydrogen Peroxide (H2O2) 2O2).
Put centrifuge tubes on a hot plate and warm to 40°C. If the reaction is vigorous, remove from heat and place in an ice bucket until reaction has ceased.
After approximately 0h 30m 0s to 1h 0m 0s , increase the temperature to 80°C. If reaction is none or minimal then increase temperature to 100°C. Stir carefully with a pipet tip every 5 minutes. Once no reaction is visible, move to step 15 .
Completely fill the centrifuge tubes with 30% Hydrogen Peroxide (H2O2) 2O2).
If the reaction has not ceased within 8 hours, leave on hot plate overnight at 80°C. Top off with 30% Hydrogen Peroxide (H2O2) 2O2) in the morning if evaporated.
When the samples are a clear yellow or yellow/green, remove from heat and allow to cool.
Centrifuge at 1700rpm to pellet.
Remove supernatant with pipet, rinse with water, and dry with Acetone by repeating step 11.
ZnBr2 Solution Preparation
After carbonate and organic steps are completed or skipped depending on sample content, microfossils have to be isolated. This can be done using a specific gravity solution such as ZnBr2and centrifugation.
To prepare the Zinc Bromide (ZnBr2) 2) solution, start with a magnetic stirrer and slowly add 500g of solid Zinc Bromide (ZnBr2) 2) to 175mL of distilled water (dH2O) 2O).
Based on literature review and trial and error, we generated a Zinc Bromide (ZnBr2) 2) solution with density of 2.3 g/mL using:
 necessary for a density of 2.3 g/mL. The amount of solution is dependent on sample size, quantity, and sediment type.")
Below is a practical example:
Creating a 2.3 g/mL solution of Zinc Bromide (ZnBr2) 2) using 250 g of Zinc Bromide (ZnBr2) 2) with a 4.22 g/mL density from the manufacturer:
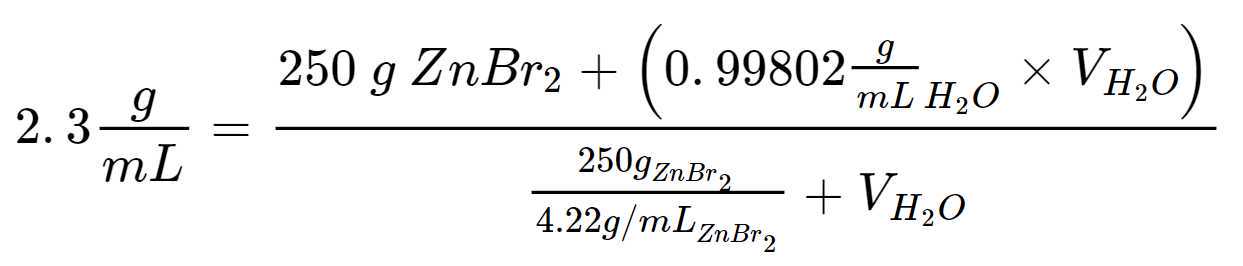
Multiplying both sides by denominator gives:

Rearranging to have like terms on each side:
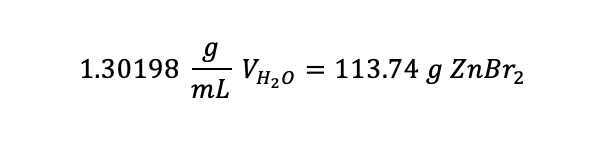
Dividing both sides by 1.30, leaving:
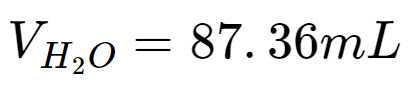
∴ To make a 2.3 g/mL solution of Zinc Bromide (ZnBr2) 2), one should mix 250 g of solid Zinc Bromide (ZnBr2) 2) with 87.36 mL of H2O 2O.
Stir the Zinc Bromide (ZnBr2) 2) solution and cool down for 1h 0m 0s to 2h 0m 0s hours, until room temperature or 25°C, per a thermometer.
Check density using a hydrometer.
The specific gravity density should be 2.30 ± 0.057 g/mL. If higher, add water slowly to the beaker until density decreases to the accepted range. If lower, add Zinc Bromide (ZnBr2) 2) to bring density up to the accepted range.
Pour the solution into a glass bottle, cap, and label it with the date and density.
Heavy Liquid Flotation Separation (with ZnBr2)
To separate paleobotanical microfossils from inorganic sediment, first prepare a new set of labeled centrifuge tubes and a set of pipets with bulbs.
Add dried sample to the new centrifuge tubes.
Fill the centrifuge tubes with the Zinc Bromide (ZnBr2) 2) solution using a new pipet, leaving room so the tube can be closed.
Gently mix with a clean pipet.
Centrifuge at 1700rpm
For each sample, use a new pipet to draw off the microfossil surface layer. Pipet into the new labeled test tube. If no material is visible, draw off 0.5-1 mL of liquid anyway from as close to the surface as possible. Focus on the ring close to the tube wall.

Fill a clear wash bottle with hot non-distilled water (any source including sink will suffice). Add water to dilute the microfossil solution. Stir well with a pipet to mix water and microfossil-ZnBr2 solution. Centrifuge at 1700rpm and decant supernatant with a new pipet into a 'Waste ZnBr2' container. Do not pour down the sink.
If no evidence of floated material is present on the surface of the solution, it could be an indication that only a small amount of paleobotanical microfossils are present. In such case, top off the original sample tubes with Zinc Bromide (ZnBr2) 2) and do a second float separation repeating steps 24-29 .
Repeat step 29 two more times.
Acetone wash the paleobotanical microfossils using the same procedure from step 11.
Mounting Slides
Label a glass side and carefully add a drop of Immersion Oil onto a glass slide.
")
Using a clean spatula, add about a quarter of a pinky fingernail of powder from step 32 to the immersion oil on the slide.
Mix the oil and sample with the tip of a new glass pipet.
Slowly place the coverslip on top of the oil/microfossil mixture.
If the intention is to keep the slide for future use rather than observing right away, seal the coverslip onto the slide with clear nail polish.
Air dry for at least 24 hours before handling.
Repeat step 37 and 37.1 for better sealing of material, if desired.
Microscopy (Brightfield)
Use a compound microscope, binocular or trinocular, for brightfield viewing (light placed below sample, viewing from above).
A polarizing lens will help discern shapes and features in phytoliths and diatoms.
A magnification of 40x is good for the initial observation. For individual identification of microfossils and microscope photography, a magnification of 100x will be required.
 is approximately 20 microns.")
, diatoms (c, d, e; 100x magnification), sponge spicules (f; 100x magnification), and clusters of palaeobotanical microfossils (g, h, i) at 40x magnification. All scales (in black) are approximately 20 microns.")
