U2OS Nucleofection & Analysis Protocol for MSPH Validation
Jason Waligorski, William J Buchser, Mallory Wright, Colin Kremitzki, Graham Bachman
Abstract
Validation steps.
Steps
Design
Choosing synGRNA sequence
This is the method utilized in 2023 for the MSPH library in U2OS cells for validating Raft-Seq hits. This is NOT the tandem gRNA method.
- Choose one gRNA that was a hit from the primary screen, usually from a published library (Brunello)
- Design a 2nd 'backup' gRNA sequenced which is not from the same library, cross-checked with InDelphi for high frameshift %, Hi On Target, and Low Off Target
The majority of syn GRNAs we have tested yield >95% cutting. The fraction of out-of-frame was slightly lower.

Tandem gRNA Approach (alternate)
The approach below is published, but they use in-vitro transcribed gRNAs that are inferior to Xiaoxia's synGRNAs.
For this to work at WashU, we would need the following:
- gRNAs should be designed to have high on-target and low off-target to produce a frameshift
- gRNAs should be less than 250 bp apart so they can be sequenced in the same amplicon
- gRNAs should be in an exonic region, and not span introns or intron-exon boundaries
- Cut site distance should not be divisible by 3 . . even so, it is possible to get an in-frame deletion because of INDEL occurring when the two sides recombine
- The Paper shows gRNAs have to be ~50 bp or more separated to be effective
- Of note, although the synergistic benefit is high with further separated gRNAs, that absolute cutting efficiency is sometimes low (EPHX2 is worst case, but even combined ADK is worse than we usually get with a single gRNA)
![Synergistic effect of tandem guide RNA (gRNA) combinations. (A) Bar chart displaying the percentage of remaining wild-type alleles in CRISPR/Cas9 gene editing (GE) experiments in HepG2 cells using either each gRNA alone—the most efficient guide (driver [D]), the second guide (helper [H]), or the synergistic tandem combination (T)—for 12 targets (14 combinations). An expected additive gRNA combination has been calculated (see Methods) and is also displayed. Distance between the two Cas9 sites is indicated inside brackets. No synergistic effect is observed when the two sites are too close. Horizontal bars: 50% and 90%. (B) Scatter plot showing the synergistic benefit (calculated as the difference between the %GE obtained with the tandem synergistic approach and the %GE that would be expected if the effect of the two gRNAs would only be additive) in relation to the distance in between the two Cas9 sites. Green dots, positive synergistic benefit; red dots, negative synergistic benefit. ADK-S, 1 bp in between Cas9 sites; ADK-L, 58 bp; FABP-S, 26 bp; FABP-L, 52 bp. Horizontal bar, 35 bp.](https://static.yanyin.tech/literature_test/protocol_io_true/protocols.io.kqdg325kqv25/qbmdb6ypp3.jpg "Synergistic effect of tandem guide RNA (gRNA) combinations. (A) Bar chart displaying the percentage of remaining wild-type alleles in CRISPR/Cas9 gene editing (GE) experiments in HepG2 cells using either each gRNA alone—the most efficient guide (driver [D]), the second guide (helper [H]), or the synergistic tandem combination (T)—for 12 targets (14 combinations). An expected additive gRNA combination has been calculated (see Methods) and is also displayed. Distance between the two Cas9 sites is indicated inside brackets. No synergistic effect is observed when the two sites are too close. Horizontal bars: 50% and 90%. (B) Scatter plot showing the synergistic benefit (calculated as the difference between the %GE obtained with the tandem synergistic approach and the %GE that would be expected if the effect of the two gRNAs would only be additive) in relation to the distance in between the two Cas9 sites. Green dots, positive synergistic benefit; red dots, negative synergistic benefit. ADK-S, 1 bp in between Cas9 sites; ADK-L, 58 bp; FABP-S, 26 bp; FABP-L, 52 bp. Horizontal bar, 35 bp.")
Ordering synthetic sgRNAs
Go to Integrated DNA Technologies ǀ IDT (idtdna.com)
#尊敬的用户,由于网络监管政策的限制,部分内容暂时无法在本网站直接浏览。我们已经为您准备了相关原始数据和链接,感谢您的理解与支持。
https://lh7-us.googleusercontent.com/pzfxY0HDiQ9KPulOENzqP5PzKghGLIXyXOKrpBWtO5Vz_3FEwMJpOQZNy_-eyrVQo0_8h0jYJnsPbW6xIoEyTdghZdVhS2xL5hGRSmSNh_7OXcjPqeiLZ5Vi7RiyYrwIe3ZdjyJ7KAW68P9gncnaFg
Click “PRODUCTS & SERVICES” -> “CRISPR-Cas9”
#尊敬的用户,由于网络监管政策的限制,部分内容暂时无法在本网站直接浏览。我们已经为您准备了相关原始数据和链接,感谢您的理解与支持。
https://lh7-us.googleusercontent.com/hPKW1xFLLXOnKZMW0sIBJMvQUBn0DwoNkV5ZSuuNSpt7PnK8evywArvV_-gQ_sXAo56LrHnKbdgG7lyi5kpxw4MJnL81YTVK1aB6ccdHNRErY8CLhyzEoqBFM6pwzi6sy5H58A9AYQ5wHItidFfAvg
Scroll down to “ORDER IN TUBES,” click.
#尊敬的用户,由于网络监管政策的限制,部分内容暂时无法在本网站直接浏览。我们已经为您准备了相关原始数据和链接,感谢您的理解与支持。
https://lh7-us.googleusercontent.com/NGyY9QybUNBdyGNM5gYpFqvnOKDy8B-7JMxOu8bkRiY-s4_jigy7UOu-t1R_A3sJ-KQ-x12i2urUSPCLsJRzC4QPaQicxJWxBJXCjy7CW0ulk32IjMLLlbTVWZjEMkIGtrsrJynSUX1da1MrZqYr5g
Input the full name of your gRNA into the input field next to #1. Select “Alt-R CRIPSR-Cas9 sgRNA, 10 nmol” from the “Scale” drop-down menu. Type your full 20 base sequence into the “Sequence” text box. Select the desired quantity (1 = a single tube). Click “CONTINUE”. Check if we are out of Nuclease-Free Duplex Buffer, add to order if necessary (see step 8). Select “ADD TO ORDER.”
#尊敬的用户,由于网络监管政策的限制,部分内容暂时无法在本网站直接浏览。我们已经为您准备了相关原始数据和链接,感谢您的理解与支持。
https://lh7-us.googleusercontent.com/STQzU6uMeVKRPMp0nOTstCWoGffhip4fr7ldOc8Oi8KXIotmsTFmDfaxwjEnYq39T9Q_-YGZVAXpuMCkxv3DG1RZMkrzW38zdib-Gyc50zF9s1iGUbGU1ufR_eUU88zi-jzHnMKjdUuNaysmOdVpvQ
Click “CONTINUE SHOPPING” to add any additional synthetic gRNAs to your order. When you are done, click “CHECK OUT.”
Under “Billing Address,” change the drop-down menu to “Accounts Payable.”
#尊敬的用户,由于网络监管政策的限制,部分内容暂时无法在本网站直接浏览。我们已经为您准备了相关原始数据和链接,感谢您的理解与支持。
https://lh7-us.googleusercontent.com/9PDIrlYkpWz6YwiXX5Vs7-zgaGOnFZUiPBvmf148rHZ97hQJy90urIFP8GIzxuy-fHClNxvZ1KDSrw8SbwdQ3NY3zMP3JxzuoD9tUxcp3qTYXy6twlmI9rsW9eFL7adeW-p0_HmDgrSfy8tnwdiQkQ
Change the “Choose Payment” drop-down menu to “Buchser,” other fields will automatically populate. Click “SUBMIT ORDER.”
#尊敬的用户,由于网络监管政策的限制,部分内容暂时无法在本网站直接浏览。我们已经为您准备了相关原始数据和链接,感谢您的理解与支持。
https://lh7-us.googleusercontent.com/a8BvuEyRHOiY1D56bHpoMjAB0R7bPQe1z4JFB4g3837dhm2TyKPF3u0LbA34103h8_wjNM8hYKqT7msDu41c-htaMmwjmzGwvQ_H_jnuPTD_TIoTtcqbT19Z3fyuy9XBjuYumuTdrptozrRSVsXcZQ
When your synthetic gRNAs arrive you need to dilute them in a Nuclease-Free Duplex Buffer. There should be a bottle in the “Mariel” 4 degree. If necessary, you can order a new bottle from the “Order CRISPR Essentials” page after you enter the synthetic gRNA sequence.
#尊敬的用户,由于网络监管政策的限制,部分内容暂时无法在本网站直接浏览。我们已经为您准备了相关原始数据和链接,感谢您的理解与支持。
https://lh7-us.googleusercontent.com/AUi5hw2n4VUCJ2qb_uc1BHuE440aWRNFTQu3tgs92aYyYoq0Cb0wCJY9nVbbFo9EEZJ4XpZIuyx9gVIayUf7uJdp7Flws2PKuEQNOdA6oLO9sX6IoPUe0CWHFK8tac2N9LcIs1qp5D9B
Dilute each synthetic gRNA in n microliters where n is 10 times the stock concentration. For example, if your stock concentration is 10 nmol, dilute the synthetic gRNA in 100 μl.
RNP Nucleofection
How we nucleofect LUHMES : dx.doi.org/10.17504/protocols.io.36wgq32d3lk5/v3
CRISPR/Cas9-Mediated Knockdown in LUHMES Cells: Nucleofection and Validation Protocol
General workflow of validation experiments>
-
Get synGRNAs for those of interest (1 or 2)
-
Start up Same parental cell type - U2OS iCas9 (3e5)
-
Nucleofect with RNPs
-
Wait 4 days, take some bulk samples off, and test cutting / primer sets
-
Wait 3 more days (7 total)
-
Calculate # of replicate wells needed (at least 3 sets of wells in at least 2 plates)
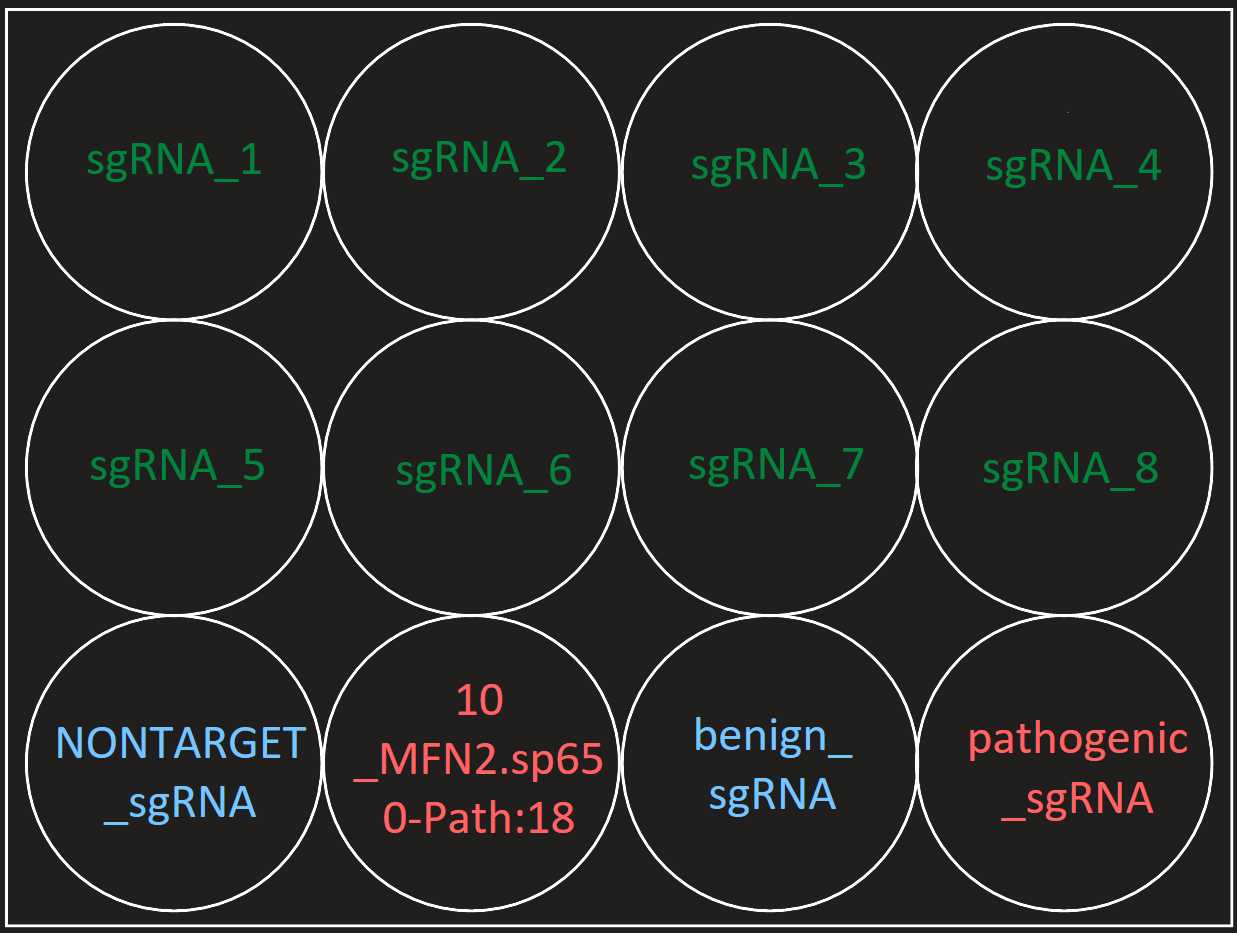
Setup at least 2 96-well plates with random layout and replicates of
the gRNAs and controls (use sterile Biomek i5) - controls are parental
and our usual clones like L76P, R94Q, D04
-
Cells should be plated for ~16 hours, stain in the morning (as with screening)
-
Image mitochondria, analyze morphology
| A | B | C |
|---|---|---|
| (cells per ul^) | ||
| 16 gRNA per run | add 2 uL | |
| Additional P3 Solution | 40 | how many more ul of P3 we want to ensure no trouble aspirating from INTEGRA boat |
| cas9 (10ug) | add 1 uL | |
| Cell Count A | 574,000 | |
| Cell Count B | 524,000 | |
| Cells per uL | 549 | |
| Density Factor | 1.3922 | How much we need to multiply our target density by to ensure that when resuspending in larger volume of P3, retaining target density. |
| FF | 1.10 | |
| Final volume | 1,255.22 | How much cell solution to bring into 1.7ml snap tube |
| Number of Well used in a Lonza Nucleocurvette strip | 6 | |
| Resuspned in P3 Nucleofector Solution + Supplement | 142 | |
| Target Density | 75,000 | |
| Total cell taret / by exact P3 amt. | 3,750 | |
| Total Cells Needed | 626,471 | |
| Working Density | 114,853 | Density to use in calculation with cell count |
17 because we want 20 total in cuvette including 3 ul of RNP
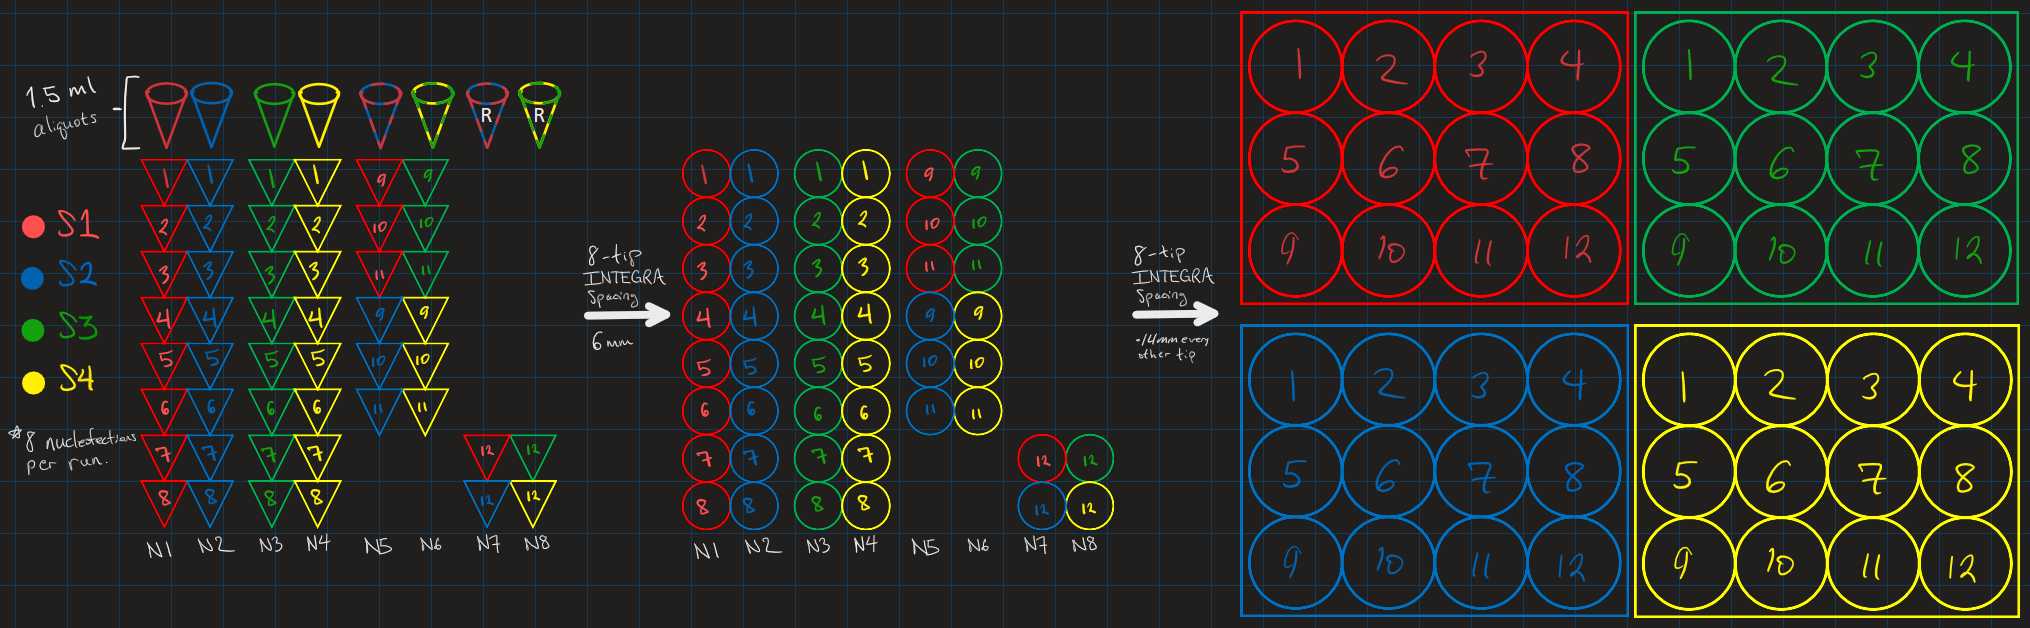
8 nucleofections are run in parallel on a 16 well cuvette and plated onto 12-well plate(s). A single experiment ideally would produce two 12-well plates, each with 8 experimental synthetic gRNAs, 2 negative controls and 2 positive controls from 1 and a half 16 well cuvettes or 4 12-well plates from 16 well cuvettes.
An 8-tip INTEGRA is needed for resuspending cell aliquots in Lanza P3 solution in parallel and transferring nucleoected aliquots from the 16-well Lanza strip to a 12-well plate. See graphic below:
Complex 2 µl of synthetic gRNA with 1 µl of Cas9 protein. Complexed RNPs can be stored at -20C for several weeks without degradation. Remove from freezer and place on ice prior in preparation for nucleofection.
Start up parental cell line - U2OS iCas9 (3e5)
Mix Lanza primary solution with supplement (both stored at 4C) at an 82:18 ratio and place on ice. This is the P3 solution.
The amount of solution you need is determined by (17*n)+e where n is the number of wells you are plating into and e is an additional amount of P3 in µl to ensure no issues in aspirating from the INTEGRA boat later. e was 40µl throughout MSPH validations. The total volume of a single cuvette well is 20µl, 3µl of which is taken up by the RNP, thus the constant of 17µl.
Place 2ml of McCoy’s Tet-Free FBS Media in each well of your 12-well plate and place in
incubator.
Count cells, wash in PBS.
Using the INTEGRA, resuspend
Plate Randomization

Staining and Imaging
96-well plates are to be scanned on the HT Ai confocal microscope, but can be adjusted for any confocal microscope that can detect Blue, Red, and DeepRed channels.
Make a staining media by combining the following dyes as such in a compatible cell media:
Hoechst 1:2500ul media
TMRM: 1:1000ul media
Mitotracker DeepRed: 1:1000ul media
Aspirate existing plate well media and add 100ul of stain media. Allow plate to stain in a 37C/5% CO2 incubator for 30 minutes.
Aspirate stain media and wash each well with 100ul of media and return to incubator until ready to image.
Set up HT Ai to collect the Blue, Red, DeepRed, and Brightfield channels and focus on the plapte bottom.
Dial in Exposure, Laser power percentage, and Focus of each channel and collect as many images as needed. Make sure to label images properly for retrieval after scanning is complete.
PCR and NGS Submission/Analysis
At the time of plating, you should have taken a bulk sample of cells for each synthetic gRNA. These will be used to test the cutting efficiency of Cas9. These cells should have been collected into properly labeled 1.7ml snapcap tubes and centrifuged for 3 minutes at 1200 rpm to pellet the cell and to remove supernatant. Cells should then be resuspended in Extraction Buffer at a ration of 100ul/500K cells and run with the following protocol to extract DNA (https://docs.google.com/document/d/1jzNhZdHz9bz731jB_lTLPowFR0hkQPq9bEsJVN6YzfQ/edit#heading=h.lzms4duz8cm3)
Utilize the NanoDrop one to determine your DNA quantity before taking samples into PCR1
Make sure you have primers ordered that flank the gRNA cut sites. We order three different 20-mer primer sets not to exceed 300bp amplicons and run them against generic bulk DNA to test which primers work best. Primers should have the following DeepSeq tags in order multiplex samples on the Illumina Sequencers. We will link well specific Index Primers in the PCR2 section. You can follow the PCR1 and Gel Confirmation protocols below to test the primers and to run your actual samples.
The two DeepSeq tags are (5’ -> 3’):
Forward: CACTCTTTCCCTACACGACGCTCTTCCGATCT
Reverse: GTGACTGGAGTTCAGACGTGTGCTCTTCCGATCT
So instead of ordering the forward primer CGCTCTGCTAGCTATCCCTG and the reverse primer GCTCGAGGGATCCGTTAACTC, we would order CACTCTTTCCCTACACGACGCTCTTCCGATCTCGCTCTGCTAGCTATCCCTG and GTGACTGGAGTTCAGACGTGTGCTCTTCCGATCT GCTCGAGGGATCCGTTAACTC
DeepSeq primers are only used in the PCR1 section. Forward and reverse Index primers are assigned to us by the Sequencing Core are specific to our lab.
PCR1 MasterMix recipe and Cycler conditions:
Prepare the PCR reaction mix in a sterile microcentrifuge tube by combining the following components:
Template DNA: The DNA you wish to amplify, need ~100 ng of DNA per
- 25 µL reaction
- Forward and Reverse Primers: Short DNA sequences that bind to the start and end of the target DNA region you want to copy.
- MyTaq Red Mix (Meridian Life Science Catalog #BIO-25047): A ready-to-use PCR master mix containing DNA polymerase, dNTPs, buffer, and a red dye.
- DMSO (Dimethyl Sulfoxide): Added to enhance PCR specificity and amplification of GC-rich templates
| A | B | C | D |
|---|---|---|---|
| w/ 100µM Primers | +10% Extra | ||
| # of reactions | 1 | 10 | 844.8 |
| Fwd (100µM) | 0.1 | 76.8 | 84.48 |
| Rev (100µM) | 0.1 | 76.8 | 84.48 |
| MyTaq | 12.5 | 9600 | 10560 |
| DMSO | 1.25 | 960 | 1056 |
| Nuc Free Water | 9.05 | 6950.4 | 7645.44 |
| Template | 2* | ||
| Total Rxn Vol. | 25 |
PCR1 Cycle conditions for Bulk Cellular DNA template
95C - 2:00 min
95C - 15 sec
57C - 15 sec
72C - 30 sec
Repeat above 3 temps 34 more times
72C - 2:00 min
4C - forever
*If more or less Template needs to be used, subtract it from the water in each reaction.
Agarose Gel Confirmation:
Once PCR1 has been completed, follow the Agarose Gel Confirmation protocol to see if you have amplicons for each validation. Set up cassette with combs in cassette container so that it is completely sealed and there won’t be any leakage
- Weigh out 1g of Agarose for a 2 comb gel or 2g for a 6 comb gel and add to an erlenmeyer flask. Pinch the weigh boat for easy addition to the flask
- Add 0.5% TBE buffer to erlenmeyer flask. The amount varies based on the size of the gel - 70ml for a small 2 comb gel, or 140ml for a large 6 comb gel
- Microwave until all agarose dissolves and the mixture is pretty much clear
- 1:15 for 70mL, 1:25 for 140mL and higher (though this isn’t exact)
- Grab the flask from the microwave USING GLOVES/HOT HANDS and run the outside of the flask under cool running water for a bit
- Add SYBR-Safe dye to the flask. The volume added is 1/10000 the volume in the flask, so 70mL => 7µL SYBR-Safe. Swirl until the dye is mixed
- Pour the gel into your cassette and wait until cooled (~30 min)
- Place the gel and cassette into the gel box containing 0.5% TBE buffer and remove the combs
- If you look from the side, the buffer should go at least a centimeter above the gel
- Using the rectangular holes left by the combs, pipette in ladder and then your samples
- Attach the electrodes ( RED at the bottom, BLACK at the top; you can remember this by “Black in Back” or “Run towards Red”)
- Set the voltage to 170V, the mAmps to 400, and the time to run 24 minutes and hit start
- Maker sure there are bubbles being formed by the front and back wires in the buffer
- Take the gel out and image it in the UV chamber, usually around 240 exposure.
- Save image into the Buchser Lab Gels folder by pressing the “Export For Publication” tab at the bottom and exporting it as a .tif file.
- Name the file in this format: YYYYMMDD_FIV###_AdditonalDetails_Initials
PCR2 and Pooling:
This is the step where we combine all our samples. Technically the PCR2 and pooling/cleanup steps are separate, but we have usually done them in quick succession for convenience.
Our input to the PCR2 is PCR1 product, importantly containing the universal DeepSeq tags. The DeepSeq tags are what the forward and reverse primers containing the all-important indices (aka barcodes) latch onto in order to do the overhang PCR.
Once the barcodes are added, we can simply pool the PCR2 product together. In order to go from that pooled stuff to an actual NGS submission, we have to clean up the product using magnetic beads and dilute it to a standard molar concentration.
The Buchser Lab Index Scheme
(This system was largely copied from GESC, because it works pretty well)
Our system of Barcoding uses pairs of indexes, a forward (6bp) and a reverse (10bp). Adding different barcodes according to sample allows us to combine multiple samples together (multiplexing) which makes things a lot more efficient. The indexes are surrounded by sequences called adaptors to make the full primer. The adaptors are for binding to the DeepSeq tags on one end and binding to the oligos in the Illumina sequencer on the other end
You can find the forward indexes here:
R:\FIVE\Genotyping\Dual Index Primers FIVE.xlsx
And the reverse index primers here:
\genstorage.wustl.edu\smlab\Protocols\NGS in Index_Plate_Ordering_Template_PZ.xlsx
for Z=1,2,3,4
Note: The reverse indexes are the variable region within these primers, but they are reversed-complemented from the actual index sequence that the SIC uses.
We share the reverse indices with GEiC, but the forward indices belong solely to the Buchser Lab, so be careful in giving those sequences out.
There are 16 different forward indexes (NGS.1 - NGS.16) and 384 different reverse indexes (Plate1_A1 - Plate4_H12). The forward index primers are just in different tubes, but the reverse index primers are organized into 4 different 96 well plates (hence the naming scheme), so that instead of pipetting out from 384 different tubes, we can use a machine that will take a sample from a whole 96 well plate 4 times. The forward index file also shows how we number plates for NGS, e.g. NGS.1 with the Reverse Index Plate 2 is Plate101 and NGS.5 with the Reverse Index Plate 3 is Plate118. These plate #s are what show up when we get our sequencing results back.
What matters is the unique combination of indexes, so we can pool up to 16 x 384 = 6144 samples = 64 96-well plates of samples without any overlap.
PCR2 Mastermix recipe and Cylcer conditions:
#尊敬的用户,由于网络监管政策的限制,部分内容暂时无法在本网站直接浏览。我们已经为您准备了相关原始数据和链接,感谢您的理解与支持。
https://lh7-us.googleusercontent.com/docsz/AD_4nXd-17EmrdvH9V0-WUfBw0RbG4S7MImuOHVpCFqU4hFtVUU_rxm6dT7j0XLyjMhO0GCqz5d1JaIdNNmu1sRtnpcLzm9taW7vzcFIcMXg4mKzseFoAOZs2Ms7dCK4w5YeoF-mmLamSK85TL7LoQW6dlnGJ9fI?key=fVlZoWm-P19mLAMGDVh6Hg
PCR2 Cycle conditions for Bulk Cellular DNA template
95C - 2:00 min
95C - 30 sec
56C - 30 sec
72C - 40 sec
Repeat above 3 temps 4 more times
72C - 2:00 min
4C - forever
Ampure Bead Sample Cleanup:
Once PCR2 has completed, your samples can be pooled by hand into one bulk sample. We then clean up the sample with the following protocol before submission to the Sequencing Core
- Label one 0.2mL tube with 0.6
- Transfer 100µL of the NGS pool into the 0.2 mL tube.
- Obtain Ampure XP beads from the fridge and vortex until all beads are in solution
- Dispense 60ul of beads into the 0.6 tube
- Pipette thoroughly to get a homogenous mixture of beads/sample
- Incubate at room temperature for 5 minutes.
- After incubation, place tubes on 96-well plate magnet for 3 minutes
- Remove 155ul supernatant and discard in labeled waste container. Leave tubes on the magnet.
- While on magnets, dispense 200µL of 70% ethanol in each tube. Incubate for 30 seconds. Aspirate 200µL of ethanol from each tube.
- Repeat for a total of 2 washes
- Use a 10ul pipette to remove an residual ethanol from well
- Remove tube from the magnet and dispense 40µL of water in tube. Triturate to get a homogenous mixture. Incubate for 3 minutes.
- Place the tube back on the magnet. Incubate for 1 minute or until the solution becomes clear.
- While on the magnet, carefully transfer the supernatant to a new 0.2mL labeled tube while avoiding any of the beads on the side.
- Calculate the concentration (ng/µL) using GESC’s nanodrop instrument.
- Select dsDNA.
- Wait for instrument to Self Test.
- Add 1.2ul Elution Buffer.
- Wipe away sample and add 1.2ul Sample.
- Record reading which usually should be between 10ng/ul and 60ng/ul
- Perform a dilution using the nM Conversion Calculator for NGS spreadsheet on the desktop of the computer next to the nanodrop instrument.
- Enter the concentration(ng/µl), BasePair Length= Amplicon size. Then look at the returned information in the dilution column. This is the amount of your cleaned up sample you should add to a labeled 1.7mL tube. The total volume of the tube should be 40µL. For example, the spreadsheet returns a dilution value of 2.58. In the 1.7 mL tube, you will add 2.5µL of the cleaned up sample to 37.5µL of Elution Buffer.
- Label the 1.7mL tube with colored dot with Buchser Lab, Sample Name, 2x150 run, Date and Initials
- Send the Genotyping Submission Form to CGSSB-DSIL@LISTSERV.WUSTL.EDU
- Take the tube to Jess and MariaLynn on the 4th floor of the Couch building. If it’s Tuesday afternoon, drop tubes off in Jess’s Ice Bucket on her bench. Any other drop offs can go in the small drop off freezer in the equipment hallway.
Once your NGS reads that have been returned from the Sequencing Core, you can follow the protocol below to download the NGS reads and run cutting analysis.
