T-2 TICK PROCESSING
REDI-NET Consortium
SORT TICK SAMPLES
PREPARING TICK e-ID (IDX)
IMAGING USING TICK E-ID
PREPARING DINOSCOPE
TICK HOMOGENIZATION
Disclaimer
This work is supported by the US Army Medical Research and Development Command under Contract No.W81XWH-21-C-0001, W81XWH-22-C-0093 and HT9425-23-C-0059. The views, opinions and/or findings contained in this report are those of the author(s) and should not be construed as an official Department of the Army or Navy position, policy or decision unless so designated by other documentation.
Abstract
This protocol details tick processing.
Before start
BEFORE START
- Pre-cool the Bullet Blender by adding dry ice into the cooling compartment and running the cooling program.
- Clean the work surfaces with RNaseZap, then wipe the surfaces with 70% /molecular biology grade ethanol to remove additional contaminants.
- Transfer 0.1 mm zirconium oxide beads (2 spoons, Appendix 1) to Thermo Scientific Screw Cap Micro 1.5 ml Tubes.
- For the first time use of IndiMag pathogen kit, add 100% ethanol to Buffer AW1 and AW2, and add 100% isopropanol to ACB as indicated on the bottles.
- MagAttract Suspension G from IndiMag pathogen kit needs to be vortexed thoroughly for
0h 3m 0s(before first use) or0h 1m 0s(before subsequent uses) to ensure that the magnetic silica particles are fully resuspended. - Aliquot nuclease-free water in big bottle into a few 15 ml tubes for preparing TNA elution in KingFisher Flex or KingFisher Duo Prime to avoid cross-contamination.
Steps
1. SORT TICK SAMPLES
2. PREPARING TICK e-ID (IDX): Device setup using Bluetooth
If set-up with ethernet is desired, skip to Section 3.
Click the drop-down arrow at the top-center of the page (see figure). Click “Add New Device,” click on the bluetooth icon button. When a device with a name “Agamotto” appears, select the device and click “Pair” . When given the opportunity, select and enter your Wi-Fi credentials [user name, passcode] (the website may throw an error,but ignore this error). Return to the “Data” tab.
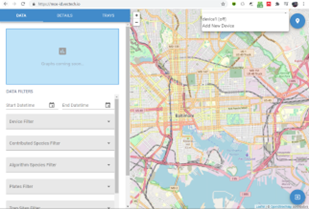
Click the drop-down arrow at the top-center of the page, and you should see a device with status [booting] or [Idle] . If [booting], wait for status to change to [idle] and stay. Then select “ Device .” Setup is complete. If your device soon changes to [Idle] under the device drop down menu, continue to 4. Imaging Protocol.
3. PREPARING TICK e-ID (IDX): Device setup using Ethernet
If setting up with ethernet instead of Bluetooth, follow these steps. Select the user menu at the bottom right corner of the screen. Select “Connect Device.”
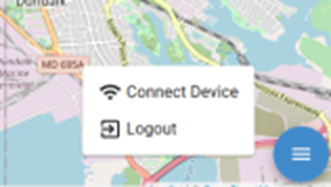
Select “Device.” If the device name is not known, contact Vectech for support. Then select your Wi-Fi name from the “ Wi-Fi SSD” drop down menu. If you do not see your Wi-Fi in the drop down, verify the network is functioning on other devices. Then enter your Wi-Fi password. Select connect.
If a successful Wi-Fi connection is established, disconnect the device from power and ethernet, then reconnect power. If your device soon changes to [ Idle ] under the device drop down menu, continue to Section 4. Imaging Using Tick e-Id.
If you have trouble connecting to the device via Wi-Fi, try to connect an Ethernet cable directly from your device to your modem. You should soon see your device status change to [ Idle ] under the device drop down menu.

4. IMAGING USING TICK E-ID
On https://mos-id.vectech.io , navigate to the “Trays” tab. Verify that the device is plugged in. The device should flash lights when booting up.
Organize the specimens to be multi-imaged in sample tubes laid out in tubes in a 96-well sample rack (8x12). MAINTAIN THE COLD CHAIN. Keep samples in dry ice or in polystyrene boxes filled with cool beans until ready to use. Place a glass tray on the chill table as you fill the rows before imaging and immediately return to storage tubes once imaged. Sequentially lay out the sequential sample across the row, with each row of 12 equaling one tray of multiplex photos.

Wipe forceps using bleach wipes between each sample and rinse each RNA-later preserved sample in water before pulling tick sample on Kimwipes on chiller table to allow absorption of excess fluid before slotting into the imaging wells.
Repeat step 12, until all 12 specimens are placed in the tray, dorsal side facing up.
Close the tray by placing the lid on the well-side of the tray until you hear the gentle click as the magnets connect to keep the tray closed.

Insert tray into device tray slot. Tray will “click” into place when fully inserted.
To capture the dorsal view, go to the “Trays” tab in the website, click, “Capture New Tray.”

Images auto upload.

Enter the following information:
Genus and species (if known).
Plate and well number.
Remove tray, flip upside down (i.e. dorsal to ventral), and insert tray again to capture the ventral image of the tick.
Click “Capture Other Side”.

Click “ Finish ,” and return specimens to original storage. Make a note of the tray number that corresponds to your sample row.
5. PREPARING DINOSCOPE
Place a portable chill table on the adjustable stand.
Place white porcelain stage directly on top of the chill table surface. If a porcelain stage is not available, cut a 5cm x 5cm square from a paper note card and use color lab tape to attach to the bottom of a petri dish to make a stage.
Once in place, secure the stage by taping either porcelain or petri dish stands to sides of the chill table.
Adjust the DinoScope holster on the stand so it is 4.5 cm above the surface of the stage.
Turn on the chill table (skip if not maintaining a cold chain) and wait until the surface temperature monitor reads -20°C .
Ensure all specimens slated for imaging are arranged in individual Eppendorf tubes and stored in 96-well racks labeled with a plate number.
Use a Kimwipe and 75% ethanol to wipe clean the stage surface. If using a petri dish stage, replace paper cards.
6. IMAGING USING DINOSCOPE
Remove a specimen from tube with forceps and place in the center of the stage with the dorsal side facing up.
Using the DinoScope interface and stand fine adjustment, bring the specimen into focus ( magnification requirements will differ between larvae/ nymphs and adults ). Specimens should be centered in the field of view. Make sure all important characters are visible.
Annotate with the file naming convention: Sample ID-View (D = Dorsal, V = Ventral) Example: NMNH2020-D.
Ensure the correct magnification is entered into the Magnification field and that all metadata is included in the image output (magnification, magnification profile, scale, username and annotation) but does not overlap with specimen in the image.
Just before taking an image readjust the white balance for each individual image to standardize the background color for all images.
Take a single image and review the photo to ensure quality (focus, frame, taxonomic characters). If the image is not satisfactory delete and repeat steps 31 to 35.
Use forceps to flip the specimen so that the ventral side is facing up.
Repeat steps 31 to 35 for ventral view.
Return specimen to tube and repeat steps 30 to 38 until a dorsal and ventral image are captured for all specimens.
When the imaging session is completed, copy photos from the dated folder and save.
7. BEFORE TICK HOMOGENIZATION
Clean the work surfaces with RNaseZap, then wipe the surfaces with 70% molecular biology grade ethanol to remove additional contaminants.
Transfer 0.1 mm zirconium oxide beads (two spoons, Appendix 1) to Clear RINO brand 1.5 ml screw-cap microcentrifuge tubes.
For the 1st time use of the IndiMag pathogen kit, add 100% ethanol to Buffer AW1 and AW2, and add 100% Isopropanol to ACB as indicated on the bottles.
Buffer ATL may form precipitates upon storage. If necessary, warm to 56°C until the precipitates have fully dissolved. Prepare buffer ATL-DX: add 100µL Reagent DX to 15mL Buffer ATL. If smaller amounts are needed, transfer 1.5mL of Buffer ATL into a sterile 2 ml vial and add 10µL Reagent DX. Mix well, after addition of Reagent DX. After preparation, the mixture is stable for 6 months at Room temperature (15-25°C).
MagAttract Suspension G from the IndiMag pathogen kit needs to be vortexed thoroughly for 3 mins (before first use) or 1 minute (before subsequent uses) to ensure that the magnetic silica particles are fully resuspended.
Prepare a few 15 ml or 50 ml conical centrifuge tubes with nuclease-free water for preparing TNA elution in KingFisher Flex or KingFisher Duo Prime to avoid cross-contamination.
8. TICK HOMOGENIZATION
Clean forceps with 70% ethanol and Kimwipes before use and between samples.
Label orange RINO RNA lysis tubes on the cap.
Wash tick using ice-cold 1x PBS:
For adult ticks: 3 times sequentially in Petri dishes to wash away any external pathogens.
For nymph ticks: in a clean microcentrifuge tube 1.5mL, add 250µL of PBS and pipette off the supernatant without pipetting the nymph. Repeat sequentially 3 times to wash away any external pathogens.
For larval ticks:
- Transfer 60 tick from lint roller to an orange RINO tube containing five 3.2 mm beads or use pooled larval ticks stored at
-80°Cin orange RINO tubes (see step 1). - Add
200µL1x PBS to wash the ticks. The ticks will be floating at the top of the 1x PBS. - To remove the PBS, using a pipette with 200 µL tip, directly insert the tip to the bottom of the tube and aspirate the PBS until all PBS is retrieved. Discard the PBS and repeat the wash twice. The minimum 1x PBS residuals retaining on the beads will not affect the result.
Tick transfer:
For adult ticks: Transfer individual ticks into labeled orange RINO tubes and set On ice.
For nymph ticks: For a good amount of material used in downstream processing, transfer a pool of ticks (approximately 10-15 nymph, according to their size) until reaching the size of one bead (see Appendix 2), into labeled orange RINO tubes and set On ice.
For larval ticks: See step 51.3. A pool of ticks reaching the size of one 3.2 mm bead will be sufficient (approximately 60 larvae, according to their size, see Appendix 2). Label the orange RINO tubes from step 51.3 and set On ice.


Ensure the Bullet Blender is fully cooled down. Add more dry ice into the cooling compartment of Bullet Blender, if necessary, then load the RINO tubes with ticks.
Set the controls for Speed 10 and Time 3. Press Start.
After the run, remove the tubes from the instrument, briefly spin down and set On ice.
Add 400µL cold sterile 1xPBS into each orange RINO tube with ticks.
Return RINO tubes to the Bullet Blender.
Set the controls for Speed 10 and Time 3. Press Start.
After the run, remove the tubes from the instrument and visually inspect the samples. If homogenization is incomplete, repeat the homogenization at speed 10 and Time 3 (for larvae, one time beating should be sufficient for homogenization).
Centrifuge the suspension at 100x g to pellet debris.
Without disturbing the tubes, carefully transfer the top 320µL supernatant into 1.5 mL tubes.
9. MICROBE LYSIS
80µL of ATL-DX Lysis Buffer to the 1.5 mL tubes containing 0.1mm beads from step 52. Transfer 320µL homogenate to each of the pre-labeled bead tubes.
Include a positive control for each batch of samples: transfer 37.5µL ZymoBIOMICS Microbial Community Standard Material and 100µL EBV, and 100µL HIV standard into a tube from step 62. Add 82.5µL 1x PBS.
Include a negative control for each batch of samples: a bead tube with 320µL cold sterile 1xPBS only.
Add more dry ice into the cooling compartment of Bullet Blender, if necessary and then load the all bead tubes (samples and controls).
Set the speed at 12 and time at 3. Press Start.
Let the samples settle for 0h 1m 0s and then repeat step 64.
Centrifuge the tube at 100x g.
Carefully transfer the 350µL supernatant from the RINO tube to a new snap-cap 1.5 ml microcentrifuge tube, avoiding bead carryover (slight bead contamination is tolerated).
10. INSTRUMENT SET UP
Confirm 96 deep-well magnetic heads and 96 well deep-well heat blocks are being used.
Ensure the program IndiMag_Pathogen_KF_Flex_4wash has been downloaded and loaded onto the KingFisher Flex instrument.
10.1 SET UP THE PROCESSING PLATES
Set up the Wash, Elution, and Tip Comb Plates outside the instrument according to the following table:
| A | B | C | D | E |
|---|---|---|---|---|
| Plate ID | Plate position | Plate type | Reagent | Volume per well |
| Tip comb | 7 | Place a 96 Deep-well Tip comb in a deep-well plate | ||
| Elution | 6 | Deep-Well | Nuclease-free water | 75 µL |
| Wash 4 | 5 | Deep-Well | 100% ethanol | 750 µL |
| Wash 3 | 4 | Deep-Well | 80% ethanol | 750 µL |
| Wash 2 | 3 | Deep-Well | Buffer AW2 | 700 µL |
| Wash 1 | 2 | Deep-Well | Buffer AW1 | 700 µL |
| 1 | Sample Lysate | Lysate and lysis buffer | 985 µL |
10.2 EXTRACTION
Centrifuge the 1.5 mL tubes with lysate from step 70 for 12000x g.
Add 20µL of Proteinase K into wells (based on number of samples) of a new Deep-well plate.
Transfer 270µL supernatant of step 71 without any particle carryover to the wells of the Deep-well plate containing proteinase K. This plate becomes the Sample Plate.
Add 135µL Buffer VXL, 540µLBuffer ACB, and 20µL MagAttract Suspension G to each sample in the sample plate. For multiple samples, make a master mix with 10% overage. Invert slowly to mix the master mix, avoid foaming (can be mixed on Hula mixer for 2 min). Add 695µL mixture to each sample.
Select the program IndiMag_Pathogen_KF_Flex_4wash on the instrument.
Start the run, then load the prepared plates into position when prompted by the instrument.
10.3. QUANTIFICATION AND STORAGE
After the running protocol is completed (~35 minutes), immediately remove the elution plate from the instrument and cover the plate or transfer the eluate to the final tube or plate of choice for final storage.
In a 0.6 mL microcentrifuge tube, use 1µL total nucleic acid for DNA and RNA concentration measurement using Qubit 4 Fluorometer following manufacturer instructions.
Proceed with sample testing following the REDI-NET SOP T-4 Tick Testing or store at -20°C for less than 2 weeks.
11. INSTRUMENT SET UP
Confirm 12-tip magnetic head and 12 well deep-well heat blocks are being used.
Ensure the program IndiMag_Pathogen_KF_Duo_4wash has been downloaded and loaded onto the KingFisher Duo Prime instrument.
11.1 SET UP THE SAMPLE PLATE AND ELUTION STRIP
Set up the Sample Plate according to the table below:
| A | B | C | D |
|---|---|---|---|
| Row ID | Plate Row | Reagent | Volume per well |
| Sample row | A | Lysate and lysis buffer | 985 µL |
| Wash 1 | B | Buffer AW1 | 700 µL |
| Wash 2 | C | Buffer AW2 | 700 µL |
| Wash 3 | D | 80 % ethanol | 750 µL |
| Wash 4 | E | 100 % ethanol | 750 µL |
| Tip Comb | F | Tip comb | 700 µL |
| G | Empty | ||
| H |
Set up the Elution Strip according to the table below:
| A | B | C | D |
|---|---|---|---|
| Row ID | Plate Row | Reagent | Volume per well |
| Elution | A | Nuclease-free water | 75 µL |
11.2. EXTRACTION
Centrifuge the bead tubes with lysate from step 68 for 12000x g.
Add 20µL of Proteinase K into wells (based on number of samples) of a sample row.
Transfer 270µL supernatant without any particle carryover to the wells of the sample row containing proteinase K.
Add 135µL Buffer VXL, 540µL Buffer ACB, and 20µL MagAttract Suspension G to each sample in the sample row. For multiple samples, make a master mix with 10% overage. Invert slowly to mix the master mix, avoid foaming (can be mixed on Hula mixer for 2 min). Add 695µL mixture to each sample.
Select program IndiMag_Pathogen_KF_Duo_4wash on the instrument.
Start the run, then load the prepared plate/strip into position when prompted by the instrument.
11.3 QUANTIFICATION AND STORAGE
After the protocol is completed (~35 minutes), immediately remove the elution strip from the instrument and transfer the eluate to the final tube or plate of choice for final storage.
Use 1µL total nucleic acid for DNA and RNA concentration measurement using Qubit 4 Fluorometer.
Proceed with sample testing following the REDI-NET SOP T-4 Tick Testing or store at -20°C for less than 2 weeks.
APPENDIX 2. SIZING CRITERIA FOR TICK NYMPH AND LARVA POOLING
NOTE: The size of nymphs from different tick species could vary which may influence the number of nymphs needed for pooling.
The picture below provides an “actual” size reference for 10 nymphs of Amblyomma americanum pooled in a 1.5 ml microcentrifuge tube compared to a 3.2 mm diameter stainless steel bead in an identical tube (used for tick sample processing).
| A |
|---|
| Number of nymphs pooled: 10 Amblyomma americanum |
| The diameter of the stainless steel bead: 3.2 mm |
#尊敬的用户,由于网络监管政策的限制,部分内容暂时无法在本网站直接浏览。我们已经为您准备了相关原始数据和链接,感谢您的理解与支持。
https://lh7-us.googleusercontent.com/FYTrXeMjPftrA_Zu8f1ZLvyvTdEA4-Wz6S8eKAvnRBL2H21vDzWqm7SoqPaBpI75vKOmTHNaL9546HOV5T3XmLI-30jn4C_YYyU_jsoxcYsdAJyPRg1fFZEICH_RlY6i2d-SkZb7tqC7SALIOOmn6Q
The picture below provides an “actual” size reference for 60 larvae of Amblyomma americanum pooled in a 1.5 ml microcentrifuge tube compared to a 3.2 mm diameter stainless steel bead in an identical tube (used for tick sample processing).
| A |
|---|
| Number of larvae pooled: 60 Amblyomma americanum |
| The diameter of the stainless steel bead: 3.2 mm |
#尊敬的用户,由于网络监管政策的限制,部分内容暂时无法在本网站直接浏览。我们已经为您准备了相关原始数据和链接,感谢您的理解与支持。
https://lh7-us.googleusercontent.com/CdHzsT7Iqh8w1xqflzTSBZ30MS6rbLmzMlAF5ZP7qn-fA2C-KVtB_vC53jS1YkM4wFrcXT99TPmwMWOZhM-t3ISCVQ7ZOpsjyKCv7osaMwfDivLwOSpjJ0MGI6QVAqi6vZ4vR5LM-da-Zw5M3aIOcA
APPENDIX 3. DNA and RNA Measurement Using QUBIT FLUOROMETER 4.0
DNA quantification:
According to the volume of sample used, add the 1xHS dsDNA Qubit Assay for a final volume of 200 µL (i.e., if using 1 µL of sample, add 199 µL of 1x HS dsDNA Qubit Assay.
RNA Quantification:
In a new microcentrifuge tube/falcon tube (depending on the number of samples processed), prepare a working solution of the Qubit HS RNA Assay:
| A | B | C |
|---|---|---|
| Reagents | Volume/sample | Volume for n+1 sample |
| Qubit RNA HS Assay buffer | 199 µL | …. µL |
| Qubit RNA HS Assay Dye | 1 µL | …. µL |
In a new 0.6 ml tube, mix 199 µL of Qubit HS RNA Assay working solution and 1 µL of the sample. Incubate for 1 minute at room temperature before reading.
