Sample preparation and imaging for large scale 3D spectral confocal imaging of tissues
Tarek M. El-Achkar, Michael Ferkowicz
Abstract
Frozen participant samples are first sized and preserved for high-resolution 3D imaging. Preserved biopsy sections are imaged, without staining, to understand the sample’s structure and condition. Next, the biopsy sections are stained with antibodies and fluorescent dyes to identify specific structures and cells with pathological significance. This stained sample is imaged in its entirety giving a 3D image. Finally, the 3D image is analyzed by experts to assess known and novel pathologies.
This protocol summarizes both label-free imaging and labeling for fluorescence imaging including the labeling, mounting and imaging approaches. The fluorescent labels used herein include conjugated or fluorescent small molecules and conjugated antibodies. Protocol 2 uses both directly conjugated primary antibodies for identifying specific antigens and indirect labeling with a fluorophore conjugated secondary antibody that recognizes the primary antibody.
Multiple rounds of imaging are enabled by the use of a non-hardening mounting media, low charge slides and removable rubber cement as a sealant. Details are described below.
Two imaging approaches are outlined: protocol 1 and 2. Protocol 1 involves label free imaging of auto-fluorescent species and second harmonic generation (SHG) with multiphoton excitation. These modalities are followed by protocol 2, which involves staining with fluorescent small molecules and immuno-fluorescence and subsequent large scale 3D confocal fluorescence imaging. There are three different staining strategies used in protocols, summarized in Table 1.
These protocols start with fixed 50 µm tissue sections prepared as described in the Cryopreservation protocol.


Version 3.0
| A | B | C | D | E | F | G |
|---|---|---|---|---|---|---|
| Structure/cell type | Target | Species | Vendor (cat #) | Dilution [stock] | Direct labeling | Indirect labeling |
| nuclei | DAPI | - | ThermoFisher (D1306) | 1:200 [1 mg/mL] | - | - |
| vasculature | Phalloidin | - | ThermoFisher (O7466) | 1:200 [2 U/mL] | Oregon Green | - |
| glomeruli | " | - | " | " | " | - |
| brush borders | " | - | " | " | " | - |
| TAL | THP | Sheep | R&D Systems (AF5144) | 1:1000 [0.2 mg/mL] | Alexa 546 | - |
| Proximal tubules | AQP1 | Goat | Santa Cruz (sc-9878) | 1:50 [0.2 mg/mL] | - | donkey anti-goat Alexa 568 (1:200) |
| Neutrophils | MPO | Rabbit | Abcam (ab9535) | 1:50 | - | donkey anti-rabbit DyLight 594 (1:200) |
| macrophages | CD68 | Mouse | Dako (M0876) | 1:50 [0.3 mg/mL] | - | donkey anti-mouse Alexa 633 (1:200) |
| T-cells | CD3 | Mouse | BD Pharmingen (557706) | 1:50 | Alexa 647 | - |
| vasculature | CD31 | Mouse | NovusBio (NB600-562ss) | 1:50 [1 mg/mL] | Alexa 660 | - |
this panel was initiated for KPMP 2.0 (first stains October 17, 2022)
Version 4.0
| A | B | C | D | E | F | G |
|---|---|---|---|---|---|---|
| Structure/cell type | Target | Species | Vendor (cat #) | Dilution [stock] | Direct labeling | Indirect labeling |
| nuclei | DAPI | - | ThermoFisher (D1306) | 1:200 [1 mg/mL] | - | - |
| vasculature | Phalloidin | - | ThermoFisher O7466 | 1:200 [2 U/mL] | Oregon Green | - |
| glomeruli | " | - | " | " | " | - |
| brush borders | " | - | " | " | " | - |
| TAL | THP | Sheep | R&D Systems (AF5144) | 1:1000 [0.2 mg/mL] | Alexa 546 | - |
| proximal tubules | AQP1 | Goat | Santa Cruz (sc-9878) | 1:50 [0.2 mg/mL] | - | donkey anti-goat Alexa 568 (1:200) |
| neutrophils | MPO | Rabbit | Abcam (ab9535) | 1:50 | - | donkey anti-rabbit DyLight 594 (1:200) |
| macrophages | CD68 | Mouse | Dako (M0876) | 1:50 [0.3 mg/mL] | - | donkey anti-mouse Alexa 633 (1:200) |
| hematopoietic cells | CD45 | Mouse | Biolegend (304056) | 1:50 [0.5 mg/mL] | Alexa 647 | - |
| vasculature | CD31 | Mouse | NovusBio (NB600-562ss) | 1:50 [1 mg/mL] | Alexa 660 | - |
This panel was initiated on May 24, 2023.
Steps
Label Free Imaging of Tissue
Mount sample on uncharged slide in PBS using prepositioned piece of spacer tape to support coverslip.
Gently push coverslip to the sample and seal with rubber cement dispensed from a syringe and 16 G needle.
Configure the microscope for multiphoton excitation at 910 nm for detecting SHG and auto-fluorescence (AF) (Table 2).
Equipment
| Value | Label |
|---|---|
| SP8 confocal scan-head mounted upright DM6000 microscope | NAME |
| Confocal Microscope | TYPE |
| Leica | BRAND |
| n/a | SKU |
| Custom motorized stage coupled to a femtosecond pulsing MaiTai DeepSee laser (Spectra Physics, Santa Clara, CA) with EOM modulation for multiphoton excitation and a solid state laser launch providing 405 nm, 488 nm, 552 nm and 635 nm excitation. Imaging is performed with 25x 0.95 NA or 20x 0.75 NA Mimm objective with water immersion for label-free imaging or Leica immersion oil RI=1.51 with a 20x 0.75 NA Mimm objective for spectral confocal imaging. Detectors on the SP8 include two HyD detectors and two photo-multiplier tube (PMT) detectors ordered by wavelength, HyD1, PMT2, HyD3, PMT4. The SP8 is controlled by and linear unmixing is performed in Leica LASX software v. 3.5.2 build 18963. | SPECIFICATIONS |
Configure emission path by opening confocal pinhole and adjust the bandpasses on 2 to 4 detectors to collect SHG (~455 nm) and AF as desired (refer to “Excitation and filter settings”). Use PMTs to avoid detector “overloading” and data loss.
Configure x, y and z limits to cover the entire tissue. Scan in x and y at 0.5-1 µm/pixel. Sample in z with 1-2 um steps.
Perform scans with standard galvanometers set to 400 Hz, and averaging by line 2x.
Fluorescence lifetime imaging is under development and may be included at this step.
Staining of Tissue with Fluorescent Small Modules and by Immunofluoresence
Recover specimen by removing rubber cement and gently lifting coverslip.
Washing: Sample is washed 1x in PBS >0h 10m 0s
Blocking: Remove wash and block non-specific binding sites with PBSTS 4–8 hours at Room temperature on rocking platform.
Indirect primary antibody staining (Table 1): Incubate tissue in 200µL staining solution for all the indirect detection primary antibodies 8-16 hours at Room temperature on rocking platform.
Washing: Wash sample with 2mL PBST 2 times for a total of 6h 0m 0s.
Blocking: Remove wash and block non-specific binding sites with PBSTS 4h 0m 0s to 8h 0m 0s at Room temperature on rocking platform.
Indirect secondary antibody staining (Table 1): Incubate tissue in 200µL staining solution for all the indirect detection secondary antibodies 8h 0m 0s to 16h 0m 0s at Room temperature on rocking platform.
Washing: Wash sample with 2mLPBST twice for a total of 6h 0m 0s.
Blocking: Remove wash and block non-specific binding sites with PBSTS 4h 0m 0s to 8h 0m 0s at Room temperature on rocking platform.
Directly conjugated antibody staining (Table 1): Incubate tissue in 200µL staining solution for all the direct detection primary antibodies 8h 0m 0s to 16h 0m 0s at Room temperature on rocking platform.
Washing: Wash sample with 2mLPBST twice for a total of 6h 0m 0s.
Mount tissue with Prolong Glass or Fluoromount on pre-cleaned sides with silicone grease as needed to support coverslip.
Seal cover slip to slide with rubber cement applied with a syringe.
Large-scale 3D Spectral Confocal Imaging
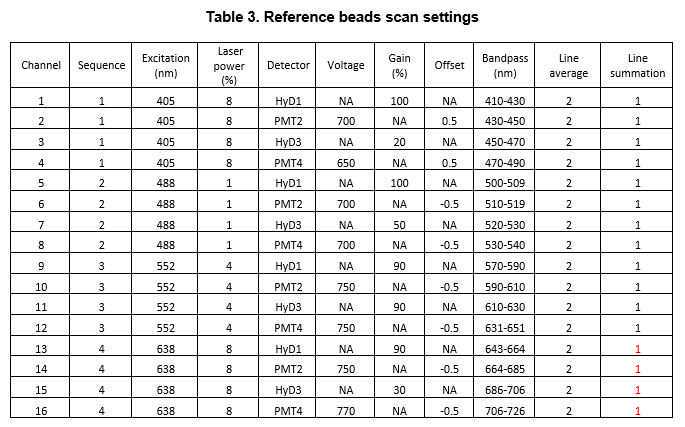
Configure the microscope for spectral confocal imaging as described in Table 2 below.

Configure x, y and z limits to cover the entire tissue. Scan in x and y at 0.5-1 µm/pixel. Sample in z with 1.04 µm steps.
Perform scans with standard galvanometers set to 400 Hz. The multispectral 16 channels are configured as indicated in Table 2 with 4 sequences of 4 detectors.
Preparation of Bead Slide for Reference Spectra
Incubate 20µL of CML latex beads (ThermoFisher, cat# C37253) with 100µg ,0h 0m 0sof fluorophore conjugated secondary overnight.
Wash the beads after centrifuging at 1000x g . Repeat twice. Dilute and mix individually labeled beads in MM (Prolong Glass or Fluoromount) such that 5-10 beads of each individually labeled beads is visible in a field size of 500 x 500 µm.
Beads are mounted under #1.5 coverglass and cured for 48h 0m 0s to 96h 0m 0s
Genearating Matrix for Linear Unmixing
Scan slide-mounted beads labeled with known fluorophores with settings given in the table below for channels 1-16.
Select “Process” -> “Dye Separation” -> “Channel Dye Separation”
Select regions of interest including beads intensity and select “Add” to add to spectra.
Select Rescale to “Per Channel.”
Select “Load” to load a saved matrix. The saved matrix will be displayed near the bottom of the window.
Select “Apply”.
Applying Unmixing Matrix for Linear Unmixing
In the LASX software select image to unmix.
Select “Process” -> “Dye Separation” -> “Automatic Dye Separation”
Set fluorescent dyes to “8.”
Set Rescale to “Per Channel.”
Select “Load” to load a saved matrix. The saved matrix will be displayed near the bottom of the window.
Select “Apply”.
Stitiching/Merging of Unmixed Confocal Volumes
Select images to merge.
Select “Process” -> “Mosaic Merge”
Check “Autostitching”, “Smooth” overlap and “Linear Blending”.
Select “Apply”.
Cytometric analysis of stitched and merged unmixed confocal volumes
All 3D cytometry is performed with the ImageJ plugin Volumetric Tissue Exploration and Analysis (VTEA). The settings for processing, segmentation and gating are given in analysis files. As software improves, new versions of VTEA may be used.
