Rapid transposas based total DNA library preparation and sequencing using MinION
Ashley Jones, Benjamin Schwessinger, Lavi Singh
Abstract
This protocols is part of the ANU Biosecurity mini-research project #1 "Plant Pathogen Diagnostics: Visuals, subcultures, and genomics".
You will be provided four pots of 3-4 week old wheat plants that have been infected with different wheat pathogens. Each pot has been infected with one major pathogen. You will not know which pot has been infected with which pathogen. However, you will be provided a compendium of 10-15 wheat pathogens that will guide you to identify the infective agent for each treatment group. The fifth treatment group will be uninfected wheat plants which will be clearly identified. You can use treatment group #5 as negative control for your experiments.
In total, each group will obtain five pots each:
| A | B |
|---|---|
| Treatment group 1 | Unknown infective agent |
| Treatment group 2 | Unknown infective agent |
| Treatment group 3 | Unknown infective agent |
| Treatment group 4 | Unknown infective agent |
| Treatment group 5 | Uninfected control |
This specific protocol describes the molecular biology and a step-by-step guide for rapid barcoding of total native DNA extracted from the five treatment groups followed by Nanopore sequencing. We will perform sequencing of all five native DNA samples from three research groups to enable us to have three independent replicates per sample. Replications makes our observation and analyses more robust. Total native DNA contains all the DNA extracted from your leaf material plus any contamination that was part of the extraction process. We did not include a negative extraction control this time round.
We will select the samples of three research groups based on their quality control values such as DNA concentration and DNA size measured by gel electrophoresis. Most of the class need not be present for these library preparations but will join in for loading the final library and starting sequencing runs. We will also explain more about the theory during the lab.
This protocol is applicable for week 6.
Conceptual overview:

- Bring all DNA samples to same concentration and same volume.
- Barcode individual samples with transposas loaded with specific DNA barcodes.
- Pool all samples and clean up with magnetic beads.
- Add sequencing adapters with click chemistry applied to the barcoded and pooled DNA samples.
- Prepare for loading onto the flowcell.
- Prime flowcell to make it ready for loading.
- Load library.
- Start of sequencing run.
- Basecall during or after the sequencing run.
You can cite this protocol in the methods section of your report as for all other protocols. No need to write it all up again :).
Attachments
Steps
Preparation of input DNA
This first series of steps will be performed by the three groups we selected in week 5. We will use their total native DNA samples for sequencing. We selected these samples bases on DNA concentrations and DNA integrity. We assessed the former using Qubit and the latter perform agarose gel electrophoresis
Retrieve the DNA concentrations of your five samples from your Qubit measurements in week 4. To note these the original DNA samples and their concentrations BEFORE dilution to 10ng/ul.
Label a PCR strip tube of eight with your group number and sample numbers.
For each sample prepare 500 ng as input for the library preparation in 10ul. This means calculate the volume in uL you need for each sample to reach 500 ng given your concentration measured in week 4. Pipette this volume into the labelled tube and top it up to 10 ul with nuclease free water.
Remember:
n = c*V with n being the amount in ng, c the concentration in ng/ul, and V the volume in ul.
Consult previous protocols if you struggle with these calculations and check with a demonstrator
Mix the samples by short pipetting up and down. Collect the samples at the bottom of the tubes using a benchtop mini-centrifuge.
Once all three groups are done we will have 15 samples in total that we can process for library preparation.
Rapid barcoding library preparation
For these steps we can rotate between groups and people. Only one person will perform the (sub) step at any one point in time.
Program the thermal cycler: 30°C for 2 minutes, then 80°C for 2 minutes. Ramp it up and keep it at 30°C so we can start the program immediately.
Keep the tube on the magnet and wash the beads with 1 ml of freshly prepared 80% ethanol without disturbing the pellet. Remove the ethanol using a pipette and discard.
Repeat the previous step 3.10.
Briefly spin down and place the tube back on the magnet. Pipette off any residual ethanol. Allow to dry for 1 - 2 mins, but do not dry the pellet to the point of cracking
Remove the tube from the magnetic rack and resuspend the pellet in 15 μl Elution Buffer (EB).
Incubate for 10 minutes while warming the tube with your fingers.
Pellet the beads on a magnet until the eluate is clear and colourless, for at least 1 minute.
Remove and retain the full volume of eluate into a clean 200ul PCR tube.
Quantify 1ul of library using Qubit BR as described in previous protocols. Note down the concentration
Transfer 11 μl of the sample into a clean 200ul PCR tube.
Add 0.5uL of Rapid Adapter (RA) and 1.2uL of Adapter Buffer (ADB) to the DNA.
A demonstrator will help you with this step.
Note down which sample will receive which barcode.
Mix gently by flicking the tube, and spin down
Incubate the reaction for 5 minutes at room temperature.
Add 37.6uL of Sequencing Buffer (SB) and 25.5uL of Library Beads (LIB) to the sample.
Note – the library beads settle on the bottom of the tube very quickly. Make sure to mix well before pipetting.
We now have our library ready to load and will wait for the rest of the class to come in.
To each sample add one rapid barcode. Pipette 1.5 ul of the barcode into the 10 ul of 500 ng of DNA.
Immediately mix all the components by pipetting up and down.
Collect all liquid at the bottom of the tube.
We will add the barcodes with a mutli-channel pipette and the demonstrator will help you with it or perform the task for you.
Incubate the tubes at 30°C for 2 minutes and then at 80°C for 2 minutes using the PCR machine we already set up. Once done, briefly put the tubes on ice to cool.
Pool all barcoded samples in a clean 2 ml Eppendorf DNA LoBind tube, noting the total volume of 15* 11.5uL = 172.5ul
Resuspend the magentic beads for DNA binding by vortexing.
Add an equal volume of magnetic beads to the pooled barcoded DNA samples.
172.5ul DNA + 172.5ul magnetic beads.
Incubate while rotating the tube with your hand for 10 minutes at room temperature
Spin down the sample and pellet on a magnet. Keep the tube on the magnet, and pipette off the supernatant.
A demonstrator will help you with this step.
Flowcell preparation for sequencing aka priming
These steps will be performed by one group member while the rest of the class is watching.
If you are not familiar with MinION flowcells check out this explanation video here Community - Flow cell introduction (nanoporetech.com).
This is a useful video for flowcell priming and loading Community - Priming and loading your flow cell (nanoporetech.com).
Perform a flowcell check as shown here Community - MinKNOW: Flow cell check (nanoporetech.com)
To prepare the flow cell priming mix with BSA, combine the following reagents in a fresh 1.5 ml Eppendorf DNA LoBind tube. Mix by inverting the tube and pipette mix at room temperature.
| A | B |
|---|---|
| Flow Cell Flush (FCF) | 1170 |
| Bovine Serum Albumin (BSA) at 50 mg/ml | 5 |
| Flow Cell Tether (FCT) | 30 |
| Total volume | 1205 |
Open the MinION device lid and slide the flow cell under the clip. Press down firmly on the flow cell to ensure correct thermal and electrical contact. This step might have been already performed if you did the flow cell check.

Slide the flow cell priming port cover clockwise to open the priming port. The priming port cover has the Nanopore logo.


IMPORTANT
Take care when drawing back buffer from the flow cell. Do not remove more than 20-30 μl, and make sure that the array of pores are covered by buffer at all times. Introducing air bubbles into the array can irreversibly damage pores.
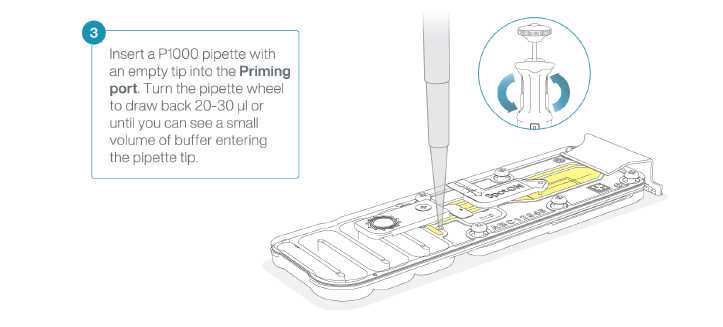
After opening the priming port, check for a small air bubble under the cover. Draw back a small volume to remove any bubbles:
- Set a P1000 pipette to 200 μl
- Insert the tip into the priming port
- Turn the wheel until the dial shows 220-230 ul, to draw back 20-30 ul, or until you can see a small volume of buffer entering the pipette tip.
Note: Visually check that there is continuous buffer from the priming port across the sensor array.
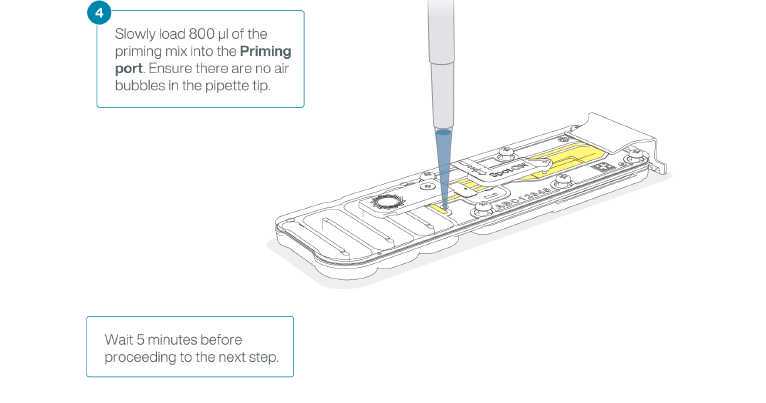
Load 800 μl of the priming mix into the flow cell via the priming port, avoiding the introduction of air bubbles. Close the priming port cover during incubation. Wait for five minutes.
The flowcell is now ready for loading and sequencing.
Loading of DNA library onto MinION flowcell
Now we will load the DNA library from step 3.23 to start sequencing.
This is a useful video for flowcell priming and loading Community - Priming and loading your flow cell (nanoporetech.com).
IMPORTANT
The Library Beads (LIB) tube contains a suspension of beads. These beads settle very quickly. It is vital that they are mixed immediately before use.
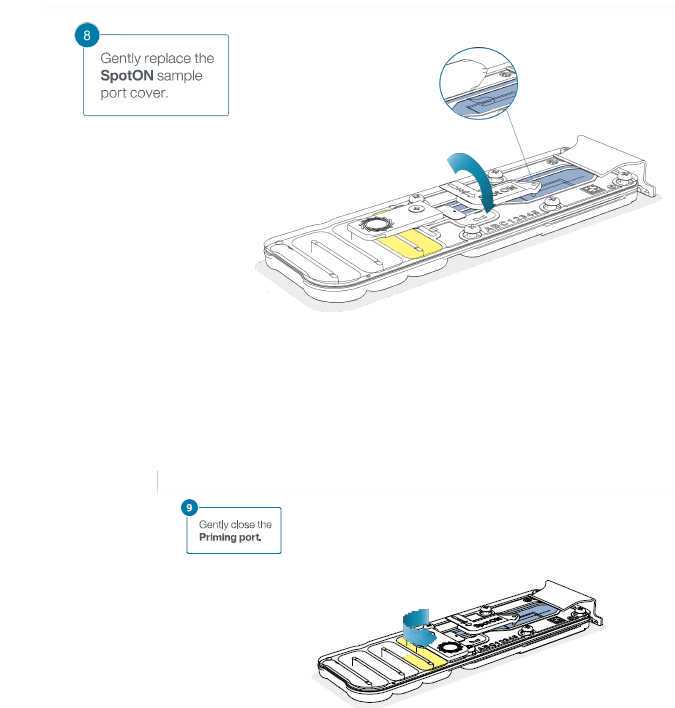
Complete the flow cell priming:
- priming port cover.
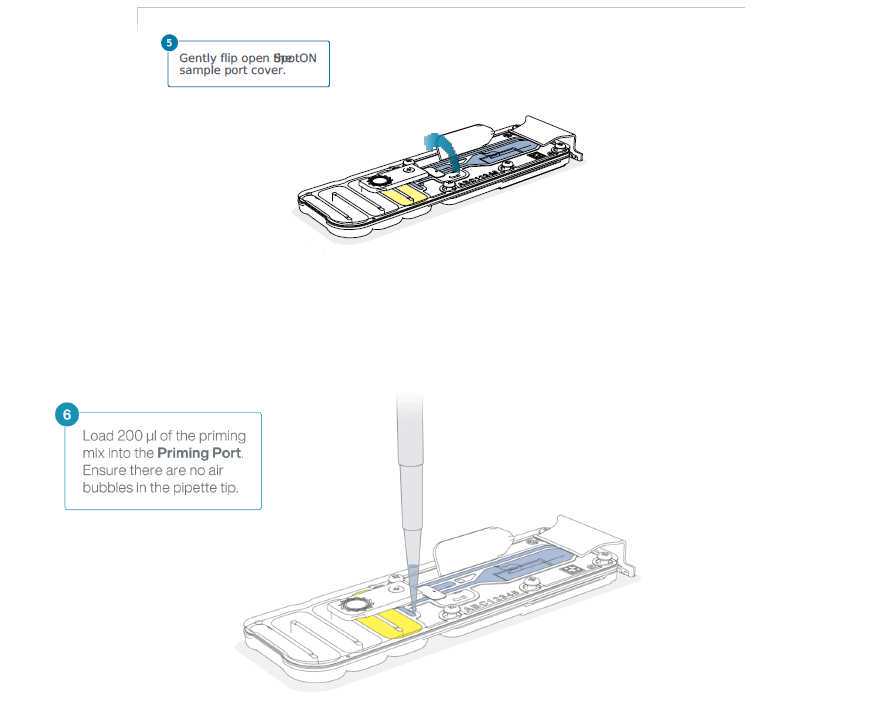
- Gently lift the SpotON sample port cover to make the SpotON sample port accessible.
- Load 200 μl of the priming mix into the flow cell priming port (not the SpotON sample port), avoiding the introduction of air bubbles.
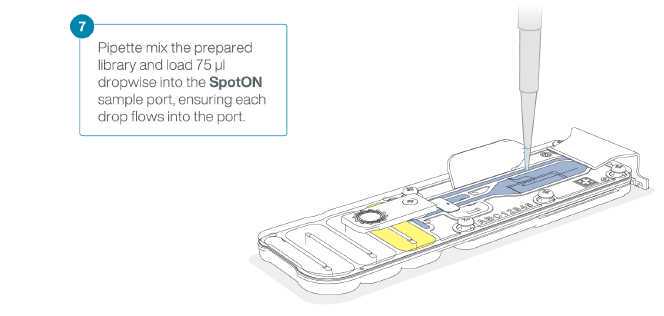
Mix the prepared library gently by pipetting up and down just prior to loading.
Add 75 μl of the prepared library to the flow cell via the SpotON sample port in a dropwise fashion. Ensure each drop flows into the port before adding the next.
A demonstrator will assist you with this step.
Gently replace the SpotON sample port cover, making sure the bung enters the SpotON port and close the priming port.
IMPORTANT
Install the light shield on your flow cell as soon as library has been loaded for optimal sequencing output.
We recommend leaving the light shield on the flow cell when library is loaded, including during any washing and reloading steps.
The shield can be removed when the library has been removed from the flow cell. Gently replace the SpotON sample port cover, making sure the bung enters the SpotON port and close the priming port.
Place the light shield onto the flow cell, as follows:
- Carefully place the leading edge of the light shield against the clip. Note: Do not force the light shield underneath the clip.
- Gently lower the light shield onto the flow cell. The light shield should sit around the SpotON cover, covering the entire top section of the flow cell.

Now we are ready for DNA sequencing via the MinKNOW graphical user interface.
DNA sequencing and basecalling
The demonstrators will help setting up the sequencing runs. We will perform basecalling later on.
Here is a list of useful videos:
- Introduction to the MinKNOW graphic user interface Community - MinKNOW: The graphical user interface (GUI) (nanoporetech.com)
- How to set up a sequencing experiment Community - MinKNOW: Setting up a new experiment (nanoporetech.com)
- How to assess your run is going fine Community - MinKNOW: Assessing your run (nanoporetech.com)
- How MinKNOW selects the best channels Community - MinKNOW: Mux scan and active channel selection (nanoporetech.com)
- More about checking on if your sequencing run is going smoothly Community - MinKNOW: Pore occupancy (nanoporetech.com)
