PotatoMASH library construction
Maria de la O Leyva Perez, Lea Vexler, Dan Milbourne
Abstract
We have developed PotatoMASH (Potato Multi-Allele Scanning Haplotags), a novel low cost, genome-scanning marker platform. We designed a panel of 339 multi-allelic regions placed at 1 Mb intervals throughout the euchromatic portion of the genome. These regions were assayed using a multiplex amplicon sequencing approach, which allows to genotype hundreds of plants at a cost of €5/sample.
This protocol describes the library construction part of the method. PotatoMASH libraries are made to be sequenced in Illumina sequencing platforms.
Steps
Organize your samples in 96 well plates, quantitate template DNA, and normalize at 20ng/uL.
Quantification with PicoGreen
In the preparation for the library construction, the first step is to quantify the template DNA. We used Quant-iT™ PicoGreen ® dsDNA assay kit (Invitrogen, P7589)as detailed below:
The Quant-iT™ PicoGreen kit should be stored in 4°C in the dark . An hour before take the PicoGreen kit out from the fridge and place in room temp, protect the PicoGreen reagent from light by covering the tube with aluminium foil. The Lambda DNA standard should be always kept in 4°C.
Notes:
Step duration is estimated for one plate. However, the duration for each step and sub-steps of this protocol is not necessarily the result of multiplying the duration of all steps by the number of plates to process. For example, in this step 1 (Quantification with Picogreen) the duration should be multiplied by the number of plates to process only in steps 1.3, 1.4, 1.6, 1.8 and 1.10.
It is advised to read the manufacturer's protocol Quant-iT™ PicoGreen.pdf
Prepare the Lambda DNA standarts in a serial dilution:
Note: Vortex and spin down between each dilution.
| A | B | C | D |
|---|---|---|---|
| Concentration of standard (λ) | Volume of 1X TE | Volume and concentration of Lambda | Final DNA Concentration PicoGreen Assay |
| 2000 ng/ml | 1470 μL | 30 μL of 100 μg/mL λ | 1000 ng/ml |
| 200 ng/ml | 1350 μL | 150 μL of 2000 ng/mL λ | 100 ng/ml |
| 20 ng/ml | 1350 μL | 150 μL of 200 ng/mL λ | 10 ng/ml |
| 2 ng/ml | 1350 μL | 150 μL of 20 ng/mL λ | 1 ng/ml |
Template DNA Normalization:
Make dilutions in a new plate or add nuclease free water according to each sample concentration to bring all samples to 20 ng/µl.
In 50 ml tube Prepare 1X TE as following TWICE (the second load is for the PicoGreen working solution - in step 1.5 ):
| A | B | C |
|---|---|---|
| Reagent | 1 x 96-well plate | 4 x 96-well plates |
| 20X TE | 500 µl | 2 ml |
| Autoclaved water | 9.5 ml | 38 ml |
| Total | 10 ml | 40 ml |
Mix by vortex.
Dilute DNAs in black 96-well plate for quantification:
In columns 1-11:
Pipette 98 µl of 1X TE in each well
Add 2 µl of each DNA sample (multichannel pipette recommended).
Mix by pipetting.
In column 12 : Fill in with 100 µl of the standards as follows:
| A | B |
|---|---|
| Column 12 | Content |
| 12A | 2000 µg/ml λ |
| 12B | 200 µg/ml λ |
| 12C | 20 µg/ml λ |
| 12D | 2 µg/ml λ |
| 12E | 1X TE |
| 12F | Empty |
| 12G | Empty |
| 12H | Empty |
Prepare the working solution:
| A | B | C |
|---|---|---|
| Reagent | 96-well plate | 4 x 96-well plates |
| 1X TE (from step 1.2) | 9.9 ml | 39.6 ml |
| PicoGreen reagent | 100 µl | 400 µl |
Protect the working solution from light by covering the tube with aluminium foil.
Add 100 µl of working solution in each well.
Use the same tips to mix by pipetting.
Incubate for 2 to 5 minutes at room temperature, protected from light.
Measure by using a fluorescence microplate reader and standard fluorescein wavelengths (excitation ~480 nm, emission ~520 nm). The instrument’s gain should be set to the well containing the highest DNA concentration (12A)
Calculate template DNA concentrations:
Subtract the fluorescence value of the reagent blank (12E) from that of each of the samples. Use corrected data to generate a standard curve of fluorescence versus DNA concentration. Determine the DNA concentration of the sample from the standard curve and multiply by the dilution (x100)
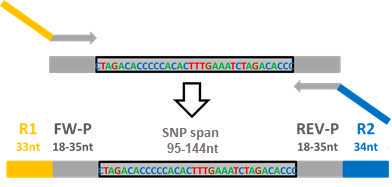
PotatoMASH PCR1 (multiplex PCR of 339 loci)
This step amplifies all PotatoMASH loci and adds Illumina sequencing primer tags R1 and R2.
PotatoMASH primers can be downloaded as supplemental data of the publication: Leyva-Pérez, M.O.; Vexler, L.; Byrne, S.; Clot, C.; Meade, F.; Griffin, D.; Ruttink, T.; Kang, J. and Milbourne, D. PotatoMASH - a low cost, genome-scanning marker system for use in potato genomics and genetics applications. Please cite this work if using this protocol.
If you decide to skip the library normalization (step 5) use the thermocycling conditions in 2.4 B
Prepare the PCR cocktail the same day for the number of plates to be processed.
Additional note: step duration is estimated for one plate. However, the duration for each step and sub-steps of this protocol is not necessarily the result of multiplying the duration of all steps by the number of plates to process.
Prepare the PCR1 Cocktail: keep On ice
Note: It is possible to prepare enough cocktail for all the plates planned to do the same day
| A | B | C |
|---|---|---|
| Reagent | Final content per prep | Cocktail for 96-well plate |
| Nuclease free water | 0.1 µl | 10 µl |
| PotatoMASH primers 125nM each primer (A pool of 678 primers=339 primer pairs) | 1.4 µl (25nM each primer) | 140 µl |
| Qiagen Plus multiplex master mix (2x, ref:206152) | 3.5 µl (1x) | 350 µl |
| DNA (20ng/µl) | 2 µl (40ng) | - |
| Total | 7 µl | 500 µl (5 µl per sample) |
Note: Advised order to prepare the cocktail: 1st pipette the water, 2nd add the primers, 3rd the Qiagen Master Mix. st pipette the water, 2nd add the primers, 3rd the Qiagen Master Mix.
Gently mix by pipetting.
Dispense 5µL of the PCR1 Cocktail into each well
Note: it is advised to use 100 µl electronic pipette with dispenser function to apply the 5 µl of the PCR1 Cocktail to the plate with a 100 µl filter tip. A single tip can be used for all the plate.
Apply 2µL of the DNA (20ng/µl) with 10 µl filter tips,
Mix by pipetting.
Seal the plate.
Spin down in a mini plate spinner for 10 sec.
In a gradient thermocycler with heated lid, run PCR1 as follows:
A - Follow when performing library normalization (step 5)
| A | B | C | D | E | F | G | H |
|---|---|---|---|---|---|---|---|
| Step | Cycles | Temp | Time | Annealing Temp | Time | Elongation Temp | Time |
| Initial Denaturation | 1x | 95 °C | 15 min | ||||
| Initial amplification | 8x | 95 °C | 30 sec | 0.2°C/sec ramp down to 57°C | 30 sec | 72 °C | 2 min |
| Amplicon multiplication | 16x | 95 °C | 30 sec | 65 °C | 30 sec | 72 °C | 30 sec |
| Hold | 1x | 10 °C | ∞ |
B - Follow when skipping library normalization (step 5):
| A | B | C | D | E | F | G | H |
|---|---|---|---|---|---|---|---|
| Step | Cycles | Temp | Time | Annealing Temp | Time | Elongation Temp | Time |
| Initial Denaturation | 1x | 95 °C | 15 min | ||||
| Initial amplification | 5x | 95 °C | 30 sec | 0.2°C/sec ramp down to 57°C | 30 sec | 72 °C | 2 min |
| Amplicon multiplication | 10x | 95 °C | 30 sec | 65 °C | 30 sec | 72 °C | 30 sec |
| Hold | 1x | 10 °C | ∞ |
Note: PCR1 product can be stored at 4 ° C 1-2 days or longer at -20 ° C before dilution.
Dilute PCR1 product to be used as template for PCR2
Note that it is recommended to dilute PCR1 product the same day PCR2 will be performed.
Centrifuge the PCR1 product plate to make sure all volume is down (e.g. for 3 min at 3000 RPM 15°C )
Add 100µL of nuclease free water to each well to dilute 1:15.
Mix by pipetting up and down 30 times.
Note: it is convenient to use a multichannel 100 µl electronic pipette with function 'pipette and mix' set up to dispense 100 µL and mix 40 µL volume 30x.
Spin down for 10 sec in a mini plate spinner.
Diluted plates can be kept at 4 ° C meanwhile preparing the cocktail for PCR2
PotatoMASH PCR2 (Adds dual barcodes)
PCR2 adds Illumina capture adapter P5 and P7 and barcode indexes that identify each sample by well and by plate.
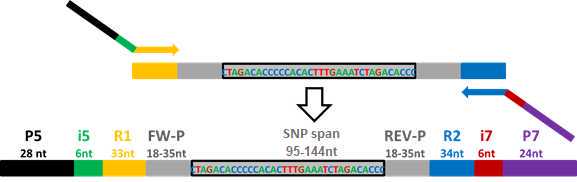
Primers i5 provide with well-specific barcodes. There is a panel of 96 primers. We use the same panel for each plate.
Primers i7 provide with plate-specific barcodes.
The 96 i5 primers and 10 i7 primers can be downloaded as supplemental data of the publication: Leyva-Pérez, M.O.; Vexler, L.; Byrne, S.; Clot, C.; Meade, F.; Griffin, D.; Ruttink, T.; Kang, J. and Milbourne, D. PotatoMASH - a low cost, genome-scanning marker system for use in potato genomics and genetics applications. Please cite this work if using this protocol.
Here we provide with additional i7 primers to multiplex more plates (plate 11 to plate 19)
Additional_i7primers_plates11_19.txt
By using 96 i5 barcodes in combination with 19 i7 barcodes, they can be indexed up to 1,824 samples to be joined in a single library.
Prepare the PCR2 Cocktail: keep on ice. On ice
| A | B | C |
|---|---|---|
| Reagent | Final content per prep | Cocktail for 96-well plate |
| Plate-specific i7 10 µM primers | 1 µl | 100 µl |
| 206152 | 5 µl | 500 µl |
| Well-specific i5 10 µM primers | 1 µl | - |
| PCR1 product diluted 1:15 | 3 µl | - |
| Total | 10 µl | 600 µl (6 µl per sample) |
Notes: Since i7 primers are plate-specific, you will need to prepare a different PCR cocktail for each plate. Advised order to add reagents: 1st apply the i7 primers, 2nd the Qiagen Master Mix. Mix by pipetting and spin down 10 sec. st apply the i7 primers, 2nd the Qiagen Master Mix. Mix by pipetting and spin down 10 sec.
Dispense 6µL of the PCR2 Cocktail into each well
Note: it is advised to use 100 µl electronic pipette with the '(Disp.)' function to dispense 6 µl of the PCR2 Cocktail to each well in the plate with one 100 µl filter tip. A single tip can be used for all the plate.
Add 1µL of the well-specific i5 primers .
Note: it is advised to use the manual (not electronic)10 µl multi-channel pipettor to add the 1 µl of the well- specific i5 primers from the plate were the 96 primers are to your PCr2 plate. That way is easier to place each of the 96 i5 primers in each well position and to reduce the chance of mistakes. Make sure the 1 µL is delivered by pipetting up-down a couple of times.
Add 3µL of the diluted PCR 1 product and mix by pipetting.
Seal the plate.
Spin down in a mini plate spinner for 10 sec.
Run PCR as follows:
| A | B | C | D | E | F | G | H |
|---|---|---|---|---|---|---|---|
| Step | Cycles | Temp | Time | Annealing Temp | Time | Elongation Temp | Time |
| Initial Denaturation | 1x | 95 °C | 15 min | ||||
| Amplification cycles | 10x | 98 °C | 10 sec | 65 °C | 30 sec | 72 °C | 30 sec |
| Final Extension | 1x | 72 °C | 5 min | ||||
| Hold | 1x | 10 °C | ∞ |
Note: The libraries (PCR2 product) can be stored at 4 ° C 1-2 days or longer at -20 ° C.
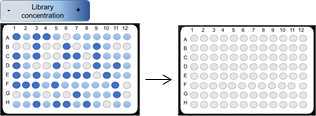
Library normalization (optional)
This step is optional. By having normalized the template genomic DNA prior to PCR, we minimized the differences of efficiency in each PCR. Homogeneous template DNA quality also minimizes differences in PCR yield in each well. However, if you are genotyping sets of DNA extracts within the same plate of very variable quality, we recommend to follow the complete protocol including library normalization step.
When performing this step be aware to have followed step 2.4A and proceed at later stage with step 6.2A.
When skipping this step be aware to have followed step 2.4B and proceed at later stage with step 6.2B.
In this step we normalize the PCR2 product in each well down to ∼25 ng in 20 µL (∼1.25ng/µL).
As an additional benefit, it also provides with a first purification step: the binding buffer provides low pH condition causing the positive surface charge of coating of the library normalization plates to bind the negatively charged nucleic acid backbone. Proteins and other contaminants (such as short oligonucleotide primers) are not bound and are simply washed away.
Tip: In this step, it is possible to use unfiltered tips, since the libraries are already prepared and barcoded, therefore, the risk of contamination is lower.
It is advised to read the manufacturer's protocol (Applied Biosystems, A105100) sequalprep_platekit_man.pdf
Before starting:
- Centrifuge the PCR2 product plate to make sure all volume is down (e.g. 3 min at 3000 RPM
15°C)
Binding:
- With a multichannel pipette, add
10µLbinding solution (the same volume of the PCR product) into the PCR2 plate and mix completely by pipetting up and down. With the same tips, transfer 10 µl, twice, to the normalization plate.
Advice: Release on the upper part of the well, careful to not interrupt the coating by scratching the well sides.
- Seal the plate and spin down in a mini plate spinner for 10 sec.
- Incubate in
15Room temperaturefor 1 hour - Transfer back the amplicon/Binding Buffer mixture to the original PCR 2 plate.
After binding is complete, the mixture can be stored at –20ºC for up to 30 days to recover more libraries later if needed. Again, be careful no to scrape the well sides with the tips during aspiration. To use 10 µL (transfer 10 µL twice), helps to avoid scrapings.
Washing:
- Add
50µLof wash buffer . Mix by pipetting up and down 35 µl 3 times.
Note: it is convenient to use a multichannel 100 µl electronic pipette with function 'pipette and mix' set up to dispense 50 µL and mix 35 µL volume 3x. Then you can press the pipette button again to use the same tips to aspirate and discard the washing buffer.
- Use the same tips to aspirate and discard the wash buffer.
- Invert and tap the plate on a paper towel to get rid of the remaining droplets of liquid.
Elution:
- Elute the libraries with
20µLof elution buffer (pH 8.5–9.0). Mix by pipetting up and down 10 µl 5 times. - Incubate at room temperature 5 min. The plates with the eluted DNA can be stored at 4°C (short-term storage) or –20°C (long-term storage).
Store in 4°C until library pooling.
Pooling libraries, Concentration - Purification
Pooling sub-libraries:
At this stage, the libraries are barcoded and even normalized. We can pool a full plate (96 samples) into one 2mL tube.
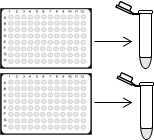
We also refer to each of the pools as 'pooled sub-library'.
It is convenient to keep the plate on a cooling holder or 4On ice .
Before starting:
- Spin down the plates.
- Label one tube per plate
4On ice.
A - Follow if you have performed library normalization (step 5):
Transfer 15µL of each sample per 96-well plate into one 2mL tube.
B - Follow if you have skipped the library normalization (step 5):
Transfer 5µL of each sample per 96-well plate into one 1.5mL or 2mL tube.
Note: we advise to use a 200uL electronic pipet with multi-aspirate function to take 15 µl x 12 times (pool by rows) and deliver in the same tube. All can be done with 1 filter tip. Tubes can be kept at 4°C or On ice for short term prior to Purification steps the same day or at -20°C for longer term.
Concentration - Purification:
In this step we use the purification kit to purify, concentrate and reduce the volume of each pooled sub-library from 0.25 or 1.5 mL to 42 µl by using the Qiaquick PCR Purification kit (Qiagen, 28104) and extra binding buffer (PB buffer, Qiagen, 19066), following manufacturer's guidelines with slight adjustments:
Note: It is advised to read the manufacturer's protocol QQ_PCR_Gel_Cleanup_Kit_0718_WW.pdf or HB-1196-005_HB_QQ_Spin_0120_WW (1).pdf
Before starting:
- Spin down the tubes with the pooled sub-libraries.
- Label 15 ml tube (in case of normalized libraries, protocol A ) or one 2mL tube (in case of normalized libraries, protocol B ) for each pooled sub-library for the binding step (7.2)
- Prepare collection tubes with a QIAquick Spin column inserted for each sub-library for the binding and washing step (7.2-7.3)
- Prepare same number of 1.5 ml tubes for the elution step (7.4)
Binding:
A- Follow if you have performed library normalization (step 5):
-
Prepare a 15 ml tube for each pool with
7.5mLof PB The ratio is 5 volumes of Buffer PB to 1 volume of the PCR product. -
Add the
1440µLof the pooled sub-libraries B- Follow if you have skipped the library normalization (step 5): -
Prepare a 2 ml tube for each pool with
1.2mLof PB Important: Make sure that the non-normalized pool is well mixed by vortexing a few seconds if you didn't so right after pooling the libraries. It is important because we will use only the half of the volume. The remaining volume can be stored at -20 Important: Make sure that the non-normalized pool is well mixed by vortexing a few seconds if you didn't so right after pooling the libraries. It is important because we will use only the half of the volume. The remaining volume can be stored at -20 °C in case is needed. -
Add the
240µLof the pooled sub-libraries
From now on, all steps are in common for protocols A and B:
- Vortex for 5 sec after mixing each pool with the PB and again after having processed all of the tubes.
- Pipette
600µLof the PB-PCR product mix into the QIAquick Spin column. - Centrifuge for 30 sec at 13,000 RPM and discard the flow-through.
- Repeat the last 2 steps until all the PB-PCR product mix in the tube is finished.
Washing:
- Add 750 µl Buffer PE to the QIAquick Spin column,
- Centrifuge for 60 sec at 13,000 RPM and discard the flow-through.
- Centrifuge for 60 sec at 13,000 RPM to dry.
Elution:
- Transfer the QIAquick Spin column to a new 1.5 ml tube.
- Elute with
44µLElution Buffer - Incubate in
4Room temperaturefor 1-5 min . - Centrifuge for 1 min at 13,000 RPM.
Quality check (optional):
- Use
2µLof the eluted pooled libraries to check quality with nanodrop . Expected concentration values: 30 – 80 ng/µl.
Expected ratio A260nm/A280nm: 1.8 – 2,1
Expected ratio A260nm/A230nm: 2-2.5
Size selection
This step is meant to remove PCR1 primer-dimer amplified products in PCR2 and other unwanted secondary products from the PotatoMASH libraries. All PotatoMASH core primers are designed to produce libraries of around 300bp. Therefore, electrophoresis in agarose gel is a low-cost and easy way to separate them.
Note that we usually perform this step the same day we perform step 7, but probably the concentrated libraries can be stored at 4°C for a day or at -20°C for longer term.
Prepare 1.2 % standard low melting point agarose gel in 0.5x TBE (TAE buffer can be also used).
For DNA visualization, we use GelRed dye applied to the agarose gel before polymerizing.
Make sure the wells of the gel are wide-deep enough to hold 48 µL of sample. That can be achieved, for example, by covering three 7 mm. wide x 1mm thick comb teeth (3 wells) with scotch tape to make a wider well of 2.5 cm x 1mm thick. We recommend to leave one normal size well empty between different pools.
Tip: Around 200mL of agarose are used for a gel 14cm long and 23 cm wide 7mm thick to get the wells deep enough to hold 48 µL. Try to get the gel only thick enough to hold the sample but not more. The more thick is the gel, the more agarose you will have to clean up in the next step.
Add 8µL of loading buffer 6X to the 40 µl of each of the tubes with the concentrated libraries. Mix by pipetting.
Load the sub-libraries onto the big wells.
Load 6µL of p100 DNA ladder (e.g. NE Biolabs N3231) into at least one of middle wells in between. We do this to confirm that our main product is of the expected size and help us to spot it.
Run in 50 V for 1 hour and then run for 90 min with 100 V .
Note: Settings used for a gel 14 cm long and 23 cm wide 0.7 cm thick, 200-230mL of agarose.
Use a transilluminator UV (recommended to use low intensity like 70%) to visualise and excise the band around 300bp. Use a clean scalpel and place it in a 2 mL tube.

Weight the gel slices and record the weights (the weight will be important for next step, gel purification)
At that point, the gel slice can be stored in a closed tube at 4°C for a couple of days if necessary.
Gel purification
Purify the slice using the Wizard® SV Gel and PCR Clean-Up System Kit (Promega A9281) following manufacturer's guidelines:
Note: It is advised to read the manufacturer's protocol Wizard SV Gel and PCR Clean-Up System TB308.pdf
Before starting:
- Heat a thermoblock to
65°C - Prepare collection tubes with SV mini-column for each sub-library for the extraction step (9.3)
- Prepare same amount of 1.5 mL tubes for the elution step (9.5)
Dissolving the gel
- Add 10 µL of membrane binding solution per 10mg of gel slice.
- Warm up to 50-65 °C vortexing from time to time until the agarose completely dissolves.
- Vortex or mix by inversion.
Extraction of PCR product (libraries) from the dissolved gel:
- Transfer
650µLof the dissolved gel mixture to the SV mini-column and a collection tube - Incubate for 1 min in
65Room temperature. - Centrifuge for 1 min at 14,000 RPM (16,000 x g) and discard flow-through.
- Repeat until all the dissolved gel mixture have passed through the SV mini-column.
Washing:
- Wash with
700µLof washing solution - Centrifuge 1 min at 14,000 RPM (16,000 x g). Discard flow-through
- repeat with 500 µl of washing solution. Discard flow-through
- Centrifuge 5 min at14,000 RPM (16,000 x g) to dry the column.
Elution:
- Transfer the mini-column to a 1.5 ml tube.
- Elute with
50µLNuclease-free water (pre warm65°C) - Incubate for 1-5 min in
4Room temperature. - Centrifuge 1 min at 14,000 RPM
Quality check:
- Use
2µLof the eluted pooled libraries to check quality with nanodrop . Expected concentration values: 5 – 25 ng/µl. ( The higher yields are expected for non-normalized libraries. Note that nanodrop measurements are not accurate for very small concentrations )
Expected ratio A260nm/A280nm: 1.8 – 2,5
Expected ratio A260nm/A230nm: 0 – 1
Store in 4°C until next step.
Purification with Magnetic AMPure XP beads
The last purification step is performed with Magnetic AMPure XP beads (Beckman C. A63881) on each of the pooled sub-libraries and by using a magnetic stand for 1.5mL microcentrifuge tubes.
This step is necessary to achieve the level of library purity needed for posterior Illumina sequencing. Note that the Expected ratio A260nm/A230nmof the pooled sub-libraries after gel purification are not good.
As an additional benefit, the method utilizes a double-size selection steps that will further purify remaining traces of PCR products larger or smaller than 300bp that weren't properly separated during the size selection by agarose gel.
In the first selection, beads will bind in higher proportion to fragments larger than 400 bp. Then we recover the clear supernatant with fragments smaller than 400 bp. In the second selection, beads will bind in higher proportion to fragments larger than 200 bp and by discarding the clear supernatant we will discard fragments smaller than 200 bp.
Note: It is advised to read the manufacturer's protocol SPRIselect User Guide.pdf
Before starting:
- Prepare
5mL85 % Ethanol . - Magnetic Ampure XP beads stock to be stored
4°C - Resuspend the Ampure XP beads stock Suspension (usually in a bottle) carefully until complete homogenization.
Tip: It is convenient to separate from the bottle the volume of ampure beads you'd need for all tubes into a small tube, which is easier to vortex and get homogeneus every time is needed.
- Spin down the sub-libraries (if they were in the fridge or freezer) and measure the volume of library sample (∼ 46 µl).
First purification:
- Vortex again the AMPure beads.
- Add 0.5 x volumes of AMPure beads (∼ 23 µl) of the sample volume (∼ 46 µL) and mix by pipetting 10 times.
- Vortex for 30 sec .
- Incubate in room temperature for 1 min .
- Place the reaction tube on a magnetic stand for 1-5 min to allow the AMPure beads to settle to the magnet until the supernatant is clear.
- Recover the clear supernatant, measure and record the volume. Place in a new tube.
Note: it is advised to use an electronic pipet with function 'manual (man.)' to pipette very slowly and measure the recovered volume.
Second selection:
- Vortex the AMPure beads again.
- Add 0.6x volumes of AMPure beads (∼ 42 µL) to the recovered supernatant (∼ 70 µL). Mix by pipetting 30 times.
- Vortex again for 1 min. incubate at room temperature for 1 min.
- Place the reaction tube on the magnetic stand for and allow the AMPure beads to settle to the magnet.
- Remove and discard the clear supernatant Notes: It is ok to leave a droplet at the bottom, it will wash in the next step with the ethanol. Careful not to aspirate any AMPure beads.
Wash with 85 % ethanol
- While the reaction tube still on the magnet, add
180µLof 85% ethanol - incubate at
4Room temperaturefor 30-60 seconds . - Carefully Remove and discard the ethanol supernatant by pipetting.
- Leave the tube open for 30 sec to dry.
Elution:
- Remove the reaction tube from the magnet
- Add
30µLof Nuclease-free water . - Mix the total elution volume by pipetting 30 times to resuspend the beads
- Incubate at
4Room temperaturefor 1 minute . - Place the reaction tube on the magnetic stand for 1 min or more and allow the Ampure beads to settle to the magnet.
- Carefully transfer by pipetting the eluted pooled sub-library (∼ 27 µl) into new tubes.
Quality check:
- Use
2µLof the eluted pooled sub-libraries to check quality with nanodrop . Expected concentration values: 7 – 35 ng/µl. ( The higher yields are expected for non-normalized libraries. Note that nanodrop measurements are not accurate for very small concentrations )
Expected A260nm/A280nm ratio: 1.8 – 2.2
Expected A260nm/A230nm ratio: 1.5 – 2
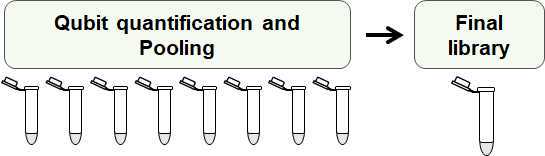
Sub-libraries quantitation and final pooling into a single library
Quantitation:
Sub-libraries quantitation using Qubit™ dsDNA BR Assay Kit (Thermofisher Q32853) following manufacturer's guidelines Qubit_dsDNA_BR_Assay_UG.pdf
Given the expected yield, we recommend to use 3-5 µL of each sub-library to quantify them with the Broad spectrum assay kit. Alternatively, The HS (high sensitivity) assay kit can be used.
Pooling sub-libraries into a single library:
Calculate the volume from each sub-library to be pooled so there is the same amount in ng of each sub-library in the volume of the final library. Pool the sub-libraries and mix by pipetting.
Make sure that your final PotatoMASH library meets the sample requirements for Illumina sequencing of pre-made libraries (PCR free library), which usually are >0.5-1ng/ µL (quantified by Qubit), >20 µL or more volume depending of the amount of sequencing data required.
Sequencing service companies usually offer demultiplexing of libraries and for that the ask the barcode of each sublibrary. Here is an example of how to code the sublibraries:
You can also demultiplex the data yourself and you will need the i5 and i7 barcodes of each sample. The tags are written in the name of each primer, but here you have them in a table:
This method has successfully genotyped 765 samples in a whole lane of Illumina HiseqX platform using 50% PhiX, obtaining paired-end 150nt reads (56Gb of data). The libraries have been also proven to be successful for sequencing in NovaSeq 6000 platform.

Library quality check (optional)
Library quality check (optional) by 'Illumina PCR' (PCR with known primers which anneal to Illumina capture adapters P5 and P7).
This is an alternative method to check the quality of your libraries without the need to use bioanalyzer or fragment analyzer.
It can be performed only on the Final library or to the sub-libraries before pooling them, in case you would prefer to further purify one of them before pooling.
The primers will anneal to any PCR product containing P5 and P7, so you can detect if you still have too many small fragments in your sub-libraries or final library.
Before starting:
Order the primers:
P5 primer: 5'-AAT GAT ACG GCG ACC ACC GA-3'
P7 primer: 5'-CAA GCA GAA GAC GGC ATA CGA-3'
Dilute the library/libraries to test to 0.1 ng/µL. You will only need 1µL of this dilution.
Prepare the Illumina PCR cocktail:
| A | B | C |
|---|---|---|
| Reagent | 1 sample | 7 samples |
| Nuclease-free water | 3 µl | 21 µl |
| Qiagen Master Mix (2x) | 5 µl | 35 µl |
| Illumina primers 10 µM (mix of both, 5µM each) | 1 µl | 7 µl |
| library (0.1 ng/ul) | 1 µl | - |
| Total | 10 µl | 63 µl (9 µl per sample) |
Distribute 9 μL of the cocktail per 0.2mL PCR tube and add 1μL of your library at 0.1 ng/μL. Mix by pipetting and /or spin down the tubes.
Run PCR as follows:
| A | B | C | D | E | F |
|---|---|---|---|---|---|
| Step | Cycles | Denaturation Temp | Time | Annealing and Elongation Temp | Time |
| Initial Denaturation | 1x | 90 °C | 1 min | ||
| Annealing & Elongation | 16x | 95 °C | 15 sec | 63 °C | 45 sec |
| Hold | 1x | 10 °C | ∞ |
Be aware that the optimal elongation temperature for the polymerase in the Qiagen multiplex master mix is 72°C and not 63°C. However, it works nicely anyway, and the annealing and elongation are done at the same temperature making the program shorter. Proper optimization is always welcome though.
Run the PCR product (10 µL) mixed with 2 µL of loading buffer (6x) on 1.2 % agarose gel. Use ladder p100.

 Fragment analyzer electropherogram")
Fragment analyzer electropherogram")
3 examples of libraries tested. Notice that brightness/contrast have been increased to highlight the unspecific bands√: the library passed quality test made in fragment analyzer by the sequencing service. This library was made skipping the library normalization (protocol B).*The libraries were set on hold by the service because they contained small fragments. However, the customer can ask these on hold libraries to be sequenced anyway and they were successful.We don't have examples of libraries failing quality control to be rejected for sequencing. However, we advise to keep in mind that the risk of having too much unspecific libraries is to loose part of the sequencing data in non-informative data.
