Planktoscope protocol for plankton imaging
Lombard Fabien, Will Major, Anna Oddone, Clémence Clausse
Disclaimer
this protocols applies to the version 2.5 of the planktoscope and the 2.3 version of software. it is optimised to image 40µm-200µm organisms using the 25mm lens (as tube lens) and 16mm one as objective one and may be inaccurate with other configurations or light. Please note that the segmenter in currently also optimised for this and may need to be recoded (or adjusted) for other configurations, notably the size threshold but also the intensity threshold
Abstract
this protocol is for using planktoscope and collect usable result for quantitative imaging of plankton
see also https://www.planktoscope.org/
Before start
-Test the protocol before acquisition of your first sample
-Calibrate your instruments to ensure coherent measures
-Create an Ecotaxa account and request the right to create project way before
-Collect a plankton sample using a net
Steps
Quick usage version
Preparation
- Plug in the Planktoscope
- Connect to Planktoscope’s Wi-Fi
- Type Planktoscope URL http://192.168.4.1:1880/ui/
- Check WB (in OPTIC CONFIGURATION)
- Put 20 mL sample, add the air pump
- Check Focus (in OPTIC CONFIGURATION)
Acquisition
- Fill sample details (in SAMPLE)
- Fill acquisition parameters (in FLUIDIC ACQUISITION)
- pump to drain sedimented organisms
- START!
Cleaning
- Drain the syringe (disconnect your system)
- Drain the content
- Replace with fresh water and drain several times (blowing in the syringe may helps)
- Replace the system and drain first with tap water and then air
- Empty waste container
Plus, if not used immediately:
-
Put 20 mL diluted bleach
-
Leave 15’
-
Drain the content (high pump speed)
-
Put 10 mL fresh water
-
Drain the content (high pump speed)
Analysis
- Fill segmentation parameters (in SEGMENTATION)
- Start segmentation
- Back-up data
- Import on ecotaxa
Shut down
- Turn OFF (HOME)
- Unplug the Planktoscope
Planktoscope, overview.
The Planktoscope is a frugal, microfluidic microscope designed with an open-hardware, open-software approach. It was conceived within the idea of equipping the thousands of sailors exploring the oceans with a high quality instrument suitable for deepening our knowledge of the sea around us.
In this manual you will learn how to operate the Planktoscope and take images of plankton.
Material:
The device and its different parts are shown in the following figure.
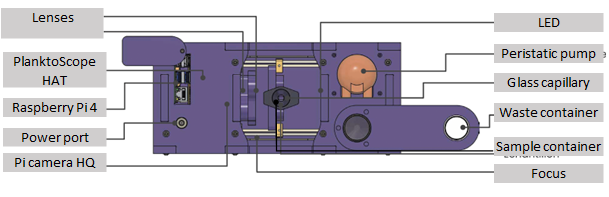
The PlanktoScope kit also includes a bubbler, power cable, waste container, falcon tube of tap water, syringe (containing the sample), sample holder, flowcell holder and flowcell.
The User Interface
There are several tabs on the UI that can be used to adjust setting, run samples
and take images. To navigate around the UI, all tabs are available from the Home
tab, including the Shutdown button which we will use when we have finished using the PlanktoScope.
We can also use the 'Hamburger Menu', situated in the top-left corner of the UI, to
navigate between tabs.

<img src="https://content.protocols.io/files/k7q2f9fw.png" alt="The "Optic configuration" page allows you to control the various features of PlanktoScope. You can focus, turn on the LED or start the pump." loading="lazy" title="The "Optic configuration" page allows you to control the various features of PlanktoScope. You can focus, turn on the LED or start the pump."/>
<img src="https://content.protocols.io/files/k7q3f9fw.png" alt="The "Segmentation" page is used to start the segmentation of the images taken in the previous phase. The images will then be processed to extract only the plankton thumbnails." loading="lazy" title="The "Segmentation" page is used to start the segmentation of the images taken in the previous phase. The images will then be processed to extract only the plankton thumbnails."/>
<img src="https://content.protocols.io/files/k7qvf9fw.png" alt="In the "Gallery" you can find the different files of the Planktoscope: the exports for EcoTaxa, the original images and the extracted thumbnails." loading="lazy" title="In the "Gallery" you can find the different files of the Planktoscope: the exports for EcoTaxa, the original images and the extracted thumbnails."/>
<img src="https://content.protocols.io/files/k7qwf9fw.png" alt="The "System monitoring" page allows you to check the correct operation of the device. You will not use this step in standard use." loading="lazy" title="The "System monitoring" page allows you to check the correct operation of the device. You will not use this step in standard use."/>
<img src="https://content.protocols.io/files/k7qxf9fw.png" alt="The "Wifi" page gives you access to the characteristics of the wifi generated by the PlanktoScope to which you will connect in order to control the device. You will not have to modify anything on this page. The procedure for connecting will be detailed later in this manual." loading="lazy" title="The "Wifi" page gives you access to the characteristics of the wifi generated by the PlanktoScope to which you will connect in order to control the device. You will not have to modify anything on this page. The procedure for connecting will be detailed later in this manual."/>
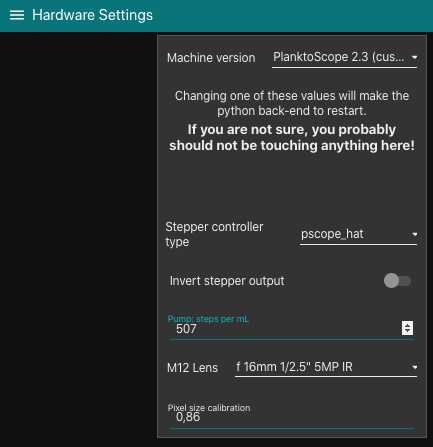
<img src="https://content.protocols.io/files/k7q4f9fw.png" alt="You will only need the "Hardware settings" page to replace the comma with a dot in the "pixel size calibration" box. Do not change anything else." loading="lazy" title="You will only need the "Hardware settings" page to replace the comma with a dot in the "pixel size calibration" box. Do not change anything else."/>
Initial connection and setup
Open the planktoscope box and check all the part first
if not installed, place the pump tube in place (the pump could be turned to be open). caution, clean the grease afterward

We need to achieve the Preview image colour that the Auto White Balance feature provides, without using the Auto White Balance. Not using Auto White Balance enhances the performance of the PlanktoScope over time (the camera will try to adjust it in between every images...)
To manually set to the White Balance, turn off the Auto White Balance and adjust WB: Red and WB: Blue until it looks white. Then switch AWB back on to see if it matches. Repeat this process until there is no colour change when clicking the AWB button.
Set the AWB button to 'off' once you have completed this step.

The red box highlights how to manually adjust the white balance of the Preview image. In this example, the correct setting was WB: Red = 4 and WB: Blue = 1.21. The AWB button should be set to 'off' once you have completed this step.

")
 and adaptation at the end of tubing")
Plug the Bubbler into one of the USB ports on the PlanktoScope. Place the tubing into the Syringe so that it reaches the bottom. Affix the tubing to the Syringe using an elastic band, string or similar.
assemble the fluidic system
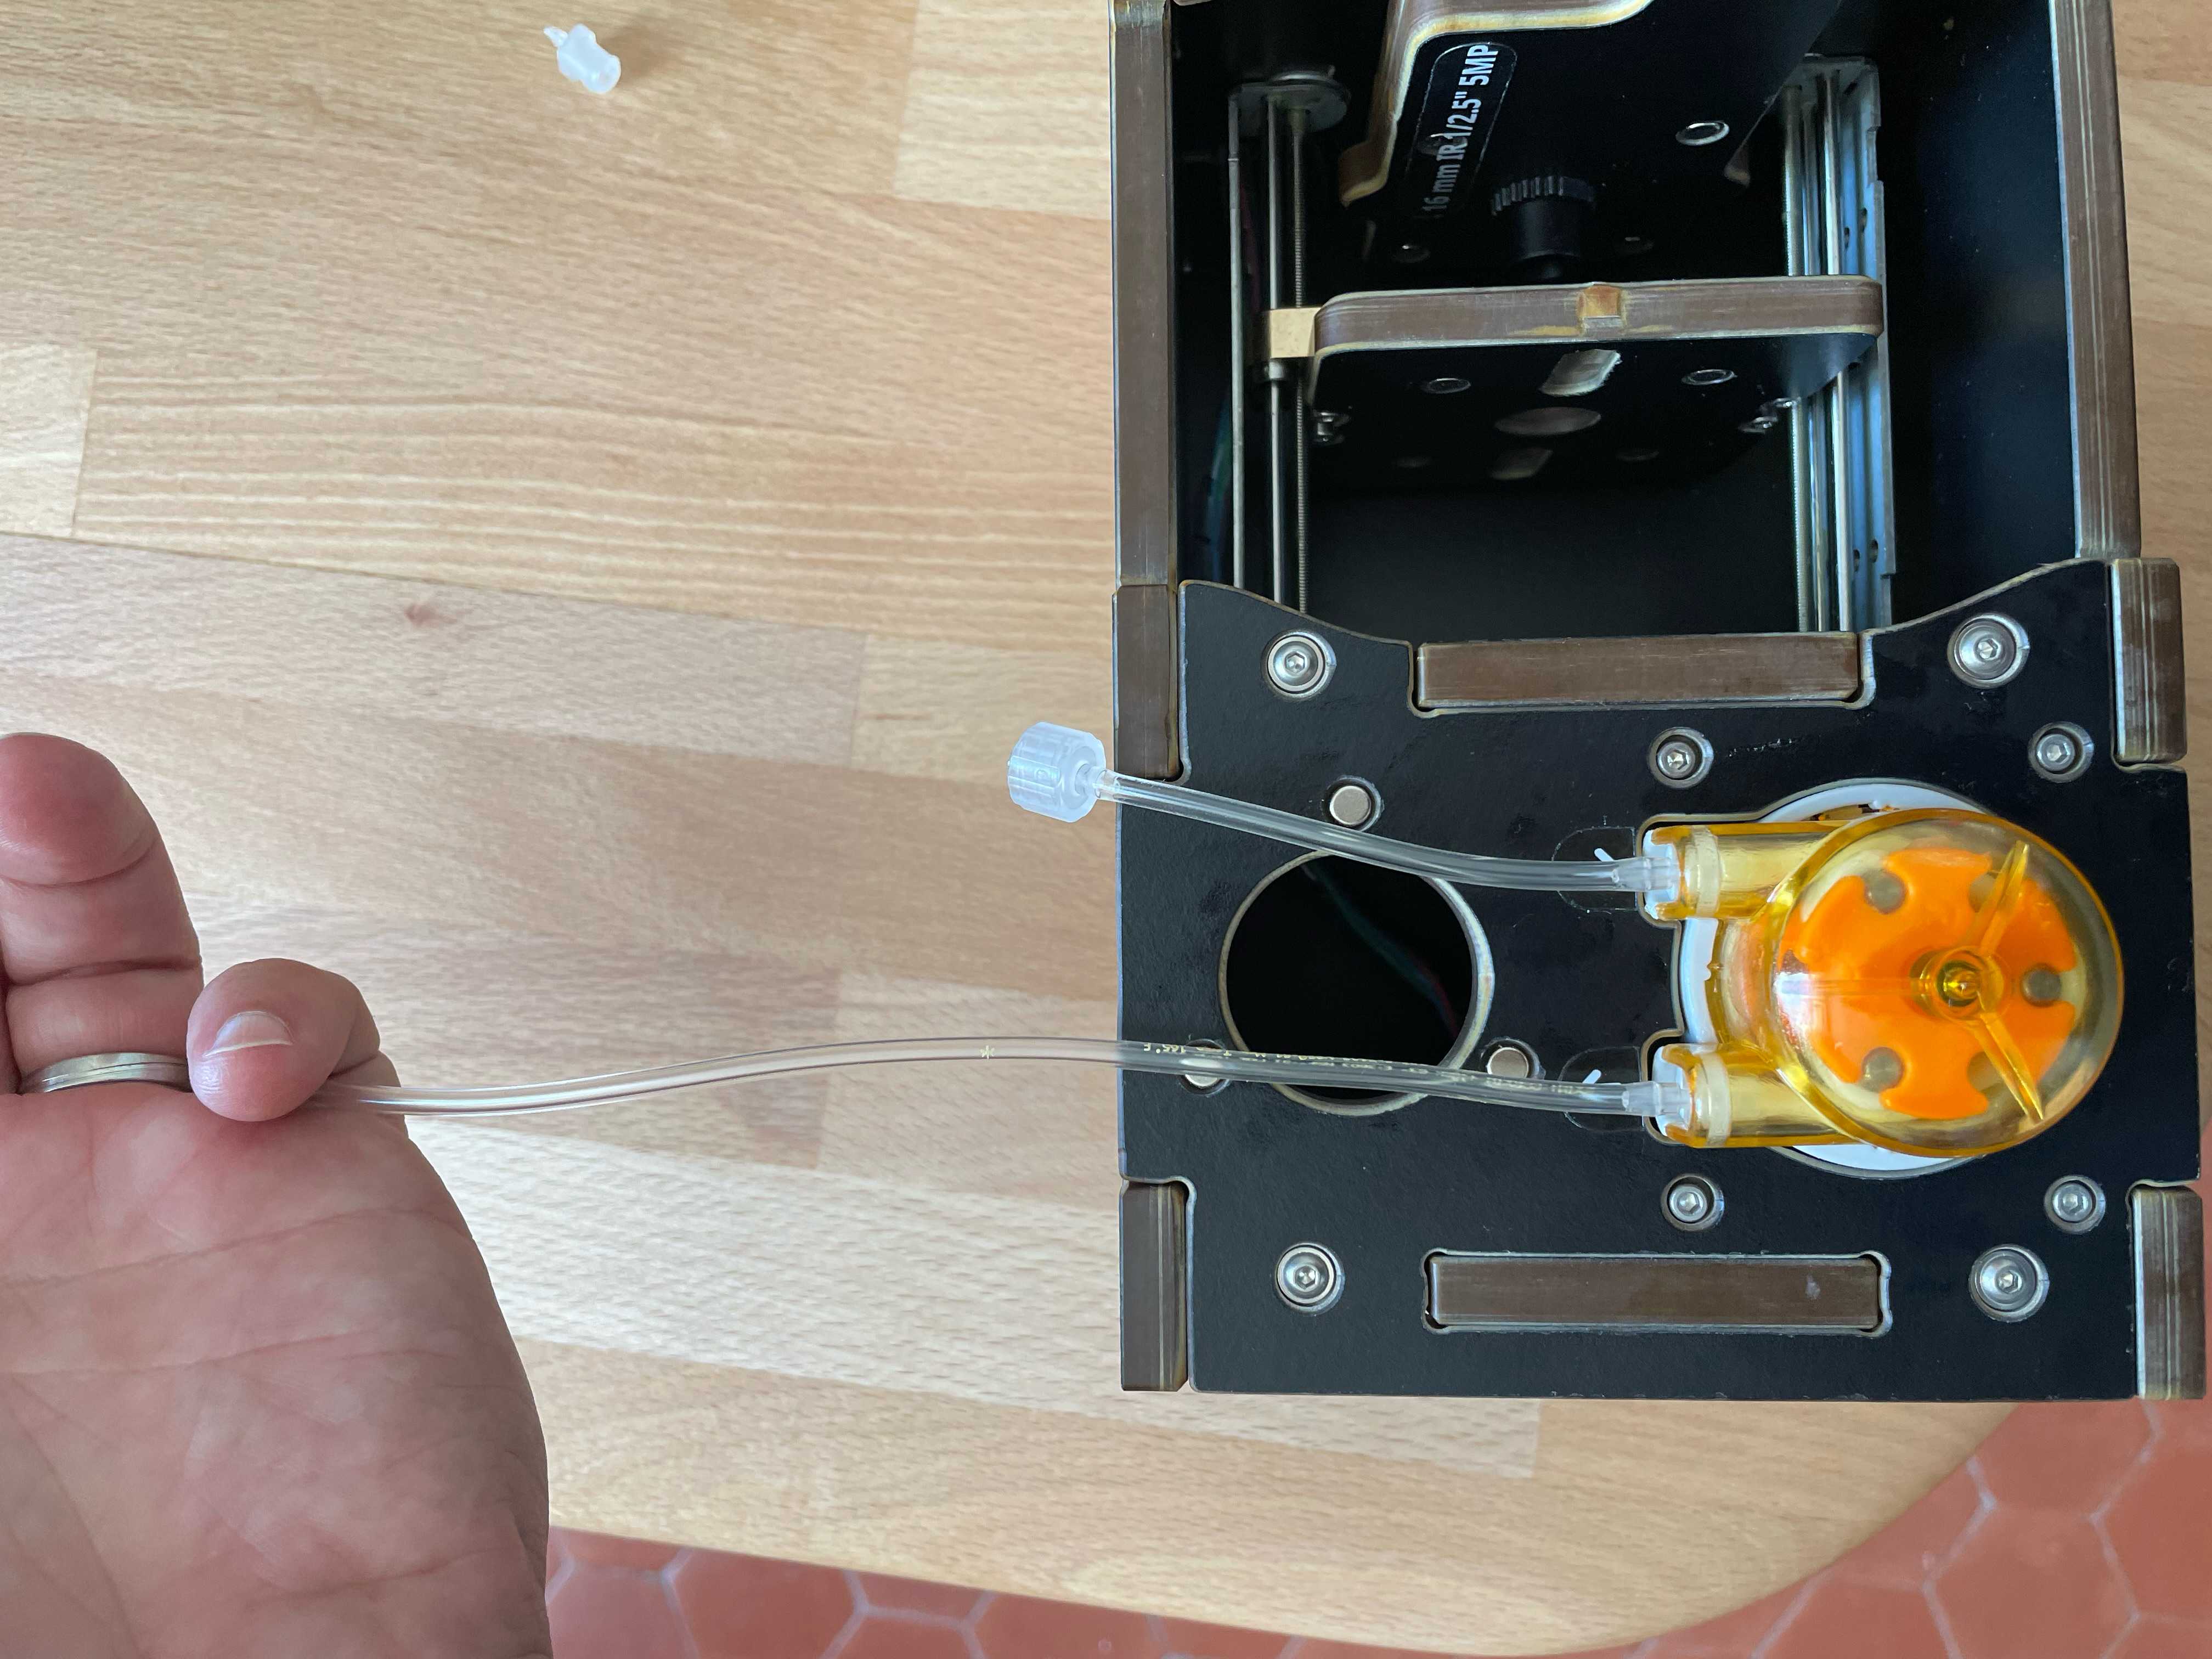
assemble the flow cell with care and step by step, note that a short length of the tube may need to be cut to get the right distance from the syringe to the flowcell


finally assemble all the system
Power your Planktoscope by connecting power cable to the power input and turning on the wall switch. Within 1 minute of turning on your PlanktoScope, you should see the LED flash once.
After a few minutes, you should see a new option for Wi-fi appearing on your computer. Connect to it using the password: "copepode".
For more information and alternative methods of connection, see the designer's Connectivity Tutorial here: PlanktoScope - Connectivity Tutorial (1).pdf
Open the PlanktoScope's User Interface (UI) on your web browser (Chrome, Firefox, Edge etc.) using the following webpage link (either click on the link or copy and paste into your browser):
There are several tabs on the UI that can be used to adjust setting, run samples and take images. To navigate around the UI, all tabs are available from the Home tab, including the Shutdown button which we will use when we have finished using the PlanktoScope.
We can also use the 'Hamburger Menu', situated in the top-left corner of the UI, to navigate between tabs.


Once the UI has loaded on your browser, navigate to the Optic Configuration tab and we will make sure the PlanktoScope is operating correctly.
To test the PlanktoScope, navigate to the Optic Configuration tab:
.")
a) Under Optic Characterisation, switch on the Light by clicking 'On'. You should see the Preview image turning from dark to light. The Preview image could be any colour so do not worry if yours does not show blue; it will be adjusted later.

b) Under Focus Adjustment, click 'UP 1MM' and 'DOWN 1MM' to ensure focus buttons turn the focus motor. You should see the mount moving further from (UP) or closer to (DOWN) the camera.
.")
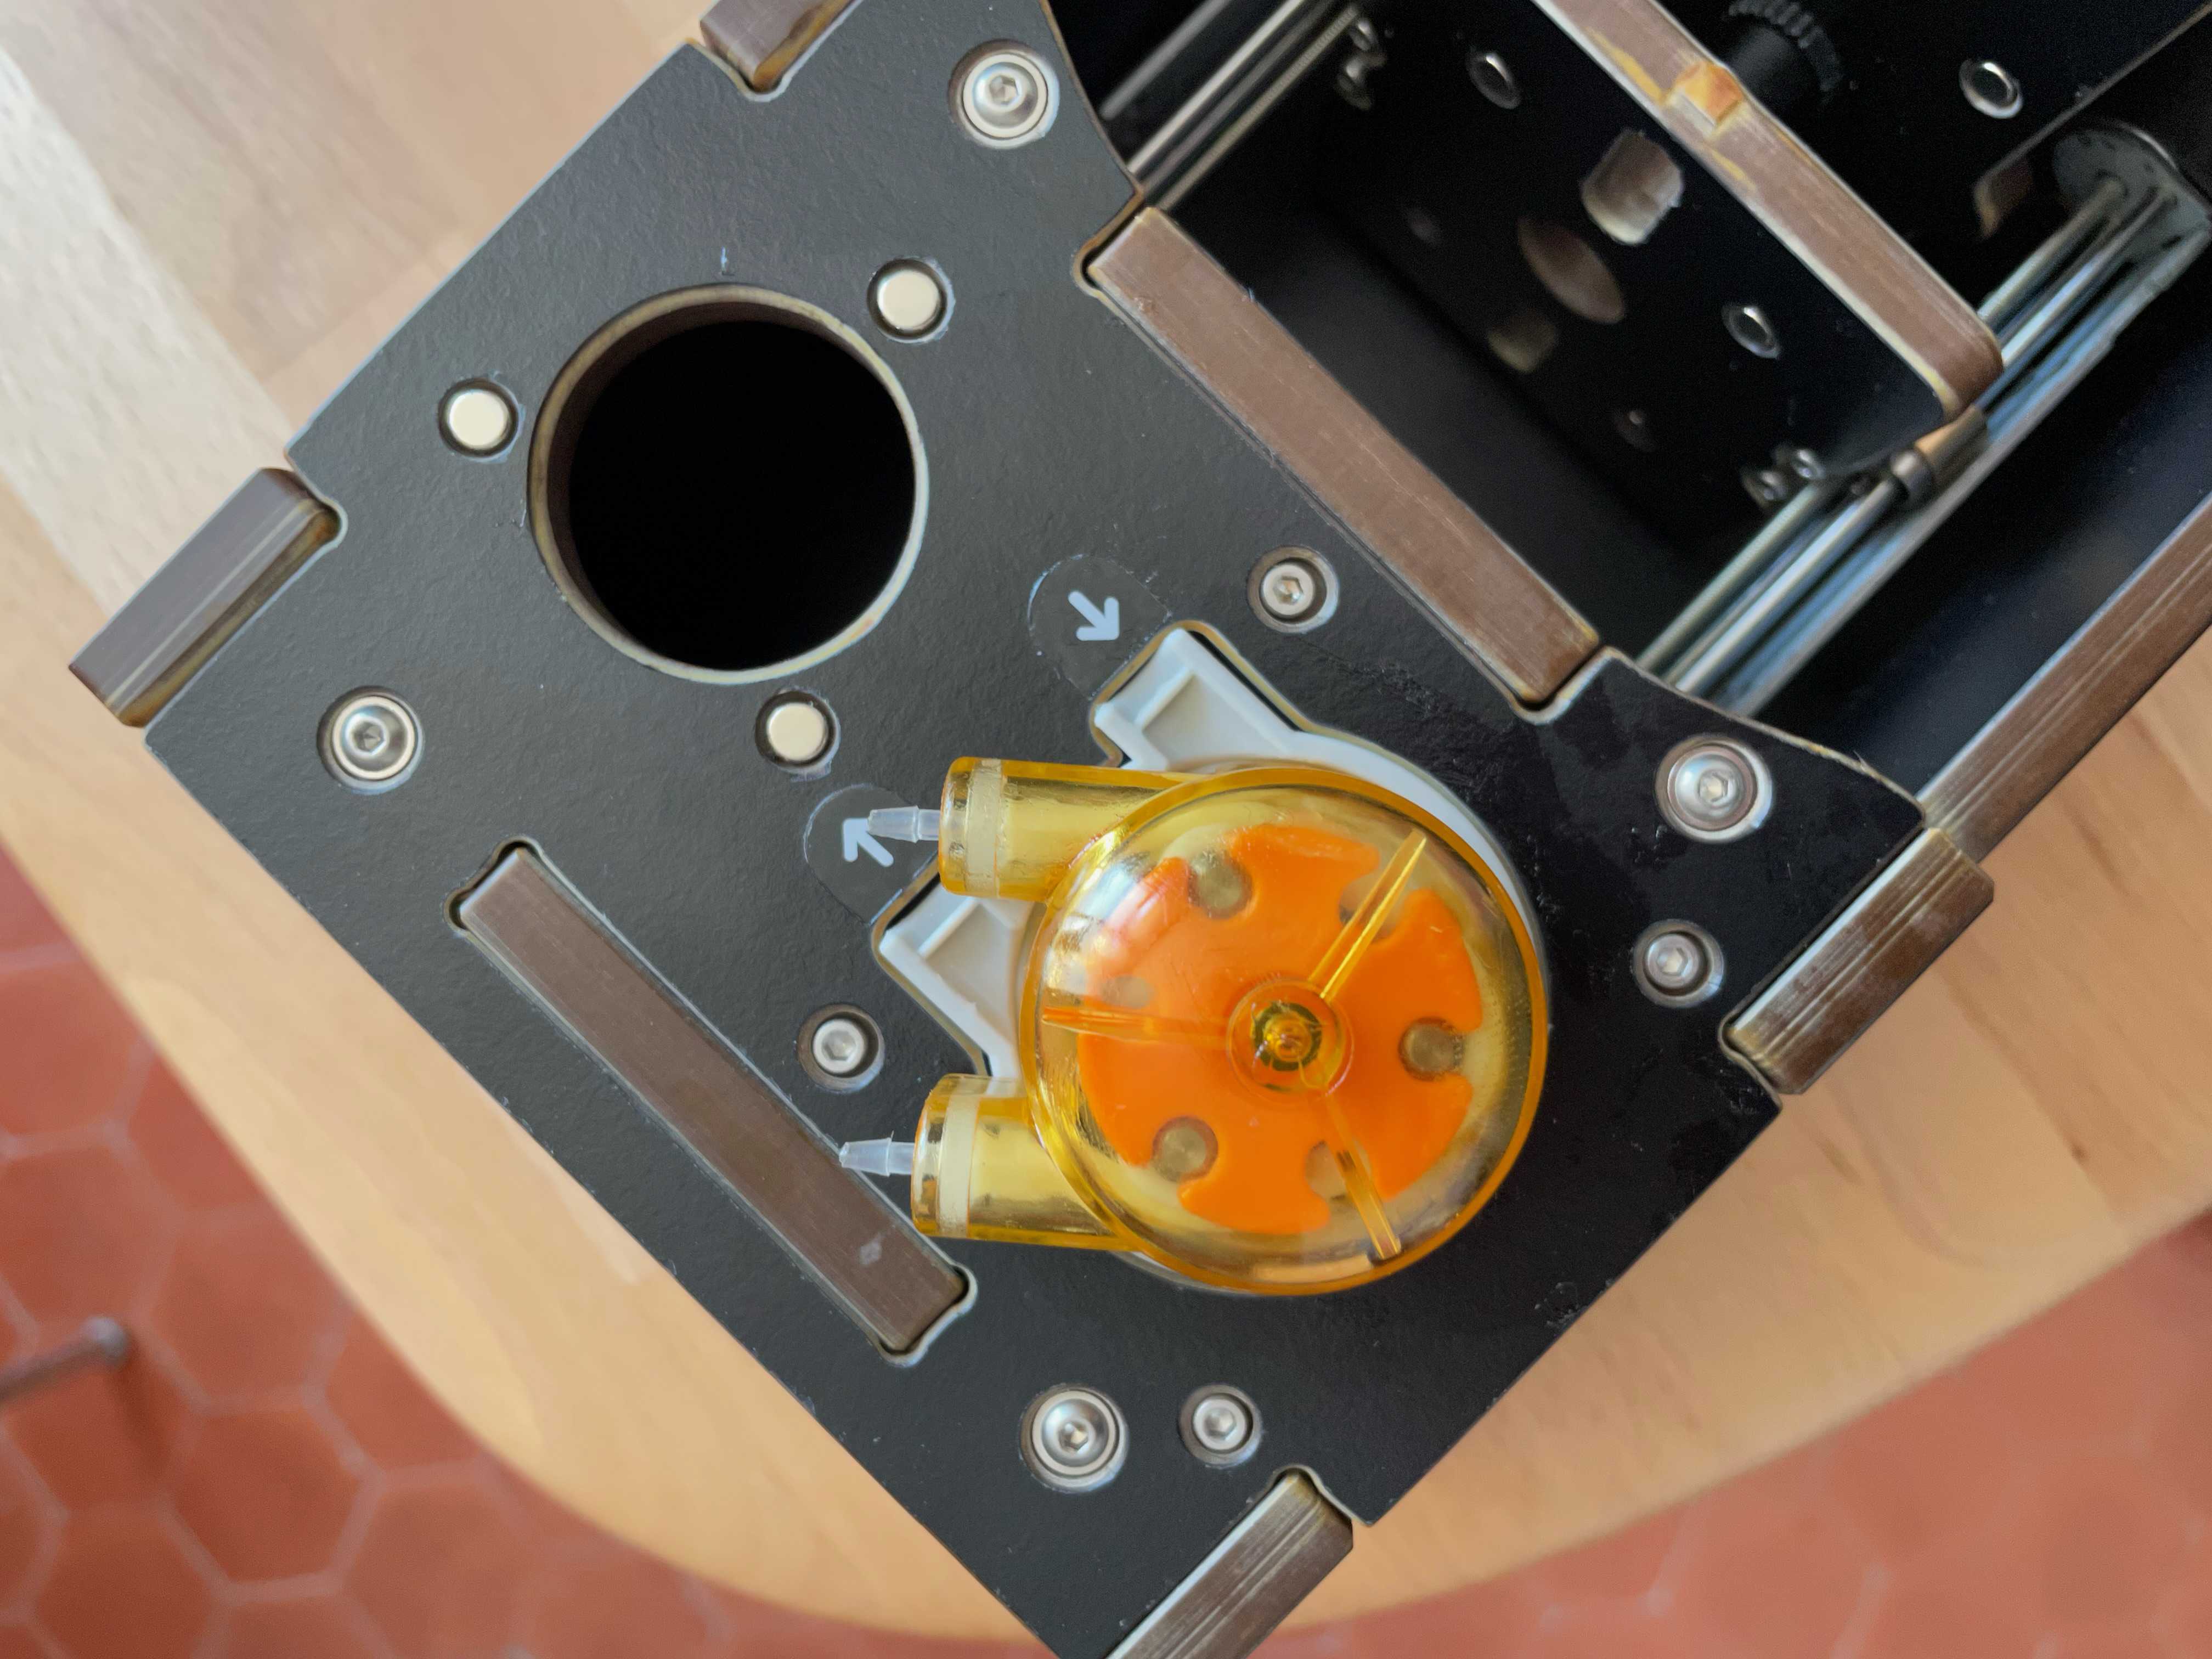
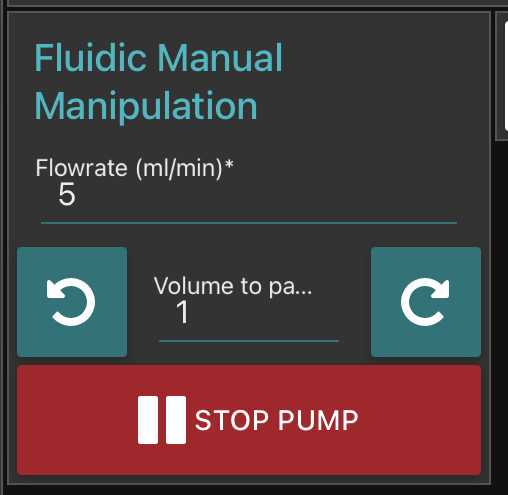
c) Under Fluidic Manual Manipulation, click clockwise arrow to check that the Peristaltic Pump is working. You should see the pump rotating in an clockwise direction.

d) Under Camera Settings, change the ISO value. You should see changes to the Preview image. After this test, Set ISO to 100.

a) Remove the Fluidic Path from the mount and gently lay to the side.

Remove the Fluidic Path and lay to the side

Remove the Fluidic Path and lay to the side
b) Make sure we have enough space to remove the lenses by clicking the 'UP 1MM' button under Focus Adjustment.

Red box highlights 'UP 1MM' button that will move the Mount away from the lenses.

Move the Mount away from the lenses using the 'UP 1MM' button to allow for outer lens removal.
c) Remove the outermost lens (16MM).


Remove the outermost (16MM) lens.
d) On the Preview image on the Optic Configuration tab, you should see a light spot surrounded by darkness. By moving the 25MM lens on your PlanktoScope, you can move the light spot on the Preview image. Try to get the light spot as close to the centre of the Preview image as possible.

With the 16MM lens removed, your Preview image should resemble this picture. If the light spot is not centred, gently reposition the 25MM lens until it is as close to centre as you can get it.

Gently reposition the inner (25MM) lens.
e) Once centred, place the outermost lens back to where you removed it from in step 3.

Place the outer (16MM) lens back into position.
f) On the Preview, you may see darker areas in the corners. To get rid of the darker areas in the corner, reposition the outermost lens (16MM) while holding the innermost lens (25MM) steady; the darker corners should disappear. Try to achieve homogenous light across the Preview image.
g) Place the Fluidic Path back into position.

Calibration
Pump calibration:
-prepare a large volume of tap water and put in in the syringe targeting a total volume of e.g. 20ml
-on the optic configuration tab: tell him that you want to pass 10ml and record the exact volume it finally ends to pass (eg. by looking on the graduation of the syringe) note X= final volume passed for a 10ml instruction
")
-then on the hardware setting, note the “pump step per ml” parameter (old step)
-calculate the "calibrated" pump step per ml such as = 10*old step/ X
-replace the “pump step per ml” parameter with this value
")
Size calibration:
-
tilt the planktoscope on the side (camera on the bottom)
-
remove the flowcell and place a micro metric ruler (or a millimetric one) on the sample stage such as the ruler is either vertical or horizontal but not in diagonal (using the 20mm/16mm combo of lenses the camera field of view should be about 3mm by 4mm). Make the focus on the scale


-take few images (select the test or culture mode in sample tab), goes on acquisition and put 1 or 2 images
<img src="https://static.yanyin.tech/literature_test/protocol_io_true/protocols.io.bp2l6bq3zgqe/Capture%20d%E2%80%99e%CC%81cran%202021-10-08%20a%CC%80%2016.53.05.png" alt="example of metadata entered in "sample" page" loading="lazy" title="example of metadata entered in "sample" page"/>
")
-download images on a computer and measure how much pixels are needed to obtain the longest path possible on the image (e.g. using imageJ https://imagej.nih.gov/ij/index.html) (s ee section 7 for communicating with your planktoscope and downloading the raw images )
")
, draw a line as long as possible (here 3mm on the scale) and measure it (analyse/measure). The line is 3476 pixel length (i.e. one pixel is 0.86 with this example)")
-calculate how much microns are represented by each pixels (should not be strongly different from 1.01 which is the default value for 25/16mm lenses combo)
Enter the calibrated pixel size value in the hardware setting
Get your sample
Use a net to collect plankton
Get the content of the collector.
Pass the volume through a 200µm sieve

 filter")
Rinse the sieve using seawater and a squeezing bottle (helps to pass small objects)
Recover the fluid / measure its volume/ record it on logsheets (will be entered latter as " concentrated sample volume ")

Pass the sample on planktoscope
assemble and start the planktoscope (see )
check for lenses alignment : remove the objective lens, start the light and check if the light source is centred.
-
if yes place back the objective lens and flowcell
-
if no adjust the position of the tube lens to center the light source (magnets allows for 1-2mm adjustments)

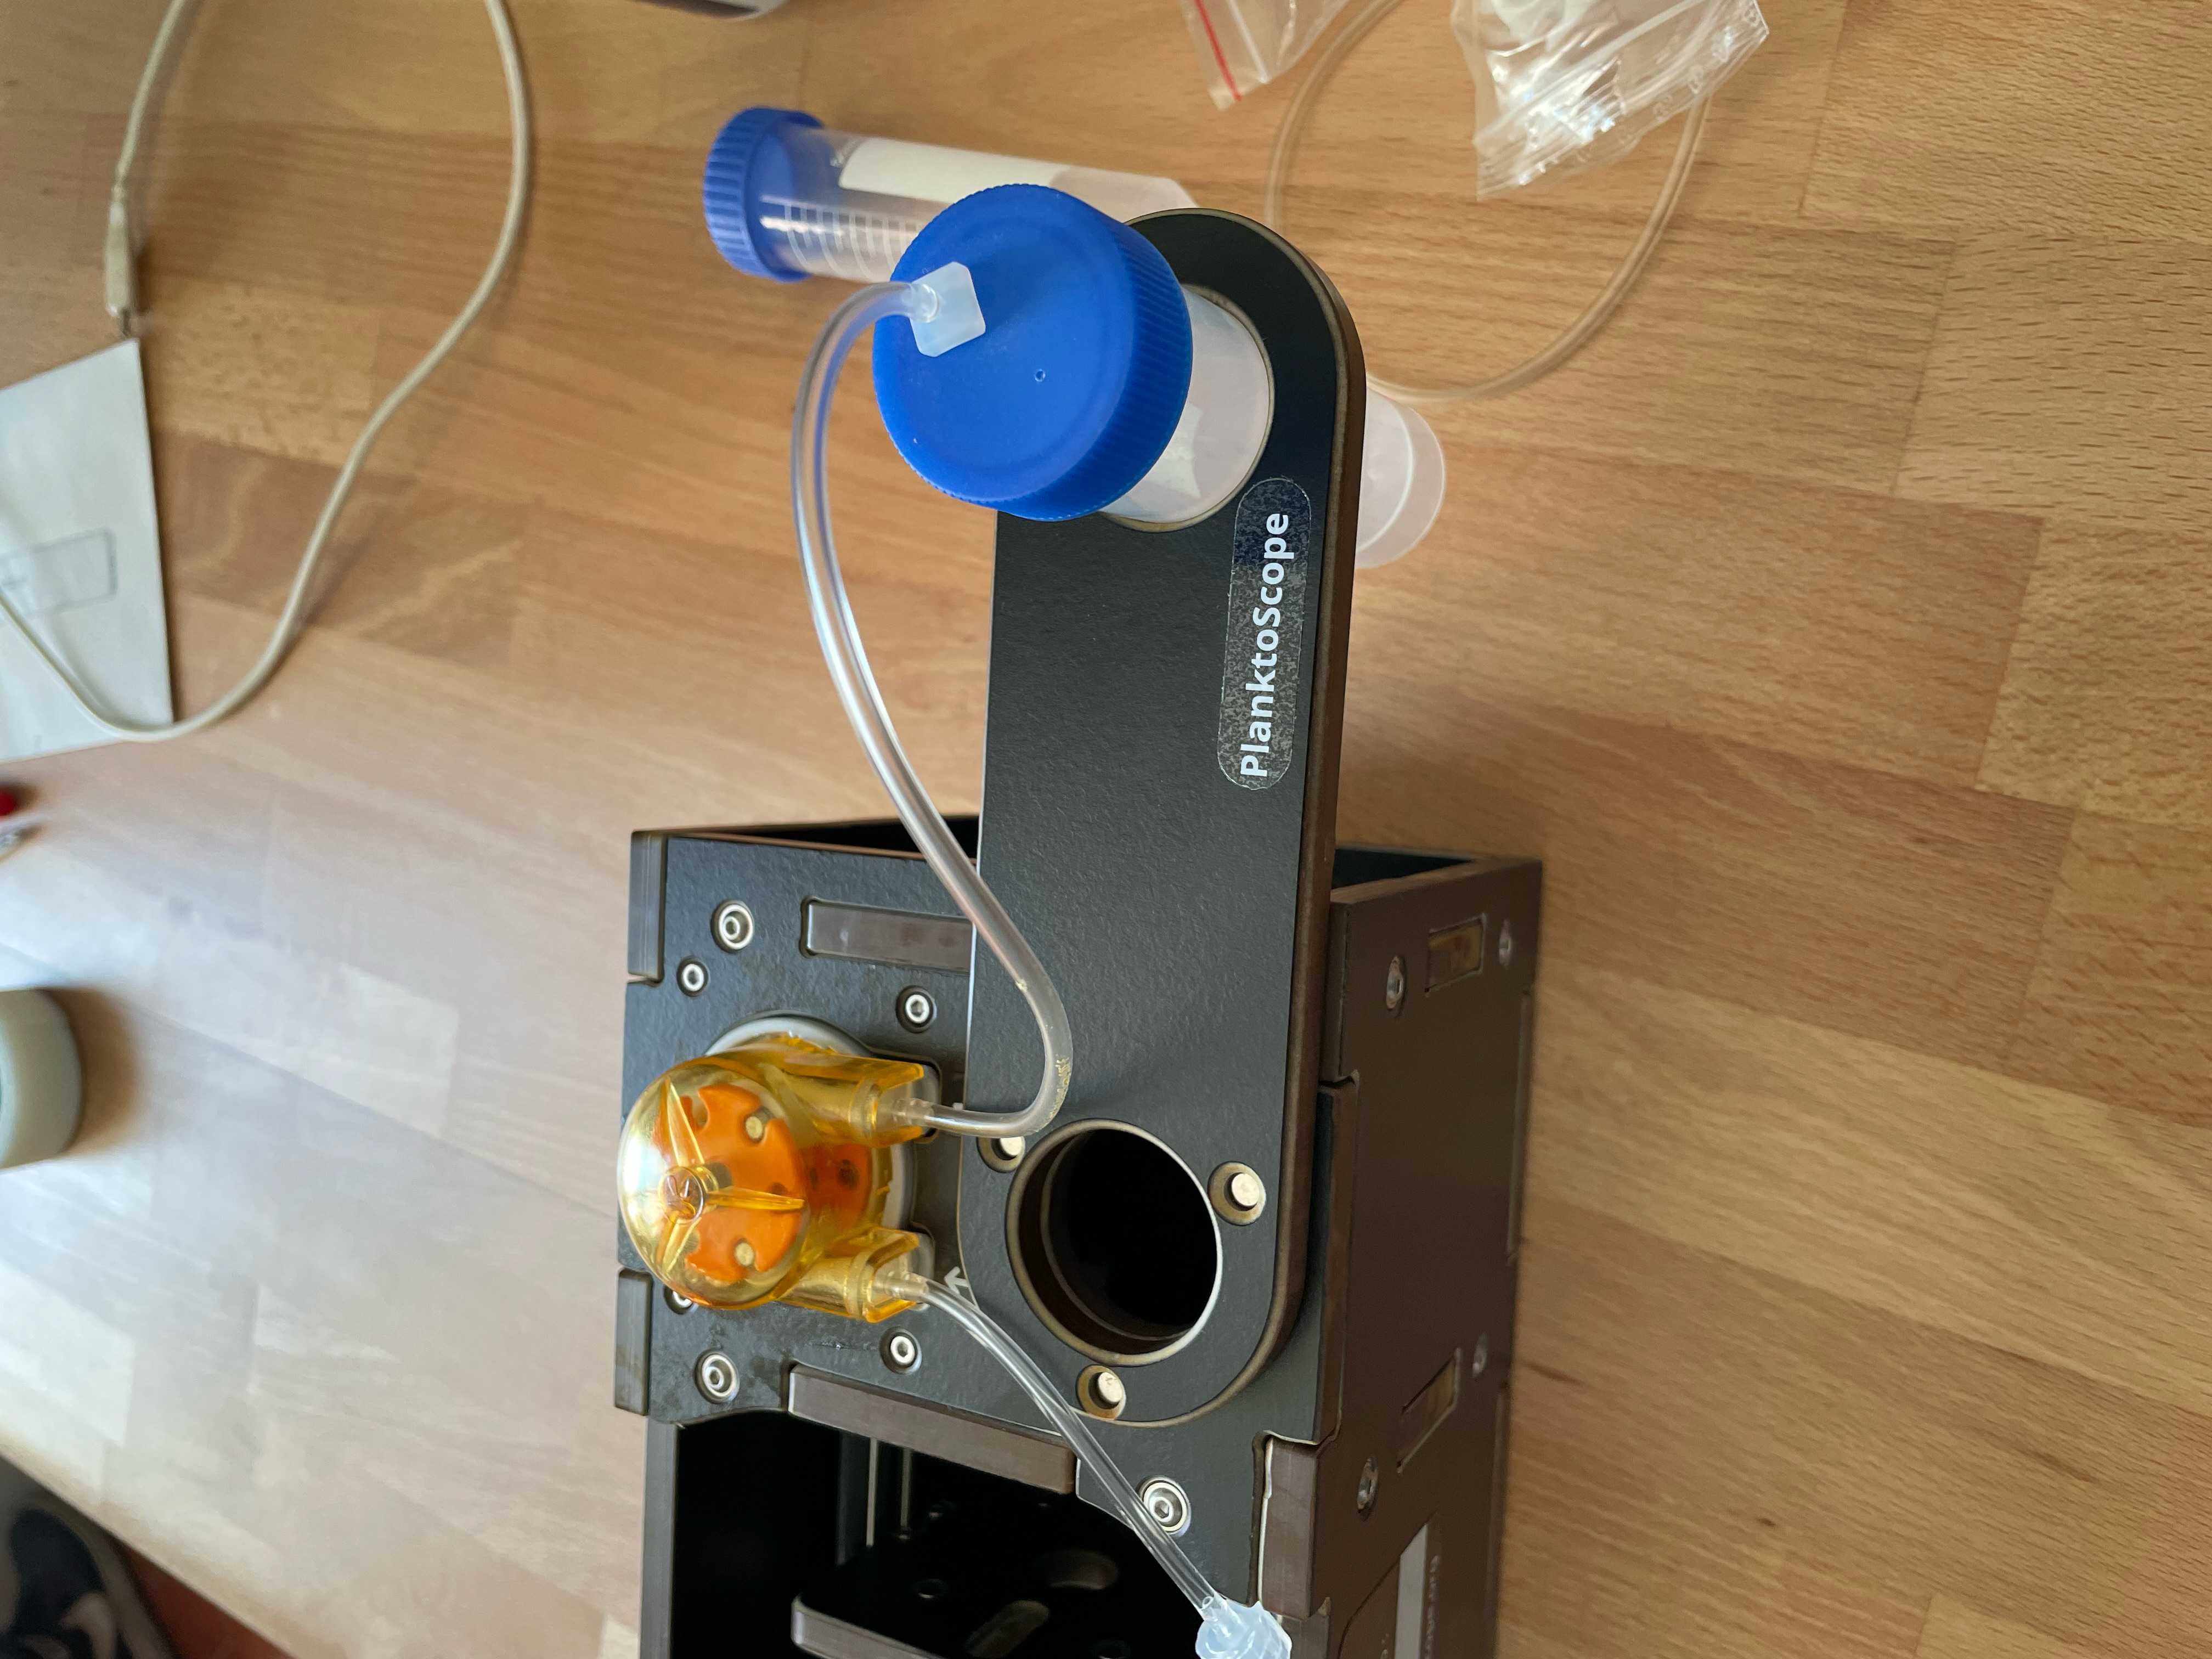
Fill the sample on the sample holder. For this you can just remove the full sample holder (and fill it on top of a sink (to not risk spills on-top of the planktoscope).
Replace the full sample holder and reconnect it to the pump, open the stopper, place the bubbler and adjusts it flow.
Go to optic configuration.
- turn the light on
- verify focus on dry slide (tip, if the slide is slightly wet, you can check for the focus simultaneously on the water traces on the two sides of the flowcell)
- Add your sample in the syringe (and keep it suspended by agitating it manually regularly or by gently inserting an air bubbler with 1 bubble/second in it)
- pump until you see your sample passing by and flowing through the peristaltic pump
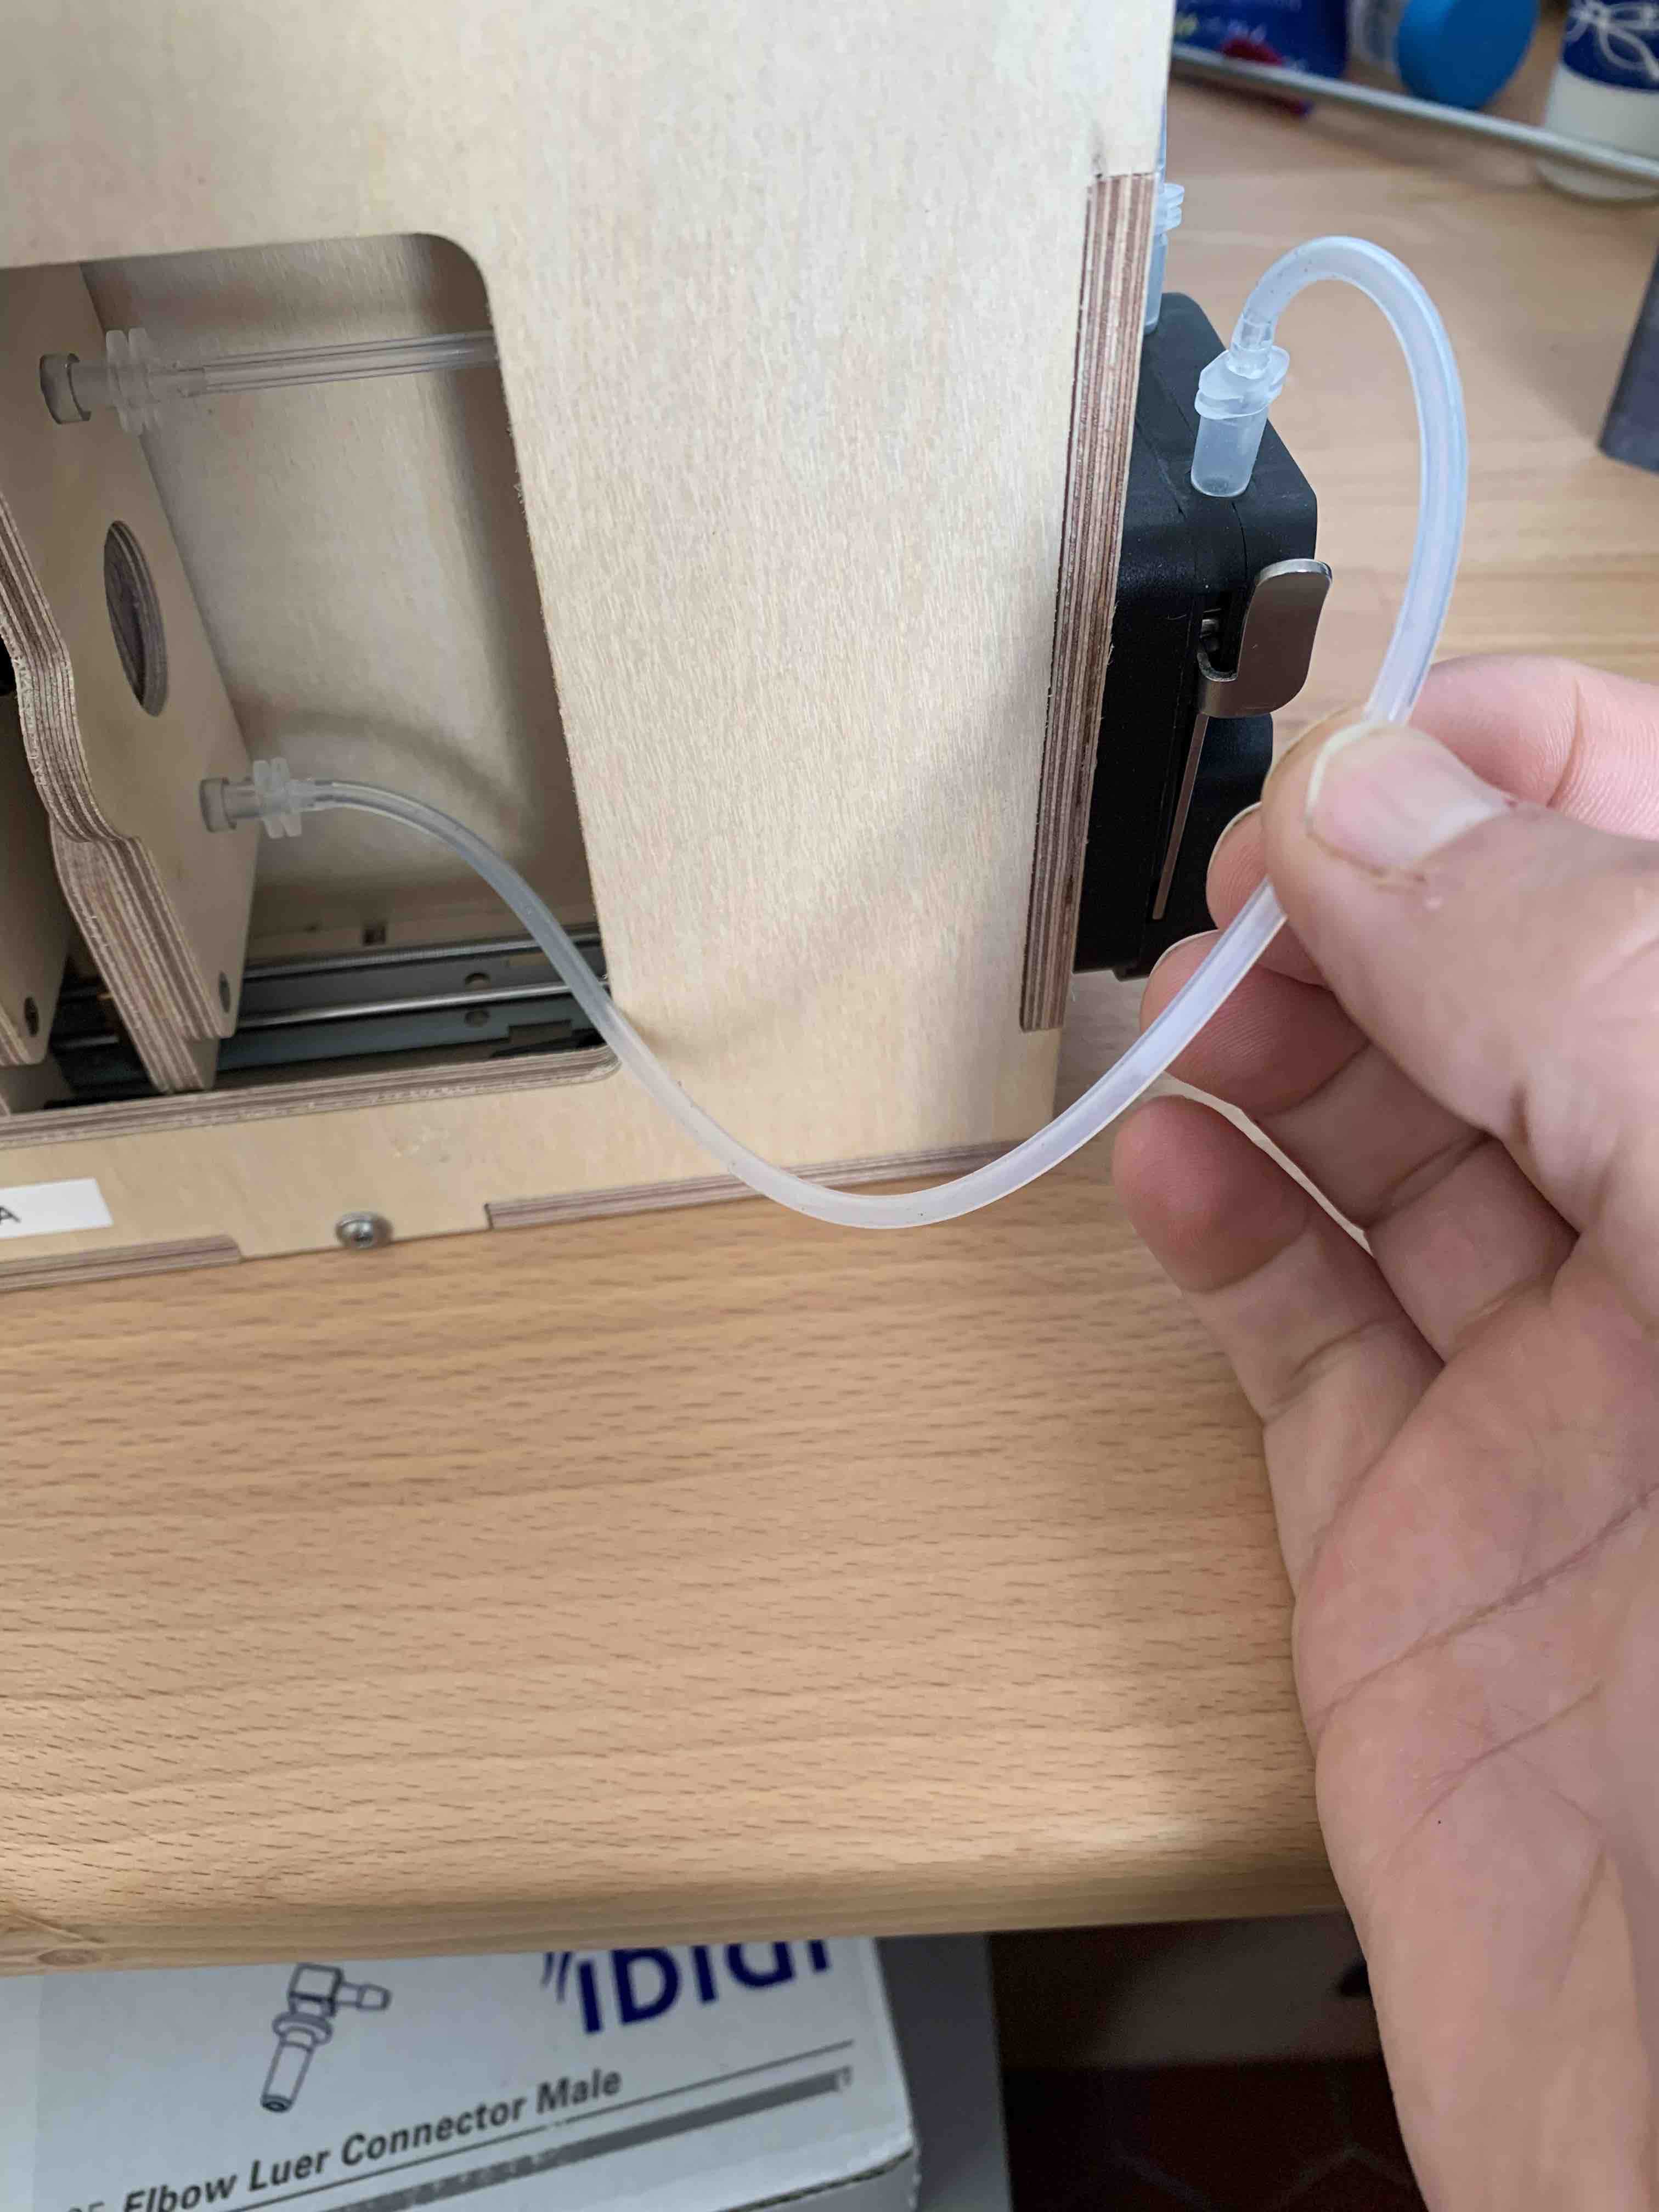
- Eventually get rid of air bubble by pinching the tubing half way between the flowcell and the pump while pumping (see also 5.7).
- finely adjust the focus on the organisms passing by ( tip#1 : start using the "1mm" buttons, then the 100µm buttons and finish by typing 25 or 50µm adjustments in the middle box (and pressing external arrows of focus; tip#2 : you can connect your phone or a tablet to the planktoscope to have controls on the focus while checking a zoomed portion on the streamed image on another device)
Safety information
not agitating your sample will let plankton sediment and could even block the fluidic part. More importantly, the organisms concentration will be inhomogeneous, and because you will first get the sinking plankton, will lead your measurements to over-estimate true concentrations. you should agitate your sample using bubbling and use pumping rate enough to avoid sinking/clogging of sample
adjust the concentration of the sample: ideally not more than 20-30 objects should be present per frame. If the sample is over-concentrated, dilute it by a factor 2 (add in a jar 1/2 of the sample -after agitating it- and 1/2 of seawater). Note dilution in metadata in 7.5
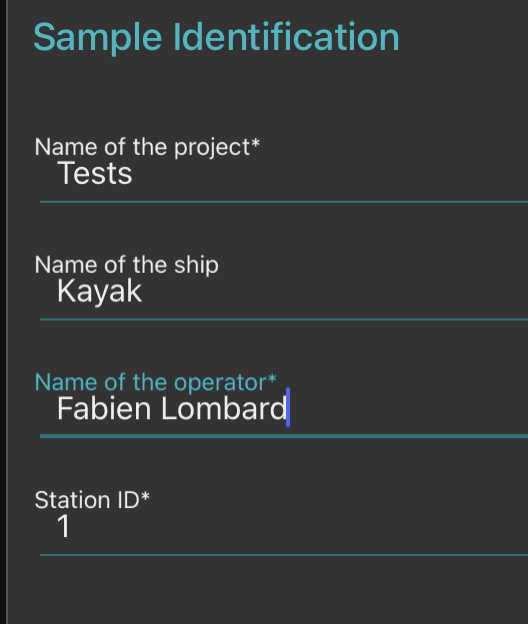
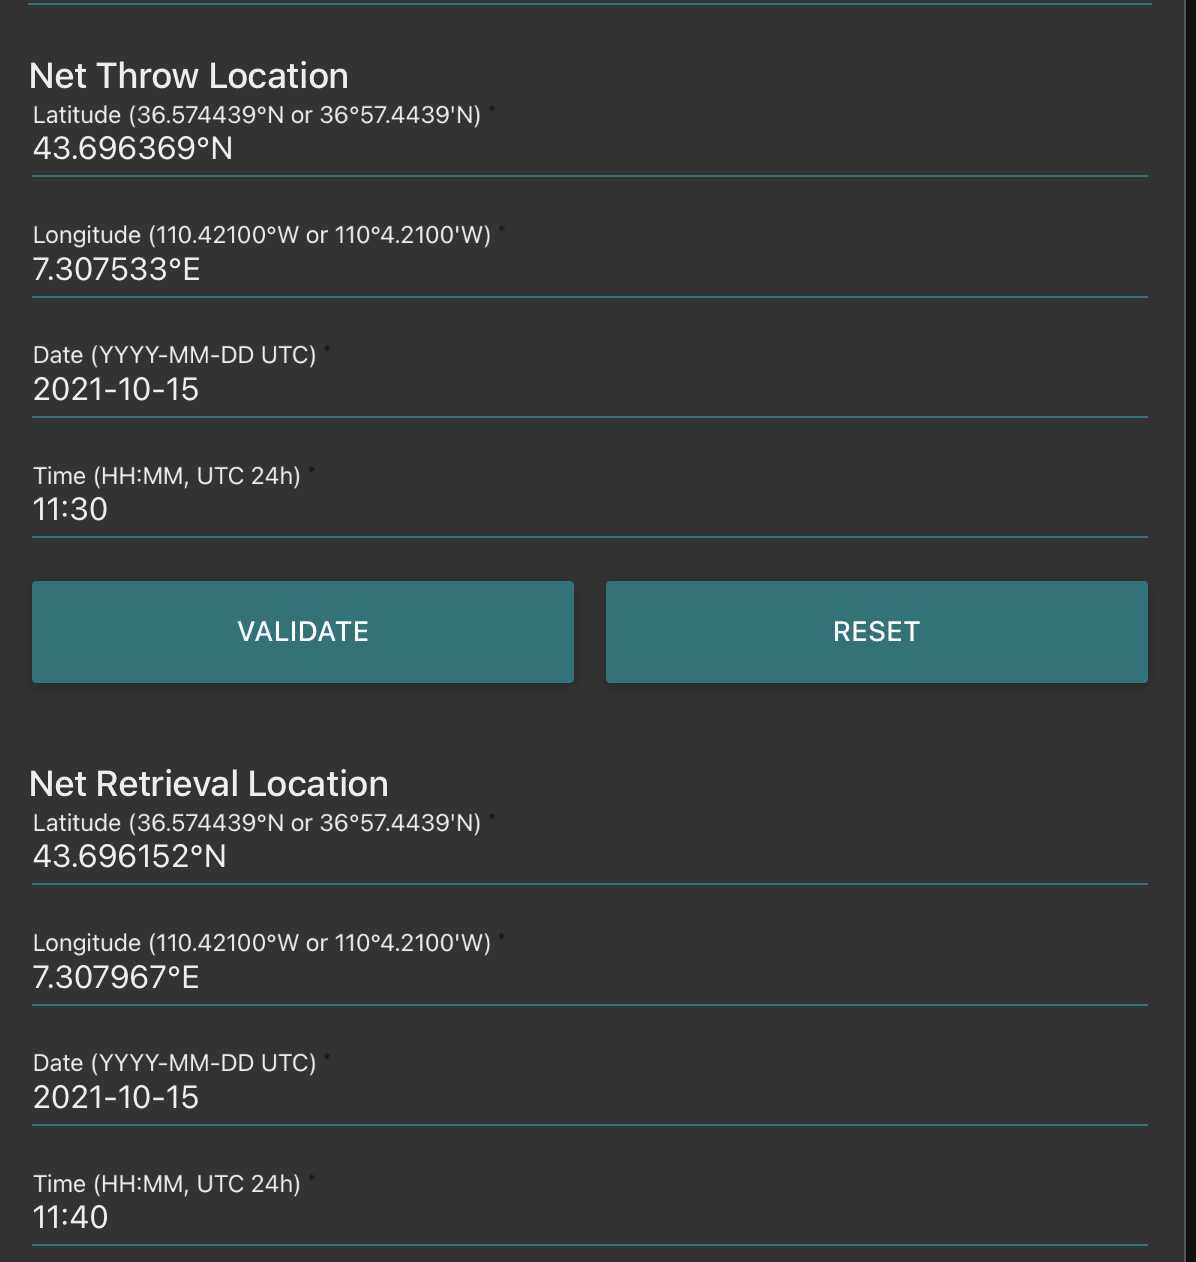
Go to "sample" page and fill metadata
This step is critical because those data are the ones that will make your sample usable or not
- fill the sample identification (project, name, boat used, your name and the station number)
-note how you sampled the plankton (recording mesh size with " minimal fraction size " (will be used afterwards in the segmentation process, objects smaller than this won't be segmented; " Maximal fraction size " is the size of the mesh used in step ; Filtered volume is important if you recorded it but could be calculated from other parameters . Make sure to either have filled it or to have filled either min and max depth if using a vertical net; initial/final positions , speed and length (min) of deployment if using a horizontal towed net
known bug: if filtered volume is provided but also initial/final size, calculation from this latter may replace the measured filtered volume
in all cases the diameter of the net opening will be needed to calculate the filtered volume
- Note the mesh size used for collection in "minimal fraction size " (it will be used afterwards in the segmentation process, object smaller than this won’t be segmented);
-The "Maximal fraction size " is the mesh size used to filter the sample during preparation (It must have been done at 200µm so as not to block the fluidic circuit);
-The “Filtered volume” is the volume passed through the net during sampling. It is better if you recorded it but could be calculated from other parameters. So make sure to either have filled it or to have filled either min and max depth if using a vertical net; initial/final positions, speed and length (min) of deployment if using an horizontal towed net; and in all cases the diameter of the net opening (to be able to calculate the volume afterwards).
-“ Concentrated sample volume” is the volume of sample recovered after all the steps of concentration or dilution.
- If dilution have been done, note the “dilution factor” (if not, write “1”).
Dilution factor if a dilution has been done in
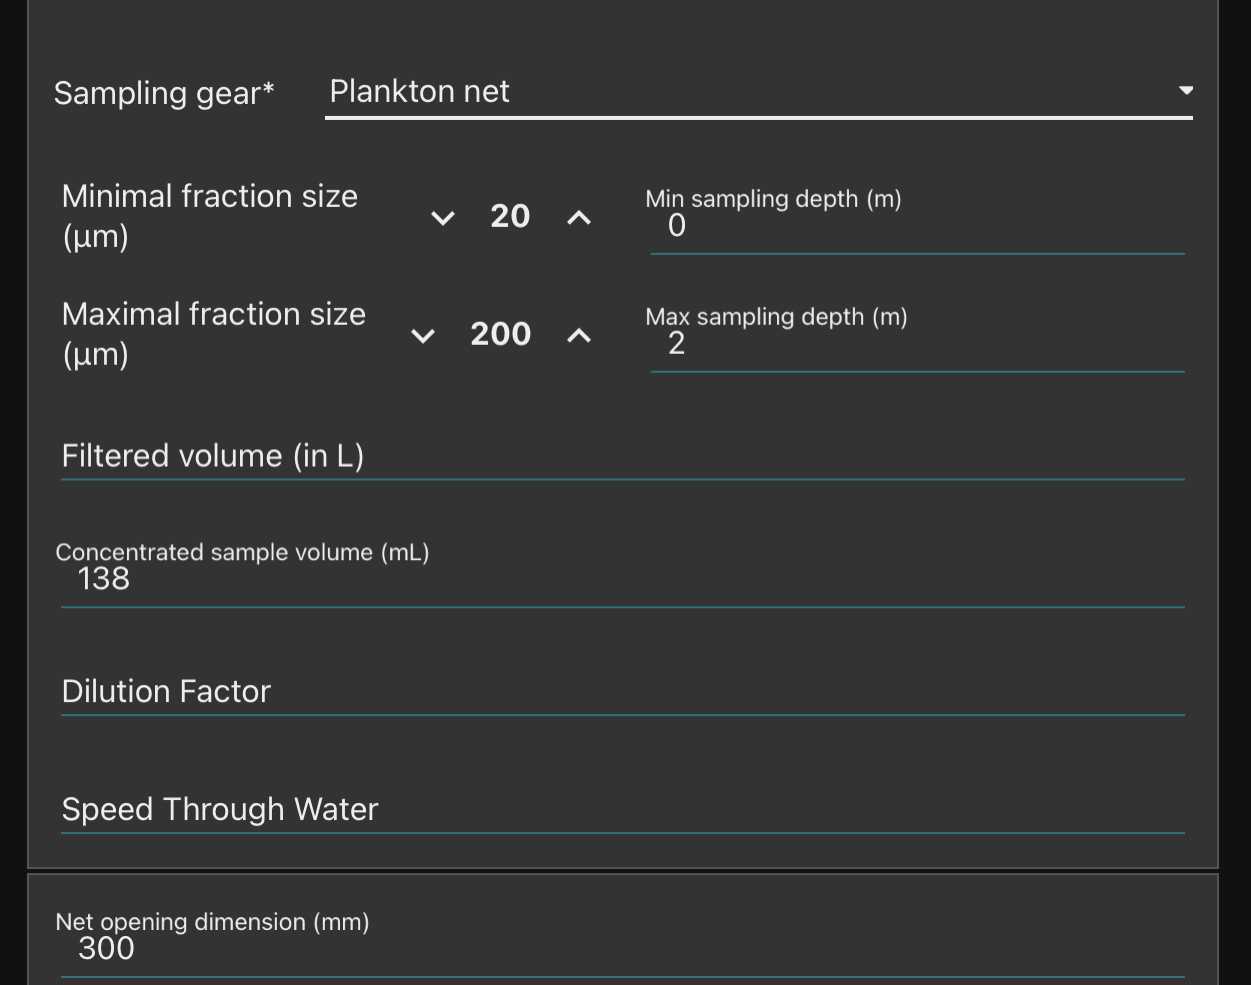
Fill the net initial and final position (if towed horizontally) remember to validate both of them (readings disappear after validation, but are recorded)
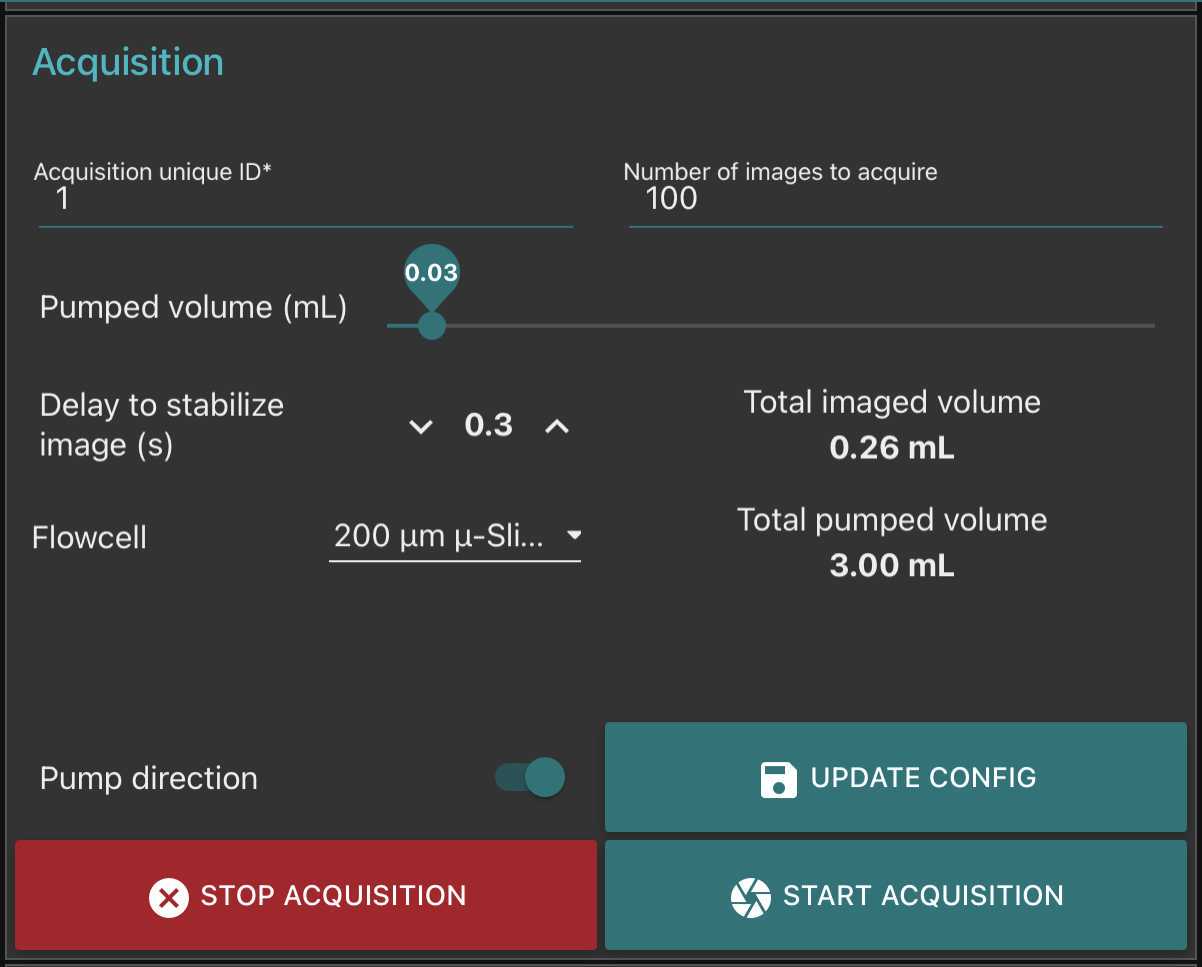
Go to fluidic acquisition and set parameters
-number of images to acquire (to be chosen depending on the desired final object number and the observed concentration on images)
-
Volume to pump is the volume pumped in between two images: it should be large enough to : avoid taking two time the same object in photo; avoid large sedimentation in the fluidic system; avoid objects to stick on the flowcell. We recommand to test it in order that the volume passed between two images correspond at least to 5-10 times to the volume imaged (see here the discrepancy between imaged volume/pumped volume)
-
Delay to stabilise image is the time lag in between the stop of the pump and the acquisition of the image. it should be large enough to avoid object moving while imaged.


go to optic configuration and pump with high flow rate a good amount of water (goal: remove plankton that have sunk in the fluidic system)
Go to fluidic acquisition and start the acquisition.
Wait for the acquisition to be done
Results can be consulted by consulting the gallery
Segment the acquisition
Go on segmentation and clic on the "update acquisition's folder list"* Select the samples you wish to segment
- Setup the different options of the segmenter
- Recursive folder means that it will segment all samples within a selected sample
- Ecotaxa archive: it will create a zip file containing all files needed for a easy importation within ecotaxa
- Force rework: if yes it will re-segment samples already segmented
- Keep objects: it will keep the final segmented images visible in the planktoscope (that could be accessed by the gallery in the objects folder)
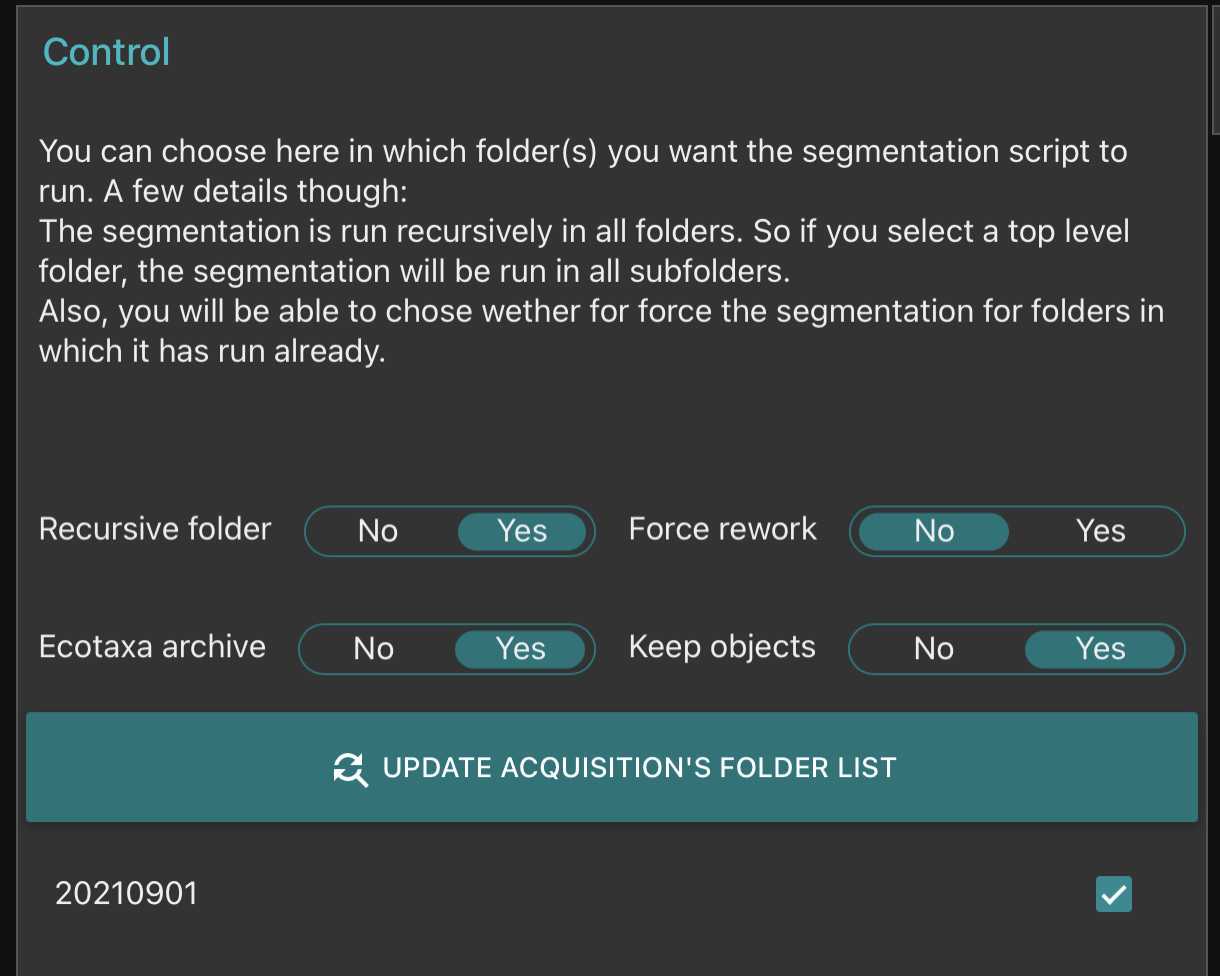
- scroll down and clic on start segmentation
- Wait for the segmenter status to turn to "done"

Download the results
You will need a computer connected to the planktoscope together with free software FileZilla (https://filezilla-project.org/)
-
Open FileZilla
-
Either clic on the top right to create a new connection or use the quick-connection fields below
-
Enter the following informations: Host: sftp://192.168.4.1 (note images were taken with a previous version, the adress does not correspond to images)
Username: pi
Password: copepode
Port: 22

- clic on connect
- on the bottom panels you have (on the left) the access to what is in your computer and (on the right) the access to what is in the planktoscope (clic and slide to transfer data in between both)
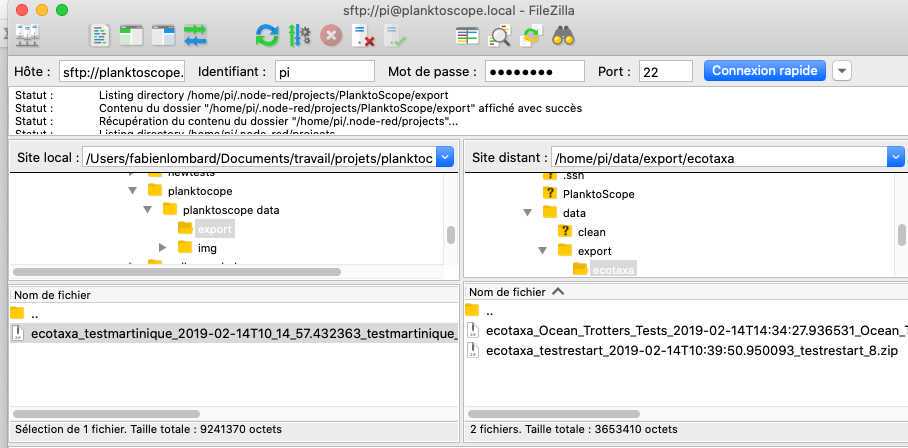
Exports file for EcoTaxa are in /home/pi/data/export/ecotaxa
Raw images files are in /home/pi/data/img
Different control files to check the segmentation process (images after background substraction, masks of the different objects etc) are in /home/pi/data/clean
Final vignettes are in /home/pi/data/objects
Clean the planktoscope
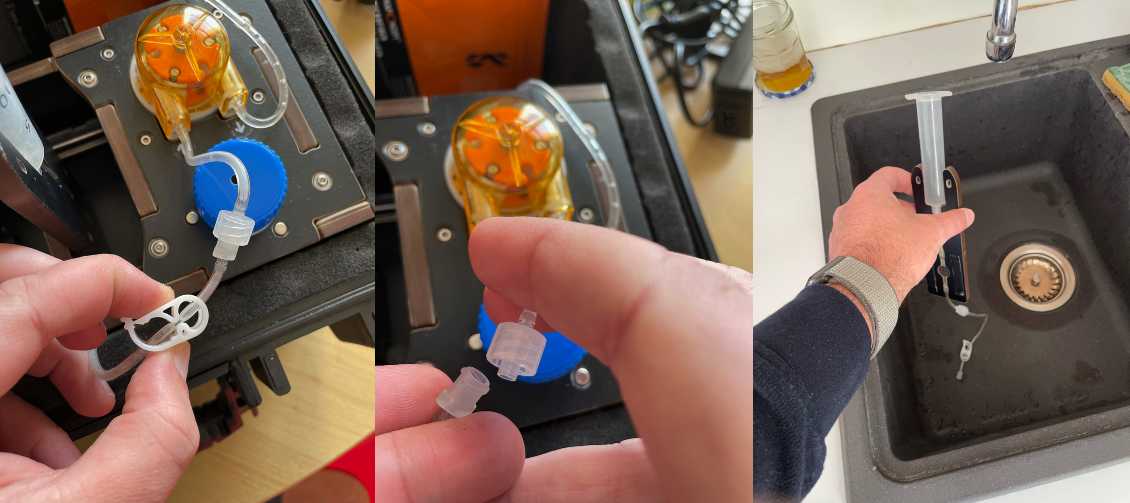
Drain the sample out of the syringe1. Disconnect the syringe and clean it with tap water (or even distilled water)
- Pump ( at high speed!) the full content of the fluidic system to remove any liquid
- Reconnect the syringe
- Fill it with tap water (or distilled water)
- Pump ( at high speed!) while regularly pinch the tubing to detach any plankton in the system (see )
- Drain again the syringe ( repeat steps 2-7 at least 2 more times until no plankton is visible on the camera)
- Finally drain the system
Upload your images on EcoTaxa
At First connection:
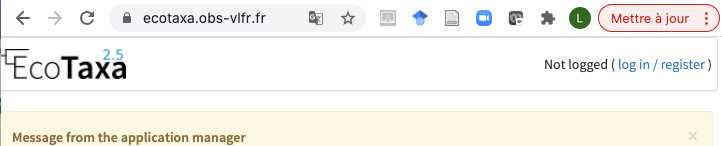
Create an account on EcoTaxa (https://ecotaxa.obs-vlfr.fr/) by clicking on the top right "log in/register"
Put your real name and a valid mail so that you can be contacted
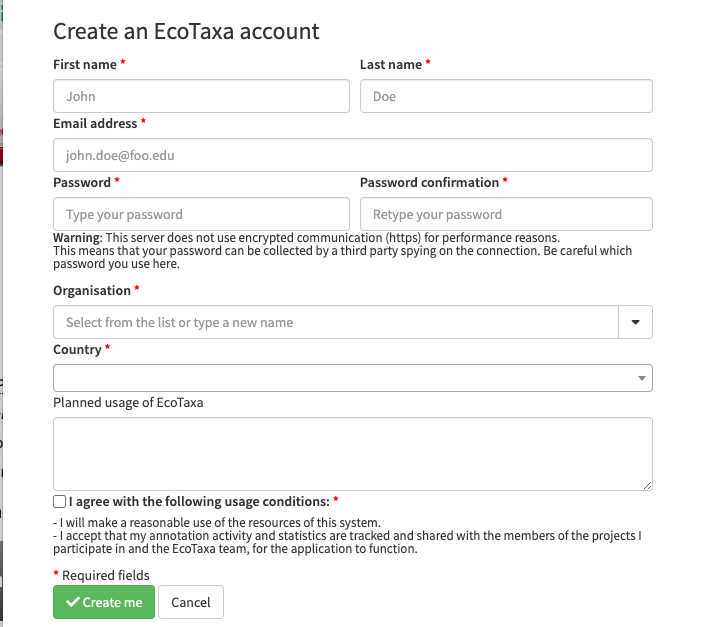
Once logged you can consult the project on which you are registered (e.g. your own projects + the ones you have been invited by the different data owners) by clicking onto " contribute to a project " on the main page

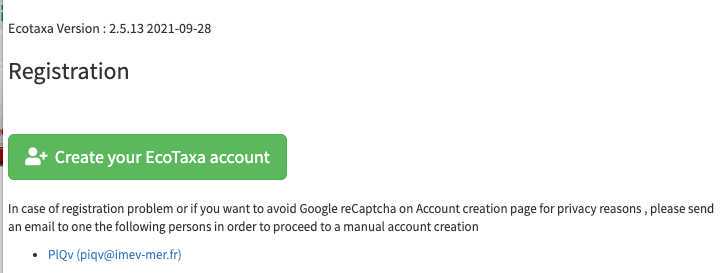
Needs to be done only once: basic rights don't include the "create project". As a protection against bots, To create a new project and upload images in it, please contact the user manager(s):
- PlQv (piqv@imev-mer.fr) The rights to create projects will be activated (by a human, please be patient few days) soon and you will see the following right appearing


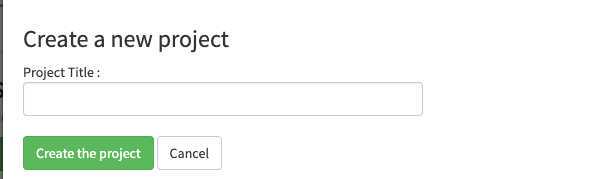
You can now create your own project on which you will be able to import, visualise and classify images
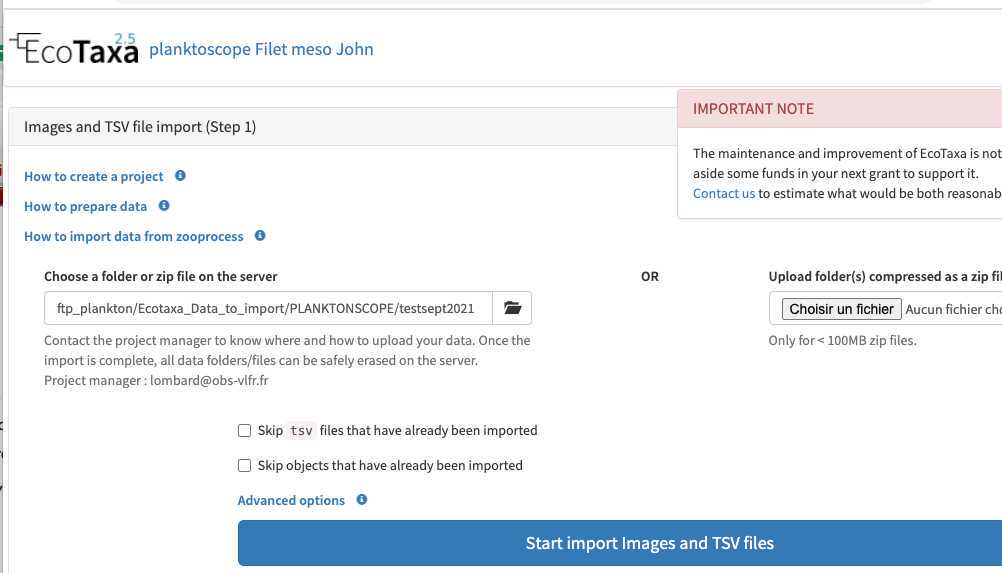
upload the ecotaxa archives (see step 6-7) on the EcoTaxa ftp
using Filezilla (see ) create a connection by using the following informations:
Select File > Site Manager...
Create a New Site called : Ecotaxa_VLFR
In General tag :
Host : plankton.obs-vlfr.fr
Protocol : FTP – File Transfer Protocol
Encryption : Only use plain FTP (insecure)
Logon Type : Normal
User : ftp_plankton
Password : Pl@nkt0n4Ecotaxa
Once this is done you could use FileZilla to load the Zip files downloaded from the Planktoscope onto the EcoTaxa ftp server (e.g. /Ecotaxa_Data_to_import/PLANKTONSCOPE)
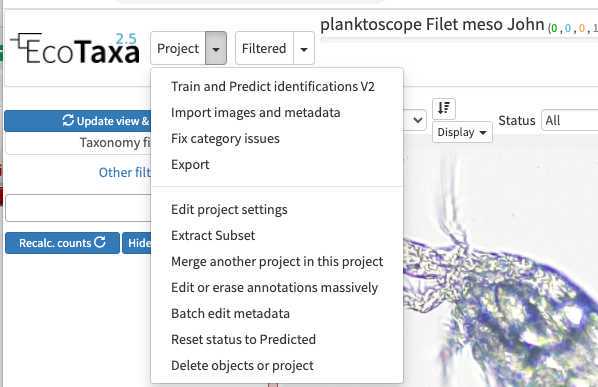
In your project/ on your project options button, select import images and metadata
locate your file on the ecotaxa ftp folders and import it (only works for one zip file at a time for now)
How to use efficiently ecotaxa
Configure your project efficiently: in Project/project settings
- Select a data sharing license (we recommend one of the CC-BY one or CC-0 if you want data to have a future use for science)
- Define if the project is visible for visitors (only "validated" images will be visible)
- Add a preset list of taxa for manual sorting (could be copied from any other project, or taxa added manually): those will be present in the taxonomic filter (see 10.1)
- Add useful sorting variables : in "Fields available for sorting": add at least those parameters that are pretty useful and will be added to the Quickfilters (see 10.1) area=area
meanhue=meanhue
meansaturation=meansaturation
meanvalue=meanvalue
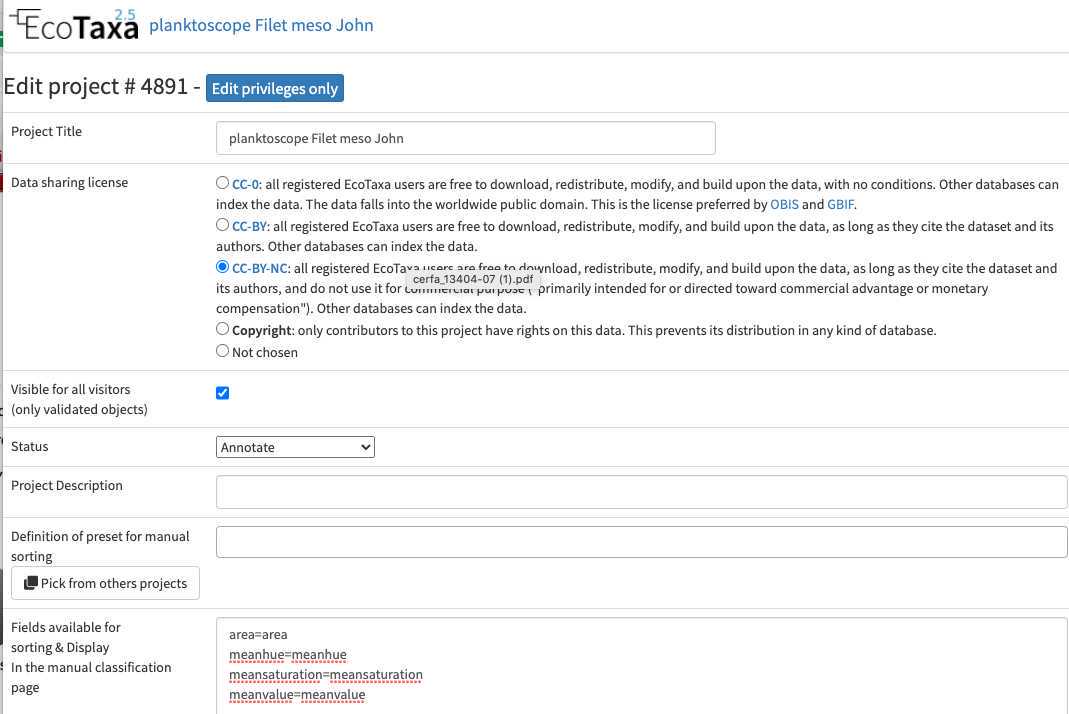
- Define a person of contact (mandatory) Define what pre-trained Deep Learning features to use on your project (we recommend to use «Planktoscope_2022-09 » unless you see a more recently trained model on planktoscope image)

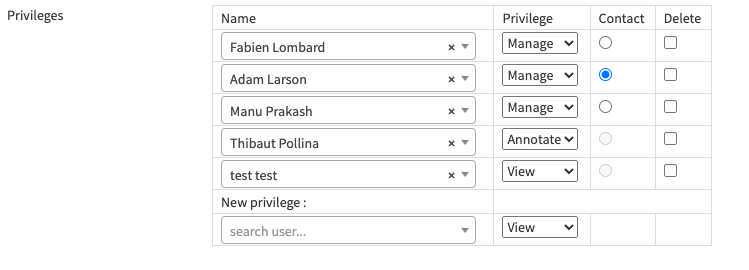
- And invite people to manage the project with you (will have the same rights than you), to help you to annotate images (won't have options below "export" in the project see ), or just view the project (both validated and non validated)
Use filters wisely
there are three layers of filters in EcoTaxa: the quick access filters (top bar)

The taxonomic filter tab (allows to filter by taxonomic groups) and the other filter tabs


Filters are additive, so you can add filters on geography, date, who validated them, taxonomic group and every numeric fields/ text fields entered in ecotaxa to search for specific things (and you can get rid of them easily too, see grey fields on to of the next image)
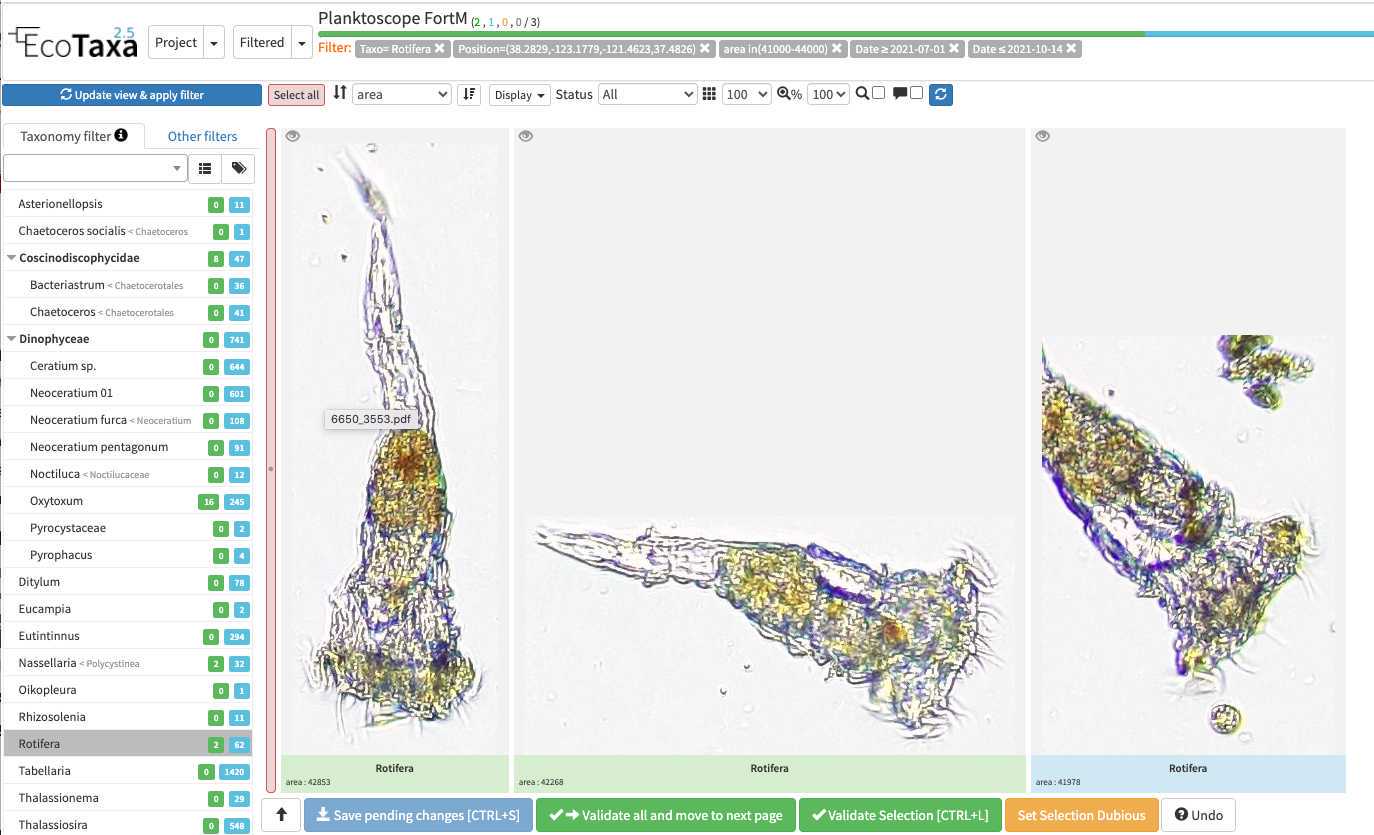
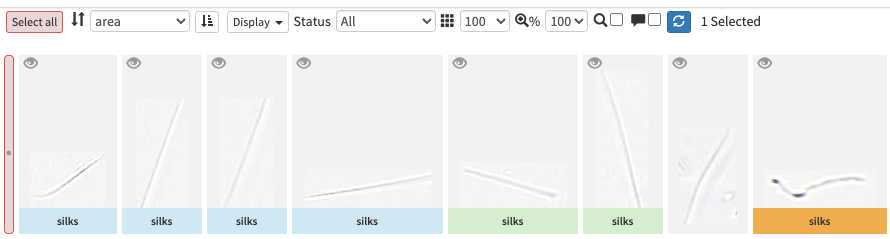
quickfilters are pretty useful since you can sort objects by specific values (eg. mean saturation below) to quickly observe objects that have here lots of chlorophyll (ps. you can revert the sorting order of those filters by ascending or descending order)

The different validation "states" in ecotaxa and how to validate
image arrives in EcoTaxa with the status "unclassified" (grey surrounding of the image)
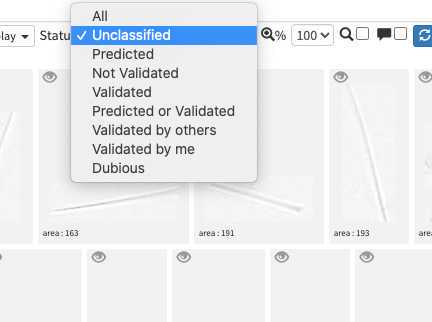
However they could be also set as "predicted" (blue surrounding; classified automatically by taking as example one pre-existing project), "validated" (green surrounding; checked and annotated by a human), or dubious (orange surrounding; checked and annotated as dubious by a human)
-validating consist in selecting one or several picture and attributing them a taxonomic or morphological identity by either displacing them in the list of taxa present in the « taxonomic filter » tab (in which you can force some categories to be present by using the « preset » in the project settings… or just by typing the name using the keyboard (which should use right away the research on top of the »taxonomic filter ». Whatever happens you need to save (ctrl.S or save button at the bottom of the page) before your action gets finally implemented.
photo here to illustrate
<img src="https://static.yanyin.tech/literature_test/protocol_io_true/protocols.io.bp2l6bq3zgqe/Capture%20d%E2%80%99e%CC%81cran%202021-10-18%20a%CC%80%2010.30.22.png" alt="typing "copepo" brings several results" loading="lazy" title="typing "copepo" brings several results"/>


-validation could be tedious and requires large taxonomic expertise, however there are plenty of tools to help you! Filters are one of those tools, but the more interesting one is to use previous project to « predict » some taxonomic identity on your new images, in best cases you will face thousands of rightly predicted images and will be able to validate thousands per minutes!
 predicted objects which would be easily validated")
Do not hesitate to "predict" your project right away (even with a project/instrument that has nothing to do)
-How to do prediction (and help you to boost your validation ability) :
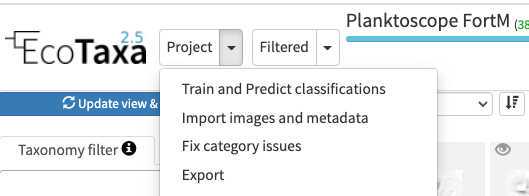
In the project (or "Filtered", in this case only the filtered vignettes would be used), select "Train and Predict classifications"
-
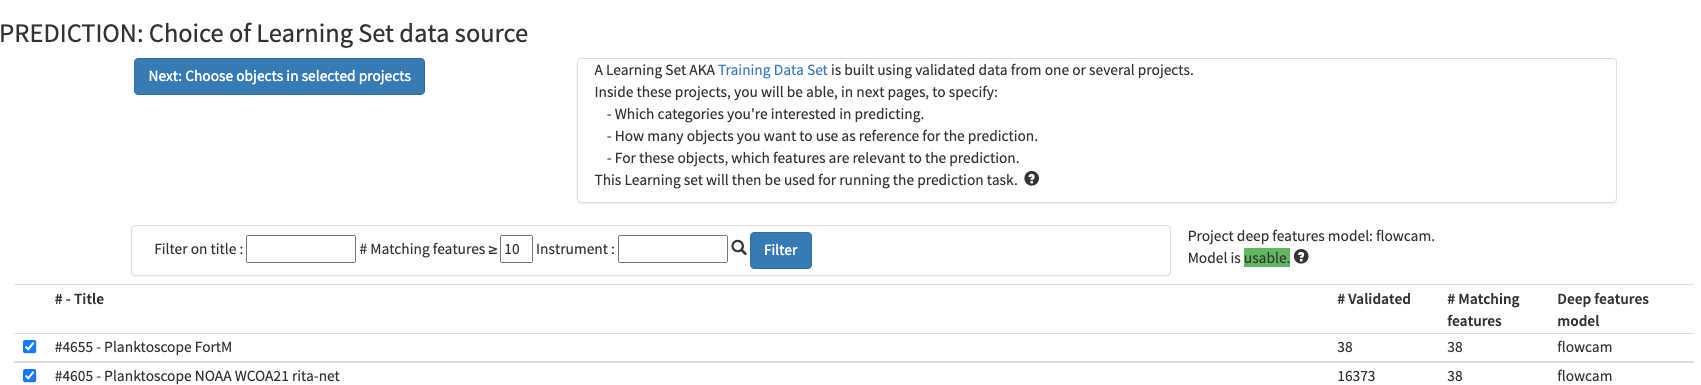
You can select any of the pre-existing project (including your own project) as a template for image recognition. By experience, using another project is only a first-aid, but won't replace prediction on images that you acquired with the same instrument/ same location / same plankton communities
-
Note that currently, only few "sorted" planktoscope projects exist (especially acquired with the same segmentation procedure than here), we therefore strongly encourage you after a first trial of prediction to quickly validate to re-predict on your own project.
-
what could be used for first prediction :
-
#6818 - MOOSE-GE-2022_tests_ID_vignettes (Med sea; Processed with current segmenter; Fully validated)
-
#4605 - Planktoscope NOAA WCOA21 rita-net (coastal US West coast from Vancouver to San Diego; Processed with current segmenter; Partly validated; Contains lots of artefacts due to lens mis-alignment )
-
#6765 - _Planktoscope Reference (Processed with other segmenter, works only with adding Deep Learning features into play ); Fully validated)
-
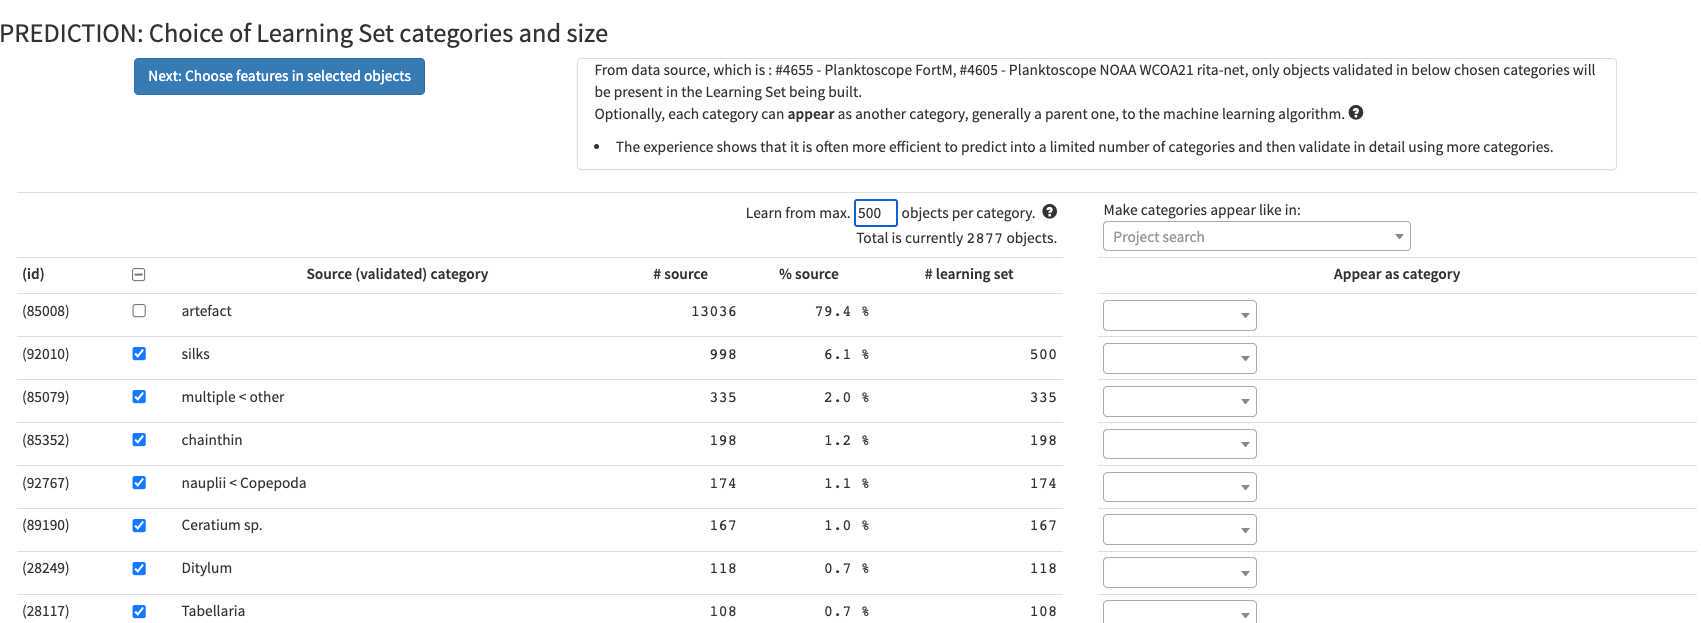
Push the button "select project below then click me. You then have the possibility to select what types of object to consider. It is recommended to try to avoid selecting too much objects to partly correct the usual strong imbalance between categories (here as an example limited to 100 example per group) (If you use project #4605 as an example, please remove artefacts)
-
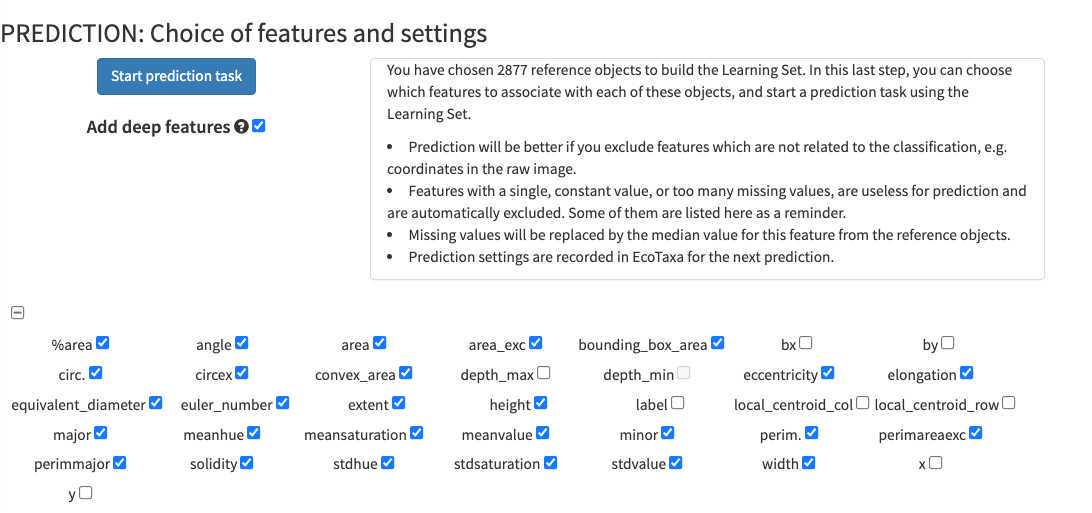
click on "continue to the classifier option screen ". Activate the pre-trained Deep Learning features (if not available see step 10). Inactivate variables that are not relevant for prediction and relate to position of the vignette in the initial images (bx, by, depth min/max, label, local centroid col/row, x, y)
Once done, images are now "predicted" (blue) but still wait for validation. Note that while classifying the different objects, the classifier also gives a classification " score " which determine if the label is attributed with high or low confidence. Using this score as a quick-filter is usually a good idea to be able to validate quickly well recognised images (and quickly start new predictions)

Doing repeated predictions on your own samples is better than doing some global one on random example project
Quickly validate objects to start to predict on your own plankton composition: the classifier is quite efficient and starts to give reasonable results starting from 30-50 images as example. Ecotaxa is then optimised to operate regular prediction rounds which could be heavily guided by the human (e.g. by doing prediction only on selections, stopping to predict some organisms etc).
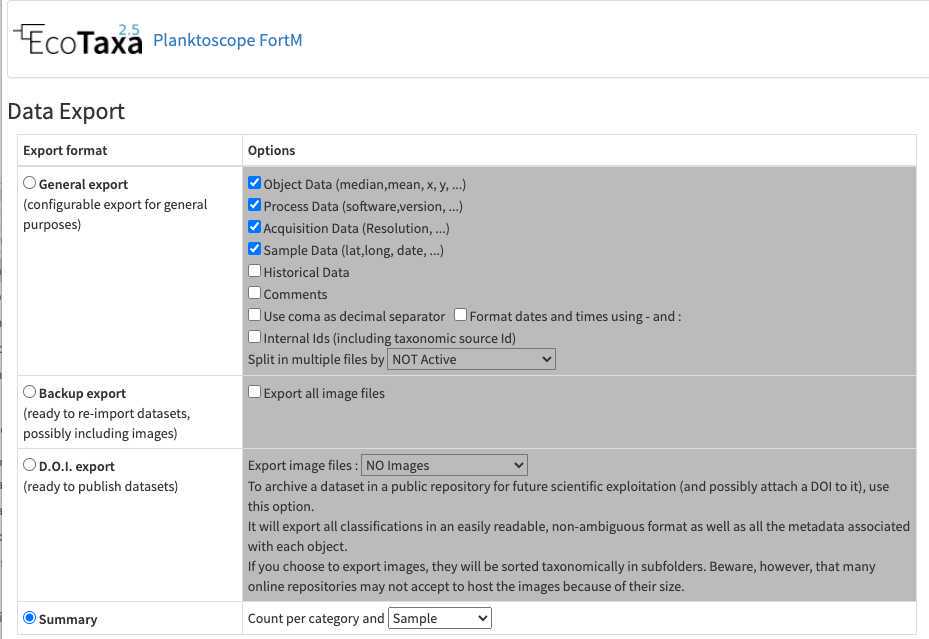
-once fully validated, export your results (lots of different solutions exist, the easiest to understand being the summary export with count per sample)

Maintenance of your planktoscope
Clean tubing and flowcell from inside
imaging plankton will lead to have a lot of organic material and seawater in the fluidic system. Some may clog or accumulates in some parts of the fluidic system.
- Don't let it dry and try to get rid of it as soon as possible (if its occurs during sample acquisition, even abort this latter, take care of the clog, maybe dilute the sample and restart acquisition while noting that the sample got diluted in the metadata )
- Pump tap or distilled water with high pumping rates helps to unclog the system. make sure no plankton organisms remain in the fluidic system and especially on the internal walls of the flowcell. If it is the case don't hesitate to pinch (during 1-2 second) and release the tubing between the flowcell and the pump while pumping to create a sudden variation of pressure (e.g. )
- Over time, wet conditions and organic matter may create favorable condition for the growth of a bacterial film. The flowcell and tubing will look dirty from the inside. You can avoid this by pumping diluted bleach sometimes, let it act for 1-2 hours and carefully rinse the whole system
- Water, bacteria, and bleach together may favour the apparition of a calcium carbonate film inside the tubing and flowcell. It may either appear as dispersed cristals attached inside the flowcell or a white coating inside the tubing. To remove and clean this, pump some acidic solution (vinegar, citrus juice or other kind of other acids), let it rest for a few hours and rinse the system
Clean flowcell outside:
The flowcell is an optical critical component, keeping it clean is an absolute necessity. Don't touch it with fingers or other kind of dirty material. If dirty:
- if only dry dusts are present, gently blow the flowcell (ideally with dry gas dispenser at a large distance - dry gas dispenser are also creating thermal chocs if used from too close, test it on other material before)
- if dirt in not only dry dusts it could be cleaned with optical paper and ethanol. DO NOT USE CLASSICAL WIPING PAPER which are usually enriched in silica fibers for solidity ... and may create scratches on the flowcell. (disposable nose tissue are better alternative if optical paper is not available)
Clean optical lenses
as for the flowcell, optical lenses are critical elements of your planktoscope and should be kept as clean as possible. It starts by never touching them with fingers (cleaning those would requires a lot of patience, efforts and may even lead to unexpected disappointments)
- dry dust: dry gas (with even more caution than previously
- others: only used optical paper
clean the camera sensor
... critical part if any, NEVER touch it, only use dry gas
regularly calibrate the pump
Troubleshooting
My flow cell is clogged with plankton, what to do?
Why this happens (preventive solutions):
-
first this may happens if your sample does not have been "pre-filtered (we recommand pre-filtration to 200µm). Make sure to do this.
-
It may aslo happens if your sample is too concentrated. If you got more than 20 plankton objects per image this may already be the case, dilute your sample and fill the dilution factor in the sample metadata
-
it may also happens if you forget to agitate your sample using a bubble ( ) or if you let sample to stagnate for too long in the fluidic system.
unclogging the flowcell:
-try to pinch the tube in between the flowcell and the pump (while the pump is running). see
-try to do the same while pumping in the reverse direction (eventually at high speed- see pump controls in optical configuration page)
-dismount the flowcell but keeping the luerlock connectors on it. on the side which was connected with the pump, either blow in it or connect a syringe and pass air/water to chase the blocked plankton.
External links
Planktoscope website
Planktoscope github
https://github.com/PlanktonPlanet/PlanktoScope
Planktoscope complete assembly guide and complete documentations
https://planktoscope.curious.bio/ (v2.5)
Planktoscope Slack channel (to exchange ideas/protocols/solutions)
https://forms.gle/qvh5jwuMvmyBKMQC7
Plankton Planet website
EcoTaxa tutorials:
https://sites.google.com/view/piqv/ecotaxa?authuser=0
