National Index of Borehole Information (NIBI): Use and Submission Guide
darthur Arthur
NIBI
National Index of Borehole Information
boreholes
wells
well logs
borehole logs
cores
subsurface
subsurface resources
Disclaimer
Any use of trade, firm, or product names is for descriptive purposes only and does not imply endorsement by the U.S. Government.
Abstract
The National Index of Borehole Information (NIBI) is a collaboration between the U.S. Geological Survey (USGS) and State Geological Surveys to meet current stakeholder and future users’ needs for accessing subsurface data. Prior to NIBI, borehole and other subsurface resource inventories (for example, drill cores, oil and gas wells, coal, test holes, and water wells) are compiled and locally served in individual databases and repositories. Searching for these resources required a separate search at each site or application. While the data reside in unique databases, many of the components are contextually similar and can be mapped to a common index for enhanced search and discoverability. NIBI serves as an index for the subsurface resource information within these individual databases, providing the connection back to the holding repositories for full access to the resources. This access facilitates multidisciplinary research in areas such as geology, climate, carbon sequestration, hydrogeology, and energy and mineral resources and can lead to improved understanding of the subsurface.
Steps
Introduction to NIBI
The National Index of Borehole Information (NIBI) is a centralized index of information (metadata) about existing subsurface resources, designed to facilitate search, discovery, access, and re-use of these highly valuable and distributed geological assets. The data itself were curated and managed outside of NIBI at the repository level. The comprehensive search interface enhances. discovery of distributed geoscience assets to inform national-scale geospatial tools, increases discovery and access to local natural resources, and facilitates subsurface characterization.
The National Geological and Geophysical Data Preservation Program (NGGDPP) coordinates with U.S. Geological Survey (USGS) Mission Areas and regions to support the preservation of data and geoscience material resulting from USGS work. The program also administers a grants program that provides funds to State geological surveys for geological and geophysical data preservation efforts. In collaboration with the NGGDPP, the Earth Mapping Resources Initiative (Earth MRI) supports State geological surveys in the preservation of historical assets, including borehole data, to support compilation of known critical minerals resources on a national scale. NGGDPP also coordinates with the National Cooperative Geologic Mapping Program (NCGMP) on seamless multi-dimensional geologic data provision for the United States, for which preserved subsurface data serves as a supporting asset and resource.
As a single portal intended to make it easier for stakeholders and users to access public subsurface data from distributed State and Federal repositories, NIBI serves as an index of borehole locations and allows users to directly connect to the home repository for data associated with each borehole. The platform allows repository managers to manage their holdings on NIBI via static uploads using Microsoft Excel files, or via an Application Programming Interface (API). This document describes how users can access the metadata for resources via searches, filters, and exporting via table, how they can find metadata geographically via map viewer, how repository managers can administer users and other information associated with their organization, how they can contribute data via either static upload or the REST API, and and also how they can fetch data using the REST API.
NIBI Website: Using the Table
The NIBI homepage (Fig. 1) displays all available resources in a table. By default, this table shows borehole and other subsurface resources by organization, borehole identifier, alternate borehole identifier, and borehole name. Text is highlighted in blue where the data contributor provided web links for the organization and/or borehole name fields. Clicking on the respective links will load whatever website or page was provided. For example, for organizations, the link leads to the organization's homepage, and links for borehole names may load a page from the organization's repository with additional information about the particular borehole.
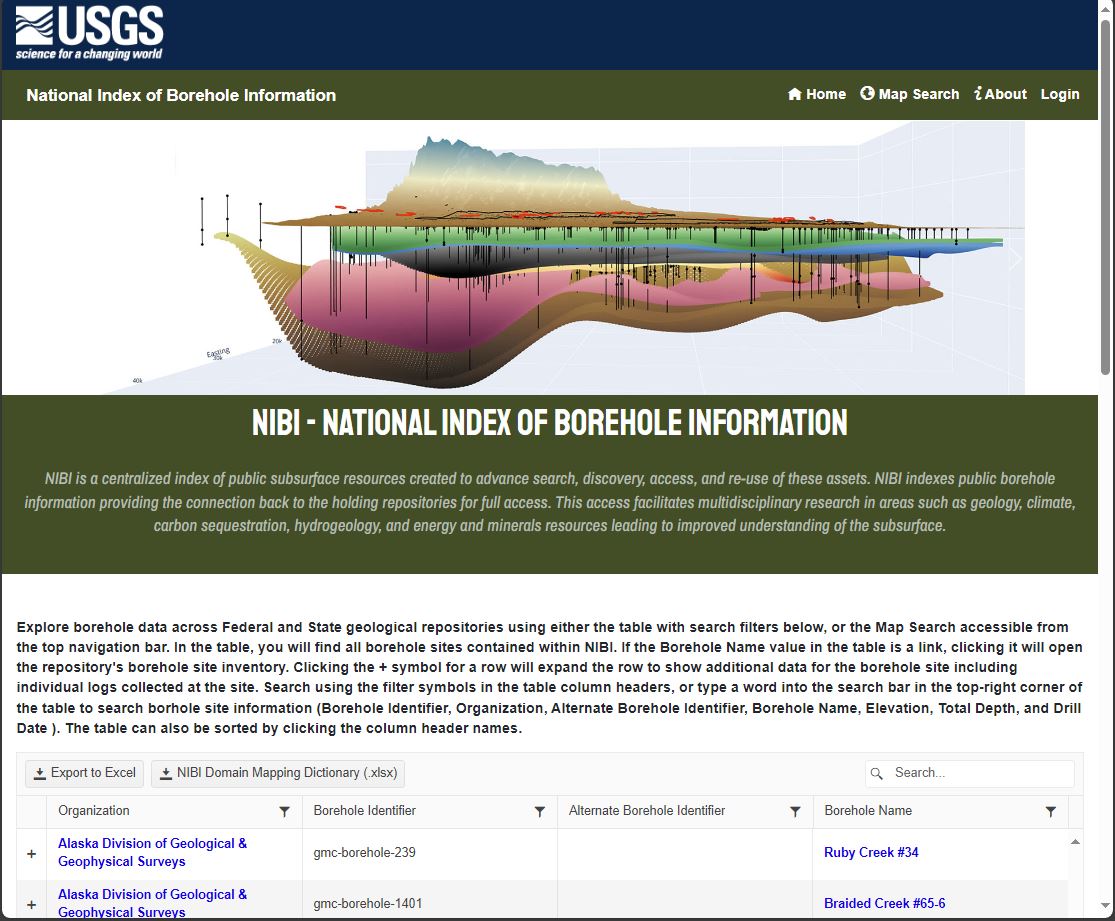
Because of the large number of records in the NIBI database, the table is paginated. At the bottom of the table, a footer shows the current page in view, how many items are shown per page, and the range of items shown on the page. The user can choose whether to display 10, 25, 50, or 100 records per page via a drop down menu. The user can also jump to a specific page in the table by typing the desired page number into the text box.

To facilitate discovery among records, the table can be filtered by one or more columns by clicking the small funnel icon to the right of each column header. Users can select from available filter logic that includes "Is equal to", "Is not equal to", "Starts with", "Contains", "Does not contain", and "Ends with". Filters also cascade, meaning they are applied in the order they are set. For example, if the "Organization" column is filtered first for "Starts with" = "Alaska", that filter is applied to the entire dataset. If the organization filter is left in place and the "Borehole Name" column is subsequently filtered for "Starts with" = "OCS", then the search results will include only those records with borehole names starting with "OCS" for any organizations starting with "Alaska".
Additional information for each borehole record can be displayed from the table by clicking the "+" sign to the far left of the record of interest. This expanded view shows additional metadata associated with the borehole in a dropdown section (Fig. 3).
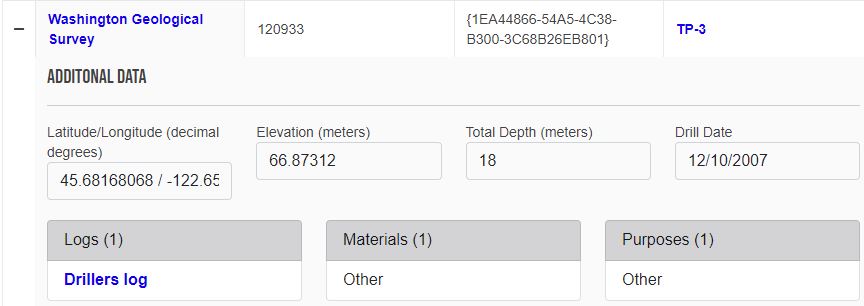
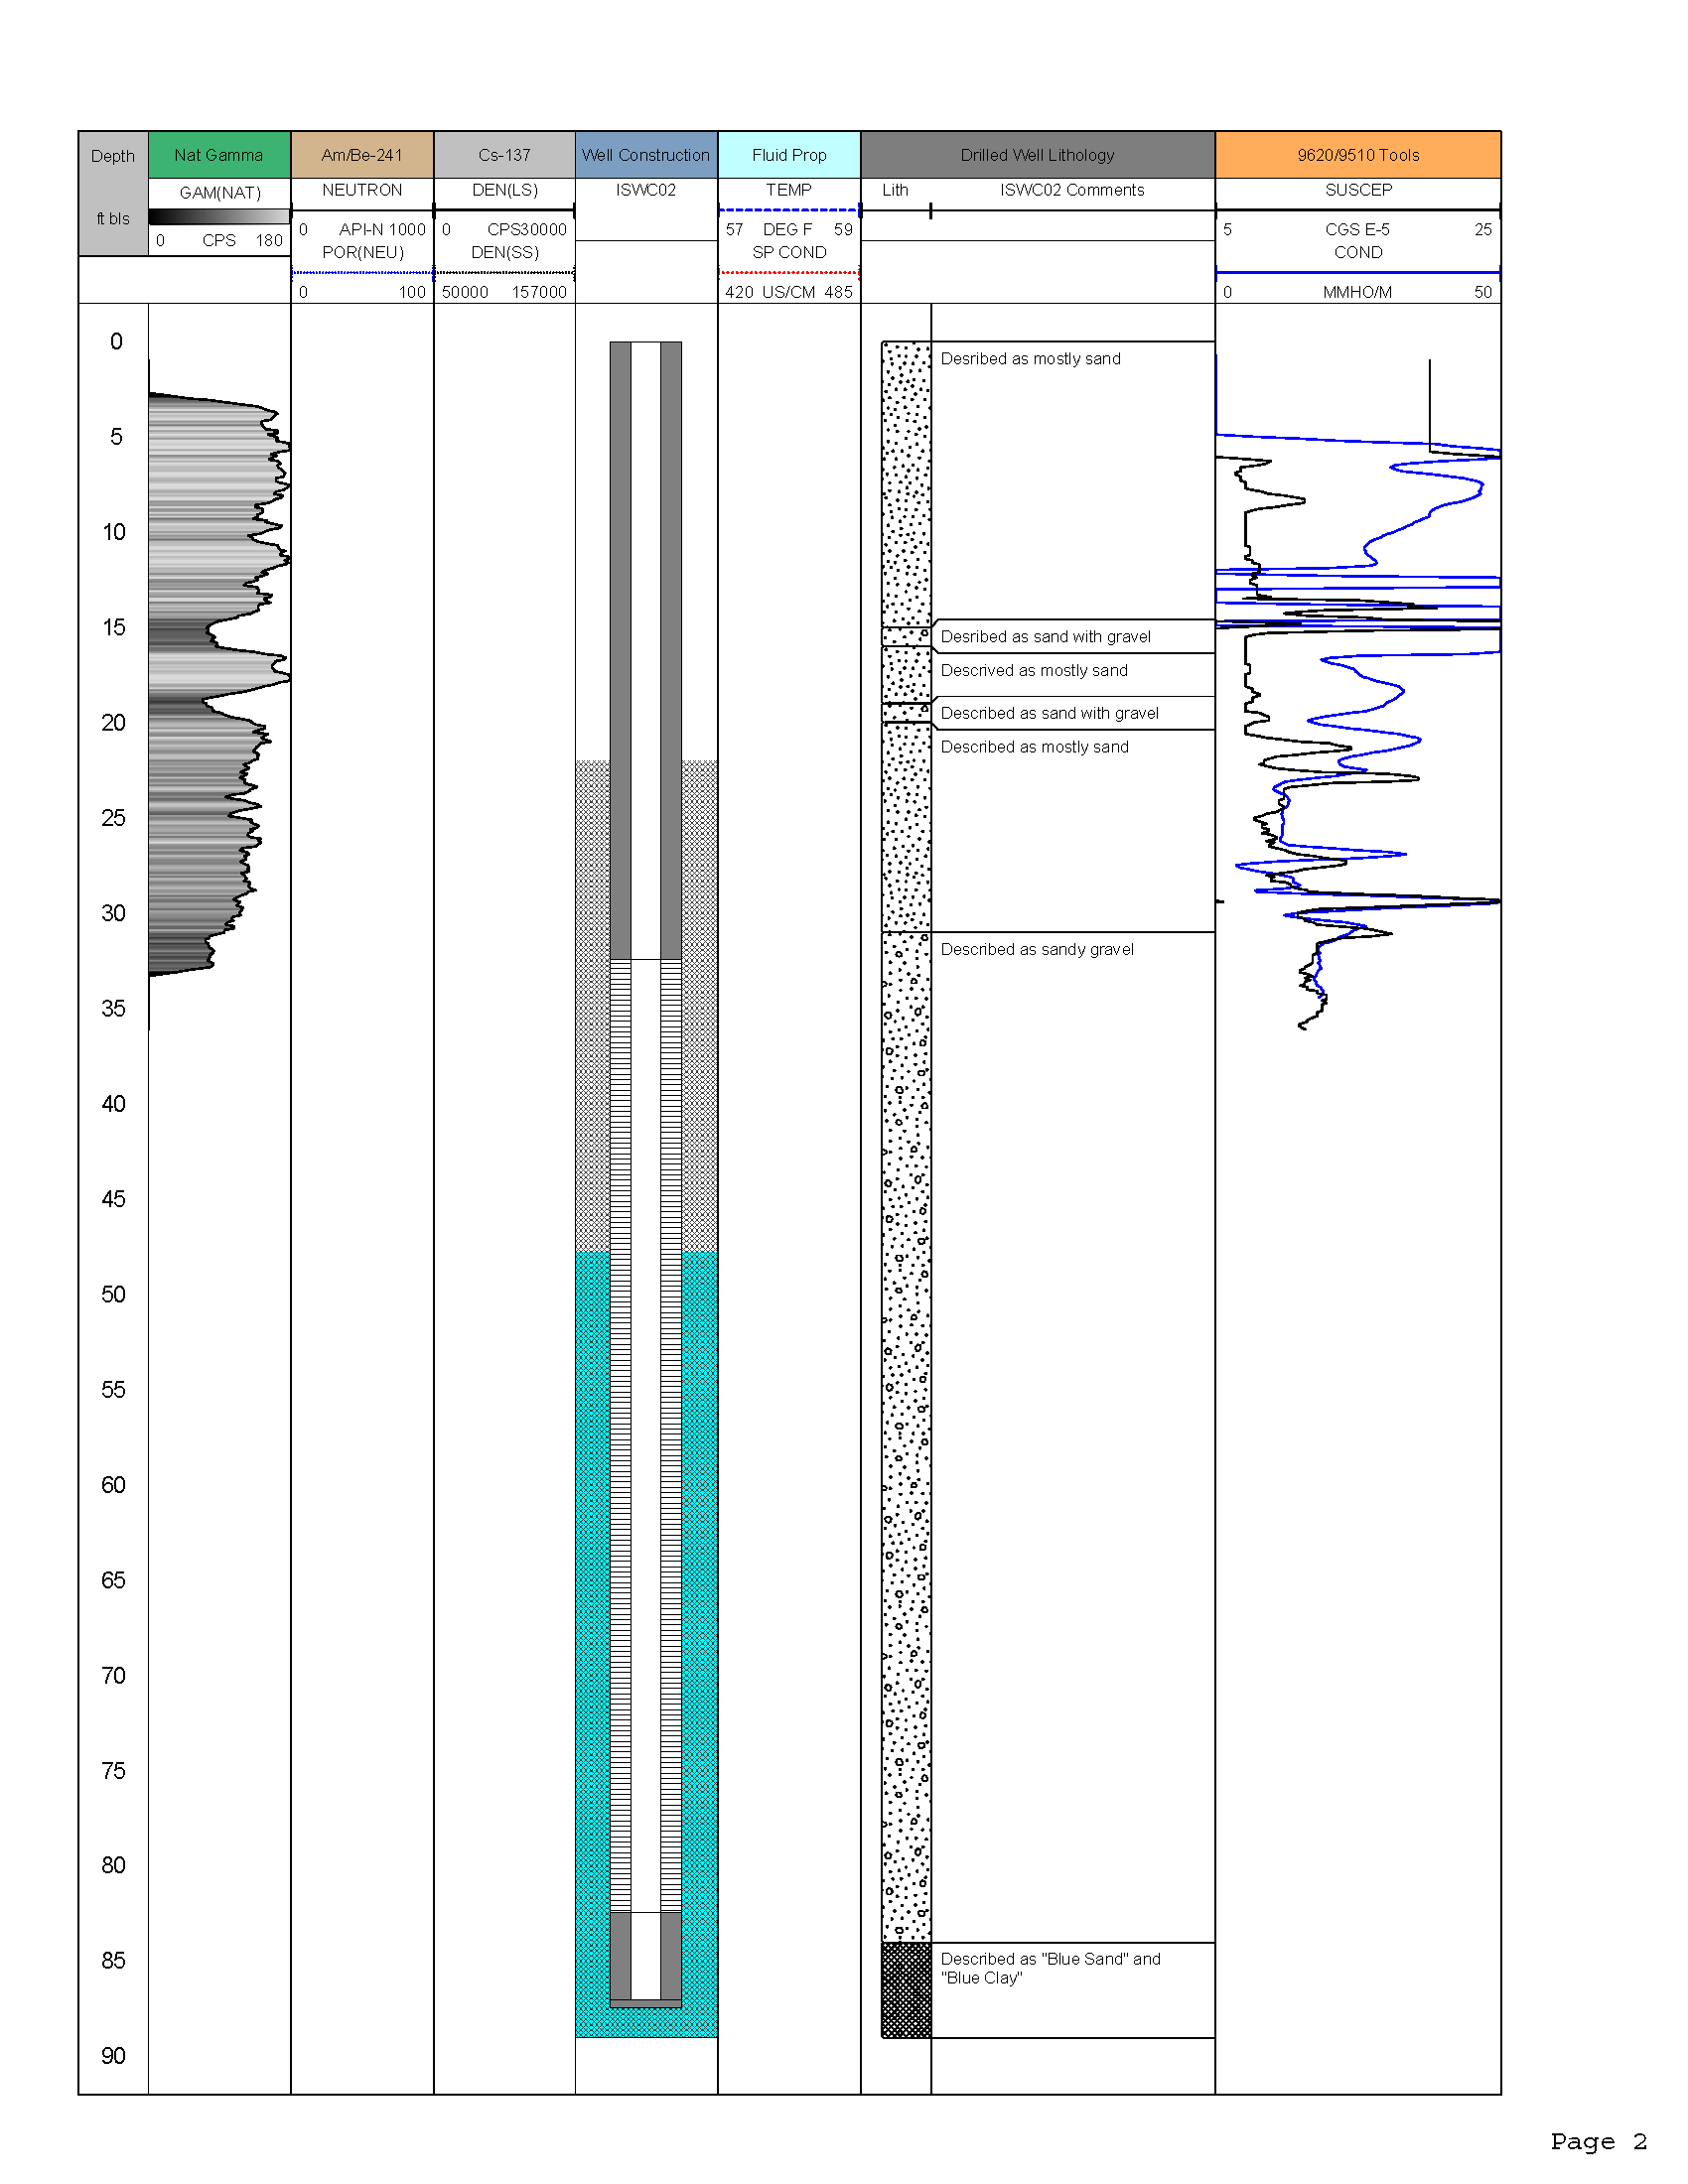
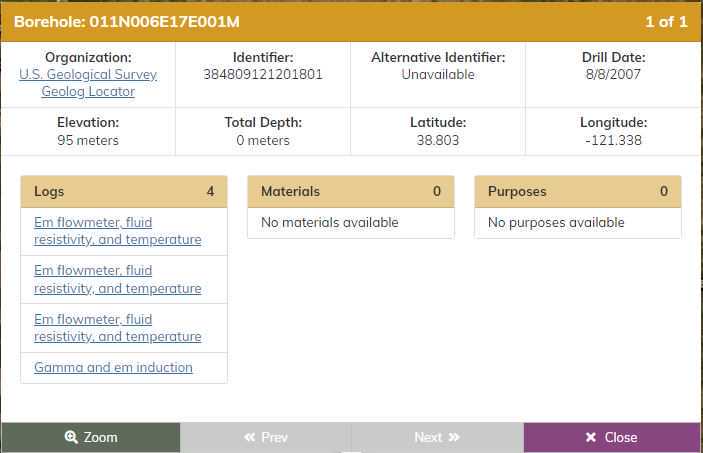
The additional metadata shown in Fig. 3 includes the geographic coordinates, depth, drill date, any linked logs, and the materials and purposes of the borehole. Clicking any links for logs will navigate to the log file(s) via links provided by the metadata contributor (Fig. 4).
NIBI Website: Using the Map Viewer - Settings & Navigation
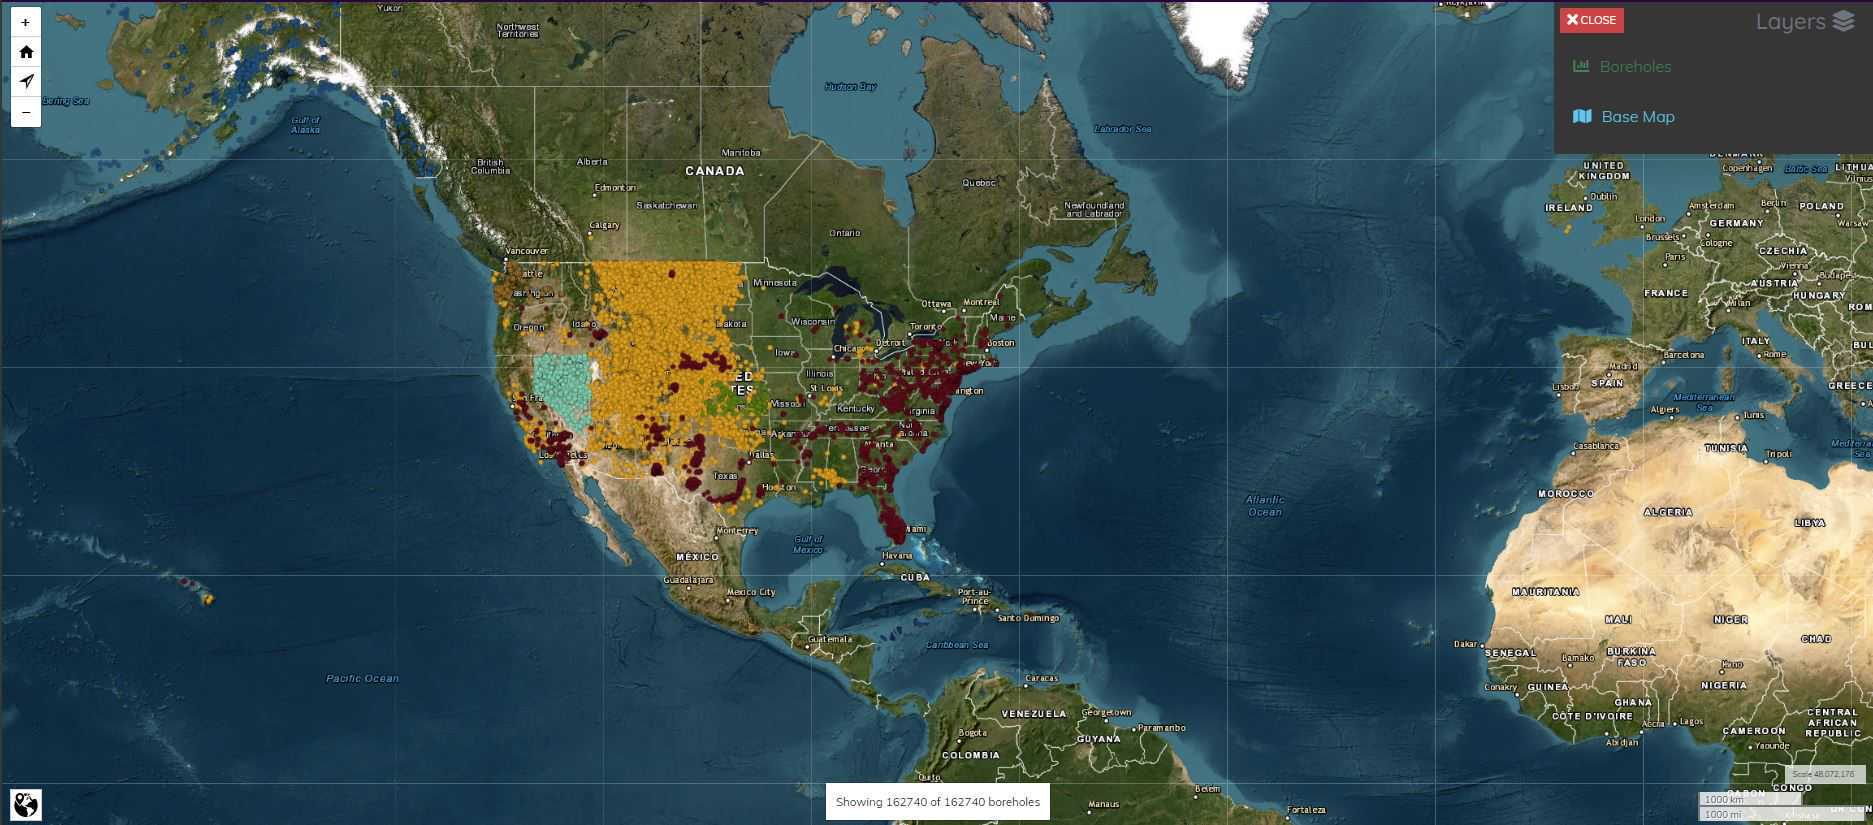
The NIBI Map Viewer is accessed by clicking "Map Search" in the green menu bar. The map loads all currently available point location data for the metadata in NIBI. The visible points are color-coded by organization, and at lower zoom levels, including the default (Fig. 5), will likely represent more than one borehole or resource. The number of available individual resources being displayed is presented at the bottom center of the map (Fig. 5), including any applied filters.
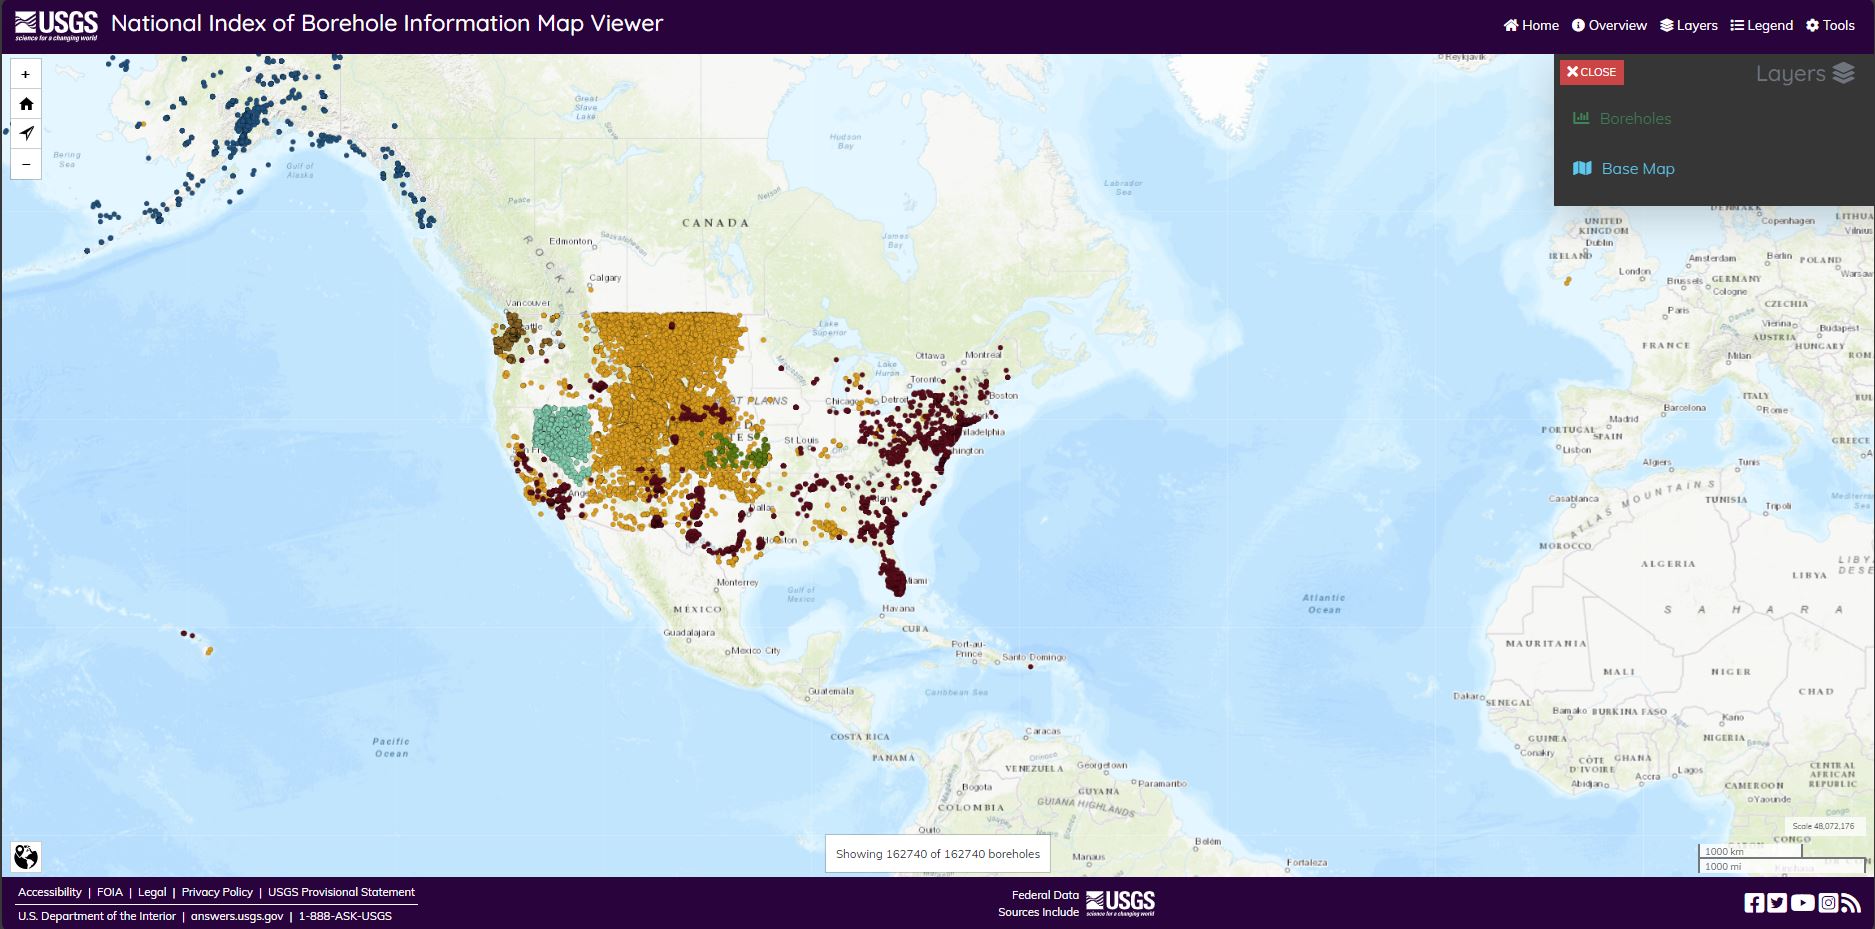
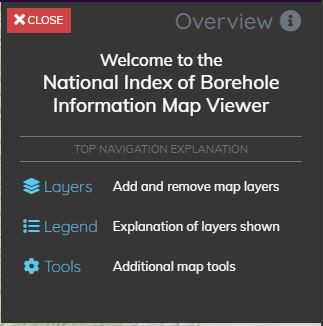
In the upper right corner of Fig. 5, the Map Viewer Main Menu can be seen. "Home" returns to the NIBI homepage (https://webapps.usgs.gov/nibi), "Overview" (Fig. 6) displays more information on the remaining Main Menu items: "Layers", "Legend" (Fig. 7), and "Tools" (Fig. 8).
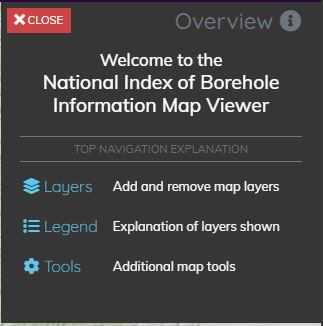
The Legend (Fig. 7) shows the colors assigned to each organization's metadata, and the currently selected base map.
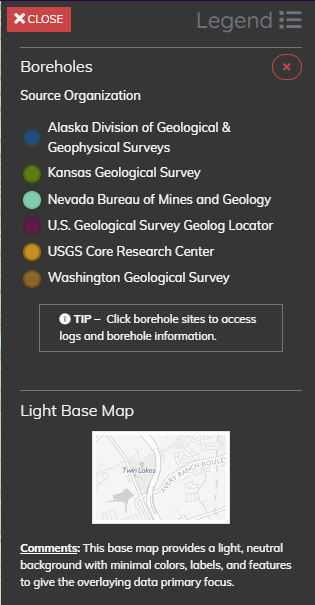
The Tools menu (Fig. 8) allows control of pop-ups (information shown when points on the map are clicked), hover help tips (information about a control or link shown when hovered over by the mouse pointer), dark theme, and transparent theme.
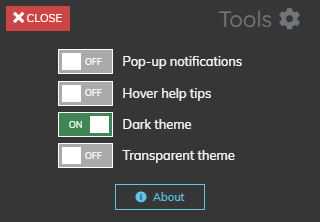
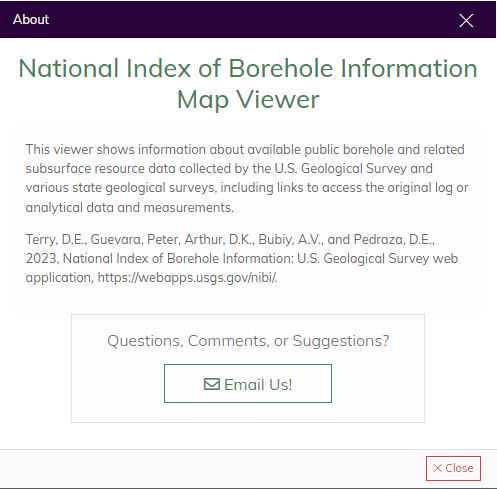
Clicking the "About" button on the Tools menu displays information about NIBI, including the current dataset and application citation (Fig. 9). The "Email Us!" button links to nibi@usgs.gov, where support is available, and any suggestions and feedback are welcome.
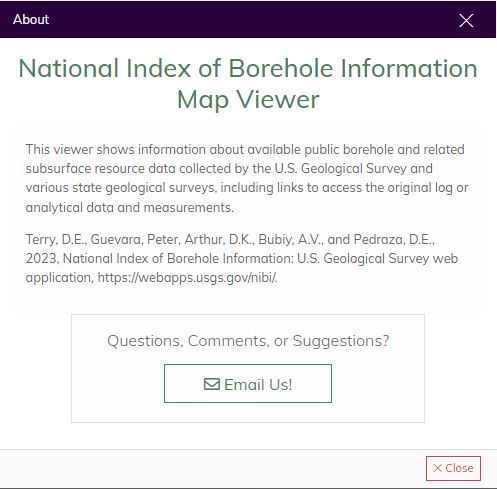
From the Layers menu, users can choose from a variety of base maps (Fig. 10). Topographic is the default base map. The slider shown above the selections can be used to adjust the opacity of the base map.
After selecting the Imagery basemap, for example, the map will appear as in Fig. 11.
In the upper left corner of the Map Viewer is a set of navigation controls (Fig. 12). From top to bottom, each symbol controls: zoom in, home (default zoom level), center on user location, and zoom out.
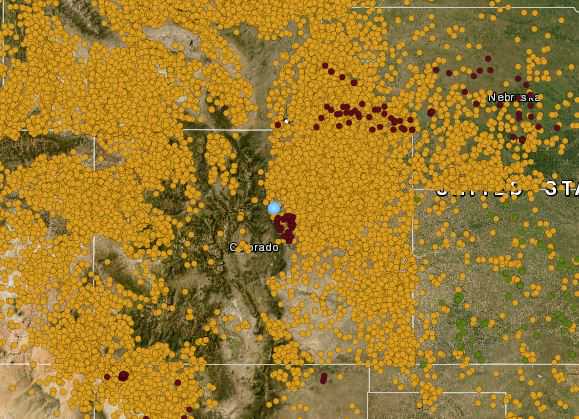
The "center on user location" option will not only pan and zoom the extents of the map, it will display an animated (flashing) circle at the location (Fig. 13). The function is also a toggle, meaning the location icon will remain until the feature is turned off by clicking the icon in the navigation controls again.
NIBI Website: Using the Map Viewer - Filtering
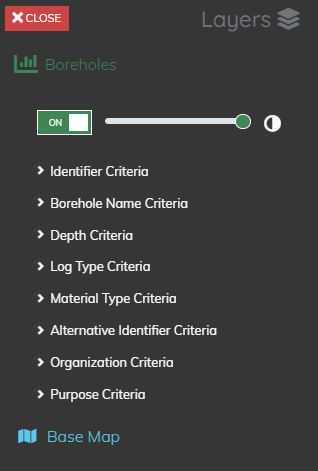
Also available in the Layers menu is a set of filters for the borehole metadata (Fig. 14). At the top, the on-off toggle switch controls the visibility of the borehole layer, and the slider to its right controls the layer's opacity. Beneath that are individual filters that can aid users in narrowing down the amount of metadata being displayed, based on available metadata from the NIBI database. Currently available filter criteria include Identifier (Borehole Identifier), Borehole Name, Depth, Log Type, Material Type, Alternative Identifier, Organization, and Purpose. To access each filter, cilck the ">" symbol to the left of the filter name. Filters cascade, meaning the results of an applied filter are further filtered by any filters added afterward.
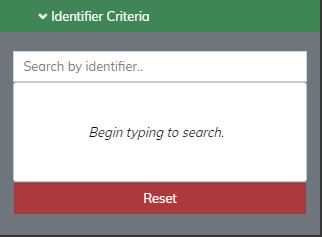
In Fig. 15, the filter interface has been expanded for Identifier Criteria. This type of filter interface is also used for Borehole Name and Alternative Identifier.
To filter, start typing a known part of the criteria, and possible results will appear (Fig. 16). As you continue to type, the matching results will narrow down to what is desired.
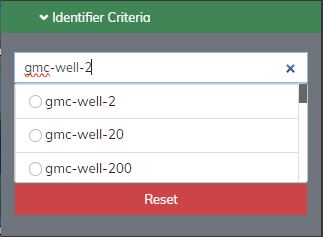
When the desired filter level has been reached, the filter is activated by selecting from the results shown using the radio buttons to the left of each result name. Multiple selections can be made, each of which activates the filter, reducing the metadata shown on the map to the filtered resources. To reset the filter (clearing it), click the large "Reset" bar at the bottom of the filter interface.
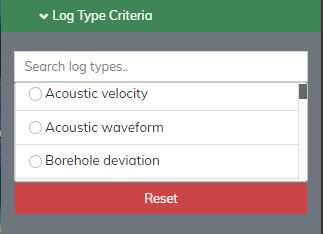
Another type of filter interface in the NIBI Map Viewer that is used for shorter lists of criteria, including Log Type, Material Type, Organization, and Purpose, is similar, but shows the selectable members of the list without requiring the user to begin typing (Fig. 17). A search bar is still available and can be used to reduce the available selections.
The final type of filter interface in the NIBI Map Viewer is for Depth (Fig. 18). Criteria can be set by either (1) dragging the circles in the range bar back and forth to set a minimum (left) and/or maximum (right) depth range or (2) for more precise filtering, the boxes above the slider allow direct entry of minimum and/or maximum depth (in meters; Fig. 19).
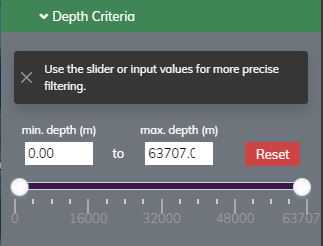

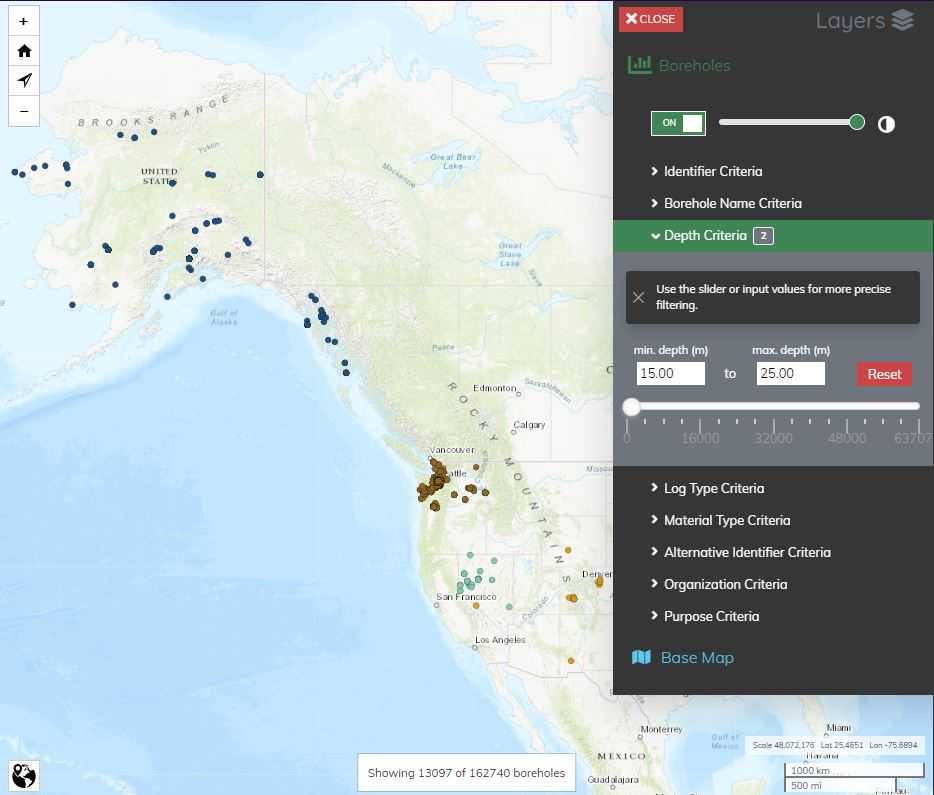
Fig. 20 depicts the Map Viewer window zoomed to the western United States, with Depth Criteria set to show only available resources with depths between 15 and 25 meters.
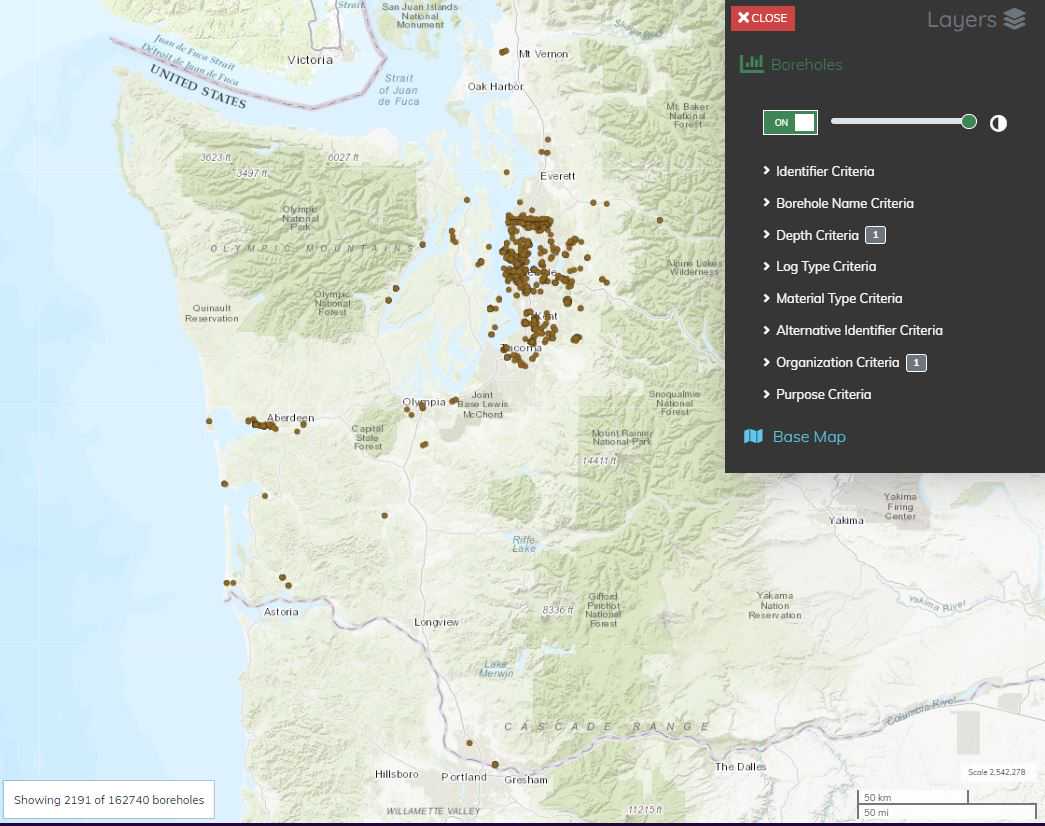
In Fig 21., an Organization Criteria (Washington State Geological Survey) and a Depth Criteria (greater than 100 meters) have been set. This example also depicts how users can see what filters have been applied, even when the filter windows are not expanded. To the right of Depth Criteria in the figure, a box with the number "1" can be seen. This means only one criteria has been selected (minimum depth) for this filter. The same can be seen to the right of Organization Criteria, reminding the user that there is also a single criteria filtering for an organization.
NIBI Website: Using the Map Viewer - Exploring Metadata
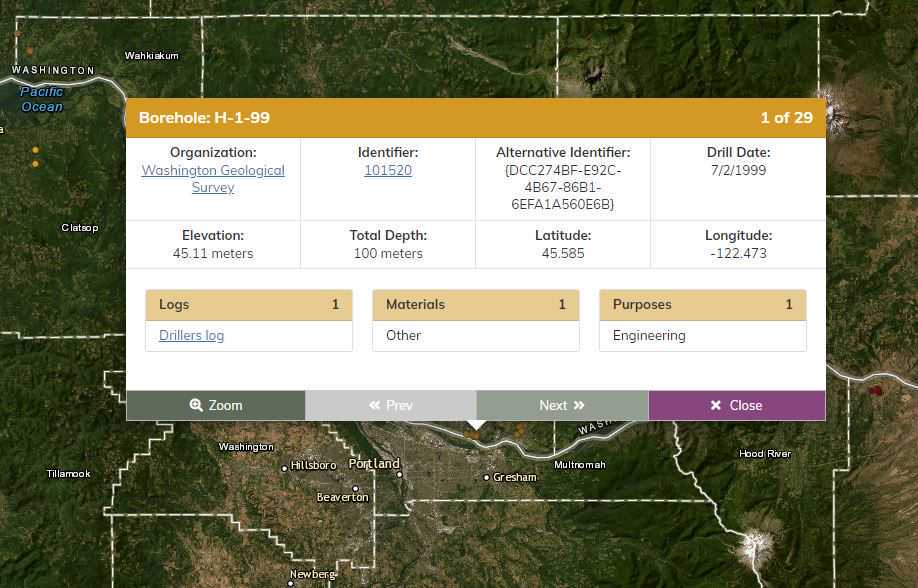
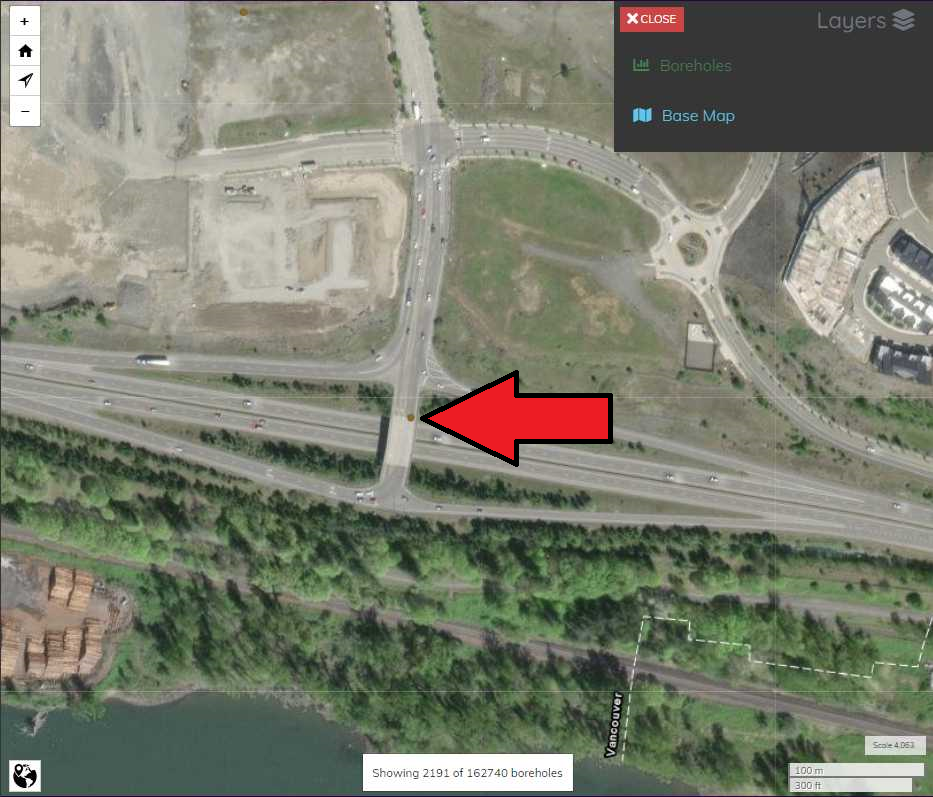
Once metadata have been filtered to a desired level, specific points on the map can be explored further by clicking on them. In Fig. 22, the map has been zoomed into the Columbia River Gorge area along the Washington-Oregon border, and a data point across the river from Portland, Oregon has been selected. A pop-up window is displayed with additional metadata for the selected resource(s).
At the zoom level in Fig. 22, the displayed point represents 29 boreholes, which is indicated in the upper right corner of the pop-up ("1 of 29"). The Borehole Name of the first record is shown in the upper left, and accompanying metadata for that borehole are shown in the rest of the pop-up window. The information displayed is the same as that which is available by expanding a borehole record in the table on the NIBI homepage, including any links to the contributor's site or repository.
To access the other 28 boreholes represented by the selected point and pop-up window, the pop-up has navigation controls across the bottom. The records can be paged through by clicking "Next" and "Prev" (previous) as desired. Clicking the "Zoom" button in the lower left will close the pop-up and zoom the map very close to the currently viewed borehole record (Fig. 23).
For resources that have more than one log associated, the pop-up window expands (Fig. 24).
A new version of the NIBI Map Viewer is currently in development, which should provide even more features and flexibility, including direct exporting of search results from the map, and a greater variety of filtering options.
Metadata Submission: Organization and User Management
If an organization wishes to contribute metadata on their subsurface resources to NIBI, they must first contact NGGDPP to request an account. Email nibi@usgs.gov or NGGDPP@usgs.gov to establish. NGGDPP staff will create a record for the organization, along with an initial admin account.
To contribute metadata to NIBI, an organization with at least one user account must be created. There are two user roles in NIBI:
- Admin: Can create other users within their organization, generate or reset API keys, and submit domain mappings for the organization.
- Users: Can upload metadata for the organization.
Admin accounts are initially created by NGGDPP staff, usually at the same time the organization is created in NIBI, after which the admin user must visit the NIBI website (https://webapps.usgs.gov/nibi - Fig. 1), and click the "Login" item in the upper right of the green menu bar (Fig. 25).

This will load the NIBI Login page (Fig. 26). The first time any new accountholder visits the NIBI Login page, they must initiate a password reset request, by clicking the "Forgot your password?" link below the "Log in" button. This will generate a link that will allow the user to set an initial password.
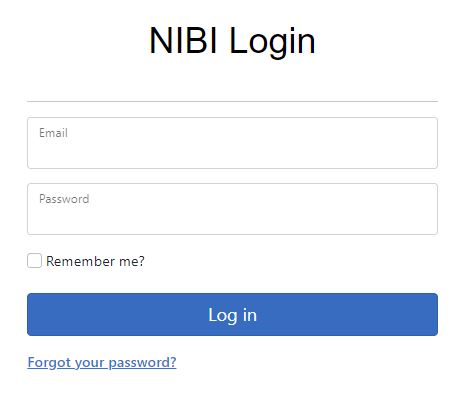
To log into NIBI, visit the NIBI homepage (https://webapps.usgs.gov/nibi - Fig. 1), and click the "Login" item in the upper right of the green menu bar (Fig. 25).
After logging in, the NIBI homepage will reload without the banner image carousel (Fig. 27).
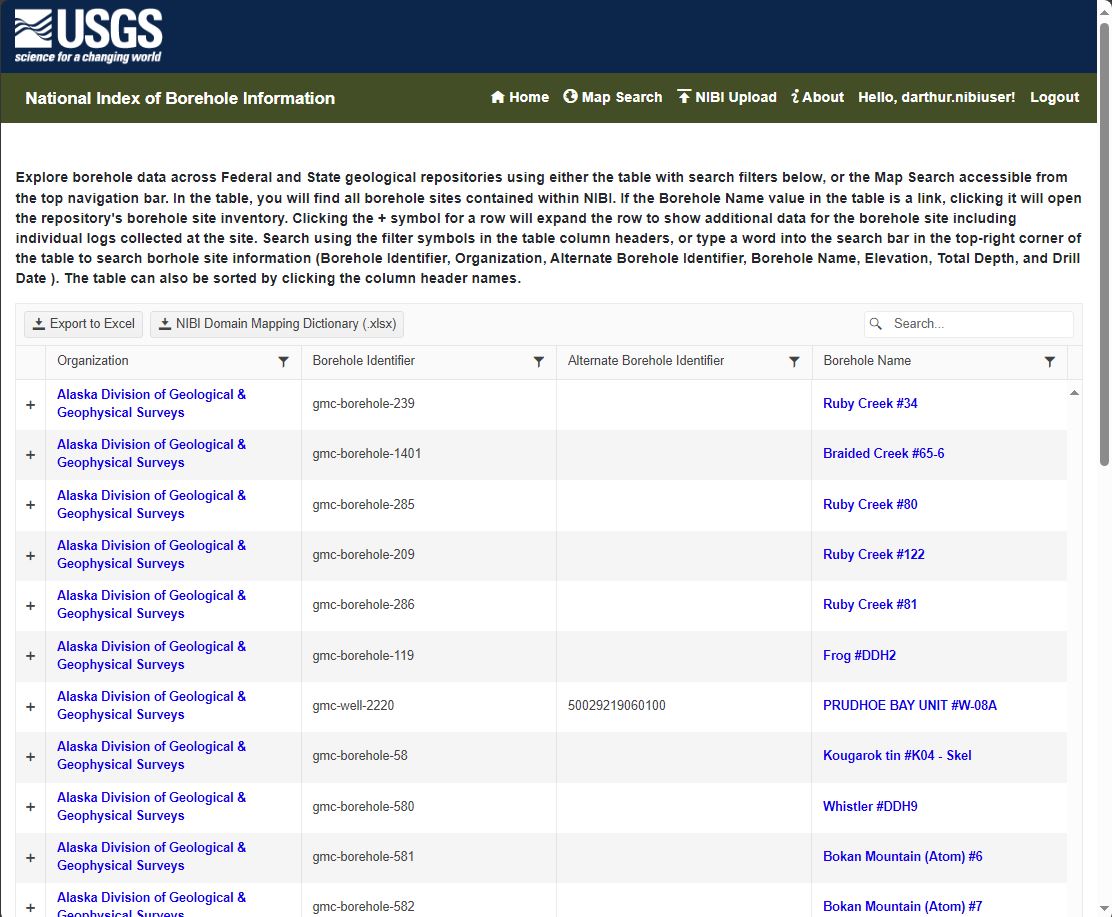
Depending on the role of the logged in account, the menu bar will show different items. In Fig. 28, the menu bar for a user account is shown, and in Fig. 29, the menu bar for an admin account is shown.


As seen in Figs. 28 and 29, NIBI users can upload data, whereas NIBI admins can upload data as well as perform other administrative functions for their organization. Should additional user accounts be desired, they can be created by clicking on "User Administration" in the green menu bar (Fig. 29), which will bring up the table shown in Fig. 30.
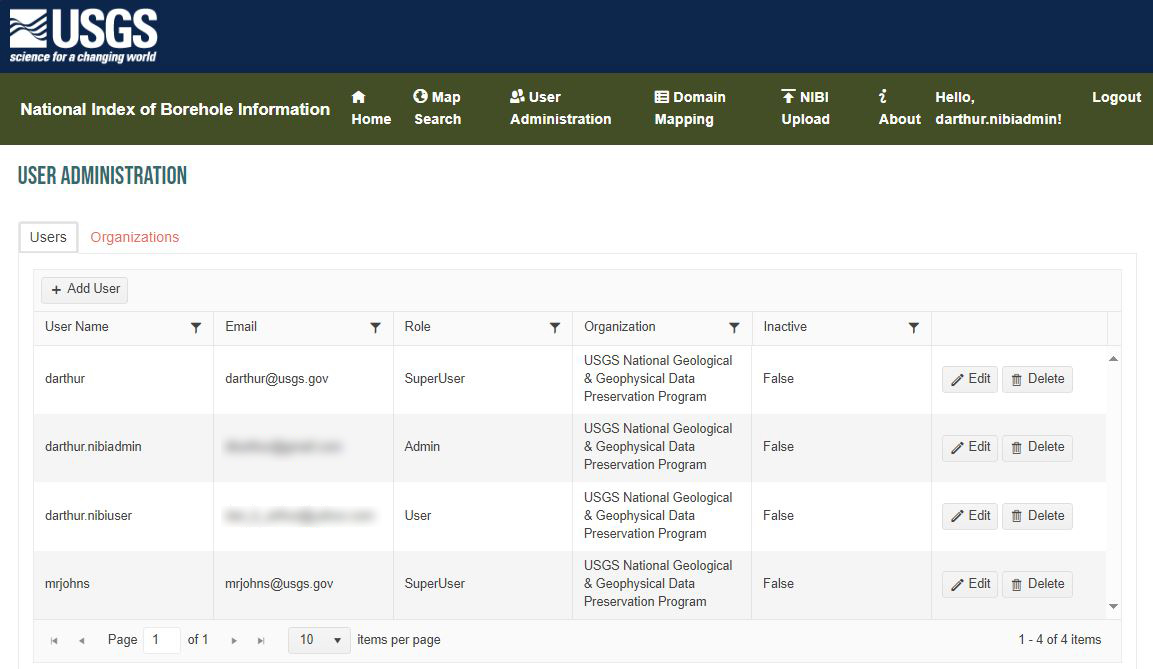
Admin users can only see and access the users belonging to their organization. They can add, edit, or delete users by clicking the "Add User", "Edit", and "Delete" buttons (Fig. 30).
To add a user, admin users must click the "Add User" button in the upper left, above the user table. A new row will be added to the top of the table (Fig. 31), in which the admin must provide a User Name, Email, and select a Role (either Admin or User) for the new account. Once completed, the account must be saved by clicking the "Update" button to the right of the new entry.
<img src="https://static.yanyin.tech/literature_test/protocol_io_true/protocols.io.rm7vzj872lx1/qbm3caja79.jpg" alt="Figure 31. NIBI user administration "Add User" feature." loading="lazy" title="Figure 31. NIBI user administration "Add User" feature."/>
To edit an existing user, admin users must click the "Edit" button to the right, in the same row with the target user's current information. As in Fig. 32, only the Role and Inactive flag can be changed. Checked, the Inactive flag disables an account so it can no longer log in. Once any desired changes have been made, the account must be saved by clicking the "Update" button to the right of the entry.
<img src="https://static.yanyin.tech/literature_test/protocol_io_true/protocols.io.rm7vzj872lx1/NIBI_UserAdmin_edituser-blurred.jpg" alt="Figure 32. NIBI user administration "Edit User" feature." loading="lazy" title="Figure 32. NIBI user administration "Edit User" feature."/>
Admins can also update information for their organization. Still on the "User Administration" page, next to the "User" tab above the users table is the "Organization" tab. Clicking on it brings up a screen like that shown in Fig. 33.

To edit organization information, click the "Edit" button on the far right. All fields are editable: Name, Organization URI (web link to organization homepage), Organization Email, and Organization Point of Contact. Also, a Research Organization Registry (ROR; see https://ror.org/ for information) identifier for the organization can be provided in the second column if available. Once any desired changes have been made, the organization information must be saved by clicking the "Update" button to the right of the entry.
Also from the organization administration tab, admins can create or reset the API key for the organization. An API key is a code generated by the system to allow users of the NIBI REST API to submit POST requests to add or PUT requests to edit their organization's metadata. For more information on editing and submitting metadata, refer to the "Metadata Submission: Using the REST API" section (Steps 16 and 17) of this document.
The API key is created or reset by clicking the button toward the right of the organization's information, under the column heading, "API Key" (Fig. 33). If no key has been generated for the organization, the button will show "Create Web API Key." If a key has been created, then the button will read "Reset Web API Key," which the admin can use to reset it
After creating or resetting an API key, a popup window will display the Organization ID and the API key itself (Fig. 34). The Organization ID and the API key must be used in the header of any POST or PUT requests to the REST API. For more information on the REST API, refer to the "Metadata Submission: Using the REST API" section of this document.

Metadata Submission: Domain Mapping
As a metadata index or catalog, NIBI is a centralized index or catalog that connects its users to resources stored in various data repositories. In order to facilitate the FAIR data principles (Findable, Accessible, Interoperable, Reusable) while maintaining a manageable structure, NIBI requires a mapping of terms used by each data contributor in their local repository to terms in the NIBI database. These terms include names used for logs, materials, and purposes. A dictionary of currently available terms in the NIBI database is available via the NIBI website at the following link: https://webapps.usgs.gov/nibi/docs/NIBI%20Domain%20Mapping%20Dictionary.xlsx
To illustrate the concept of domain mapping in NIBI, an example of a complete Domain Mapping Template is shown in Figs. 35–37. Fig. 35 shows Logs, Fig. 36 shows Materials, and Fig. 37 shows Purposes. The controlled vocabulary terms used by NIBI are in the first column (second for Logs), and those added for an example organization are in the second column (third for Logs). Note also that not all terms in the NIBI controlled vocabulary must be mapped — an organization only needs to supply terms for any of the three domains for which they have terms. Moreover, if an organization does not have log records to connect to NIBI, the Logs tab of the domain mapping template can be left blank.
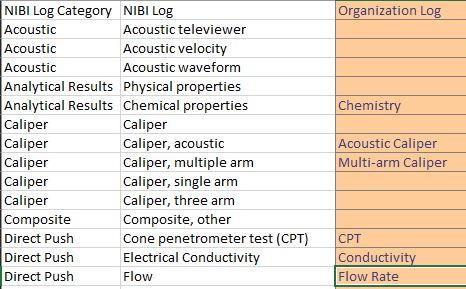
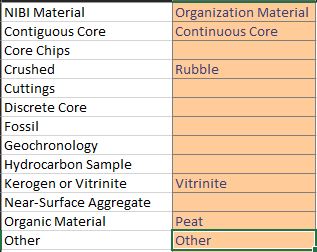
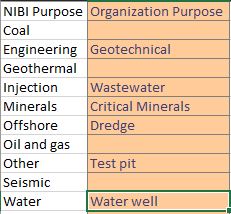
The Domain Mapping Template can be downloaded from the following link: https://webapps.usgs.gov/nibi/docs/NIBI%20Domain%20Mapping%20Template.xlsx
Once an organization has filled in their terms in the Domain Mapping Template, an admin for the organization needs to submit the completed template to NIBI at the NIBI website. While logged in as an admin, select "Domain Mapping" from the green menu bar (Fig. 29). The Domain Mapping tool will be displayed (Fig. 38).
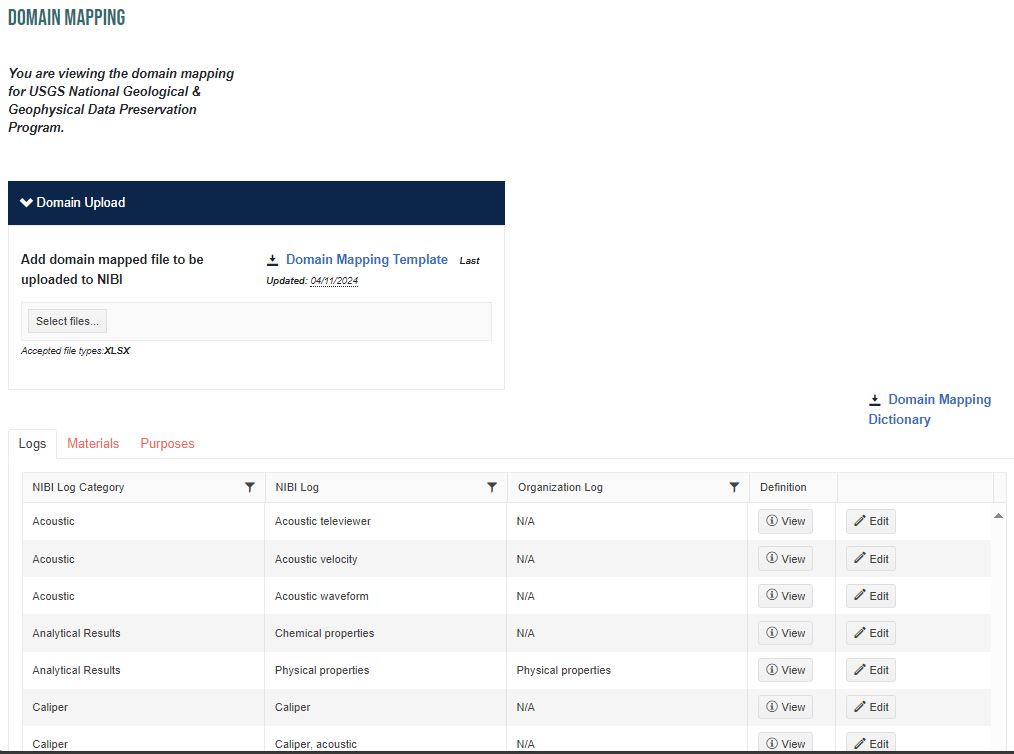
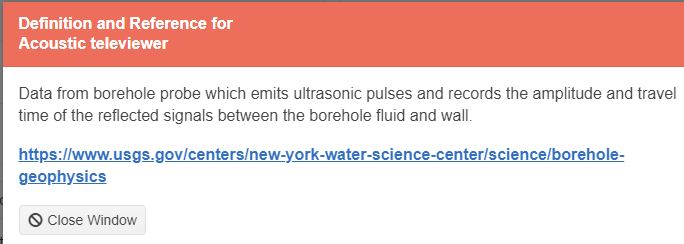
From this page, admins can download the latest version of the Domain Mapping Dictionary (Fig. 38, link near right-center) and the Domain Mapping Template (Fig. 38, under the "Domain Upload" header). Admins can also inspect any current domain mappings for their organization by using the table at the bottom of the screen. The table has three tabs: Logs, Materials, and Purposes, which correspond to those categories in the template. The table can be filtered using the funnel icons to the right of each column heading and sorted by clicking the heading itself. Mapped organization terms can be edited individually by clicking the "Edit" button to the far right of the row of the desired term. Definitions for individual NIBI terms in the latest dictionary can be accessed by clicking the "View" button. A popup window with the definition (and reference link, if available) will be shown (Fig. 39).
To upload a completed Domain Mapping Template, click the "Select Files..." button under the "Domain Upload" header. As noted on the page, the file must be an XLSX (Microsoft Excel) file. A file browser window will pop up. Select the file desired. The chosen file will be listed on the page just below the "Select Files..." button (Fig. 40).

Click the "Upload" button (Fig. 40, lower right) to submit the file to NIBI. The file will be processed, and two tables of results will be presented (Fig. 41).
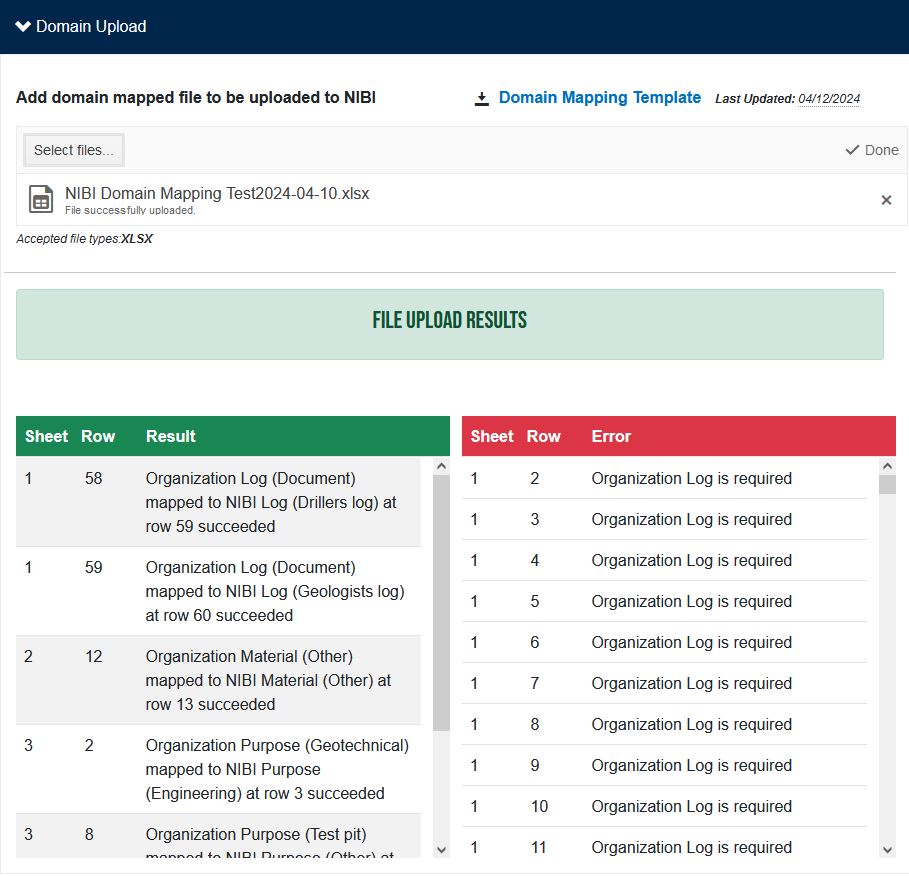
The table on the left (Fig. 41, green header) lists successful mappings. The table on the right (Fig. 41, red header), shows errors encountered. Errors are normal for any terms not mapped in the submitted Domain Mapping Template and can generally be ignored.
When domain mapping is complete, unless an organization later needs to add or change mapped terms, the process does not need to be repeated. The organization's subsurface resource metadata can now be uploaded. There are two ways to upload metadata to NIBI: Using the website with a completed NIBI Upload Template (described beginning in the section "Metadata Submission: Metadata Format - Upload Template") or by using the NIBI REST API (described beginning in the section "Metadata Submission: Using the REST API").
Metadata Submission: Metadata Format - Upload Template
Metadata submitted to NIBI must be in a specific format. An upload template is available to facilitate formatting, the latest version of which can be downloaded from the NIBI website (https://intcraftdev.cr.usgs.gov/nibi/docs/NIBI%20Upload%20Template.xlsx).
The NIBI Upload Template is a Microsoft Excel workbook with four tabs: Borehole Detail, Logs, Materials, and Purposes. Available optional and required fields and format information are described in Table 1. The values listed as "REQUIRED" in the Logs, Materials, and Purposes tabs are only required if providing metadata for those tabs. NGGDPP encourages contributors to provide as much metadata as possible to enhance findability of the organization's subsurface resources.
| A | B |
|---|---|
| Borehole Detail: | Type/Format/Requirement |
| UBI | Value (REQUIRED) |
| OBI | Value (OPTIONAL) |
| Borehole Name | Value (OPTIONAL) |
| BoreholeURI | Valid URI (OPTIONAL) |
| LatWGS84 | Decimal Value (REQUIRED) |
| LonWGS84 | Decimal Value (REQUIRED) |
| ElevNAVD88 | Decimal Value Meters (OPTIONAL) |
| Total Depth | Decimal Value Meters (OPTIONAL) |
| Drill Date | Date MM/dd/yyyy Format (OPTIONAL) |
| Logs: | |
| UBI | Value (REQUIRED) |
| Log Name | Value (REQUIRED & UNIQUE FOR EACH UNIQUE LOG) |
| Log Type | Value (REQUIRED & MAPPED IN NIBI) |
| Log URI | Valid URI (OPTIONAL) |
| Materials: | |
| UBI | Value (REQUIRED) |
| Material | Value (REQUIRED & MAPPED IN NIBI) |
| Purposes: | |
| UBI | Value (REQUIRED) |
| Purpose | Value (REQUIRED & MAPPED IN NIBI) |
Table 1. NIBI metadata elements, types, formats, and requirement designation.
The following are the definitions for each NIBI metadata element:
Borehole Detail:
- UBI: Unique Borehole Identifier (borehole ID - primary ID for identifying borehole in host databases and means of linking the host data with the NIBI metadata)
- OBI: Other Borehole Identifiers - additional identifiers for enhanced search, for example, IGSN, API, UWI, USGS station identifier, Local ID, etc.
- Borehole Name: Name of borehole, for example, "Coles", 'Coles-1", "Coles #1" etc.
- BoreholeURI: Uniform Resource Identifier, direct link to URL, application, repository URL, etc. hosting borehole data
- LatWGS84: Latitude, in decimal degrees with WGS84 horizontal datum
- LonWGS84: Longitude, in decimal degrees with WGS84 horizontal datum
- ElevNAVD88: Elevation of borehole collar or origin, in meters, referenced to NAVD88
- Total Depth: Total drilled (measured) depth of the hole, in meters
- Drill Date: Date drilling operations started
Logs:
- UBI: Unique Borehole Identifier for the borehole associated with the particular log
- Log Name: Unique name of the log that distinguishes it from other logs for same borehole
- Log Type: Name of log type (from the Organization Log column of the submitted domain mapping; refer to the "Metadata Submission: Domain Mapping" section for instructions on submitting a domain mapping)
- Log URI: Uniform Resource Identifier, direct link to log file
Materials:
- UBI: Unique Borehole Identifier for the borehole associated with the particular material
- Material: Name of borehole material (from the Organization Material column of the submitted domain mapping)
Purposes:
- UBI: Unique Borehole Identifier for the borehole associated with the particular purpose
- Purpose: Name of reason for the borehole (from the Organization Purpose column of the submitted domain mapping)
As noted in Table 1 and the definitions, a borehole can have many logs, but each log must have a unique name. Boreholes may also have more than one Material and/or Purpose, with no unique naming requirement. On the Borehole Detail tab, there must be a single record (Excel row) for each borehole. On the remaining tabs, a borehole can appear more than once via the UBI as necessary.
Metadata Submission: Uploading
A completed NIBI Upload Template may be submitted by an organization's admins or users. To upload the file, from the green menu bar (Fig. 29), click "NIBI Upload." The "File Upload" screen will be displayed (Fig. 42). On this screen, users can download the latest version of the NIBI Upload Template (Fig. 42, near upper-left), upload metadata files, and download a file containing upload results.
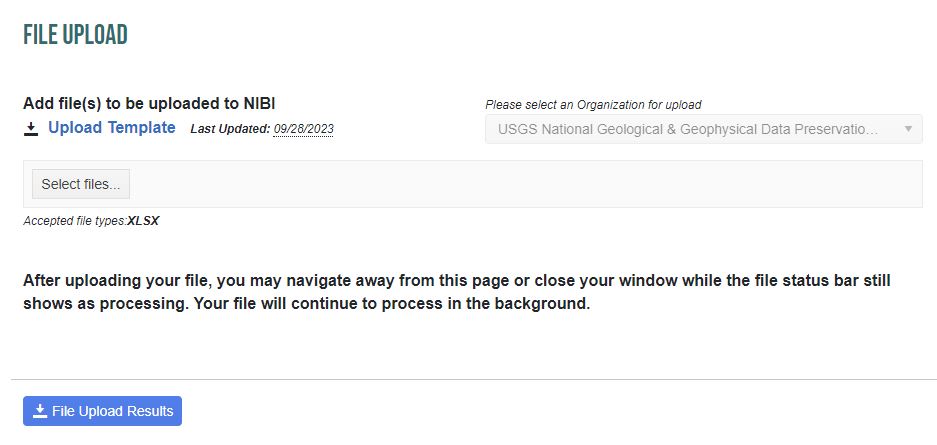
To upload a metadata file, click the "Select files..." button (Fig. 42, left side), and a file browser will be presented. Navigate to the desired file, click "Open," and the selected file name will be displayed (Fig. 43). To complete the upload, click the "Upload" button (Fig. 43, right side).
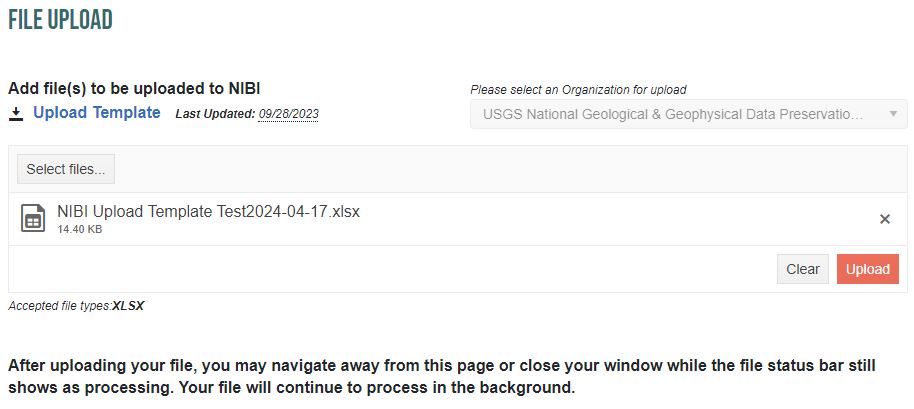
Since NIBI metadata files can be large, often containing tens of thousands of records or more, NIBI uses a queued upload system. Once a file has been submitted by clicking the "Upload" button, a bar with the message "Queueing..." is displayed while the system copies the file to the server. This queueing step can take anywhere from a few seconds to several minutes.
Once the file has been copied to the server, the "Queueing..." message will change to "Processing...", indicating the uploaded metadata are being written to the appropriate tables in the NIBI database. At this point, the user can navigate away from the "File Upload" page or close the tab/window in the browser.
When the processing of the upload has been completed, an organization's admins or users can download a CSV file that lists the upload and processing results. This file can be accessed by clicking the "File Upload Results" button (Fig. 42, lower left), which will reappear when the "Processing..." message bar disappears. An example of a portion of a File Upload Results output CSV file is shown in Fig. 44.

Metadata Submission: Using the REST API
The NIBI REST API is available for contributors (admins or users) that are familiar with using REST APIs to upload, download, and update metadata for their organization. Depending on the size and/or format of the metadata at a contributor repository, organizations may find the REST API a more convenient submission method. There are two important steps that must be completed on the NIBI website before using the API to contribute metadata:
- Generate a Web API key for the organization (refer to Step 11 of this document).
- Complete domain mapping for the organization (refer to the "Metadata Submission: Domain Mapping" section of this document, Steps 12-13).
The NGGDPP has set up a Swagger page with documentation for the NIBI REST API (Fig. 45). It can be found at the following link: https://webapps.usgs.gov/NIBIAPI/swagger/index.html
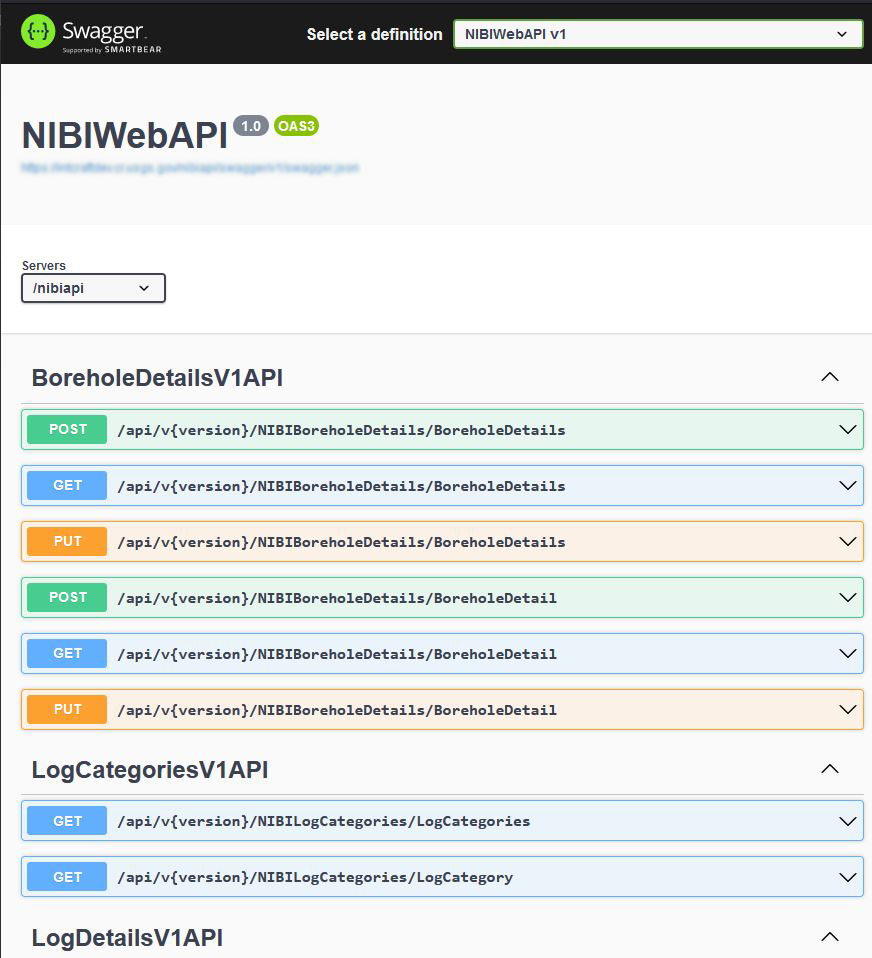
Swagger is only being used for documentation and is not the API interface for NIBI. Do not use the link shown just below the title on the Swagger page (Fig. 45, blurred part) or the "Try It Out" links within each section. Instead, send API requests (GET, POST, and PUT) directly to the NIBIAPI server URL in the following format:
https://webapps.usgs.gov/NIBIAPI/api/v1/{Table}/{Query} {Table} / {Query}
where {Table} {Table}/{Query} {Query} are defined by the list of possibilities on the Swagger documentation page. For example:
https://webapps.usgs.gov/NIBIAPI/api/v1/NIBIBoreholeDetails/BoreholeDetail
PUT requests are used, rather than POST requests, when (a) borehole record(s) already exists in NIBI, and the contributor wants to update one or more metadata elements in existing borehole records.
API Payload Format
Headers:
Request headers for POST and PUT requests should contain values for “api_key”, “organizationId”, and “Content-Type”, the last of which needs to be “application/json” (Fig. 46, the first two values have been redacted with black and red boxes).

JSON Payload:
The Swagger documentation provides formatting information for payloads as applicable. The symbols on the right side of the page (^) expand if clicked (Fig. 47, highlighted by red arrow) and reveal the payload format required for each type of request. Red and green text indicate where metadata needs to be entered. Term definitions can be found in the "Metadata Submission: Metadata Format - Upload Template" section of this document.
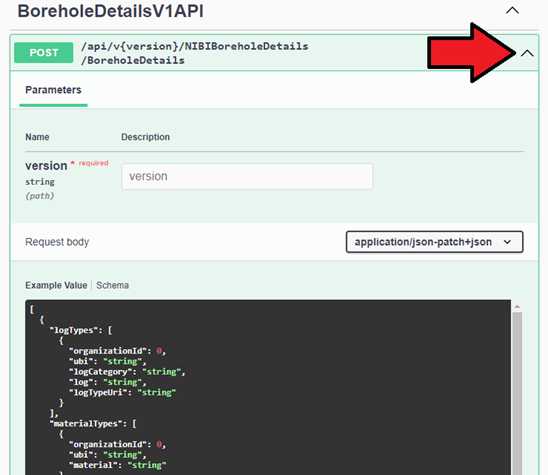
The “Example Value” window (Fig. 47, box with the dark background) provides the payload format as JSON. The JSON shown below is a full example payload for a POST request:
{
  "logs": [
    {
      "organizationId": 16,
      "ubi": "1001001",
      "logName": "TestLog",
      "logCategory": "Caliper",
      "log": "Acoustic Caliper",
      "logUri": "https://www.usgs.gov/programs/national-geological-and-geophysical-data-preservation-program"
    }
  ],
  "materialTypes": [
    {
      "organizationId": 16,
      "ubi": "1001001",
      "material": "Continuous Core"
    }
  ],
  "purposes": [
    {
      "organizationId": 16,
      "ubi": "1001001",
      "purpose": "Water well"
    }
  ],
  "boreholeDetail": {
    "organizationId": 16,
    "ubi": "1001001",
    "obi": "test4API",
    "boreholeName": "test4BoreholeAPI",
    "latWgs84": 38.9531512096478,
    "lonWgs84": -77.37399367610642,
    "elevNavd88": 410.5,
    "totalDepth": 1234.6,
    "drillDate": "2024-04-09T15:20:25.102Z"
  }
}
Below is the server response to the above request, also in JSON format:
{
	"metadata": {
		"page": 1,
		"pages": 1,
		"count": 1,
		"totalCount": 1
	},
	"payload": null,
	"message": "Data added successfully",
	"result": "Success"
}
PUT requests should still be formatted with the full payload as shown in the code examples in this step, for all metadata elements, whether they are being updated or not.
As the NIBI REST API is updated, previous versions will be retained for backward compatibility of user-developed code. The version in use should be specified in the request URL (for example, "v1", "v2").
NIBI REST API: GET Requests
Metadata may be retrieved from the NIBI database by using the NIBI REST API with a GET request. Note : When retrieving records from the NIBI database via GET requests, the response payload will be paginated at 25 records per page. The page number and total number of pages, along with the record count on the page and the total record count, are indicated in the “metadata” object in the response. For example, the GET request URL:
https://webapps.usgs.gov/NIBIAPI/api/v1/NIBILogs/Logs
returns the response payload, the top of which is shown in Fig. 48, for page 1.
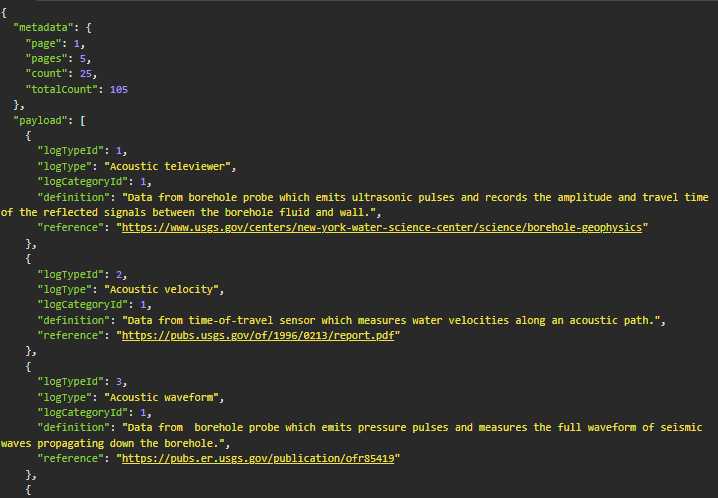
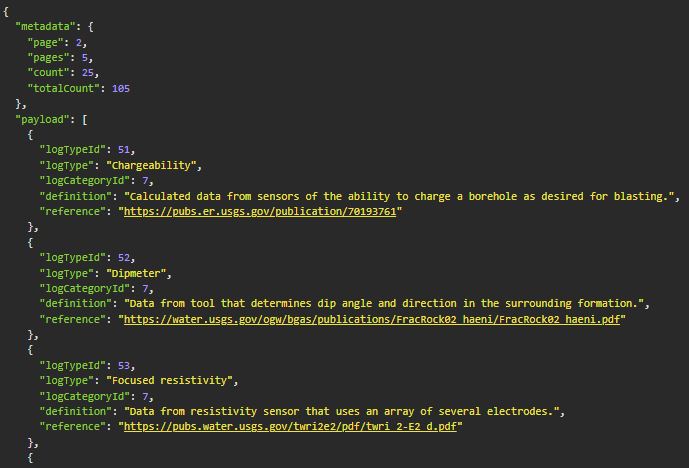
According to the response header (Fig. 48), there are 105 records, in 5 pages. In whatever code is being used to generate the successive GET requests, the URL format for page 2 of the results would be:
https://webapps.usgs.gov/NIBIAPI/api/v1/NIBILogs/Logs?page=2
This request returns the second page of the response payload, the top of which is show in Fig. 49.
Code can be written to advance through the available pages and records in several ways, for which specific instructions are beyond the scope of this document.
If, after reviewing this guidance document thoroughly, users of the NIBI catalog have questions about uploading, updating, or retrieving metadata, please contact NGGDPP staff at nibi@usgs.gov.

