INJECTION MOLDING TECHNIQUE: CORRECTING THE DREADED "BLACK TRIANGLE".
Álvaro Ferrando Cascales DDS,PhD., Antonio Mendoza Rodriguez DDS,MSc., Rubén Agustín-Panadero DDS,MSc,PhD., José Amengual Lorenzo DDS,PhD., Raúl Ferrando Cascales DDS,MSc,PhD., Ronaldo Hirata DDS,MSc,PhD., David Clark DDS,MSc., Salvatore Sauro PhD
injection molding
cosmetic restoration
microhybrid
black triangles
heated composite
natural emergence profile
Abstract
The treatment of open gingival embrasures area, also known as black triangles, has always been a frequent reason for consultation in daily clinical practice. It is undoubtedly one of the most important unaesthetic sequelae of periodontal disease
The technique we are going to describe is known as "injection molding". Based on the use of a patented matrix system (Bioclear. Washington. USA) by Dr. David Clark, which is combined with a refined technique that simultaneously uses flowable composite and conventional heated composite (nanofiller/microhybrid). The clinical procedure consists of 10 steps that must be performed in order.
Attachments
Steps
Description of the technique
Pre-treatment analysis of the gingival embrasure area and selection of the corresponding bioclear black triangle (BT) matrix.
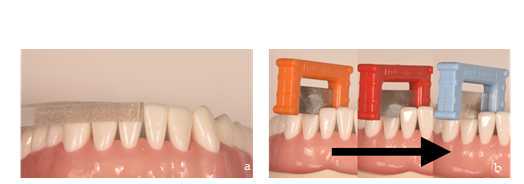
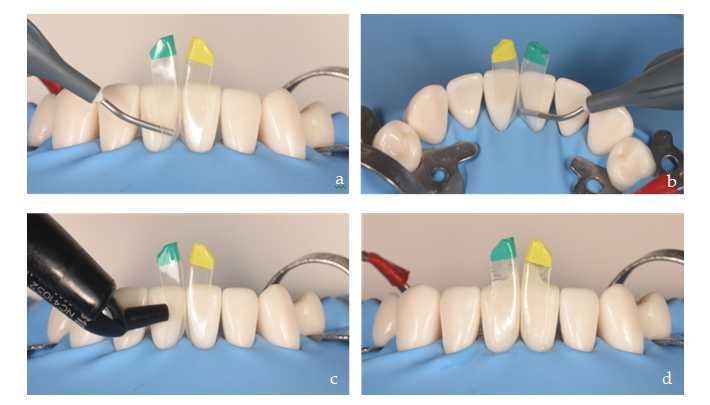
This step is performed with a BT calibration probe (Bioclear.Tacoma.WA.USA). This is a plastic instrument designed to calibrate the open gingival embrasure area and coded with four colors (pink, yellow, blue, and green). Each color is associated with a BT bioclear matrix, making selection easy and intuitive. To do this, the probe is inserted into the black triangle from vestibular to palatal/lingual until it stops (Figure 1a). Then, it is observed from incisal (Figure 1b) by selecting the matrix that corresponds to the color that we observe in the probe once it has been inserted into the black triangle.
<img src="https://static.yanyin.tech/literature_test/protocol_io_true/protocols.io.5qpvo35obv4o/m4pxbn3x72.jpg" alt="Figure 1. Analysis of the open gingival embrasure area, frontal (a), and occlusal view with the "BT" calibration probe (b) (Bioclear)." loading="lazy" title="Figure 1. Analysis of the open gingival embrasure area, frontal (a), and occlusal view with the "BT" calibration probe (b) (Bioclear)."/>
These anatomical matrices are specifically designed for the closure of black triangles with composite. They have some distinguishing features that facilitate this procedure in an efficient and conservative manner with the remaining tooth structure. These matrices are rigid and withstand the force required to insert the filling material without overflowing and are highly resistant to deformation.
At the same time, they are flexible enough to adapt to the anatomy of the tooth, providing an optimal seal at the marginal level. These are self-stabilizing matrices so that, with the interdental contact point present, there is no need for any accessory elements (wedges, rings) to fix them and hold them in position. In addition, there are different emergence profiles that allow them to cope with all clinical situations that arise during daily practice. Their composition is mylar type polyester, which provides a satin finish to the restorative material in the cervical interdental area (a critical area due to the difficulty of access). Due to its transparency, excellent polymerization of the composite is possible.
There are two available sizes of anatomical matrices.
- Small : for mandibular central and lateral incisors, including small maxillary lateral incisors.
- Large : for maxillary central and lateral incisors, including maxillary and mandibular canines.
Smoothing and relief of the interdental contact points.
This second step consists of checking the interproximal contact points to eliminate possible irregular areas such as sharp edges and/or overflow of fillings that could tear the rubber dam that we use to perform the technique by means of absolute isolation. It also facilitates the removal of bacterial plaque and/or calculus present on the interdental surface. It is also an important step to facilitate the correct and complete seating of the matrices, since in situations where there is a strong contact point, it can be difficult to insert them due to their thickness. It is important to perform this procedure gently to relieve the contact point, but without losing it, as this could also compromise the subsequent stabilization of the matrices. Polishing strips can be used for this purpose (Figure 2a). If a higher degree of relief is required, the manual sanding set is a good alternative (Figure 2b).
Fitting the rubber dam.
The technique of black triangles closure by this procedure is performed with absolute isolation by means of a rubber dam since it improves our working conditions by keeping a wide, clean, and dry surgical field, which is essential when using adhesive techniques. Of all the advantages offered by the rubber dam in restorative dentistry, the most important in this context is the retraction of the soft tissues (tongue, lips, cheek and gum) because it facilitates access and improves the field of vision to an already sensitive area (Figure 3a). The presence of the rubber dam also helps to stabilize the matrix apically, due to the pressure it exerts on the matrix and therefore on the neck of the tooth. A medium-thickness latex dam is usually recommended, as it provides optimal tissue retraction and is resistant to tearing during passage through interdental contact points. The anchorage clamp of the rubber dam is always placed one or two teeth posterior to the most distal tooth on which we are working to not interfere with the restorative procedure (Figure 3b).

Bacterial plaque removal and substrate conditioning.
This step is crucial to ensure the adhesive procedures, it is essential that the bacterial plaque present is completely removed. To facilitate its visualization and subsequent removal, we brush the surface of the tooth (focusing on gingival embrasure area) with a plaque-revealing solution for 0h 0m 20s (Figure 4a). Then rinse thoroughly with water, observing the bacterial plaque present on the surface of the tooth (Figure 4b).
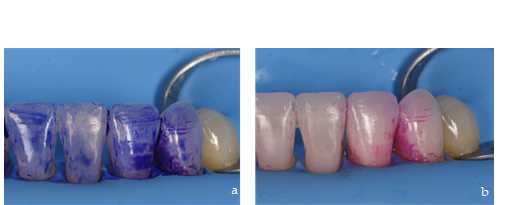
Elimination of bacterial plaque, as well as any extrinsic stains present on the surface of the tooth, is performed using ultrasonic instruments (Figure 4c) and bicarbonate spray (Figure 4d).

Conditioning of the substrate allows to improve adhesion to the enamel including the exposed root surfaces. It will also allow stability of the restoration margins by reducing the incidence of staining in the tooth-composite transition. This conditioning is performed by sandblasting with aluminum oxide, with a particle size of 29 microns, dry (Figure 4e) or combined with water (Figure 4f).

Placement of BT bioclear matrices.
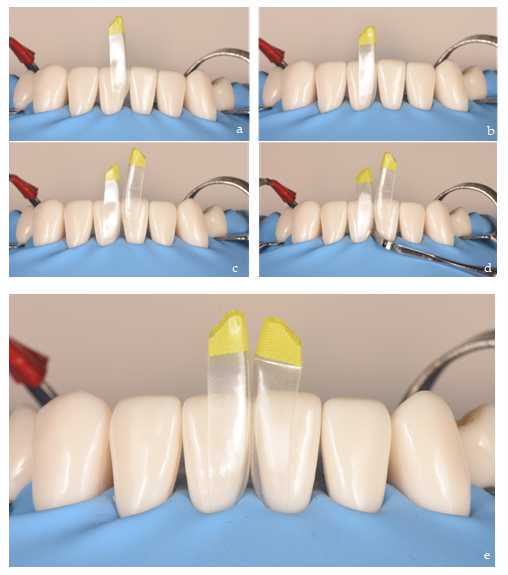
Once the substrate has been conditioned and the matrices have been selected, we proceed to place them in the black triangle to be reconstructed. It is recommended to insert the first matrix obliquely with the index finger and thumb, exerting apical pressure until it stops (Figure 5 a, b). After checking that it is correctly and completely seated, we repeat the procedure with the adjacent matrix (Figure 5c). Occasionally, due to the thickness of the matrices and the resistance of the interdental contact point, it may be necessary to use a composite spatula to facilitate the insertion of the second matrix (Figure 5d). Once the first matrix is in place, we insert the spatula through the black triangle and make a rotating movement, resting on the matrix. This way, we facilitate the opening of the contact point and the insertion of the second matrix. Their rigidity will prevent them from deforming during this procedure. Finally, we make sure that both matrices are at the same height so that they are well seated (Figure 5e).
Acid etching.
After correct placement of the matrices, the enamel and exposed root surfaces are etched with orthophosphoric acid. It is preferable to etch with the matrices in place as they act as a formwork favoring the penetration of the acid to the most apical part of the gingival embrasure area (Figure 6 a, b). After 0h 0m 30s, rinse thoroughly for the same time and dry gently.

Bonding agent application and not light curing.
There are many systems to choose from in this category. The first option is the classic 4th generation system that consists of conditioning, primer, and bond separately. Alternatively, the 5th generation system consists of a conditioning, like the previous system, but primer and bond are one solution. Lastly are universal adhesives, also known as self-etch systems, but it is highly recommended to always condition before using adhesives with orthophosphoric acid to optimize adhesion to the enamel [9]. The latter are preferred because of their lower technical sensitivity during the procedure. Brushing of the bonding agent should be performed in an active way on dentine area (0h 0m 20s), trying to access the entire tooth surface to be restored both vestibular (Figure 7a) and palatal/lingual (Figure 6b). Finally we gently air dry and do not light cure to act as a surfactant.

Injection of the flowable composite and composite paste into the matrix.
The injection molding procedure involves the sequential injection of a balanced mixture of preheated, nanofilled, flowable and paste composites into the anatomical matrix, which surrounds the tooth and acts as a reservoir containing the material.
First, the flowable composite preheated to 68° in a dry oven (bioclear HeatSync heater. Bioclear.) is applied in vestibular, from the base of the black triangle to the incisal without polymerization (Figure 8a). The procedure is repeated on the palatal/lingual side of the matrix, also with flowable composite (Figure 8b). Immediately thereafter, the paste composite, also preheated [10], is placed vestibular in the flowable composite pool until the latter overflows the incisal edge (Figure 8 c, d). The aim is to push the flowable composite into the narrower areas by filling the space within the matrix. This requires excess material as it will reduce the possibility of bubbles and/or pores in those areas that are difficult to access. This procedure is performed at the same time on the teeth to be restored, on both matrices facing each other. A video to explain this step better:
https://www.dropbox.com/preview/PROTOCOLS.IO/inyecci%C3%B3n.m4v
Simultaneous polymerization of the adhesive plus composite mixture and matrices removal.
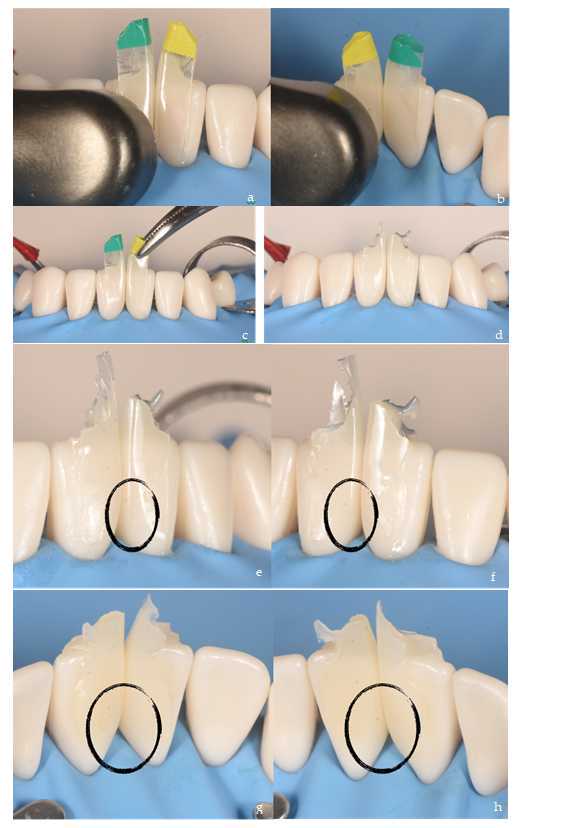
Polymerization is performed at the end of the injection molding procedure once both consistencies of restorative material have been placed in the anatomical matrix. Polymerization is done 20s per side, vestibular (Figure 9a) and palatal/lingual (Figure 9b). After simultaneous polymerization of adhesive and both composite consistencies, then, the matrices are removed with the help of mosquito forceps (Figure 9 c, d). Black triangle restorations made with the injection molding procedure are based on excess restorative material (e, f, g, h), it is necessary to check the perfect three-dimensional filling of the black triangle before starting de finishing.
Polishing of excess composite and finishing the restoration.
When performing this step, we must consider that at no time should we touch the emergence profile created with the matrices, since the composite in contact with the matrix is polished with a satin aspect due to the material these matrices are made of.
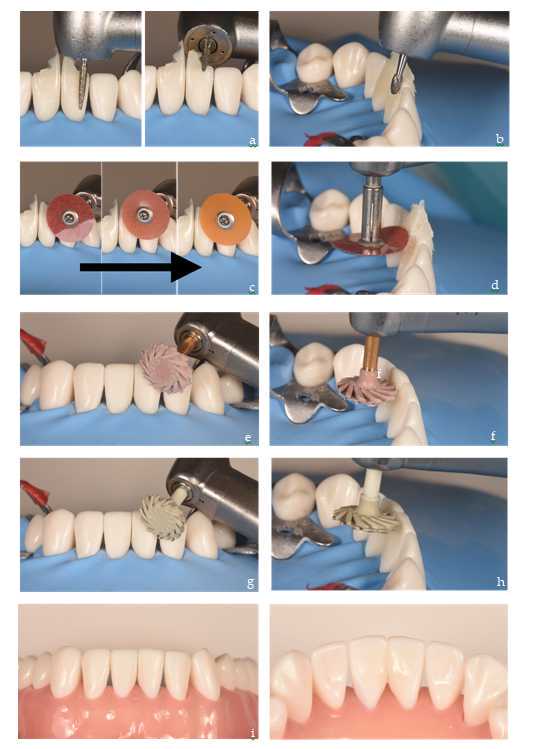
Finishing the restoration is done in three stages. First, the thick excess composite is removed from easily accessible areas such as the vestibular and palatal/lingual surfaces. This is done with burs and rotatory instruments at high speed and water irrigation (Figure 10a). The second phase involves polishing and recontouring the restoration. As we approach the tooth surface, we use tungsten carbide burs (Figure 10b) and polishing discs of decreasing particle size to blur the tooth-restoration transition (Figure 10 c, d). Finally, we proceed to fine polishing and shining using diamond rubber discs (Figure 10 e, f, g, h) and contra angle handpiece at low-speed alternating irrigation with water. In the end, the result is an anatomical restoration with a closed gingival embrasure from vestibular (Figure 10i) to palatal (Figure 10j) aspect.
