Deep Brain Stimulation (DBS) Implant
Alexandra Nelson
Abstract
This protocols describing the steps for making implants used for deep brain stimulation (DBS) in rodents.
Steps
Twisting Wires Together
Gather
- Ruler
- Wire [A-M Systems #791000,.003’ bare, .0055 coated, half hard, 100ft roll] (red top box, located on shelf above electronics bench)
- Small scissors
For each electrode, take 3 wires of 13cm .
To cut wires into 13cm, use scissors. If the tip of the wire is bent, cut it as well to ensure the wire is straight. Make many wires (~18)
Take bundle of 3 and run fingers down fiber to remove dust
Line up tips on one end and hold with fingers, then fold the wires in half bringing the ends to touch and align into a tight bunch of 6 termini
Pinch with a bulldog clip (green clip in Image 1) attached to a long rod (grey rod with yellow adhesive in Image 1) on the long axis and reinforce with a larger clip (Black clip in Image 1)

Hang on the pole upside down, putting the loop around the pole. The loop should hang 2 cm back from the end of the pole
Twist counterclockwise until the wires are twisted/joined ½ cm from top. Untwist slightly rotating clockwise, then twist again to ½ cm.
Use a heat gun to heat the bundled portion of the wire, slowly and smoothly working up and down for 1 min. Let cool for 30 s before removing (Heat gun 800℉, 4 fan bars)
Fitting into 6-pin connector
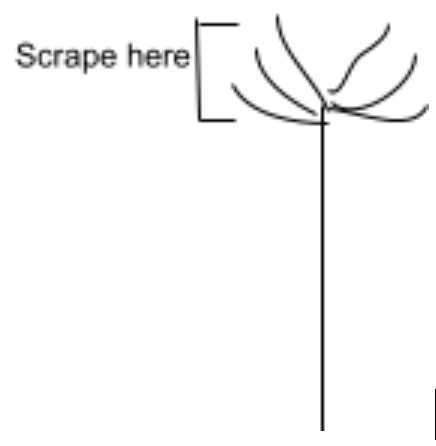
Cut top of loop with scissors to form 6 endings
Use razor blade to carefully scrape insulation off the wires from the end to the top of the twist
Separate into 2 sets of 3
Check for shorts with multimeter
If there is a short… attack from both ends
- Try trimming the bottom of the twisted wires in case short is occurring down there
- If short still exists, pull apart your wires that have been stripped even further. If that fixes the problem, remove insulation down to that point again.
- Retest for shorts.
Fitting the wires into the millmax
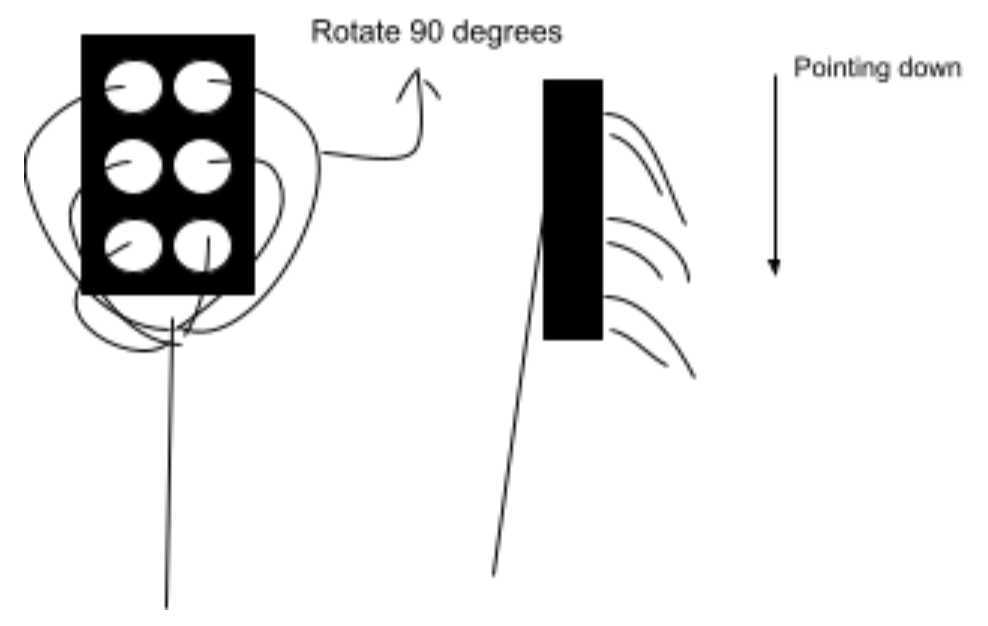
To make the millmax a “6-pin” connector, you need to cut the longer strip of female millmax. Use wire cutters to cut. Cut on the 4th pin over and save those pins (in case you lose one or damage the pins when cutting)
Use a hemostat to remove gold pins from millmax. Can also take a needle and push on the bottom of the millmax to push the pin up for better grip. Then pull out using a hemostat. I find it's best to go as vertical, or in a straight line out, as possible, minimizing side-to-side fudging.
Cut the skinnier portion off of each gold pin using a wirecutter. Keep the thicker side for pressure fitting (see below).

Once all 6 pins are removed, feed wires into the millmax
- First put in one vertical side of 3, then put in the 3 on the other side

-
Then fold the wires that you threaded through all to one side forming a “pony-tail” ensuring that these wires do not touch each other or tangle during pressure fitting
-
Pressure fit these endings into the millmax by inserting the cut pin into each hole.
-
Using scissors, cut each of the 6 endings right down the base of the pin.
Trim the bundled end of wires to your desired length. Do this at an angle so that you get wires ending at varied DV levels when you insert the electrodes.
- For STN DBS we trim the insertable portion to 6-6.5mm

