DIMPLE library generation and assembly protocol
Christian Macdonald, David Nedrud, Patrick Rockefeller Grimes, Donovan Trinidad, James Fraser, Willow Coyote-Maestas
Disclaimer
DISCLAIMER – FOR INFORMATIONAL PURPOSES ONLY; USE AT YOUR OWN RISK
The protocol content here is for informational purposes only and does not constitute legal, medical, clinical, or safety advice, or otherwise; content added to protocols.io is not peer reviewed and may not have undergone a formal approval of any kind. Information presented in this protocol should not substitute for independent professional judgment, advice, diagnosis, or treatment. Any action you take or refrain from taking using or relying upon the information presented here is strictly at your own risk. You agree that neither the Company nor any of the authors, contributors, administrators, or anyone else associated with protocols.io, can be held responsible for your use of the information contained in or linked to this protocol or any of our Sites/Apps and Services.
Abstract
This is a protocol for generating and QCing mutagenic libraries using the DIMPLE protocol.
Before start
Steps
Preparation
Use DIMPLE to generate mutagenic oligos and primers.

Important note: DIMPLE breaks a gene up into sub-library fragments and generates mutagenic insert oligo pools, where each oligo contains barcodes, Type IIS restriction cutsites, and a sub-region of the gene. Be sure to review your library generation vector and gene sequences and look for pre-existing Type IIS restriction sites. Use site-directed mutagenesis to remove unwanted off-target sites.
Input wild type gene sequence: Input your gene sequence, including backbone, in fasta format. Place all genes to be mutagenized in the same fasta file. You can define which positions your genes start and end in the fasta header. Note that this uses 0 indexing: for example, if your first nucleotide is 884 on snapgene, use 883 in the fasta header).
- For example: >geneA start:35 end:250
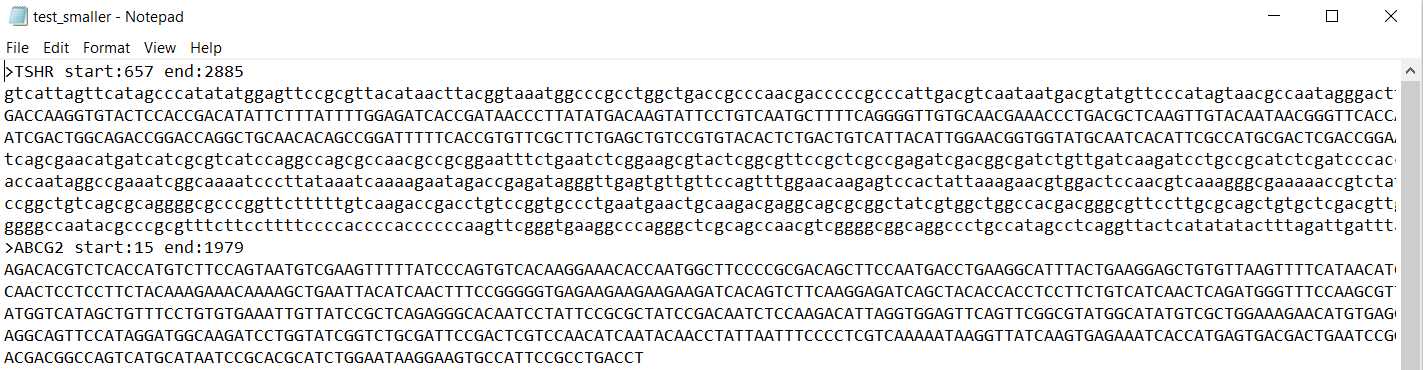
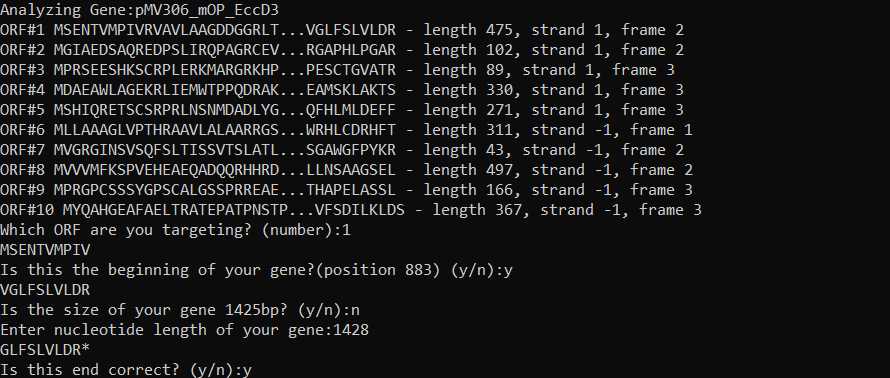
*If you do not define your start & end position, the software will analyze different ORFs and ask you to define these positions.
It is important to include backbone so that the software can avoid making primers that nonspecifically recognize a region outside of your gene
Using the DIMPLE GUI
Working Directory: When you open the DIMPLE GUI, first designate your working directory. This is the folder you wish your mutagenic oligo & primer outputs to be saved in.
Select mutations:
Deletions: If you'd like to generate a library with deletions across your gene, select "List of deletions". Enter how many base pairs you'd like to be deleted across your library.
- For example, if you'd like deletions that are one codon long, enter "3" for 3 nucleotides.
- For example, If you'd like to include both deletions that are one codon long AND two codons long in the same pool, enter "3,6" for both 3, and 6 nucleotide long deletions.
Insertions: If you'd like to generate a library with different amino acids inserted across your gene, select "List of Insertions".
- For example, If you'd like to insert glycines across your gene, include "GGG" in the box.
- For example, If you'd like to insert glycine-serine across your gene, include "GGGTGC" in the box.
- For example, if you'd like to insert glycine AND glycine-serine across your gene, include "GGG,GGGTGC" in the box.
Substitutions: If you'd like to generate a library where an amino acid at each position is swapped with every other possible amino acid, select "Include Substitutions."
Run DIMPLE: Hit "Run DIMPLE" when you are ready to generate your pool.
Target Gene File: Upload your gene fasta text file with the Target Gene File button.
Oligo length: Designate the length of your oligo. This will include the barcodes, Type IIS restriction cutsite, and a region of your target gene that will be mutagenized. So, target gene +50bp.
Fragment length: You can adjust the length of your fragments, we recommend leaving the fragment length set to auto.
- DIMPLE will automatically break up your gene into roughly the same fragment sizes, and will determine which lengths work best to avoid matching overhangs.
Fragment overlap: The number of base pairs shared between sub-regions. We have seen that setting overlap to 0 base pairs leads to errors. The overlap is set to 4 base pairs by default.
Barcode start position: The software selects from a set pool of barcodes when designing oligos. You can define which number barcode in the list this starts from.
Type IIS restriction sequence: You can select which Type IIS restriction cutsite you'd like to append to your inserts and backbone. You can choose between the BsmBI (CGTCTC) or BsaI (GGTCTC) sequences.
Sequences to avoid: This will allow the code to design fragments without the cutsite you selected in the Type IIS restriction sequence section. If there is an error when running, this implies you have a cutsite in your gene or vector that needs to be removed.

Codon usage: Your oligos can be codon optimized to your organism of choice. The default options are E. coli or Human , but you can also upload a codon usage table for any organism by pressing "Custom codon usage."
Examples of what the running code and outputs look like:
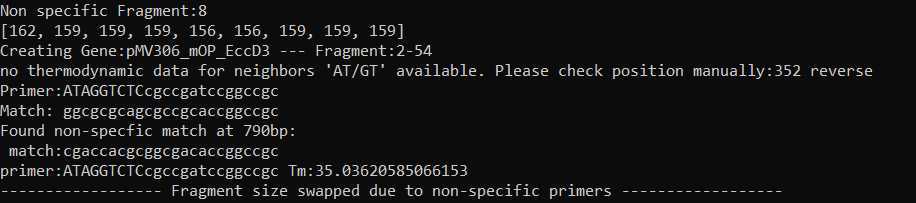
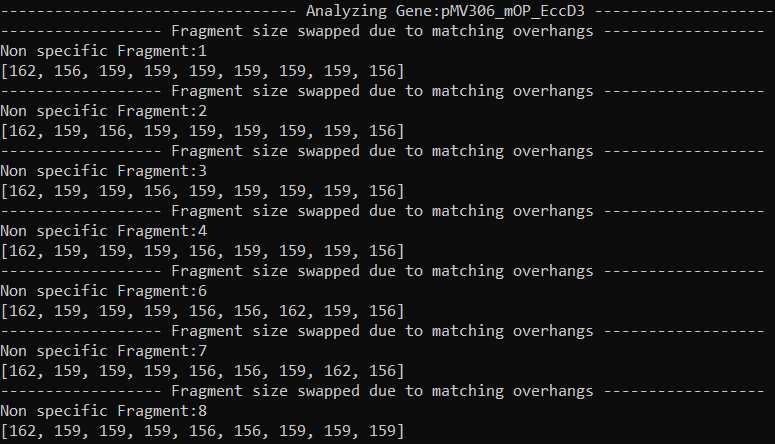
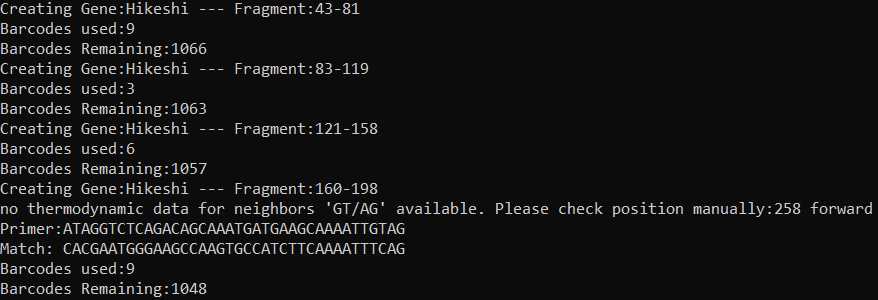
The code will first iterate the ideal fragment length sizes across each gene of interest.
Next, barcodes are assigned to each fragment. The code will update how many barcodes it attempted to use to generate each fragment pool, and will remove these from the remaining barcode pool.
This will continue for each gene included in your fasta file.
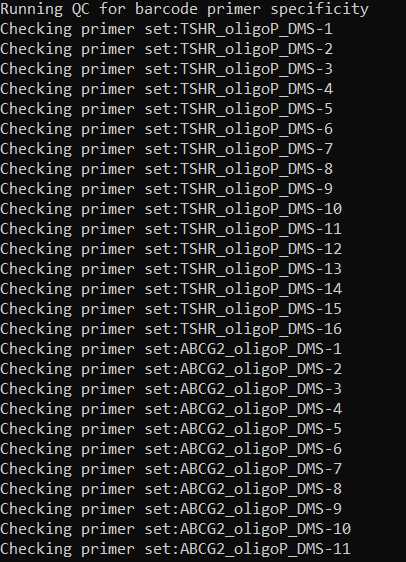
There is a final QC check for each primer set generated.
All outputs are saved in your working directory.
If you are using DIMPLE to mutagenize several genes, there will be separate files for the primers and mutagenic inserts for each gene, as well as a master list of all oligos and primers.
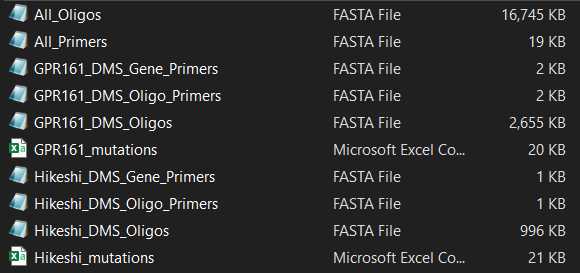
For each gene, DIMPLE generates a list of:
- EXAMPLE_DMS_Oligos. This is the list of sub-library oligo pools, where each oligo contains barcodes, Type IIS restriction cutsites, and a sub-region of the gene.

- EXAMPLE_DMS_Gene_Primers. These are primers used to add cutsites to and amplify the backbone each mutagenic insert will be ligated into.


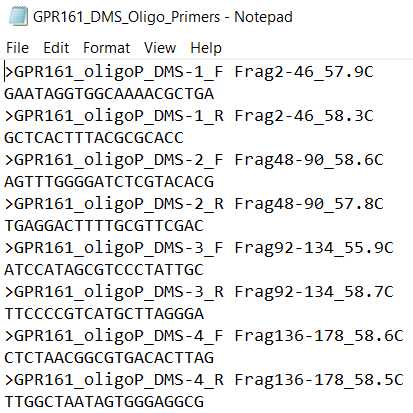
- EXAMPLE_DMS_Oligo_Primers. These are primers used to amplify the mutagenic inserts from your oligo pool.
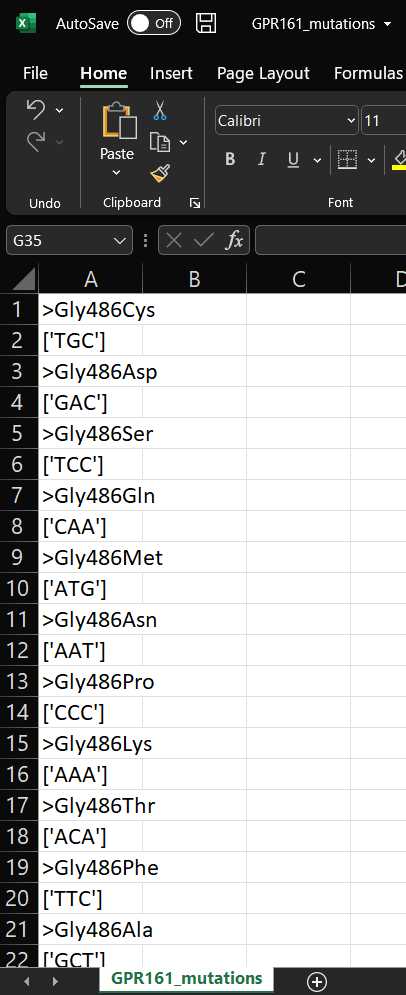
- EXAMPLE_mutations. This is the list of mutations that will be present in your final library.
Library assembly
PCR amplification of oligos, backbone
Thaw all components beforehand and follow general directions provided by manufacturer.
Amplification of mutagenic inserts and backbones should ideally be performed in parallel, assuming one has two thermocyclers. Alternatively, the backbone amplification can be performed first, then the the insert amplification can be done during the gel purification of the backbone.
PCR amplification of backbone.
Prepare a master mix with PrimeSTAR GXL polymerase:
| A | B | C | D | E |
|---|---|---|---|---|
| Component | Total amount in master mix (µL) | Amount/reaction (µL) | Comment | Number of regions |
| dNTP | =E2*C2 | 4 | =5 | |
| 5X buffer | =E2*C3 | 10 | ||
| Template (vector) | =E2*C4 | 1 | ~10 ng | |
| Enzyme | =E2*C5 | 1 | ||
| Nuclease-free H2O | =E2*C6 | 32 | ||
| Primers | 2 | Fwd & reverse combined at 20 µM (each) | ||
| Total | =E2*(C8-C7) | =SUM(C2:C7) | ||
Mix by vortexing and spin down.
Transfer 48µL of master mix into separate tubes for each reaction.
Add reaction-specific primers to each tube: 2µL . Mix and spin down.
Place on thermocycler and amplify:
| A | B | C |
|---|---|---|
| Step | T (° C) | Time (sec) |
| 1 | 98 | 10 |
| 2 | 55 | 15 |
| 3 | 68 | 60 per kb |
| 4 | Repeat 1-3 24 times | |
| 5 | 10 | Hold |
Note: the number of cycles can be optimized. Increasing cycles introduces more PCR bias and error. An initial comparison of 20, 22, and 24 cycles can be used to find a minimum number of cycles which yields sufficient DNA and no more.
Purify amplified product by gel extraction.
Prepare an agarose gel for gel purification (0.5% - 0.75%). Ideally, it should be of sufficient size to load all samples.
Load and run backbone products.
Use a scalpel or razor blade to (carefully!) cut out each product. Using a gel extraction kit, purify the product and elute in 10µL.
PCR amplification of mutagenic inserts.
Prepare a master mix with PrimeSTAR GXL polymerase:
| A | B | C | D | E |
|---|---|---|---|---|
| Component | Total amount in master mix (µL) | Amount/reaction (µL) | Comment | Regions |
| 5X buffer | =E2*C2 | 10 | 5 | |
| dNTP | =E2*C3 | 4 | ||
| Oligo pool | =E2*C4 | 1 | ||
| Enzyme (PrimeSTAR GXL) | =E2*C5 | 1 | ||
| Primers | 2 | Fwd & rev combined, 20 µM (each) | ||
| Nuclease-free H2O | =E2*C7 | 32 | ||
| Total | =E2*(C8-C6) | =SUM(C2:C7) | ||
Mix by vortexing.
Transfer 48µL into separate tubes for each reaction.
Add reaction-specific primers to each tube: 2µL . Mix and spin down.
Place on thermocycler and amplify:
| A | B | C |
|---|---|---|
| Step | T (° C) | Time (sec) |
| 1 | 98 | 10 |
| 2 | 55 | 15 |
| 3 | 68 | 60 |
| 4 | Repeat 1-3 29 times | |
| 5 | 10 | Hold |
Use a PCR cleanup kit to purify each product. Elute in 10µL.
Important QC step - run a gel with each PCR product and visualize it. Ideally, each reaction should ideally give a single strong band at the expected size. Failure to do so may require changing PCR conditions.
Golden gate assembly
Prepare a master mix for the assembly. Use the table below to calculate: adjust number of regions and amount of necessary backbone and insert for desired amounts per reaction. We have found 3 µL backbone and 1 µL oligo (insert) are usually good.
| A | B | C | D | E |
|---|---|---|---|---|
| Component | Total amount (µL) | Amount/reaction (µL) | Notes | Number of regions |
| 10X buffer | =E2*C2 | 4 | 5 | |
| Enzyme | =E2*C3 | 3 | ||
| Backbone | 3 | 300 ng | ||
| Insert | 1 | 2:1 molar ratio: for example libraries here, 100-200 ng | ||
| Nuclease-free H2O | =E2*C6 | =C7-SUM(C2:C5) | ||
| Total | =E2*C7 | 40 | ||
Vortex to mix.
Transfer appropriate master mix into separate tubes for each reaction.
Example: if each reaction has 3 µL backbone and 1 µL insert, then transfer 36 µL to each tube.
To each tube, add the appropriate vector/insert pair:
For this example:
3µL
1µL
Mix well and spin down.
Place on thermocycler and run the following program:
| A | B | C |
|---|---|---|
| Step | T (° C) | Time (min) |
| 1 | 37 | 5 |
| 2 | 16 | 5 |
| 3 | Repeat 1-2 29 times | |
| 4 | 60 | 5 |
| 5 | 10 | Hold |
Use a PCR cleanup kit to purify each product. Elute in . 10µL.
Important: using elution buffer or TE may cause electroporation to fail!
Important QC step : before electroporating libraries, transform 1 µL of each library into chemically competent cells and plate. If no or very few colonies are observed, this could suggest a failure during assembly. Further check the assembly by running a small portion on a gel.
Transformation and recovery of sublibraries
Using a high-efficiency electrocompetent strain of E. coli , such as MegaX DH10B, prepare a transformation for each assembly: 3µL with 50µL in a 0.1 cm cuvette. Follow the specific instructions for voltage and outgrowth media corresponding to your cells and electroporator. Outgrow cells for 1 hour before proceeding.
Essential QC step: C ount transformants for ensuring adequate coverage.
Prepare 6 10-fold serial dilutions: for each reaction, add 90µL H2O to six 500 µL microcentrifuge tubes. Add 10µL of the outgrowth to the first, then mix well and then 10µL of this to the second tube. Repeat for the rest of the tubes.
Plate the remainder (90µL) of the last three dilutions (1:10000, 1:100000, 1:1000000) on LB-agar with appropriate antibiotic. Grow overnight and count colonies the next day. Calculate the total number of transformants and determine the variant coverage per reaction. At least 50-fold coverage is important.
Example plates and calculations
Optional QC step: pick single colonies from the QC plates and use Sanger sequencing to check for mutations.
Add the remaining outgrowth culture to 30mL LB supplemented with appropriate antibiotic for further outgrowth in either a Falcon tube or glass culture tube. Shake until the culture reaches OD 0.6-0.7.
Note : it is important to harvest the cells in the exponential phase. This takes 4-6 hours in our experience, but may vary (including between samples in the same day).
Harvest DNA from cultures using a miniprep kit, splitting each reaction across 3 columns. Elute each column in 40µL elution buffer and combine elutions corresponding to a single sublibrary.
Sublibrary pooling and subcloning
Measure each sublibrary concentration with a fluorometric method, such as Qubit. With the lowest concentration as the target concentration, prepare a dilution of each sublibrary in H2O. Mix 2µL of this dilution from each sublibrary to create an equimolar library pool.
Subclone library to transfer from library vector to selection vector. Depending on construct design, this may require digestion/ligation or a Golden Gate reaction.
Use PCR cleanup kit to purify reaction, and elute in 10µL H2O.
Using a high-efficiency electrocompetent strain of E. coli , such as MegaX DH10B, transform 3µL with 50µL cells in a 0.1 cm cuvette. Follow the specific instructions for voltage and outgrowth media corresponding to your cells and electroporator. Outgrow cells for 1 hour before proceeding.
Repeat transformation and isolation following steps 9-11.
