CTLR-Seq Protocol
Bo Zhou, GiWon Shin, Yiling Huang, Raegan N. Wood, Hanlee P. Ji, Alexander E. Urban
Abstract
We developed a generally applicable method CRISPR/Cas9-targeted long read sequencing (CTLR-Seq) to resolve, haplotype-specifically, and at base-pair resolution, large, complex, and highly repetitive genomic regions that had been previously impenetrable to next-generation sequencing analysis, i.e. large segmental duplication (SegDup) regions and their associated genome rearrangements that often stretch hundreds of kilobases. CTLR-Seq combines in vitro Cas9-mediated cutting of the genome and pulse-field gel electrophoresis to haplotype-specifically isolate intact large (100-2000 kb) regions that encompass previously unresolvable genomic sequences. These targets are then sequenced (amplification-free) with up to 250x on-target coverage using nanopore sequencing, allowing for their complete sequence assembly.
Before start
This protocol takes at least 5 days to complete, due to overnight incubation steps.
Steps
Sample Handling:
Count number of cells in sample.
Wash cells 3X with phosphate-buffer
saline (PBS). Centrifugation should be done at 100g-200g for 0h 5m 0s-0h 10m 0s, depending on cell type.
Resuspend pellet in 60µL of Sage Science M2 Buffer per million cells counted prior to washing.
Store On ice.
Qubit Quantification:
Gently mix the cell suspension, slowly with a WO pipette tip, to encourage solution homogeny.
Obtain two 1.5 mL Eppendorf tubes and transfer 10µL of cell suspension to each of the two tubes.
Add 190µL of Qubit Lysis Buffer to each tube, and vortex at maximum speed for 0h 0m 45s.
Briefly spin down (<0h 0m 1s).
Add 600µL of TE buffer to each tube and vortex at maximum speed for 0h 0m 45s.
Briefly spin down (<0h 0m 1s).
Add 5µL of lysate from each tube to a corresponding Qubit Assay tube, along with 195µL of Qubit 1X dsDNA High Sensitivity Working Solution.
Briefly vortex (~0h 0m 3s) to mix and spin down.
Incubate at Room temperature for 0h 2m 0s before quantifying.
Quantify with Qubit machine for 1x dsDNA High Sensitivity and record the concentration per mL.
Calculate the average concentration between the two replicates.
Multiply the average concentration per mL by 3,200 to calculate the total concentration of DNA in the sample.
Dilute the cell suspension in M2 buffer so that 70µL contains up to 5µg of genomic DNA.
Sage Science HLS CATCH
Prepare cassettes:
- Prepare cassettes in accordance with the Sage Science HLS-CATCH Protocol.
- Select the positions being used and run the “check current” protocol.
Extraction
Remove the contents of the elution wells and replace with 80µL running buffer.
Remove the contents of the sample well and replace with 70µL of cell suspension.
Remove the contents of the reagent well and replace with 180µL of 3% SDS HLS Lysis Reagent.
Tape the cassettes and close the lid.
Run the appropriate workflow depending on size of target of interest (e.g., workflow ‘CATCH 300-1000kb inj80V 2m sep3h.shflow.’)
After approximately one hour of run time, begin preparing the guide RNAs (can also be prepared up to 72 hours prior to start of experiment and store
at4°C).
Guide RNA Preparation
Ensure that the tracrRNA and gRNA is diluted in duplex buffer to 100 (recommended to measure RNA concentration using Qubit RNA kits to ensure correct concertation.
In clean RNase-free PCR tubes, prepare the following On ice:
crRNA pools can also be used for multiple target enrichment, but adjust volume accordingly to not exceed what is recommended below.
| A | B | C | D |
|---|---|---|---|
| Tube 1 | Tube 2 | ||
| crRNA 1 | 4 µL | crRNA 2 | 4 µL |
| tracrRNA | 2.6 µL | tracrRNA | 2.6 µL |
| Duplex buffer | 19.4 µL | Duplex Buffer | 19.4 µL |
| Total Volume | 22 µL | Total Volume | 22 µL |
Mix well and spin down.
Incubate the guide RNAs at 95°C for 0h 5m 0s.
Allow the guide RNAs to cool at Room temperature for 0h 5m 0s.
Add the following to the respective PCR tubes:
| A | B | C | D |
|---|---|---|---|
| Tube 1 | Tube 2 | ||
| crRNA 1 with tracr RNA (annealed) | 22 µL | crRNA 2 with tracr RNA (annealed) | 22 µL |
| 4X enzyme buffer | 10 µL | 4X enzyme buffer | 10 µL |
| Cas9 (20 µM) | 8 µL | Cas9 (20 µM) | 8 µL |
| Total Volume | 40 µL | Total Volume | 40 µL |
Mix well and spin down.
Incubate the tubes at 37°C for 0h 10m 0s.
Combine Tube 1 and Tube 2 as Cas9 complex mixture and leave On ice (or 4°C for longer storage until needed).
When ready for treatment step below (i.e., 5-10 minutes prior to start of Treatment step below), dilute Cas9 complex mixture 4-fold with 1x Enzyme Buffer (e.g., add 240µL of 1x Enzyme Buffer to 80µL of Cas9 complex mixture ).
Treatment
After the extraction phase is complete, remove 5 mL of buffer from the (+) electrode port of each cassette lane, where the SDS is concentrated, and replace with 5mL of fresh running buffer.
Carefully remove the tape from each cassette (slowly peel starting from the upper right corner to avoid contaminating elution wells) and remove the contents of the sample and reagent wells.
Add 80µL of the diluted Cas9 complex mixture to the sample wells of each cassette.
Add 220µL of Sage 1X enzyme buffer to the reagent wells of each cassette.
Make sure that there is no meniscus or protrusion by adding or removing running buffer from cassettes if needed.
Close the lid and press ‘OK.’
Injection of Cas9 complex will start and last for approximately 0h 2m 0s-0h 4m 0s (depending on selected workflow. When complete, open the lid and remove the contents of the sample wells.
Add 80µL of enzyme buffer to the sample wells. Do not tape the cassettes.
Close the lid and press ‘OK.’
After 30 minutes, the machine will pause. Open the lid and empty the reagent wells.
Add 180µL of SAGE SCIENCE 1% SDS Lysis Reagent to the reagent wells.
Seal the cassettes with tape.
Top off the running buffer such that there is no meniscus or protrusion.
Close the lid and press 'OK.'
Collection
The run will complete after several hours. For optimal elution, allow the cassettes to sit undisturbed 0h 4m 0s.
Open the lid and remove the tape from the cassettes.
Use a WO pipette tip to remove the contents of the elution wells. Pipette very slowly by hand.
Place the contents into labeled PCR strip tubes.
qPCR Assay
Perform a 1:30 dilution by adding 1µL of elution to 29µL of water.
Briefly vortex the dilutions to mix. Spin down.
Prepare Master Mixes according to the following volumes:
Beta-cyclodextrin (bCD) is provided in HLS-CATCH Cassette Kit (Sage Science).
| A | B | C |
|---|---|---|
| Component | Volume per reaction | Volume total (for 25 reactions + 10%) |
| Master mix | 5µL | 137.5µL |
| bCD | 2µL | 55µL |
| probe | 0.5µL | 13.75µL |
| RNase P | 0.5µL | 13.75µL |
| Total | 8µL | 220µL |
Prepare one master mix for each probe used (using 3 probes here as example).
Add the master mixes to a 96 amp FAST plate according to the following layout:
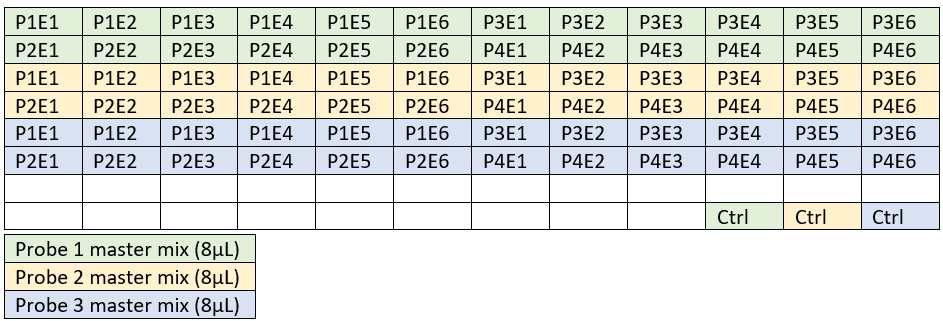
Add 2µL of dilution and 2.5µL control DNA according to the schematic above.
Mix with a pipette set to 8µL.
Seal plate and spin down.
Run qPCR protocol on StepOne according to the following protocol:
Denature 95°Cfor 0h 10m 0s.
50 cycles of 0h 0m 15s at 95°C and 0h 1m 0s at 60°C.
Qubit Measurement
Based on the results of the qPCR, combine the elutions that have target enrichment in an Eppendorf LoBind 1.5 mL tube.
Quantify target elution using Qubit 1X dsDNA High Sensitivity kit. Combine elution modules with target enrichment if appropriate.
Hi Bead Cleanup
Bring Binding Buffer and Hi-Bead suspension to Room temperature.
Add an equivalent volume of Binding Buffer to the combined elution. Allow the Binding Buffer to gently drip into the elution.
Gently incorporate the buffer into the elution by rocking back and forth. Avoid flicking or tapping.
Place the tube in a rotator at a 45° - 90° angle to ensure gentle mixing. Mix on the rotator for 0h 5m 0s.
Vortex the Hi-Bead suspension.
Add the Hi-Bead Suspension in a 0.6:1 ratio of bead volume to elution volume. Add the beads to the side of the tube and allow it to gently drip into the elution.
Gently rock the tube back and forth 5 times to incorporate the beads.
Place the tube in the rotator at a 45° - 90° angle for 0h 20m 0s.
Briefly spin (<0h 0m 1s), and place on a magnet.
When the solution is clear, discard the supernatant.
Add 80% ethanol to the tube in a 3:1 ratio of ethanol volume to elution volume. Let it sit for 0h 3m 0s.
Remove the supernatant.
Repeat the wash step for a total of 2 washes.
Spin the tube and re-magnetize to remove residual ethanol. Do not allow the beads to dry out.
Add 50µL 10mM Tris buffer and gently rock back and forth to resuspend the beads.
Incubate at 55°C for 0h 10m 0s.
Decrease the heat to 37°C and shake at 300rpm for 0h 15m 0s.
Gently resuspend the beads using a magnet and gentle rocking.
Shake at 300rpm.
Place the tube at 4°C 0h 15m 0s.
Magnetize the beads to disturb the bead pellet and gently rock the tube back and forth to resuspend the beads.
Magnetize and transfer the supernatant (50µL) to a pcr tube by pipetting very slowly with a WO pipette tip.
Quantify elution using Qubit 1X dsDNA High Sensitivity kit.
ER&AT
Add 7µL of KAPA ERAT buffer to the 50µL of eluted DNA from the beads.
Add 3µLERAT enzyme to the DNA, such that the total volume now is 60µL.
Mix well by pipetting very slowly with a WO pipette tip.
Incubate at 20°C for 0h 30m 0s and then at 65°C for 0h 30m 0s.
Ligation
Mix the Ligation buffer (LNB) because it is viscous.
Add 25µL of LNB to the 60µL ERAT product.
Add 10µL of KAPA Ligase.
Add 5µL of Ligation Adapter (LA).
Mix well by pipetting very slowly with a WO pipette tip.
Incubate at 20°C for 5h 0m 0s and then at 4°C 5h 0m 0s.
AMPure XP Bead Cleanup
Transfer the ligation product from the PCR strip tube to a 2.0 mL round bottom LoBind tube. The total volume is 100µL.
Vortex AMPure XP Beads (AXP) and add 50µL AXP beads to the ligation product.
Gently rock the tube back and forth to incorporate.
Mix on the rotator at a 45° – 90° degree angle for 0h 20m 0s.
Spin down and magnetize.
Once the solution is clear, remove the supernatant.
Add 250µL of Long Fragment Buffer (LFB) and gently rock the tube back and forth to resuspend the beads.
Spin down and return the tube to the magnet.
Once the solution is clear, discard the supernatant.
Add another 250µL of LFB and repeat the previous wash step for a total of 2 washes.
Discard the supernatant and resuspend the pellet in 33µL of Elution Buffer (EB).
Place the tube on the rotator horizontally for 0h 5m 0s.
Spin down and incubate at 37°C for 0h 15m 0s with 300rpm shaking.
Gently resuspend the beads using a magnet and gentle rocking.
Shake at 300rpm.
Place the tube at 4°C 0h 15m 0s.
Magnetize the beads for at least 0h 1m 0s.
Transfer 33µL of supernatant to a new 1.5 mL LoBind tube.
Quantify target elution using Qubit 1X dsDNA High Sensitivity kit (optional).
Priming and Loading the Flow Cell
Allow an Oxford Nanopore R10 Flow Cell to reach Room temperature.
Insert the flow cell into the ONT promethION Sequencing Machine.
Select the flow cell position and start the flow cell check.
Thaw, vortex, and spin down the Sequencing Buffer (SB), Library Beads (LIB) and Flow Cell Tether (FCT).
Prepare the Priming Mix according to the following table:
| A | B |
|---|---|
| Flow Cell Flush (FCF) | 1175µL |
| Flow Cell Tether (FCT) | 30µL |
| Total Volume | 1200µL |
Record the number of available pores from the flow cell check.
Open the flow cell port and turn a P1000 to 200µL.
Slowly rotate up the volume from 200µL to 230µL so that a small amount of liquid enters the tip. Discard the extracted liquid.
Add 550µL of priming mix, and incubate for 0h 5m 0s.
Mix the Library Beads (LIB) well by pipette.
Prepare the Library according to the following table:
| A | B |
|---|---|
| DNA Library | 32µL |
| Sequencing buffer (SB) | 100µL |
| Library Beads (LIB) | 68µL |
| Total volume | 200 |
Rotate up another small volume from the flow cell port and discard the liquid.
Add another 550µL of priming mix and incubate for 0h 5m 0s.
Enter the run parameters such that the following are selected:
- DNA
- PCR-free
- LSK114 kit
- Minimum read length 1000
- High accuracy base calling
- 99 hour run time
Rotate up another small volume from the flow cell port and discard the liquid.
Load the 200µL Library into the flow cell port.
Allow the Library to incubate in the flow cell for 1h 0m 0s.
Begin sequencing.
