Generating stably-expressing Cas9 cancer organoid lines
Charlotte Beaver, Tessa Fowler, Jade Smith, Adam Jackson, Agnieszka Andres, Emily Souster, Hazel Rogers, Alexandra Beck, Mathew Garnett
Cancer Organoids
CRISPR/Cas9
Antibiotic Titrations
Cas9 Transduction
Cas9 Activity Assay
Stably Expressing Cas9
Wellcome Sanger Institute
Organoids
Abstract
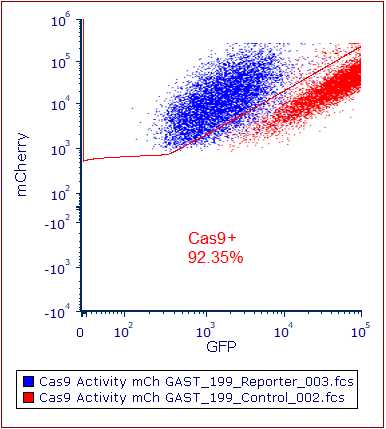
This protocol aims to establish a robust Cas9 expression system in cancer organoids through a three-stage process. The first stage involves titrating blasticidin to determine the optimal concentration for eliminating wild-type cells while supporting the survival and growth of Cas9-expressing cells. The second step introduces the Cas9 gene, and the specified blasticidin concentration selects and maintains Cas9-positive cells. The final stage assesses Cas9 activity, ensuring functionality is above 75%. This established system facilitates precise and genome-wide gene modification using the 'lentiCas9-Blast' CRISPR-Cas9 guide RNA system. 
Process Diagram

Before start
If required, ensure that all media is pre-warmed before use.
-
If required, Cell Titer-Glo 2.0 reagent is light-sensitive, so try to avoid exposure when using it.
-
If needed, thaw an aliquot of polybrene.
-
When needed, thaw an appropriate amount of Cas9 lentivirus for the number of transductions you will carry out.
Attachments
Steps
Blasticidin titration
Day 1: Titration plate set up
Pre-warm organoid specific culture media to room temperature or place in a water bath at 37°C for 0h 10m 0s
Make up enough volume to plate all required wells for running each required antibiotic concentration in triplicate (plus extra 10% for dead volume).

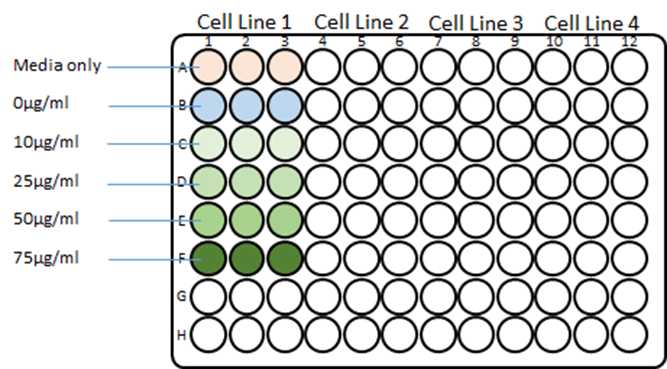
Add 100µL of the cell suspension containing BME2 to Rows B-F (according to Fig.1).
Incubate plate at 37°C, 5% CO2 for 0h 10m 0s to allow the BME2 to polymerise.
Plate control wells (in triplicate) containing 200µL organoid specific culture media containing 5% BME2 and no cells.
Add 100µL of the blasticidin antibiotic stock into the corresponding wells in Fig.1.
Incubate the plate for 72h 0m 0s at 37°C, 5% CO2.
Aspirate media from well plates and add 2mL TrypLE to each well.
Using a cell-scraper, detach BME2 drops containing the cancer organoids from the plate and transfer organoid suspension to an appropriately sized tube.
Pipette suspension up and down multiple times to dissociate organoids from the BME2.
Incubate at 37°C 5% CO2.
Check organoid suspension under the microscope every 0h 15m 0s, to assess and monitor the dissociation of the organoids.
Centrifuge at 800x g,0h 0m 0s for 0h 2m 0s.
Aspirate supernatant and resuspend in 5mL organoid specific culture media.
Resuspend 2.4x10⁶ cells in 2.7ml of organoid specific culture media + 300µL BME2 (This will give a final seeding density of 8x10⁴ cells per well once plated, Rows B-F of Fig.1).
Prepare a control stock solution containing organoid specific culture media with 5% BME2 (Row A of Fig.1).
Day 4: Assess cell viability using CellTiter-Glo 2.0 assay
Run a CellTiter-Glo 2.0 viability assay following the manufacturer’s instructions.
celltiterglo-2-0-assay-protocol.pdf
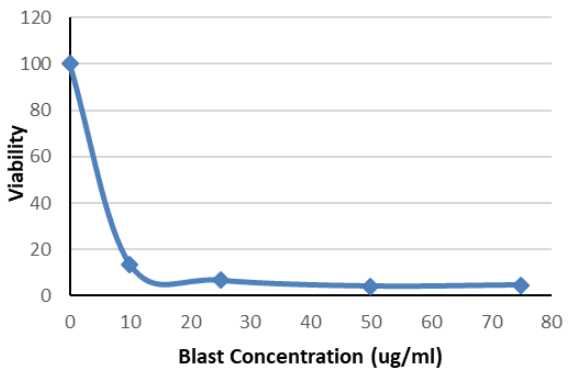
Generate a kill curve graph using the data collected. The ‘kill concentration’ is the concentration of an antibiotic at which organoid growth is completely inhibited.
Row A is used as negative control to show background luminescence
Row B is the positive control to compare against wells without antibiotics
Cas9 transduction of cancer organoids
Day 1: Transduction setup
Prepare transduction media, add 5µL ROCKi Y-27632 (10 mM) to 20mL of organoid specific culture media (2.5 µM final concentration; dilution 1:4000).
Prepare a preparation mix using the cell suspension and transduction media to achieve a final concentration of between 2x10⁶ and 4x10⁶ cells (with the minimum cells needed to perform a Cas9 transduction being 2x10⁶).
Please consult Fig.4 for the overall volumes, where the transduction media constitutes the remaining volume. Please consult Fig.4 for the overall volumes, where the transduction media constitutes the remaining volume. Add preparation mix, Cas9 transduction virus and polybrene into a 50mL bioreactor tube using the table below.
| A | B | C | D |
|---|---|---|---|
| Cell count | Amount of virus (mL) | Amount of polybrene (µL) | Total volume (mL) |
| 2x10⁶ | 1.5 | 5 | 3.5 |
| 3x10⁶ | 2.25 | 7.5 | 5.25 |
| 4x10⁶ | 3 | 10 | 7 |
Fig.4: Table showing transduction reagent volumes per required cell number. (Final concentration for polybrene is 10 μg ml^−1 and Y-27632 ROCKI 2.5 µM).
Incubate the 50 mL bioreactor tube prepared in step 3.11 at 37°C, 5% CO2.
Aspirate media from well plates and add 2mL TrypLE to each well of a 6 well plate.
Using a cell-scraper, detach BME2 drops containing the cancer organoids from the plate and transfer organoid suspension to an appropriately sized tube.
Pipette suspension up and down multiple times to dissociate organoids from the BME2.
Incubate at 37°C 5% CO2.
Check organoid suspension under the microscope every 0h 15m 0s, to assess and monitor the dissociation of the organoids.
Centrifuge at 800x g,0h 0m 0s for 0h 2m 0s.
Aspirate supernatant and resuspend in 10mL of transduction media (more or less can be added depending on the size of the cell pellet).
Perform a cell count to calculate the total number of cells.
Day 2: Plating cells
Centrifuge at 800x g,0h 0m 0s for 0h 2m 0s.
Aspirate the supernatant.
Seed 2x10⁶ cells in 230µL of 80% BME2. Seed as 15µLdrops in a one well of 6 well plate (230 μl per well).
Incubate at 37°C for 0h 15m 0s then add 2 mLs of transduction media.
Incubate cells at 37°C, 5% CO2.
Day 6: Blasticidin selection
Prepare relevant organoid specific culture media with blasticidin (using the concentration based on the results obtained from the kill curve refer to Fig.3).
Replace media on plates or flasks with media containing blasticidin at 25mg/mL(obtained at Fig.3). For example: if the concentration is 25 µg/mL add 12.5 µl to 5 mL media ((volume x 2.5) / 1000 (to convert mL to µL)).
Expand until required number of cells for endpoint experiments has been reached (e.g. assessment of Cas9 activity).
Assessment of Cas9 activity assay
Day 1: Assay set up
Prepare transduction media, by adding 7.5µL of ROCKi Y-27632 10millimolar (mM) to 30mL of organoid specific culture media.
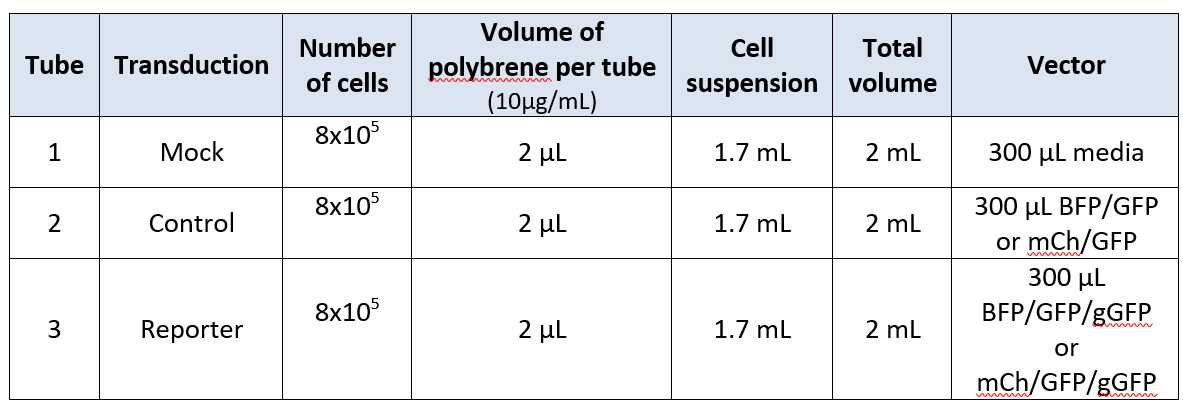
Prepare a preparation mix using the cell suspension and transduction media to achieve a final concentration of 2.8x10⁶ cells in 5.95mL(equivalent to 8x10⁵ cells in 1.7 mL accounting for dead volume) and polybrene.
Place bioreactor tubes in the incubator at 37°C, 5% CO2 for0h 15m 0s incubation.
Aspirate media from well plates and add 2mL TrypLE to each well.
Using a cell-scraper, detach BME2 drops containing the cancer organoids from the plate and transfer organoid suspension to an appropriately sized tube.
Pipette suspension up and down multiple times to dissociate organoids from the BME2.
Incubate at 37°C 5% CO2.
Check organoid suspension under the microscope every 0h 15m 0s, to assess and monitor the dissociation of the organoids.
Centrifuge at 800x g,0h 0m 0s for 0h 2m 0s.
Aspirate supernatant and resuspend in 10mL of transduction media (more or less can be added depending on the size of the cell pellet).
Perform a cell count to calculate the total number of cells.
Day 2: Plating cells
Transfer the 3 x 50mL bioreactor tubes to the centrifuge.
Centrifuge at 800x g,0h 0m 0s for 0h 2m 0s.
Aspirate the supernatant for each bioreactor tube.
Resuspend the cells in each 230µL of organoid specific culture media containing 80% BME2 (to account for pipetting loss) into each Mock / Reporter / Control tube.
Plate into 1 well of a 6 well plate for each Mock / Reporter / Control , dispensing small 15µL droplets using a pipette.
Place plate in incubator at 37°C, 5% CO2 for 0h 10m 0s until the BME droplets solidify.
Add 2mLof transduction media to each well.
Formaldehyde fixation of organoids
Day 6: Fixing and staining organoids for flow cytometry analysis
Prepare Live/Dead stain solution or antibodies.
Aspirate supernatant and resuspend in 500µL of 3.7% formaldehyde. Mix well by pipetting to ensure cells are fixed as single cells.
Incubate at 4°C for 0h 10m 0s.
Centrifuge at 800x g,0h 0m 0s for 0h 2m 0s.
Carefully aspirate supernatant (in chemical fume hood).
Resuspend the pellet in 500µL (dependant on pellet size) PBS or alternative FACs buffer, and store it at 4°C until ready for analysis by flow cytometry.

Aspirate media from wells and resuspend in 1mL of Trypsin-EDTA (0.25%) in a 2 mL tube.
Incubate for 0h 15m 0s, until organoids have broken down to single cells.
Once organoids have broken down to single-cells stop the reaction by adding 1mL (diluting 1:1) in media containing serum.
Centrifuge at 800x g,0h 0m 0s for 0h 2m 0s.
Aspirate supernatant and resuspend pellets in 200µL Live/Dead dye solution (or specific antibody of choice).
For the Live/Dead solution, incubate at room temperature for 0h 5m 0s. (Follow specific guidelines for your antibodies).
Add 1.8mL of PBS (1:10 dilution).
Centrifuge at 800x g,0h 0m 0s for 0h 2m 0s.


