MethodsJ2
Alessandro Rigano, Joel Ryan, Caterina Strambio De Castillia, Thomas Pengo, Paula Montero Llopis, Michelle S. Itano, Lisa A. Cameron, Guillermo Marqués, Mark A. Sanders, Claire M Brown
Disclaimer
DISCLAIMER : As per MethodsJ, this is not meant to be applied blindly, but rather to be used as a starting point. Metadata is recorded by the microscope driving software, so at best it reflects the way the microscope's software was configured. In addition, this script uses the fantastic BioFormats library. It has been designed to extract as much information as possible from the image data, but formats change occasionally so don't be surprised if the text doesn't completely reflect what you expect. If you do find some discrepancy, check with your facility staff (if the microscope is part of an imaging facility) for help on the appropriate wording or to check the configuration, and then with the BioFormats community to see if the metadata was not read correctly. If you believe there is an error in the script (not unlikely), feel free to reach out.
Importantly , please verify the text generation output and the csv file carefully or with someone familiar with the microscope or your experiments, in order to make sure that the information is correct, and that the grammar and syntax are ok, before copy-pasting the text into your manuscript.
Abstract
MethodsJ2
Building on MethodsJ , MethodsJ2 helps users write a materials and methods text for microscopy experiments by sourcing experiment information from metadata, as well as information from a microscope hardware configuration file generated in Micro-Meta App. A draft experiment methods section text is generated which can then be revised and used in written manuscripts and reports, etc.
See our preprint MethodsJ2: A Software Tool to Improve Microscopy Methods Reporting on bioRxiv
Before start
Requirements
This Python/Jython script requires Fiji/ImageJ - a recent or fresh installation of Fiji is recommended, since the script requires that the BioFormats library is installed, and that the OMERO plugins are disabled.
MethodsJ2 version 1.0 available in this repository, tested in Fiji (ImageJ version 1.53c) on macOS Mojave 10.14.6 and macOS Catalina 10.15.7, and in Fiji (ImageJ version 1.53c) on Windows 10 Home. Requires BioFormats. Please note that OMERO plugins must be disabled in Fiji.
As requirements, to use MethodsJ2, users first need a raw image from a microscopy experiment as well as a previously generated in Micro-Meta App microscope hardware specifications file (.json) (see bioRxiv preprint here).
The script runs in Fiji, and an active internet connection is required. A demo microscope hardware specifications file (.json) and image are provided to test the script.
Steps
Instructions with demo image and hardware specifications file
Please install Fiji from fiji.sc following the recommended installation procedure.
Please download the contents of this repository, including the python script MethodsJ2.py file, as well as the example Micro-Meta App hardware specifications file (abif-axiovert1.json), and the example images (BPAE_3color_30p-200ms_63xOil_003_diffExp_Int__.czi).
Drag and drop the python script MethodsJ2_v1_2_.py onto the main Fiji window, this should open a script editor window. Alternatively, click on File > New > Script... to open a script editor window, and then in that script editor, click on File > Open, navigate to the appropriate folder and select MethodsJ2_v1_2_.py
Once the script is loaded, make sure the appropriate language is selected - click on Language, select Python.
Click the "Run" button, and follow the dialog boxes, filling in the information as accurately as possible. More information on each dialog box is given below
When first running the script in Fiji, it may take up to ~30 seconds for the script to launch (before seeing the first dialog box). Running the script is pretty quick, and simply depends on availability of the required information about the image. If all parameters are known by the user, it should take only a couple of minutes to go through the script and generate a draft methods section.
-- Welcome to MethodsJ2
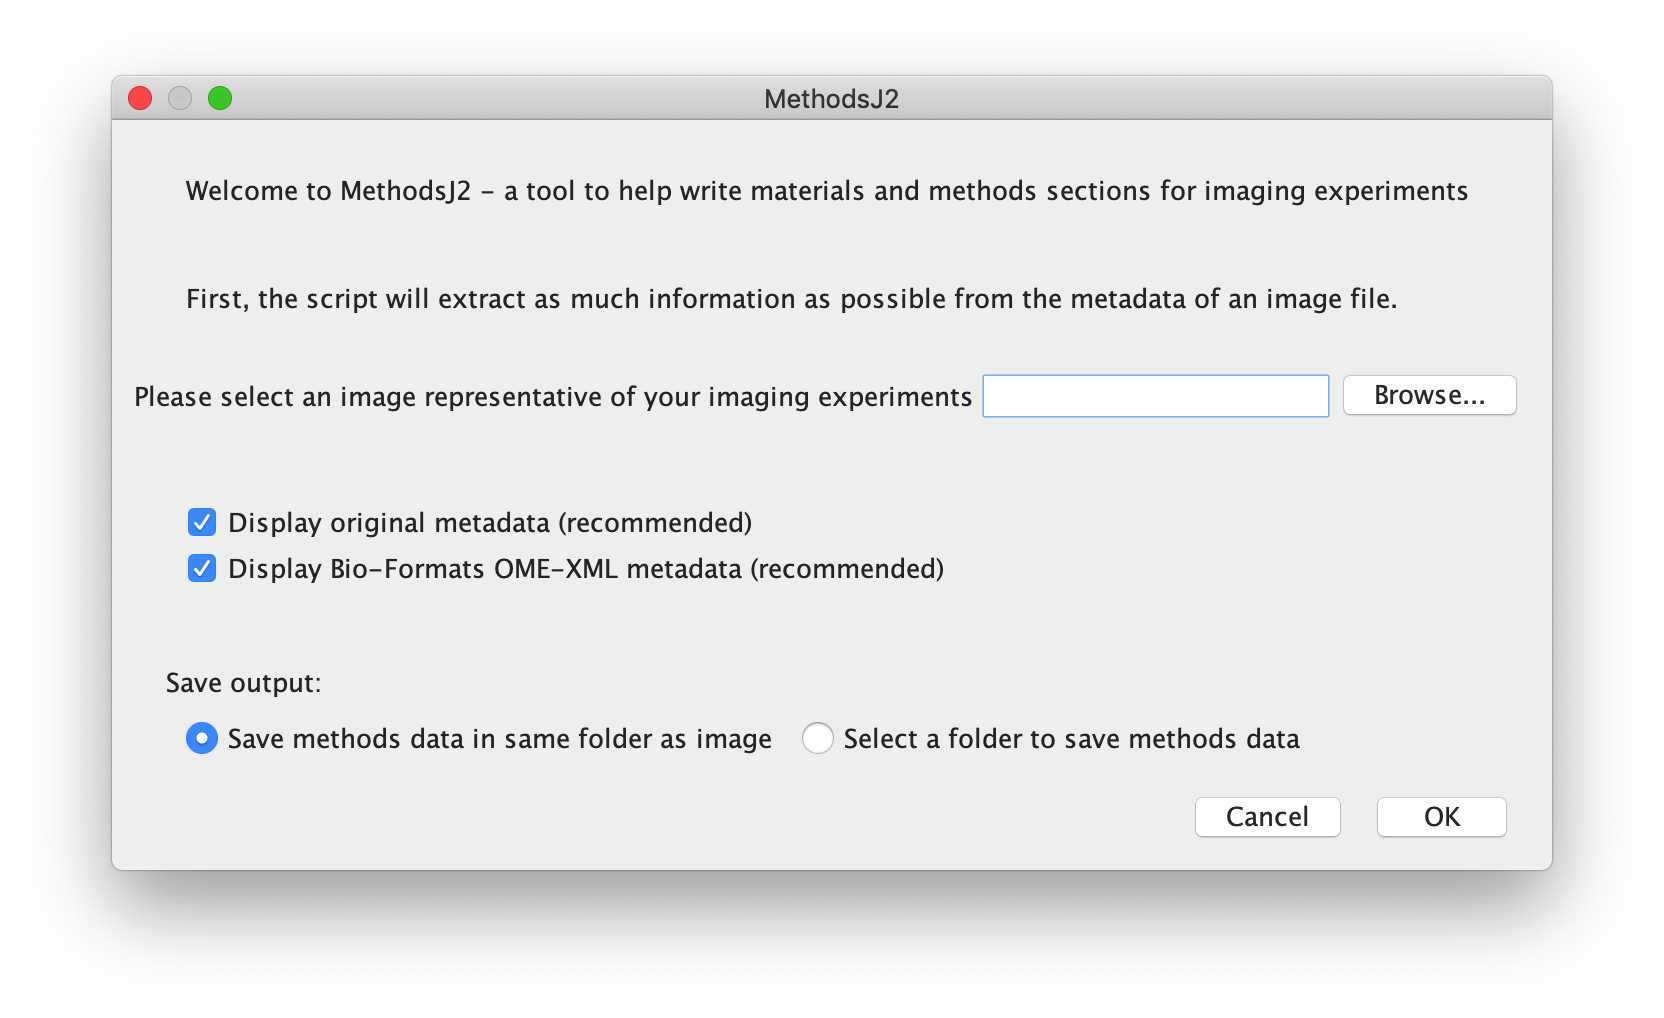
This first window will prompt you for a microscopy image file, in order to extract metadata. You can drag and drop a file into the text input field, or click Browse, navigate to the appropriate folder, and select the appropriate image. We recommend loading the metadata and Bio-Formats metadata (check boxes), which will open metadata files which can help fill in crucial information. ***As a demo, please select 'BPAE_3color_30p-200ms_63xOil_003_diffExp_Int__.czi'
Then, please select where to save the csv output for this run of MethodsJ2. The csv file can be saved in the same folder as the image, or you can choose another folder.
Please note that MethodsJ2 will open the image in Fiji (using Bio-Formats), and so memory limits might apply.
After selecting the file and target folder, the script will try to open the image using Bio-Formats (memory limits might apply).
Error check: If the file is unreadable by Bio-Formats (not an image, etc), it will alert the user and return to the previous window, allowing the user to select a new file.
-- Sample preparation Information

This dialog box asks users to fill out sample preparation information. Given the variety specimens and preparations, this input will not contribute to text generation , but is rather there as a reminder for what information is important when writing a methods section. As per community guidelines, it is important for Materials and Methods to clearly indicate a sample description, sample preparation, mounting medium, coverglass and sample holder.
Since this can easily be redundant, it is up to the user to generate the sample preparation text make sure these elements are covered.
For the demo:
- Sample description: e.g. Cultured BPAE cells
- Sample preparation: grown on No. 1.5 glass coverslips, fixed with 4% PFA and stained with DAPI, Phalloidin Alexa Fluor-488 and MitoTracker Orange
- Mounting medium: mounted in Cytoseal
- Coverglass: (1.5 glass coverslips)
- Sample holder: on glass slides
Another example
- Sample description: e.g. Live CHO-K1 cells expressing GFP-Paxillin
- Sample preparation: grown overnight on Geltrex-coated glass bottom Ibidi u-well slides
- Mounting medium: in DMEM with phenol red supplemented with 10% Fetal Calf Serum, and 1x Pen/Strep
- Coverglass: (1.5 glass bottom ibidi u-well slides)
- Sample holder: (glass bottom ibidi u-well slides)
-- Image Dimensions
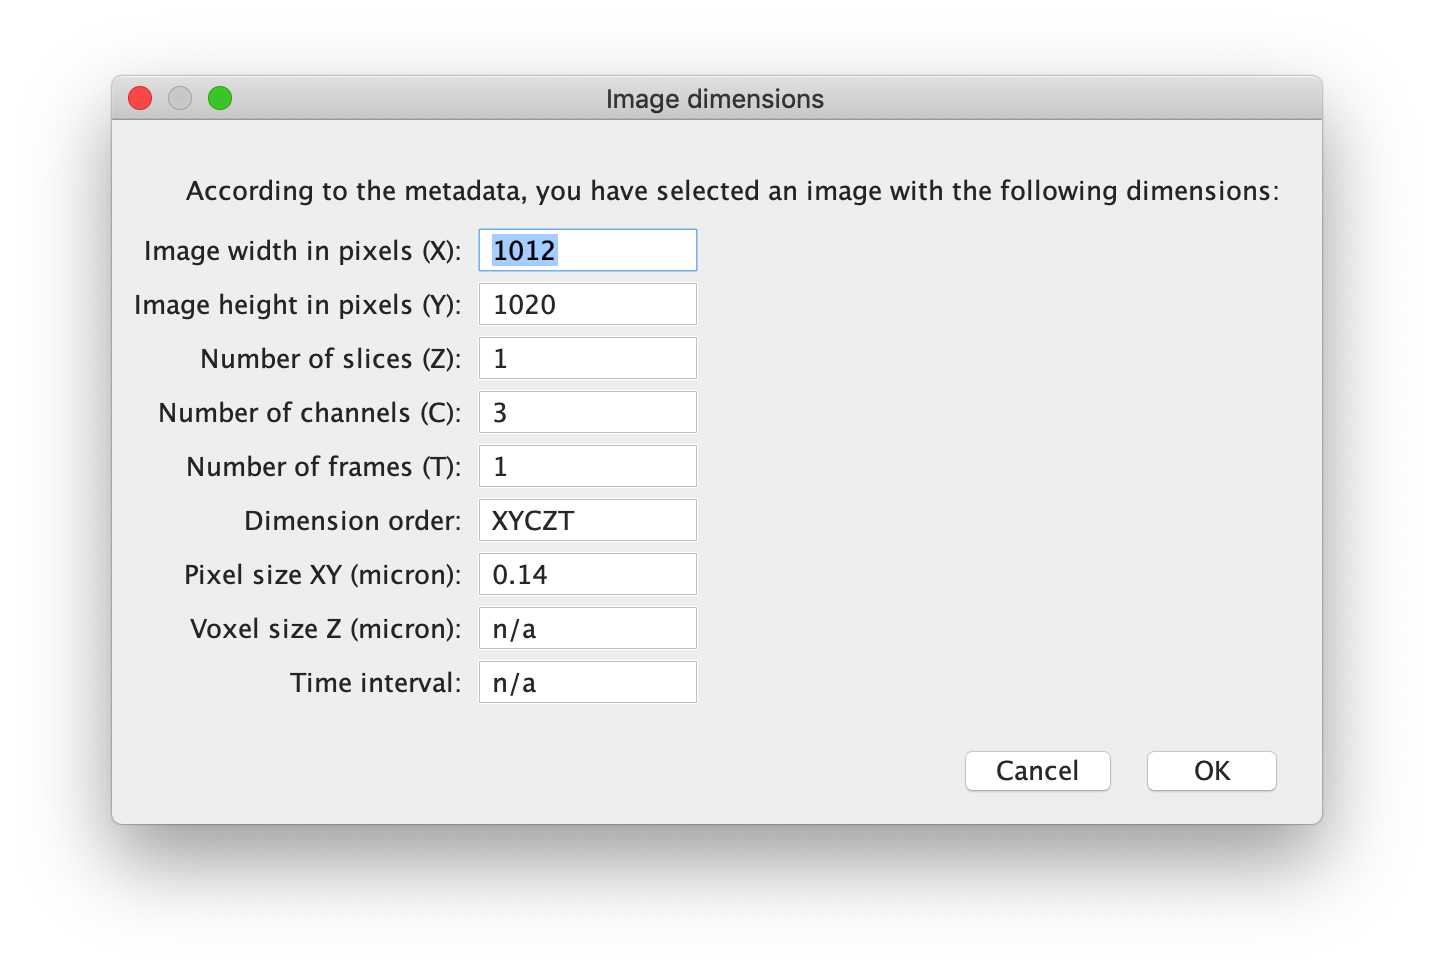
Here, the script gets image dimensions metadata from the previously selected image. If this data appears to be wrong, it is possible that the metadata is not readable by Fiji / BioFormats - in which case, crucial metadata is likely missing, and we recommend paying close attention to the information.
-- Microscope hardware: select the Micro-Meta App Microscope.json file
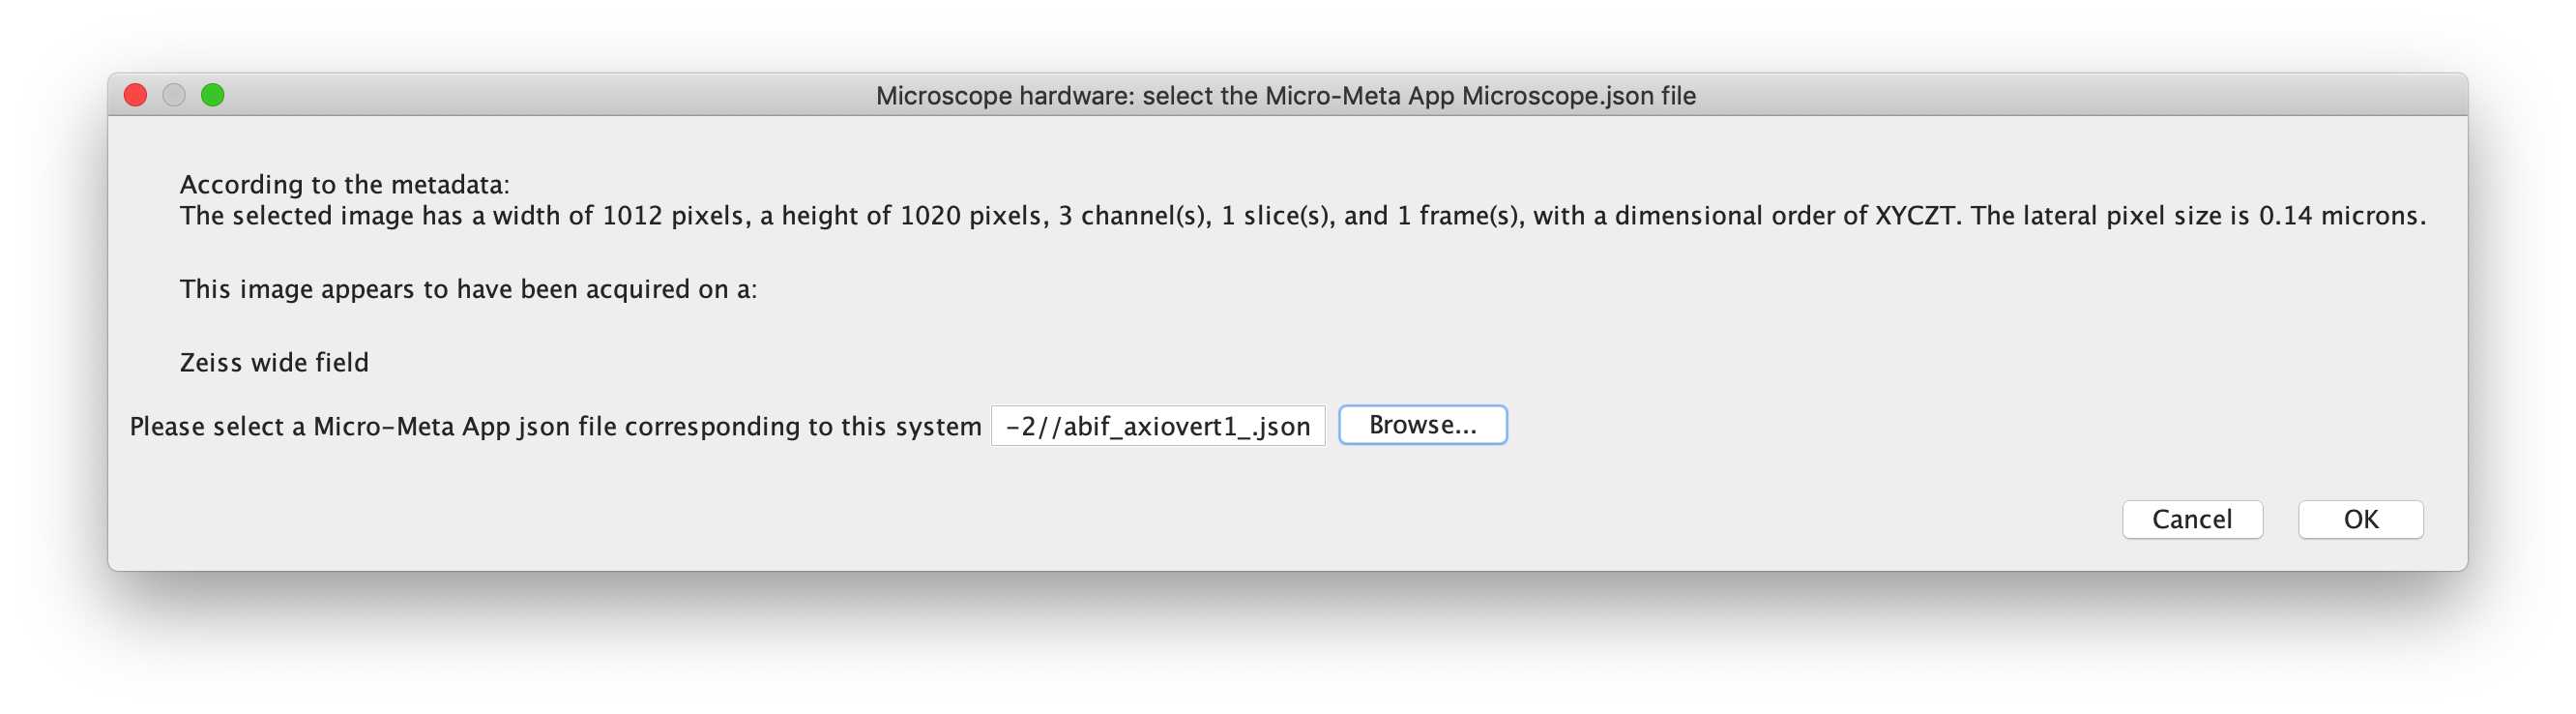
In this dialog box, the script will attempt to describe the system as best as it can based on the metadata. From there, the user is prompted to select a Micro-Meta App hardware specifications file corresponding to the microscope used to acquire the image. This hardware specification file will be used by the script to provide drop-down menus for the user to select which components were used to acquire the image, for example which objective from the list of objectives available on the selected microscope.
Error check : If the selected file is not a .json file generated with Micro-Meta App (by searching for the manufacturer of the microscope stand), the script will alert the user and return to the previous window, to select an appropriate .json file. Additionally, if the manufacturer detected in the image metadata does not match the manufacturer of the microscope stand (in the hardware configuration file), it will alert the user, who can then decide to choose a new file or continue with this file.
For the demo, please select 'abif_axiovert1_.json'
Microscope system overview
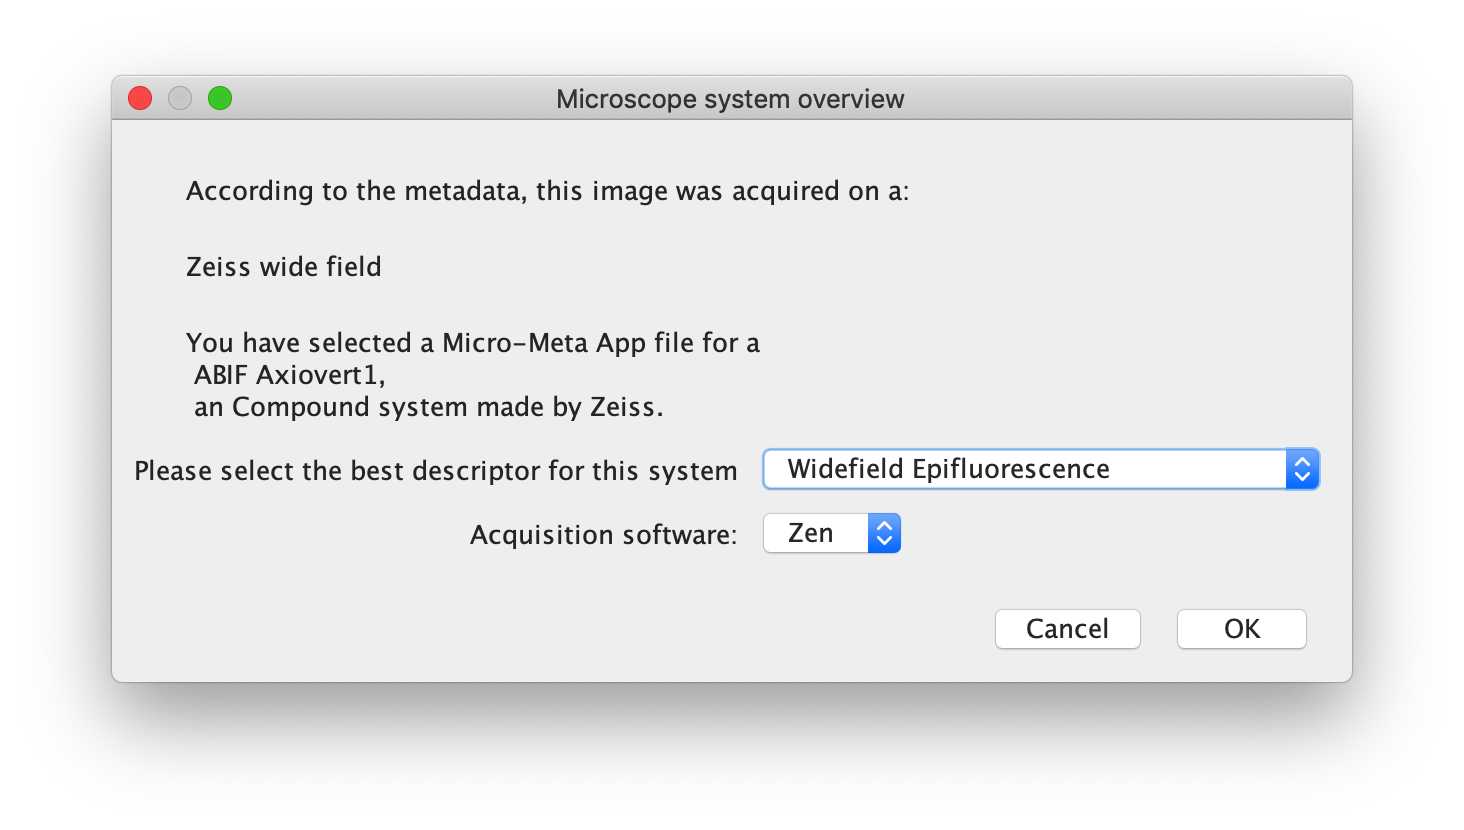
Here, the user is asked to select the best general descriptor for the microscopy system selected, as well as the the acquisition software detected in the hardware specifications file.
For the demo, please select 'Widefield Epifluorescence', and the software 'Zen' should have been detected by the script, sourced from the hardware specifications file.
-- Select objective
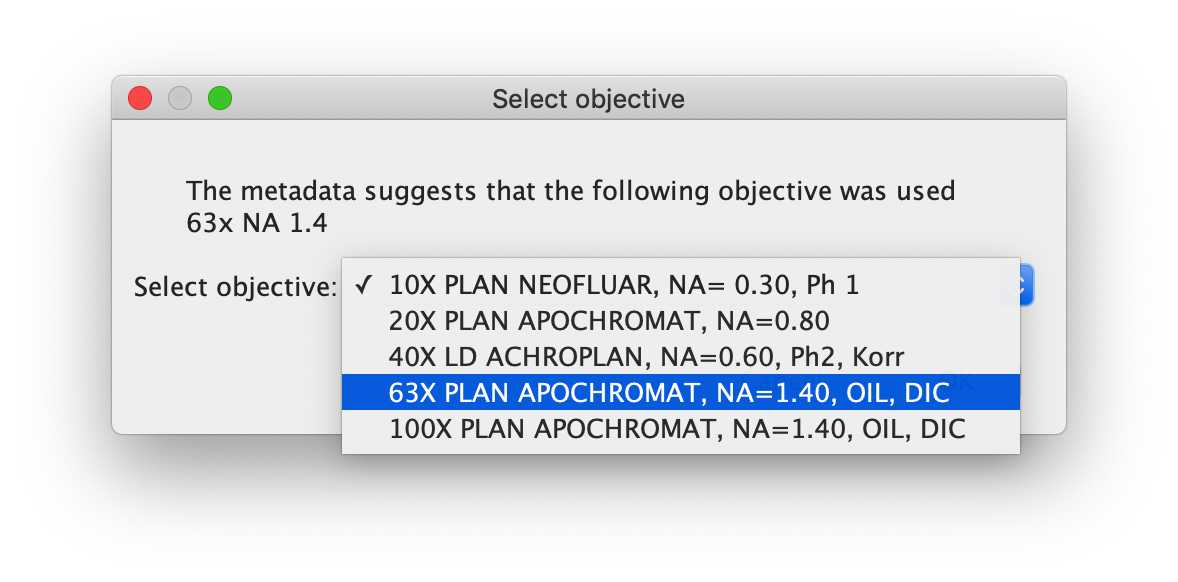
The user is asked to select from a drop-down menu which objective was used. The drop-down menu is populated by the objectives available in the hardware specifications selected for this microscope. By selecting an objective based on its "name", the script will collect important objective information from the hardware specifications file (e.g. Magnification, Numerical Aperture, Correction, Collar, Manufacturer, etc).
For the demo, please select '63X PLAN APOCHROMAT, NA=1.40, OIL, DIC' from the list of objectives available in the system.
-- Channel 1: Excitation, wavelength and detector selection
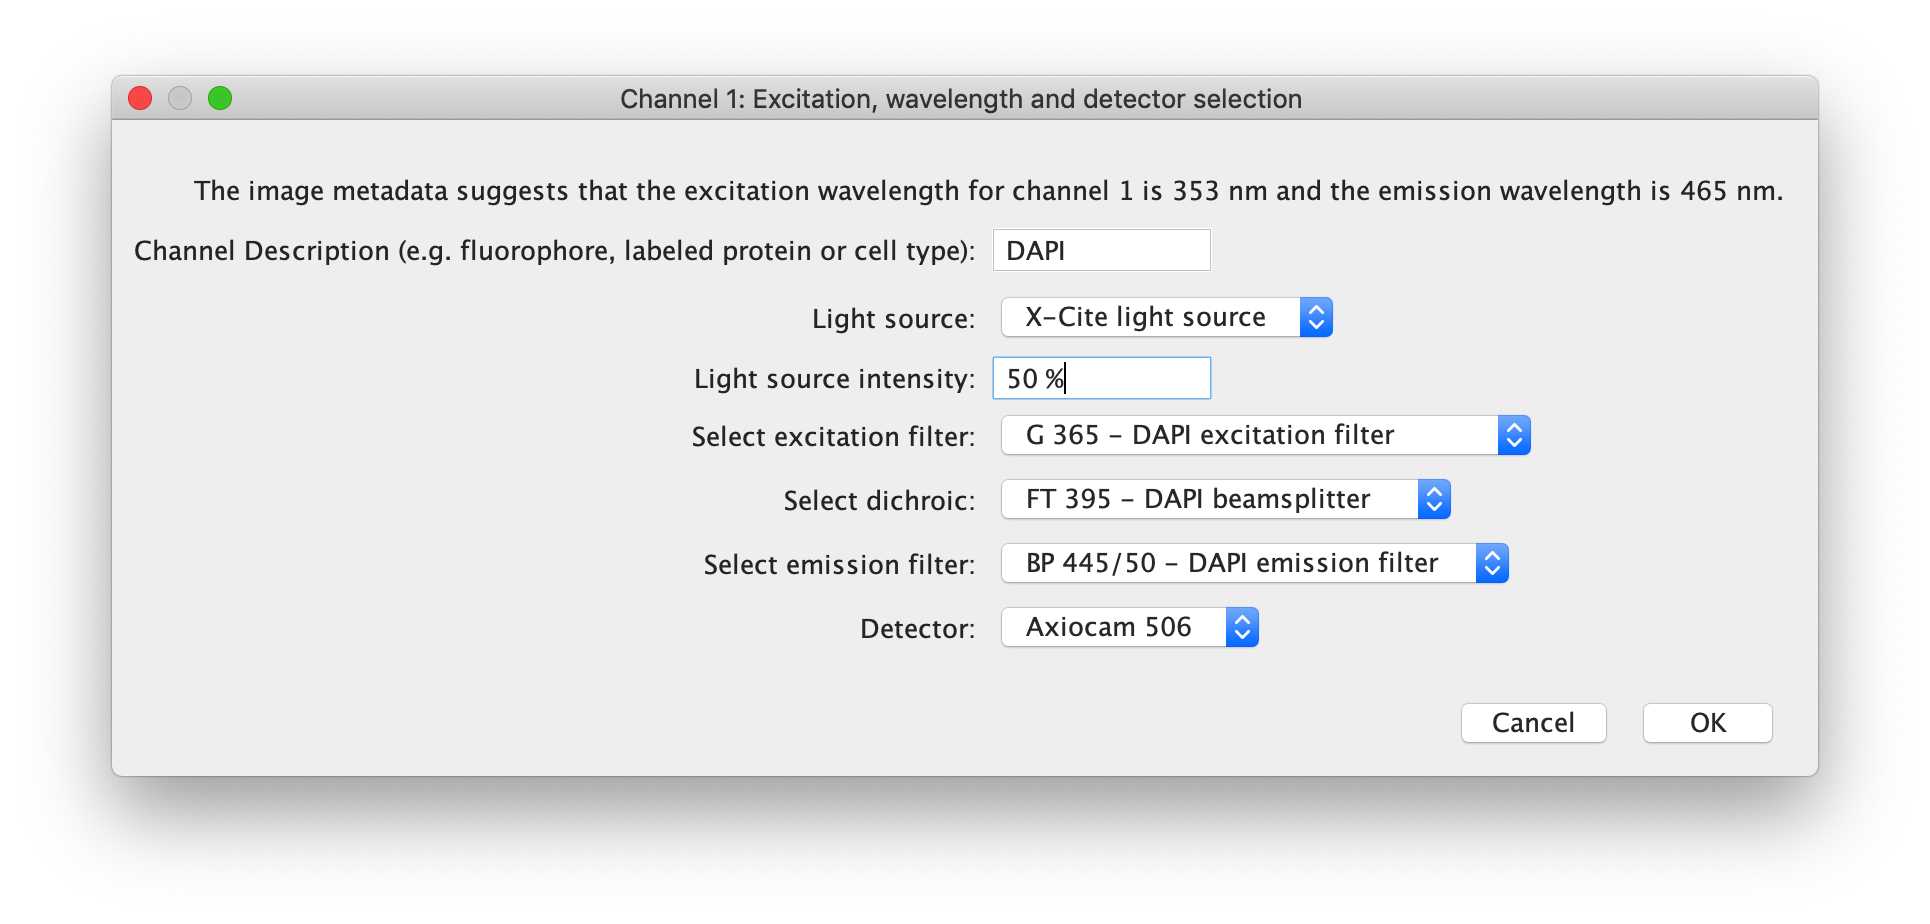
The user will now be prompted to provide information on the acquisition channel(s), for each channel separately, based on the order in which they appear in the image file.
This channel dialog box will ask for a channel description, in which the user should generally input the fluorophore detected in the channel (fluorophore fusion or antibody conjugate is fine). Then, the user can choose the light source, the intensity of the light source, the excitation filter, dichroic mirror, emission filter and the detector used for this channel. These drop-down menus are again populated by information sourced from the hardware specifications file.
For the demo, the first channel can be described as 'DAPI', and the light source intensity used for acquisition of this channel was 50 %.
-- Channel 1: Detector settings
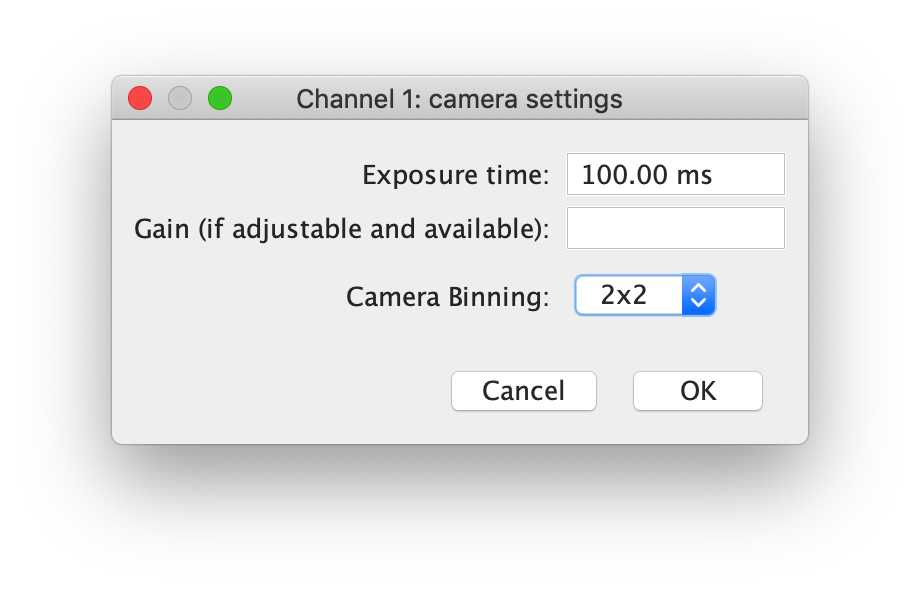
This next dialog box allows users to input the settings on the detector. The dialog box itself and the requested information depends on whether a camera or point detector (PMT, APD, hybrid detector) was selected. For camera settings, the exposure time, gain and binning is requested, whereas for point detectors, dwell-time, and line/frame averaging information in requested.
For the demo, the exposure time should be detected automatically. The gain setting is unavailable, and the Camera Binning should be set to 2x2.
-- Select optional devices:
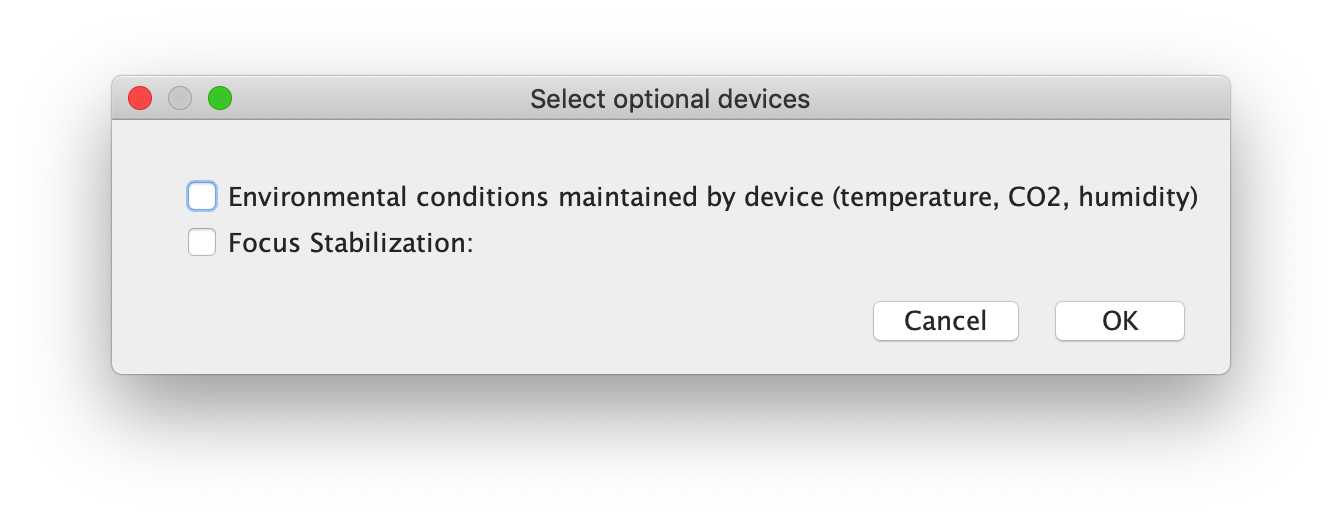
If "optional" devices which are present on the microscopy system, the user will be prompted to select whether these have been used. For example, many systems are equipped with devices to control the environment (temperature, CO2, humidity, etc), however not all users will use these devices during their acquisition. Here, the users can select whether they used these systems for this experiment, and further information will be requested if needed.
For the demo, neither there was no environmental conditioning or focus stabilization used for the acquisition.
-- Acknowledgements
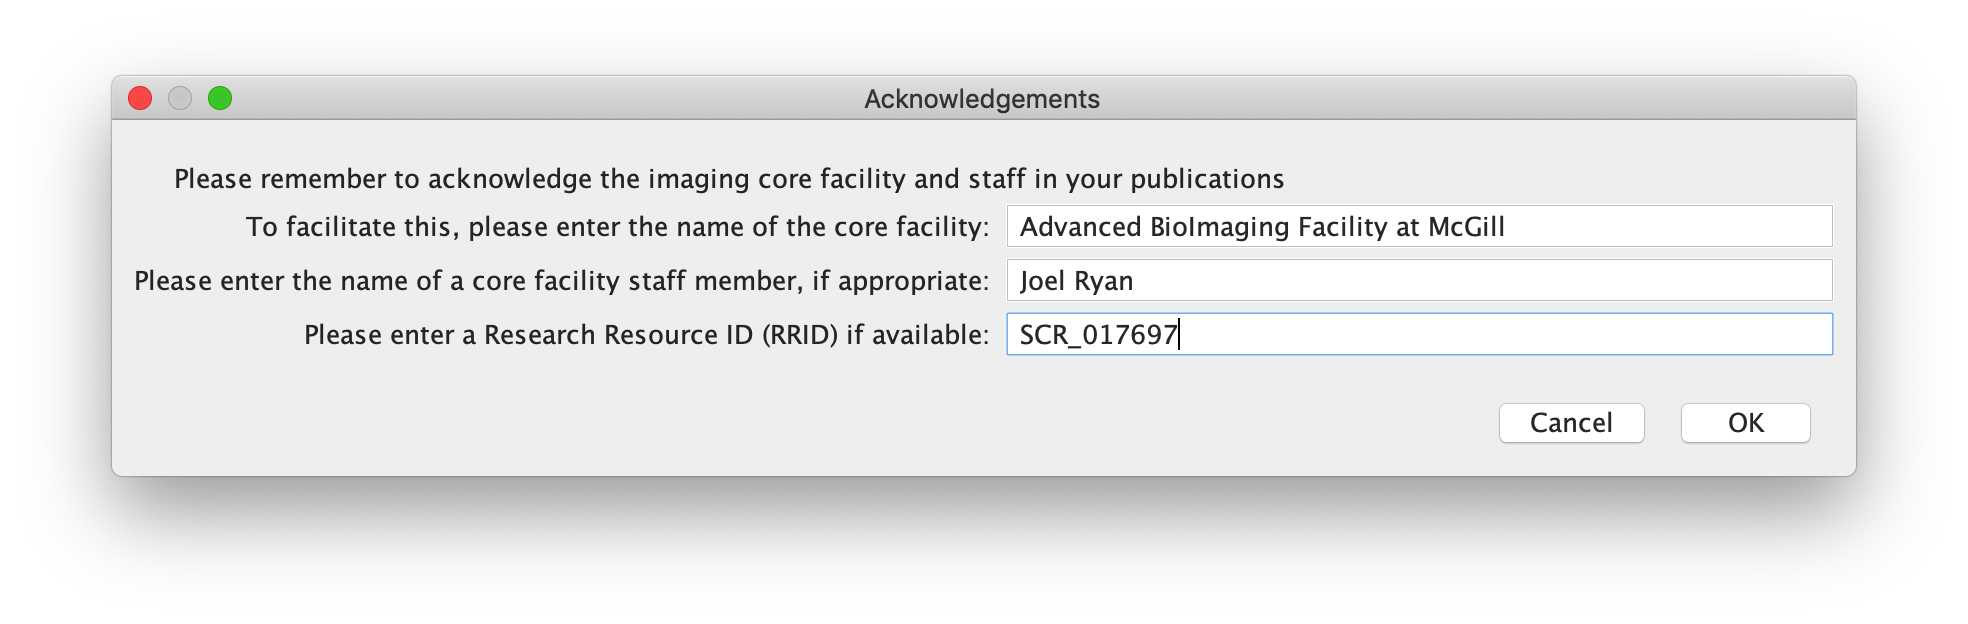
For core facilities, citations and acknowledgements are extremely to show progress, impact on research, and help enormously in securing funding. It is crucial for core facilities and imaging scientists to be acknowledged on manuscripts where their systems have been used. To this end, this final dialog box asks the user to input the name of the core facility, any staff member who contributed to training and support for the microscopy experiments, and a Research Resource ID (if applicable). These inputs will be used for text generation of a draft acknowledgement sentence, which can be revised and added to a manuscript.
-- Output
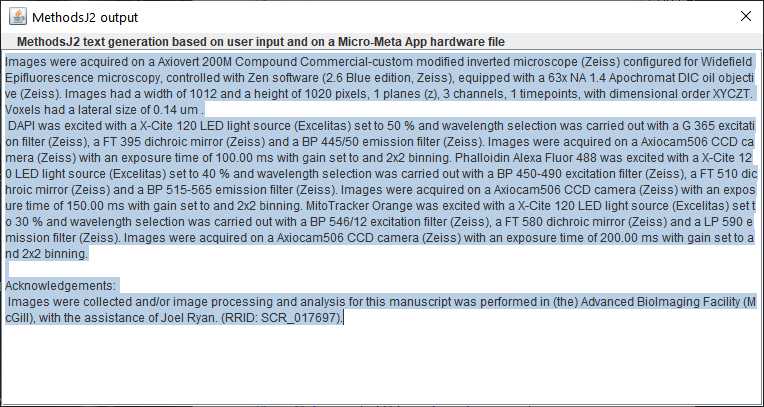
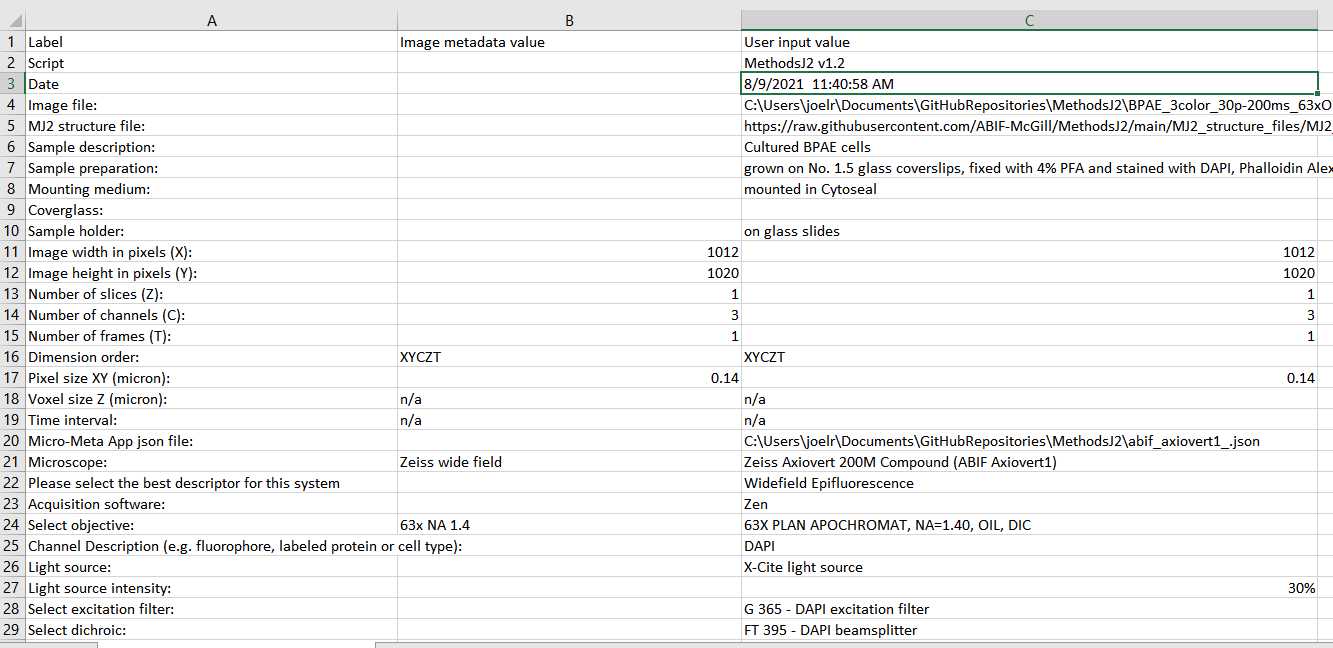
The output will appear in a popup window, already selected and copied to the clipboard. More information about the instance of the MethodsJ2 run is available in the ImageJ Log Window, as well as in the script editor console window (e.g. user selections, image file, microscope file, structure file, and output based only on metadata, as per MethodsJ)
-- csv file
A csv file is generated containing all the information detected from the image metadata and all the user input information (both manually entered and selected from the Micro-Meta App configuration file). The csv is saved either in the same folder as the image file, or in a folder selected by the user (in the first welcome dialog box). This csv file can be used to check for accuracy of the user-input information (compared to the metadata), and is the record for this particular run of MethodsJ2.
In many cases, information is input differently in the image metadata compared to how it is stored in Micro-Meta App (and OMERO). For example, information about the objective might be stored in the image metadata as "PlanApo 100x NA 1.4 (Zeiss)" or "Zeiss 100X Plan-Apo 1.4 N.A." or other permutations of the same information, depending on who set up the microscope. This makes text/string matching difficult. Thus, in the csv file, the user can directly compare and judge for themselves whether the information is accurate, by directly comparing the image metadata information with the user selection.
As an example, rows 21 and 24 ('Microscope' and 'Select Objective') in the following screenshot are examples of information which coincide accurately, but do not have matching text.