High Molecular Weight DNA extraction for long-read sequencing v.1
Kanae Nishii, Michael Möller, Michelle Hart
Abstract
Third generation long-read sequencing requires high quality DNA. Here, we developed a protocol for the extraction of high quality, high molecular weight(HMW) DNA from plants. This protocol was developed and optimized forStreptocarpus, a plant possessing high amounts of secondary metabolic compounds, such as polysaccharides. The extracted DNA was used for PacBio Sequel II continuous long reads (CLR) and Oxford Nanopore Technologies PromethION sequencing with the resulting reads averaging > 25,000 base-pairs.
References
Nishii K, Möller M, Hart M (2019) DNA extraction protocol for long read sequencing; DNA extraction for state-of-the-art sequencing. Botanic Stories: 30792. https://stories.rbge.org.uk/archives/30792
Gunter L (2015) Populus nuclear DNA purification using the QIAGEN Genomic-tip 100/G.
Populus+nuclear+DNA+purification+with+Qiagen+Genomic-tip+100 (netdna-cdn.com)
PacBio Sample Net (2015) Preparing Arabidopsis genomic DNA for size-selected ~20 kb SMRTbell™ Libraries. Access year: 2018. https://www/pacb.com/wp-content/uploads/2015/09/Shared-Protocol-Preparing-Arabidopsis-DNA-for-20-kb-SMRTbell-Libraries.pdf
Souza HA, Muller LA, Brandao RL, Lovato MB (2012) Isolation of high quality and polysaccharide-free DNA from leaves of Dimorphandra mollis (Leguminosae), a tree from the Brazilian Cerrado. Genet Mol Res 11: 756-764
Before start
Prepare Nuclei isolation buffer base solution and Sorbitol buffer base solution.
Cultivating fresh plant material > 100 g is recommended.
Steps
Before starting
Prepare 200 ml Nuclei isolation buffer (NIB) and leave on ice.
On ice
Prepare 20 ml NIB base-Triton mix and leave on ice.
On ice
Prepare 60 ml Sorbitol buffer.
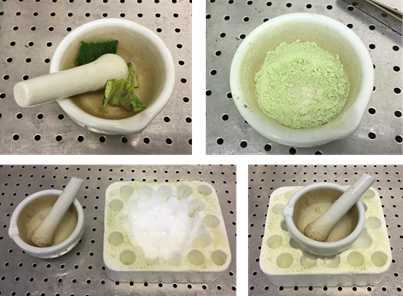
Prepare liquid nitrogen in a suitable dewar. Place mortar and pestle in fume hood.
Prepare six 50 ml Falcon tubes on ice and place 100 μm gauge cell strainers (Nylon Meshes) on top.
On ice
Prepare the other set of six 50 ml Falcon tube layered with 40 μm gauge cell strainers, leave on ice.
On ice
Tissue grinding
Pre-cool the pestle and mortar with liquid nitrogen.
Cut 1-2g of fresh leaf tissue from living plants and place in liquid nitrogen to shock-freeze.
Add frozen tissue to pre-cooled mortar held in a Styrofoam mortar holder.
Add some liquid nitrogen and grind carefully with pestle as the liquid nitrogen evaporates.
Once the liquid nitrogen has evaporated, grind more vigorously for 30 seconds, until the material is a fine powder.
Do not allow the tissue powder to thaw.
Repeat the above steps 7 to 12 until all the leaf tissue is ground. The suspension should be smooth with no clumps of leaf material.
Pre-treatment
Filtering to remove particulate material. Proceed steps on ice.
On ice
Filter the NIB/sample suspension through 100 μm nylon mesh filter by gravity (see step 5). Do not force the sample through the filter. Replace filters when it is clogged.
On ice
Filter the 100 μm mesh filtrate through the 40 μm nylon mesh (see step 6). Replace filters when it is clogged.
On ice
Divide the filtrate of step 14.2 equally into six Falcon tubes, with 40– 50 ml in each.
On ice
Add 1/20th volume of NIB base-Triton mix, close the tubes with lids and mix the solution by gently swirling and inverting the tubes.
Centrifuge at 2,000 × g for 10 minutes, if possible at 4 °C.
2000x g
Carefully discard supernatant without dislodging the pellet.
Add 10 ml Sorbitol buffer to the pellet in each tube and swirl the tubes to mix well.
Discard supernatant leaving the pellet undisturbed. Invert the tubes on tissue to remove traces of buffer without losing the pellet.
Cell Lysis
Set water bath to 50 °C.
50°C
Add 5 ml of QIAGEN Buffer G2 to each 50 ml Falcon tube containing the nuclei/ cells and gently resuspend the pellet.
Add 0.1% β-mercaptoethanol (5 μl) and a pinch of PVPP to the tube.
Swirl the tube to mix well.
Incubate the tubes at 50 °C for 5 minutes.
50°C
Add 10 μl RNase A or 50 μl RNase A/T1 Mix to the tube.
Gently swirl the tubes to mix.
Incubate the tubes at 50 °C for 5 minutes for RNase A, or 30 minutes for RNase A/T1 Mix.
50°C
Add 100 µl QIAGEN Proteinase K to the tube.
Swirl the tubes to mix well.
Incubate the tubes at 50 °C in the water bath, for > 5 hours or overnight.
50°C
Genomic-tip
Set up for QIAGEN Genomic-tip 100/G.
Set up Genomic-tip kit: Label 5 × 50 ml Falcon tubes without lids as follows: 1. QBT, 2. Sample, 3. QC 1, 4. QC 2,
5. Final sample.
Pre-heat Buffer QF to 50 °C in the water bath.
50°C
To obtain the clear lysate, centrifuge the 50 ml Falcon tubes containing nuclei and cell lysate from step 28 at 3,000 × g for 10 minutes.
3000x g
Equilibrating a Genomic-tip 100/G column.
Add 4 ml Buffer QBT to the column.
Allow the column to empty by gravity flow, do not force the remaining buffer through.
Move the column to the ' 2. Sample’ tube and apply 5 ml of the clear lysate (supernatant obtained at step 30) to the equilibrated Genomic-tip.
Allow the column to empty by gravity flow.
Wash Genomic-tip 100/G columns with Buffer QC .
Move the column to the ‘ 3. QC 1’ tube and add 7.5 ml of Buffer QC.
Allow Buffer QC to move through the column by gravity flow.
Move the column to the ‘ 4. QC 2’ tube and add 7.5 ml Buffer QC.
Allow Buffer QC to move through the column by gravity flow.
Eluting the genomic DNA from the Genomic-tip 100/G column.
Move the column to the ‘ 5. Final Sample’ tube and add 5 ml of Buffer QF pre-warmed to 50 °C.
Allow Buffer QF to flow through the column by gravity.
Store the eluted DNA sample on ice.
DNA precipitation & elution
Transfer the DNA sample obtained at step 34 to a 2 ml Eppendorf tube.
Add 1 ml sample per tube (totaling 30 tubes from 30 ml elution buffer [5 ml Buffer QF × 6 tubes] at the step 34 in our example).
Add 700 μl of ice-cold isopropanol to each tube and gently invert the tubes to mix.
Leave samples at −20 °C for > 2 hours or overnight.
-20°C
Centrifuge tubes at 11,000 rpm for 10 minutes.
11000rpm
Discard the supernatant.
Add 400 µl ice cold 70% ethanol to the tubes.
Centrifuge the tubes at 11,000 rpm for 10 minutes.
11000rpm
Discard the supernatant by tipping the tube, with the pellet on the upper side, over a clean glass beaker or a Falcon tube.
Invert tubes on tissue to remove residual ethanol.
Air dry pellet for approximately 10 – 20 minutes to remove all trace of ethanol.
Add 50 μl TE buffer (or any desired buffer for the downstream application) to the each tube.
Leave at 50 °C for 1 hour.
50°C
Collect the DNA in two 2ml tubes; i.e., from the 30 tubes with 50 μl DNA sample in each (see step 44), 1.5 ml of DNA sample is obtained, and thus add 750 μl of DNA sample to each tube.
2nd Precipitation to concentrate DNA:
Add 1/10th volume (75 μl) of 3 M NaOAc and an equal volume (825 μl)of ice-cold isopropanol to each tube.
Leave the tubes at −20 °C, for more than 1 hour to overnight.
-20°C
Centrifuge the tubes at 11,000 rpm for 10 minutes.
11000rpm
Discard the supernatant and Invert tubes on tissue to remove residual ethanol.
Air-dry pellet for 10 – 20 minutes. Do not overdry the DNA samples.
Elute the DNA pellet in an appropriate volume of elution buffer depending on the downstream application.
Leave the tubes at 50 °C, 300 rpm in a ThermoMixer for 1 hour.
50°C
Quality Control
Assessing DNA integrity: Perform quality checks for DNA integrity by 0.8% agarose gel electrophoresis or Agilent Technologies TapeStation Genomic DNA ScreenTape.
Assessing DNA quality: Perform a DNA quality assessment for OD values with a spectrophotometer such as NanoDrop or DeNovix.
Assessing DNA quantity: For NGS applications, DNA quantity must be assessed using a fluorometer such as the Qubit or DeNovix.


