Handling and Sampling Herpetofauna - ISL Peru
Gideon Erkenswick, Mrinalini Watsa, Zane Libke, Timothy Paine
Disclaimer
This protocol is actively used by Field Projects International at the Estación Biológico Los Amigos, Madre de Dios, Peru. It is revised annually to reflect improved capture, handling, marking, and sampling methodology. It has been reviewed by the ethics committees of multiple institutions. No author nor affiliated institution takes responsibility or bears any liability for the use of this protocol by others. The protocol is listed as having sensitive content since it involves biosampling from wildlife. Note: these procedures should be carried out only by trained personnel, and are not recommended for use without first obtaining all required permissions.
Abstract
This protocol contains information on the safe capture and handling of a wide range of herpetofauna in general. It's focus however is on the Neotropics, and specifically it has been applied in the lowland rainforests of Peru. Please note specific information on species, weather and habitat might be biased towards this demographic.
Program Timing:
Sample collection occurs annually during the rainforest dry season (June - August), in conjunction with other field research activities.
Program Overview:
Researchers conduct visual-encounter surveys in search of herpetofauna. This protocol is designed as a minimally invasive way to obtain species observation and genetic samples from a broad variety of species. Surveys generally take place after dusk and before dawn when most amphibians and reptiles are active.
Team Composition:
This protocol may be carried out be variable numbers of participants, typically more participants means more encounters. At least one pre-designated leader with training in handling amphibians and reptiles is required. Others may assist in capture and handling under supervision and when it is deemed safe.
Capture Overview:
When an individual is encountered, a basic register is made (coordinates, photo, identification, activity), which contributes to basic abundance, richness, and diversity comparisons. Depending on the goal of the study, the animal can be captured for more detailed photos and the collection of associated samples, including but not limited to: biopsies (genomic DNA), skin swabs (disease screening), buccal swabs (genomic DNA & disease screening), and fecal residues (genomic DNA, microbiota, disease screening, diet analysis).
Before start
Choose appropriate survey sites for the habitat and research/conservation goals.
Steps
ROLES
TEAM COMPOSITION
This protocol may be carried out be variable numbers of participants, and typically more participants means more encounters/discoveries during the survey. At least one pre-designated leader with training in handling amphibians and reptiles is required for every group. Thus, if a larger team of 8 people will be divided into two teams of 4, two leaders are needed. Any participant may assist in capture and handling (under supervision) when it is deemed safe by the leader.
During animal PROCESSING it is recommended to have:
- a trained PHOTOGRAPHER
- an EXPERIENCED HANDLER
- and a DATA RECORDER
VISUAL SURVEY
Before sampling begins, research coordinators designate transects. Distances can vary, but to allow for comparisons between different habitat types all transects should be the same distance and receive the same amount of sampling effort (measured as researchers * time, Eg. 4 researchers conducting 2 hours of sampling = 8 hours sampling effort).
Researchers walk at a pace of 200m/hour, single file, typically at night, maintaining at least 5 meters of distance from the researcher in front of them (important to avoid interference from other researcher’s headlamps).
When an animal is encountered
- Attempt an in-situ photo before disturbing it;
2. Record coordinates, activity & time (see Encounter Form in attachments);
3. Identify species (see local & regional guides, or iNaturalist);
4. If deemed necessary, capture the animal for sample processing;
ANIMAL CAPTURE
- Refer to taxa specific instructions below
- Record bag # for the captured specimen in the Encounter Form
- Store individuals in designated specimen backpack for transport back to the station or tent.
- Animals should NOT be maintained for more than 48 hours from the time of capture to release, and ideally only for 24h at the most.
Frogs & salamanders : with a new pair of nitrile gloves, gently cup the individual in hand, and quickly place in a plastic bag to minimize handling time.
Lizards: smaller lizards can be captured using the same cupping method used for amphibians. Medium & large sized lizards should be captured by grasping firmly by the back of the neck, maintaining control over the mouth, and releasing feet from substrate with the other hand. Most lizards, except geckos, should be transported in cloth bags.
Snakes: Snakes should only be captured by trained & experienced researchers who can positively ID the snake. Many nonvenomous snakes are extremely docile and can be captured by simply picking them up and allowing them to crawl among your hands like a branch. More aggressive individuals can be restrained by VERY GENTLY grasping at the back of the neck/head (this should only be performed by trained individuals – snakes have delicate, easy to break skulls and vertebrae). Venomous snakes should only be manipulated with snake hooks and by trained researchers.
Caecilians: Morphological nature and ability to slough skin can make them difficult to grasp. If unable to pick the individual up, attempt placing the bag in front of its path and allow it to slither into the bag.
PROCESSING
RECORDING DATA
We recommend recording data in the Processing Form (see attached: HerpForm_processing_hardcopy.pdf ). Once completed, we provide an example file that can be used to set up a data collection system online using systems based on ODK (https://getodk.org/).
Start a VOICE RECORDER just before processing any animals. Say aloud: (1) the full date and time; (2) the animal numbers that will be processed; (3) the team members participating.
Leave it running close to the animal processing area. This serves as a backup should any data be missed or incorrectly recorded during processing. Should the data recorder need to stop to assist in processing, there will always be a recorded backup of the proceedings.
Weigh the first animal in its bag.
Remove the animal from the bag then:
- weigh the empty bag;
- collect any feces found in bag
MEAUREMENTS
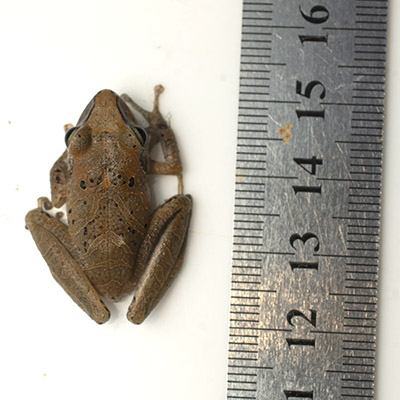
Measure SVL (Snout-to-Vent Length) with calipers, making sure that the animal is as straight as possible for accurate measurements.
SAMPLING
PREPARING THE AREA FOR SAMPLING
First, lay out all tools and supplies in advance of processing to be fully prepared. Arrange the area similar to the way items are arranged in the image below.
To minimize the risk of infection to the animals, all tools (eg. surgical scissors, scapels) should be be wiped clean before and after use with a Kim wipe (to clear off any macroscopic debris).
Then they should be sterilized with a quadruple wash system - submersion in 10% bleach for 3 minutes, rinse in distilled water x 2, and a rinse in 70% ethanol.
Finally air dry or manually dry them with a clean Kim wipe or paper towel. Ensure that tools are completely dry before sampling to avoid exposure of amphibian skin to ethanol.
TAIL BIOPSY (CAUDATES, CAECILIANS, SQUAMATES)
Reptiles should be lightly rinsed with clean water to remove debris before cutting their distal tail tip (<=3mm). Specifically:
- One researcher should restrain the animal with one hand gently clasped around the neck and the other supporting the lower half of the body and tail ->
- Another researcher should sustain the very tip of the tail with tweezers->
- Quickly and decisively cut the tail tip and place in a tube with lysis buffer with the help of tweezers ->
- A few drops of blood can be collected in a tube with lysis buffer.

TOE BIOPSY (ANURANS)
To limit impacts on animals, 1-2 toes are clipped per individual, avoiding functionally important toes: proximal toes (front feet), fourth toes (hind feet) (Grafe et al. 2011).
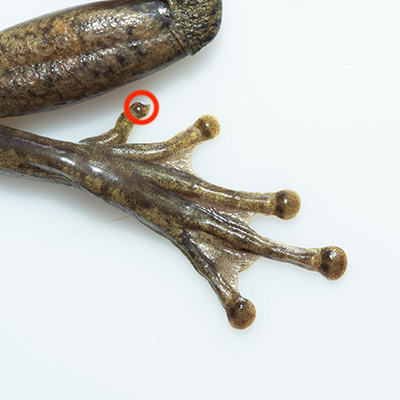
Amphibians should be lightly rinsed with clean water to remove debris before cutting their first phalanx. Specifically:
- Pick up the animal ->
- Restrain the animal in non-dominant hand, using the thumb to subject its ventral side and flip it on its back ->
- With your dominant hand, arrange the back leg (left or right) so that it can be grasped firmly by the thumb and forefinger, allowing the body of the frog to be sustained by the rest of the hand ->
- Fan out the fingers of the back foot->
- Position scissors just past the toe pad of designated finger and cut quickly and decisively ->
- With the help of tweezers, place the biopsy in a tube with lysis buffer.
.")


SCALE BIOPSY (SQUAMATES)
One researcher should restrain the animal with one hand gently clasped around the neck and the other supporting the lower half of the body and tail.
Flip the mid-section of the snake upside down to expose the large ventral scutes.
Another researcher should cut along the edge of the ventral scale, while another assistant sustains the cut scale with tweezers. Note: all materials should be sterile, as indicated above.
Three 1-2mm wide scale clips should be collected in this manner – store one in a tube with lysis buffer for genomic DNA, and store the other two dry in a 1.5mL tube for mercury analysis. (Note: mercury analysis is relevant to southeastern Peru, but other toxicology could be done on these types of samples elsewhere as well).

SKIN SWAB
(EXCERPT FROM SDZ ICR): Using a single swab, gently swab the ventral surfaces of the skin approximately 15-20 times. Target areas to include the pelvic patch (5 passes with the swab), ventral thighs (5 passes each side with the swab) and toe webbing (5 passes on each foot). It is not necessary to swab the dorsal skin surfaces.

https://science.sandiegozoo.org/sites/default/files/Chytrid%20guidelines%202019.pdf
FECES
Collect feces expelled by the animal during or before processing with a sterile swab, and place into tubes with lysis buffer. Note collection surface and potential sources of contamination (e.g. bag, sampling table)
ECTOPARASITES
Visually inspect the exterior of the animal and look/feel for bumps underneath scales. Carefully remove ectoparasites with sterile tweezers and place in a tube with > 70% ethanol.
 on the body of a Corallus hortulanus snake. Courtesy of Jorge Luis Mendoza Silva.")
BLOOD DRAW (REPTILES)
One researcher should place the animal in dorsal recumbency (i.e. on it's back).
Once animals are restrained, the area is sterilized with a prep pad and blood is collected with a sterile syringe at 45 degree angle and needle by blood draw or venipuncture of the caudal tail vein (snakes and lizards), ventral tail vein (turtle), brachial plexus (tortoise). Care should be taken to insert the needle between the scales as opposed to through.
Once the desired volume of blood is reached:
- gently retract the needle and apply pressure to the puncture site.
- Place 1 drop of blood on a 2 sterile microscope slides and perform a blood smear.
- If desired, perform a keto mojo glucose or ketone test immediately.
- The rest of the blood can be stored whole (freeze immediately), or diluted in lysis buffer.

PHOTOGRAPHS
Take images of the animal after sample collection to avoid potential sample contamination.
RETURN TO BAG
When PROCESSING is complete the animal is gently returned to the bag in which it was collected and placed in a dark, quiet location with minimal stimulus.
CLEANING
Clean the surfaces that have been in contact with the animal or its secretions by:
- Spraying and wiping with 10% bleach and then 70% alcohol;
- Disinfect all tools used during the processing with the sterilization solutions procedure: submerged in 10% bleach for 3 minutes -> 1st rinse in distilled water -> 2nd rinse in distilled water -> submerge in 70% ethanol
- Dry all tools and surfaces with clean paper towels
Repeat PROCESSING for each animal, unless instructed otherwise by the PI or team leader.
END SESSION
WRAP-UP
Once all animals have been placed back into their bags and carefully set aside for release the team should:
- End the VOICE RECORDER after stating the following: full date, location, number of animals processed, names of each team member.
- Clean materials used for processing
SAMPLE SORTING
Organize all samples according to the sample storage protocol.
Unless otherwise indicated by the PI, all other samples should be stored in the freezer until sample intake procedure the next day. NOTE, serum samples must be spun and extracted to a serum storage tube the same night and stored frozen.
Retrieve the recording from the voice recorder. Name the file using the following convention "YYYY-MM-DD_HERPsession
Check information on the PROCESSING SHEET, and listen to the VOICE RECORDER to fill in missing information with a differently colored ink pen (usually red).
Gather pictures and videos from and sort them into designated folders on the project hard drive
Scan the hard copy data and convert them into PDF files.
Group all the files from step 19 into a unique folder named by the date and range of capture numbers used [yyyy-mm-dd_herps##-##]
Upload data into an electronic database from the Processing and Encounter Sheets. If you are using an ODK-friendly system, please see the attached ODK file for import to automatically create an editable form per animal.
Check that the laboratory team has all information they need for long-term sample storage
Re-supply and pack materials for the next capture session
RELEASE
Animals in holding bags or containers should be checked on every 6 hours, approximately. Release in < 48 hrs (sooner the better) at the site of capture for each animal.
