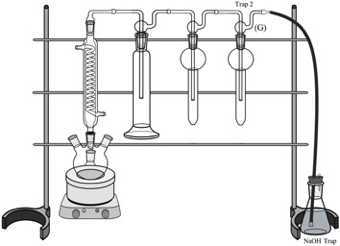
Distillation of total reduced inorganic sulfur from marine sediments
Sebastian Rubiano-Rincon, Patrick D Larkin
Abstract
This procedure can be used to precipitate H2S as Ag2S from the Total Reduced Inorganic Sulfur (TRIS) fraction of marine sediments.
Steps
Distillation Apparatus Set-Up
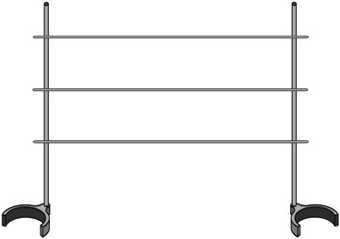
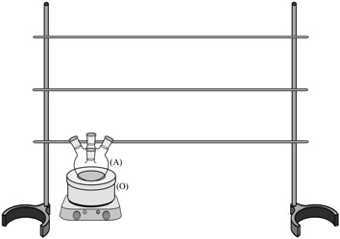
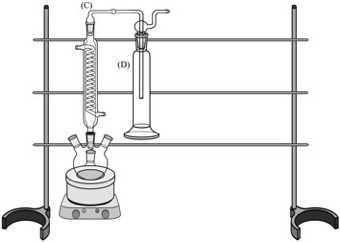
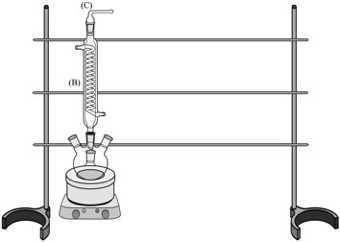
Insert a Coiled Condenser (B) into the top-middle opening of the Four-Necked Round Bottom Flask (A). Insert the Connection Adapter (C) in the top-opening of the Condenser. Secure the Adapter (C) to the Condenser (B) with a metal clip (R). Attach the glassware to the framework with clamps (not shown):
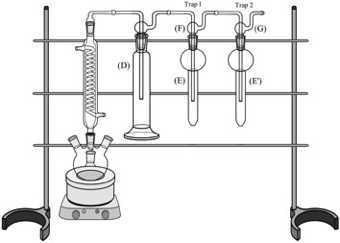
Insert a Trap Orifice Tube (F) into one of a Smog Bubbler Trap Bottle (E).Insert a Trap Fritted-Tip Tube (G) into the second Smog Bubbler Trap Bottle (E’). Connect Trap 1 (F+E) to the Buffer Bottle (D) and Trap 2 (G+E’) to Trap 1. Attach the glassware to the framework with clamps (not shown):
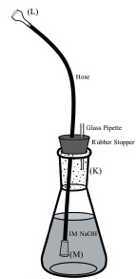
Obtain a large rubber stopper and make two holes for fitting a disposable glass pipette and a polypropylene hose.
Obtain a polypropylene hose and attach to one of its ends the Gas Dispersion Tip (M).
Obtain a disposable glass pipette and cut a 5 cm section off of its stem.
Insert the 5cm glass section into one of the holes of the rubber stopper.
Insert the free end of the polypropylene hose into the other hole of the rubber stopper.
Add 250 mL of 1M NaOH solution to the 500 mL Erlenmeyer flask (K).
Insert the Gas Dispersion Tip (M) into the Erlenmeyer flask (K) with the NaOH solution. Close the trap with the stopper.
Insert the Hose Connection Adapter (L) into the other end of the polypropylene hose. Connect to trap 2 with a stainless steel pinch-type clamp (Q).
Distillation Procedure
Carefully remove from the distillation apparatus the Four-Necks Round Bottom Flask (A), the Buffer Bottle (D), and Traps 1 (F+E) and 2 (G+E’).
Fill Buffer Bottle (D) with 200 mL of 0.05 M KHP Buffer. Secure the gas dispersion tube to the wash bottle using metal springs (S). Re-attach to the distillation apparatus.
Fill traps 1 (E + F) and 2 (E' + G) with 15 ml of 0.1 M AgNO3. Secure the orifice (F) and fritted (G) tubes to the traps with metal clips (R). Re-attach to the the distillation apparatus.
Secure the connections between the Connection adapter (C), Gas Washing Bottle (D), Orifice Tube (F), Fritted Tube (G) and Hose Connection Adapter (L) with stainless steel Pinch-Type Clamps (Q) (see Figure 8).
Thaw the sediment sample without opening its container (oxygen contamination). Shake to mix.
Transfer the sediment sample to a glove box, if available. If not, place a glove bag (T) on the benchtop and connect it to a source of Nitrogen gas using the plastic coupler provided and a length of plastic tubing.
Purge the glove bag for 3-5 minutes with N2 gas while inserting the following equipment: the four-neck round bottom flask from the distillation apparatus (A), a beaker for supporting the thawed sediment sample tube, a balance, a spatula, four rubber septa (P), and a stir bar.
Close the sleeve of the glove bag and inflate it with nitrogen gas. Once inflated. stop the N2 flow. Make sure the bag is not fully inflated as it can rupture.
Using the gloves on the bag, place the Four-Necks Round Bottom Flask (A) on the balance and zero it.
Carefully transfer ~10 g of thawed sediment sample to the zeroed Four-Neck Round Bottom Flask (A) through one of the middle stems. Record weight to the nearest 0.1 mg.
Add the stir bar to the Four-Necks Round Bottom Flask (A) and close all four openings with rubber septa (P).
Open the nitrogen-filled glove bag and take the closed Four-Necks Round Bottom Flask (A) back to the fume hood.
Insert the Temperature Sensor (N) all the way into the bushing associated with the mini-adaper (J). Add a #008 FETFE O-ring to the tip of the sensor and push up until it makes contact with the bushing. Screw the probe/bushing/O-ring combo into the #7 (24/40) glass mini-adapter (J). Connect the plug of the sensor into the temperature controller.
Take the N2 Gas Dispersion Tube (H) and insert its fritted tip into the bushing associated with the midi-adapter (I). Add a #012 FETFE O-ring to the fritted end and push it up until it makes contact with the bushing. Screw the tube/bushing/O-ring combo into the #11 glass Midi-Adapter (I). Attach the other end of the tube (H) to the hose connected to a N2 source. Start a very light gas flow. (Our standard for very light is one where we can barely feel the gas pressure from the dispersion tube on our cheek).
To minimize the exposure of the sediment to oxygen, insert the Midi-Adapter (I) with the N2 Gas Dispersion Tube into one of the openings of the Four-Necks Round Bottom Flask (A). At the same time, remove the septa (P) from the opening where the Coiled Condenser (B) is inserted.
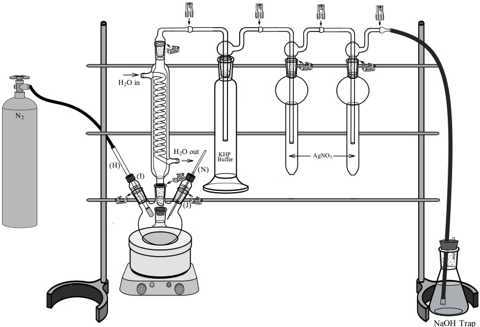
Quickly connect the Four-Necked Round Bottom Flask (A) to the Coiled Condenser (B). Next, insert the Mini-Adapter (J) with the Temperature Sensor into one of the two remaining openings of the Four-Necks Round Bottom Flask (A). Leave the remaining opening closed with a rubber septa (P). Secure the Mini-adapter (J), Midi-adapter (H) and Coiled Condenser (B) to the necks of the flask with metal clips (R).
Connect water in and out hoses to the corresponding inlets from the Coiled Condenser (B) (see Figure 8). Start the water flow.
Flush the distillation apparatus for 10 min with N2gas with a continuous flow rate of approximately 5 to 10 bubbles per second observed in traps 1 and 2.
If necessary, connections may be wrapped with PTFE (plumber’s) tape to minimize loss of gas during the distillation.
At this point, the distillation apparatus is ready for use
Collect 10 mL of 50% EtOH solution with a plastic syringe/stainless steel needle (U) and inject into the Four-Necked Round Bottom Flask (A) through the opening covered by the septum (P). Turn the stir plate on to mix with the sediment. This shall facilitate reflux condensation during the distillation.
Collect 50 mL of 6M HCl degassed solution with a plastic syringe/stainless steel needle (U).
Inject into the Four-Necked Round Bottom Flask: (i) 50 mL of 6M HCl, followed by (ii) 50 mL of 1M reduced Cr2+ solution (dx.doi.org/10.17504/protocols.io.b2b9qar6). Be careful with the positive pressure induced by the nitrogen flow into the system when injecting the reagents.
Set the temperature of the Controller (N) to 100-105°C and gently boil the sediment solution for 2 hours, while continuing to stir and maintaining a constant N2flow.
After 5 to 15 min of having injected the reagents, a black precipitate (Ag2S) should start forming in the AgNO3 trap 1 (F + E). As the precipitate begins to form, the solution will darken. Distillation progress can be monitored by a clearing of such darkened solution. When most of the H2S has been liberated and precipitated as Ag2S, the solution will become clear.
Once the distillation is complete, stop the N2flow and carefully dismount Traps 1 and 2 containing the solid Ag2S.
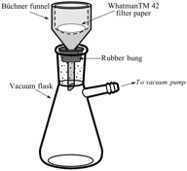
Collect the precipitated Ag2S by vacuum filtration, using a Büchner funnel, a (pre-weighed) disk of WhatmanTM 42filter paper, a rubber bung, and a vacuum flask. Use a DI water squirt bottle to aid transfer of the precipitate from the trap bottle, and to wash the precipitate.
Transfer the Ag2S-containing filter paper to a small ceramic crucible. Cover with aluminum foil and punch 8-12 holes using a pen knife or 16-gauge syringe.
Lyophilize for 2 hours to dry.
Weigh the precipitate-containing dried filter paper. Subtract the weight of the filter paper to estimate the amount of Ag2S recovered. Carefully transfer the Ag2S from the filter paper into a small (3 ml) glass vial.
Store Ag2S sample in a dessicator cabinet until isotopic analysis
Cleaning Instructions
Rinse each piece of glassware with DI water to dispose of any solid or liquid into a waste bottle. Make sure every chemical is listed on the waste bottle.
Non-glassware items may be washed in 1% solutions of Alconox or Citranox. Rinse with Distilled H2O (3x) followed by DI H2O (1x). Air dry overnight.
Submerge glassware overnight in warm, 1% Citranox solution. In the morning wash and rinse glassware with Distilled H2O (3x), followed by a DI H2O rinse (1x). Dry in oven for 2 hours at 100oC or air dry.
